Before we begin with how to rasterize an image in Photoshop, we must understand why we rasterize an image.
There are two types of image files, and they are raster and vector. It is because of their differences we need to rasterize in Photoshop sometimes.
About Raster Images and Vector Images
Raster Images
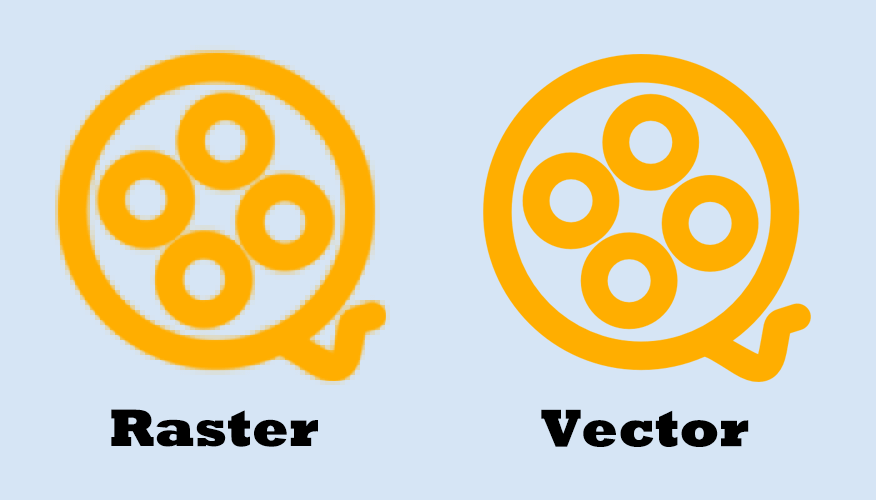
When you surf the web, you are likely to see raster images anywhere. Raster images are created with pixel-based programs or captured with a camera or scanner. These pixels contain bits of color to build image. The more pixels, the higher quality the image enjoys.
When you zoom in a raster image, the jagged pixels become more apparent and you are able to view and edit each pixel, which is most significant for you to judge whether this is a raster image.
Raster images are commonly used in photography and digital applications. When you take a photo, the image is recorded as pixel data in the form of general image files such as .jpg, .gif, .png. When these images are on the web, the end result is raster images. To access and edit these images, you can use Adobe Photoshop.
Vector images
Vector images are much more different. They are created with vector software like Adobe Illustrator and are made of paths and curves dictated by mathematical formulas. It is due to the algorithmic makeup, vectors are infinitely scalable. No matter how many times magnified, the images remain smooth, clean and good quality.
Vector images are perfectly applied onto physical products and design work. Also, they are used in CAD, engineering, and 3D graphics for accurate mapping. Common vector graphics are .svg, .eps, .pdf, etc.
Raster VS Vector

Vector images are great, but not always perfect. Obvious shortcomings of vector images can be summarized as follows:
- One problem is usually related to the number of colors. Vector images aren’t generally used to handle numerous colors (like 10,000+). However, Raster images have no problems with that.
- Also, there are compatibility issues when shared. You must have access to vector-based programs in order to edit the native files.
- Furthermore, almost all output devices (such as printer, monitor) expect to work with raster images. To turn images to real products, you would need a raster image, which means converting the vector to a raster.
- With raster images, you can also do some fine-tuning work. You can more easily add smudges, highlights and do color corrections, blending colors and making photo-realistic artwork. What’s more, if you want to make video from pictures, you need to raster an image.
From these perspectives, sometimes we do have the demand to convert vector to raster.
Can you rasterize a vector image?
Knowing the difference between raster and vector, you might be wondering: can I rasterize a vector image? In fact, you can convert vector to raster easily using Photoshop. Read on to get the details.
How to Rasterize in Photoshop
What does it mean to rasterize in Photoshop?
Rasterizing an image in Photoshop converts a vector layer to pixels. Vector layers can be enlarged randomly without getting blurred. However, this format leaves the image unsuitable for artistic effect. Thus, it is better to rasterize the layer and then you are able to edit using pixels.
Here is how to rasterize an image in Photoshop:
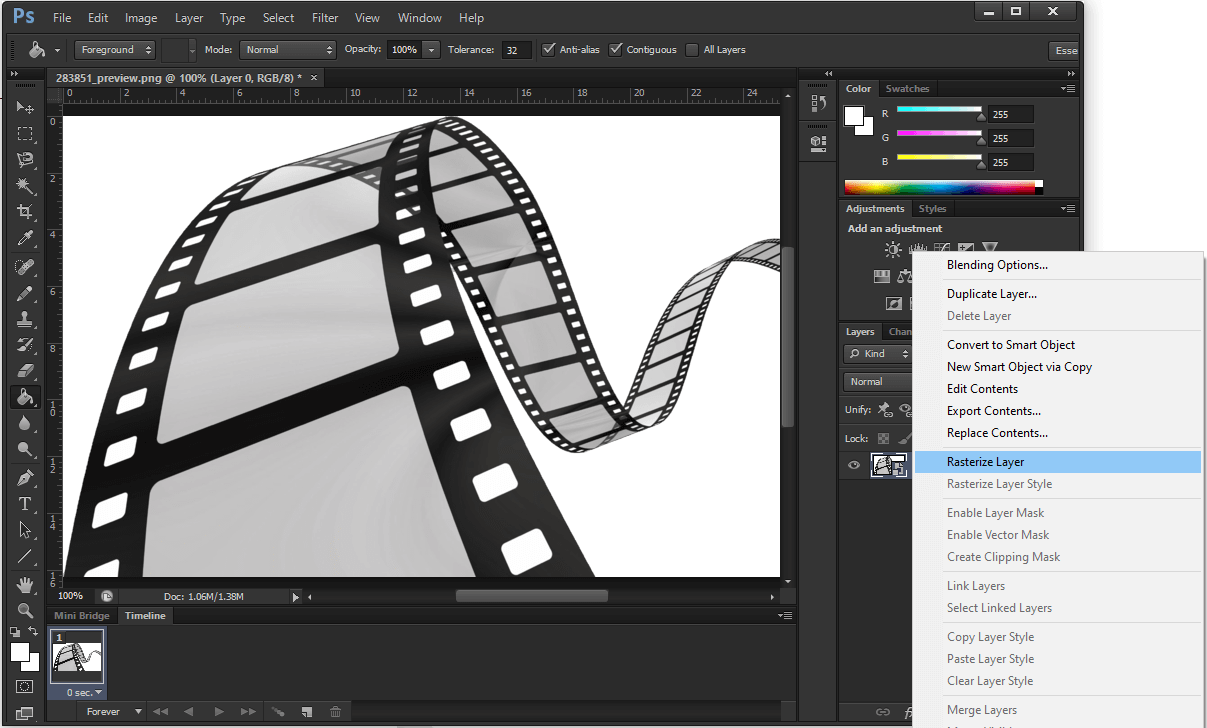
- Open an image in Photoshop.
- Select that image from Layers.
- Right click on it and then choose Rasterize Layer.

Then how to rasterize text in Photoshop?
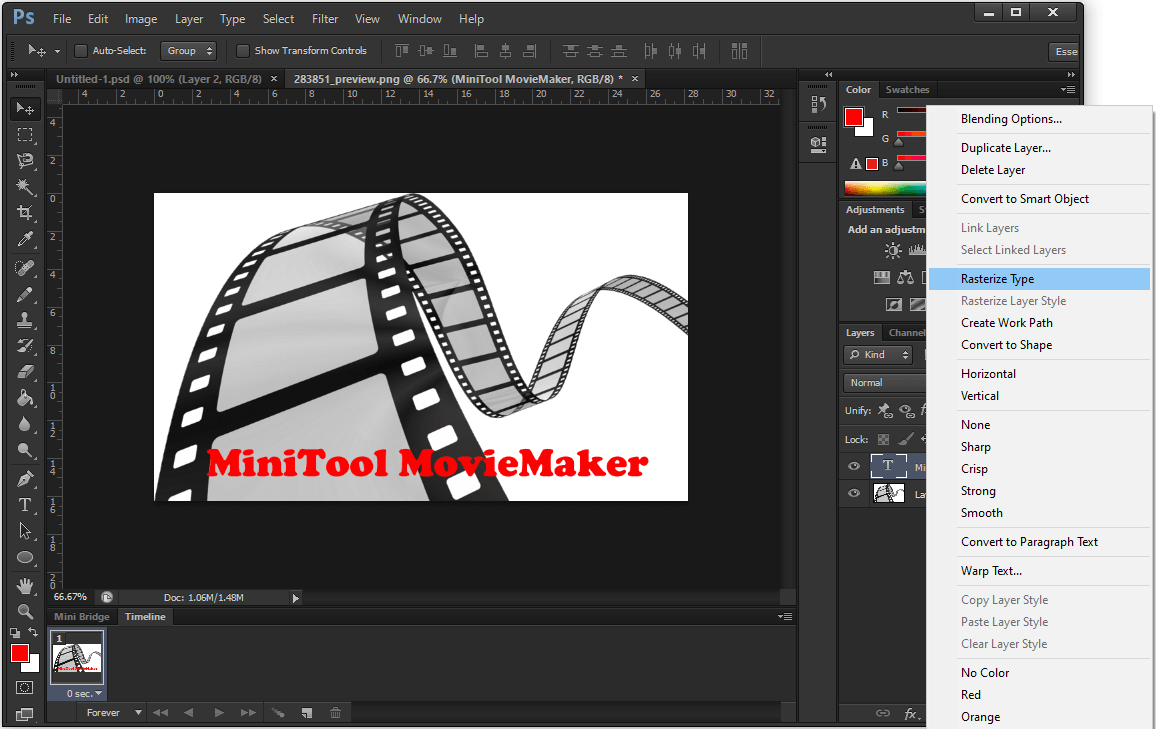
- Add text to the selected picture.
- Select the text layer and right-click on it, from the menu select Rasterize Type. Then the text turns into an image.

By doing these, you get a raster image. From now on, you are able to edit this image with your imagination.
How to Undo Rasterize in Photoshop
To undo rasterize in Photoshop, you have two options:
- Press Ctrl + Z if you have just rasterized an image as the previous step.
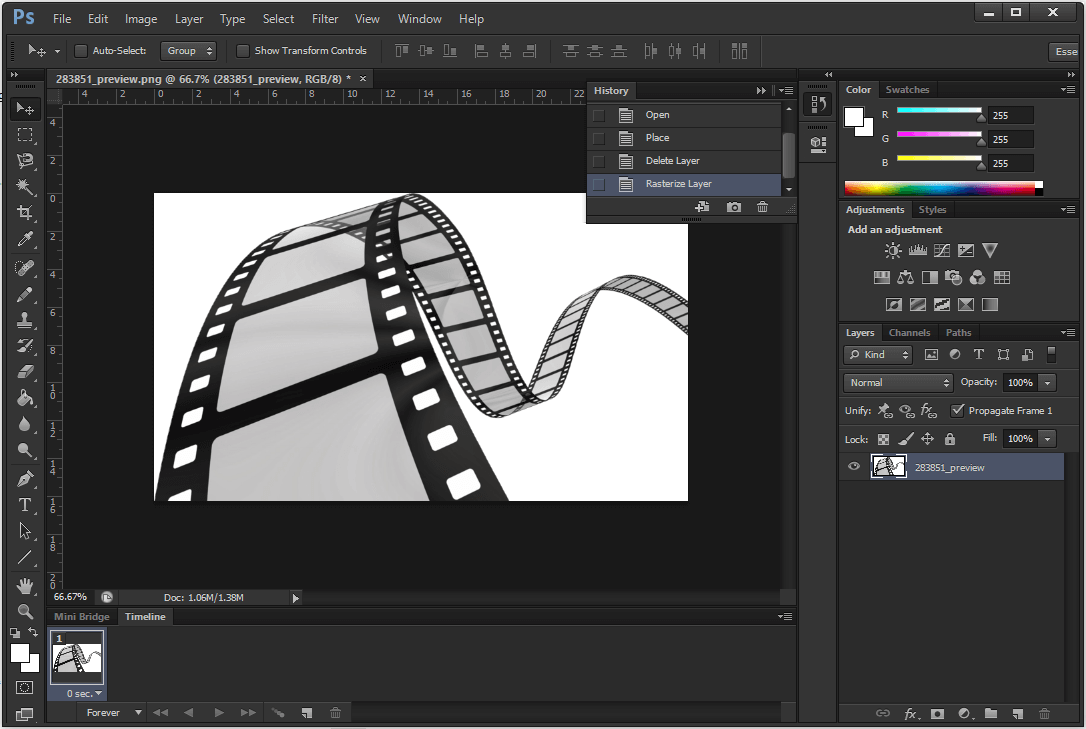
- Go to Photoshop History, where you are able to revert the image state to any recorded point. Click on the state before you rasterize to undo rasterize in Photoshop.

Get the useful way rasterize & undo rasterize an image in Photoshop!Click to Tweet
How to Rasterize a Layer FAQ
Rasterize is the process of converting a vector image to a raster image. This process converts points and curves to discrete pixels in fact, which can be used to handle more colors and then saved to the most commonly used format such as jpg, png, and gif.
A raster image is always less quality than a vector, whether that change is noticeable or not. A good quality raster will look identical to a vector if the raster perfectly matches the pixel definition of the display screen; but if it is resized or displayed on a screen with a higher pixel definition, it will have less quality than it's vector counterpart.
Vector-based images are much more versatile than raster-based images. When you enlarge a vector layer, it is perfectly scalable. There is no upper or lower sizing limit. For raster image, it is easier to edit for diverse needs. Thus, based on image quality, vector is better. From this perspective of daily use, raster is better.
The simplest way is to enlarge the image. When you expand it to 200% or even larger, look at the edges to see if the image is getting blurry and appear to have various shades of color, that is a raster image. If the image looks the same, then it is a vector image.


![[Guides] How to Crop a Photo in Photoshop and Photoshop Element?](https://images.minitool.com/moviemaker.minitool.com/images/uploads/2022/11/crop-photo-in-photoshop-thumbnail.png)
![[2 Ways] How to Crop Someone out of a Photo by Photoshop/Fotor?](https://images.minitool.com/moviemaker.minitool.com/images/uploads/2022/11/crop-someone-out-of-a-photo-thumbnail.jpg)
User Comments :