This article offered by the free video editor – MiniTool MovieMaker aims to delve into the various aspects of converting M4A to video with image, exploring the tools, methods, and practical applications of this transformation.
In the ever-evolving landscape of multimedia content creation, the need to convert audio files like M4A into video formats has become increasingly common. M4A, typically recognized as an audio file extension, holds a unique place in the digital sphere due to its high-quality audio compression. However, many individuals and content creators seek methods to transform M4A audio files into video format, particularly for platforms like YouTube that predominantly support video uploads.
Is M4A Audio or Video?
Is M4A a video file or an audio file? M4A, known as MPEG-4 Audio, is primarily associated with audio files. It uses the MPEG-4 Part 14 container format to encode audio streams. Despite its audio-centric identity, the MPEG-4 container allows for the inclusion of both audio and video streams, making M4A files capable of storing both types of media. However, by default, M4A files generally contain only audio data, which brings us to the need for converting them into video files when required.
Why Convert M4A to Video?
The conversion of M4A to video with image serves various purposes:
# Convert M4A to Video for YouTube Compatibility
YouTube, being a video-centric platform, necessitates content to be in video format for uploads. Converting M4A audio to video allows for seamless sharing of audio content on this platform.
# Enhanced Presentation
Incorporating still images or visuals along with the audio can enhance the overall presentation and engagement of the content. This is especially useful for podcasts, music tracks, or lectures.
# Wider Audience Reach
Videos often garner more attention and engagement compared to standalone audio files. Converting M4A to video can help reach a broader audience base across different platforms.
M4A to Video Converters
Numerous online and offline M4A to video converters facilitate the conversion of M4A audio files to video formats. Here are a few common methods:
- Online Converters: Websites like Online UniConverter, CloudConvert, and Convertio offer user-friendly interfaces to upload M4A files and merge them with images or videos to create a video file.
- Software Solutions: Applications such as VLC Media Player, FFmpeg, Adobe Premiere Pro, and MiniTool MovieMaker allow users to combine M4A audio files with images or videos to produce a video output.
- Dedicated M4A to Video Converters: Specific converters like MiniTool Video Converter, M4A to MP4 Converter or Any Video Converter specialize in transforming M4A files into video formats, simplifying the process for users.
How to Convert M4A to Video with Image?
Here, let’s see the step-by-step guide to converting M4A to YouTube video with free video cutter – MiniTool MovieMaker.
MiniTool MovieMakerClick to Download100%Clean & Safe
Step 1. Click the above button to download and install MiniTool MovieMaker on your computer.
Step 2. Launch the program and enter its main user interface.
Step 3. Click the Import Media Files option under the Media tab in the upper left section to upload the target M4A audio file. If you want to add an image to the audio, you need to also upload your desired photos or video clips.
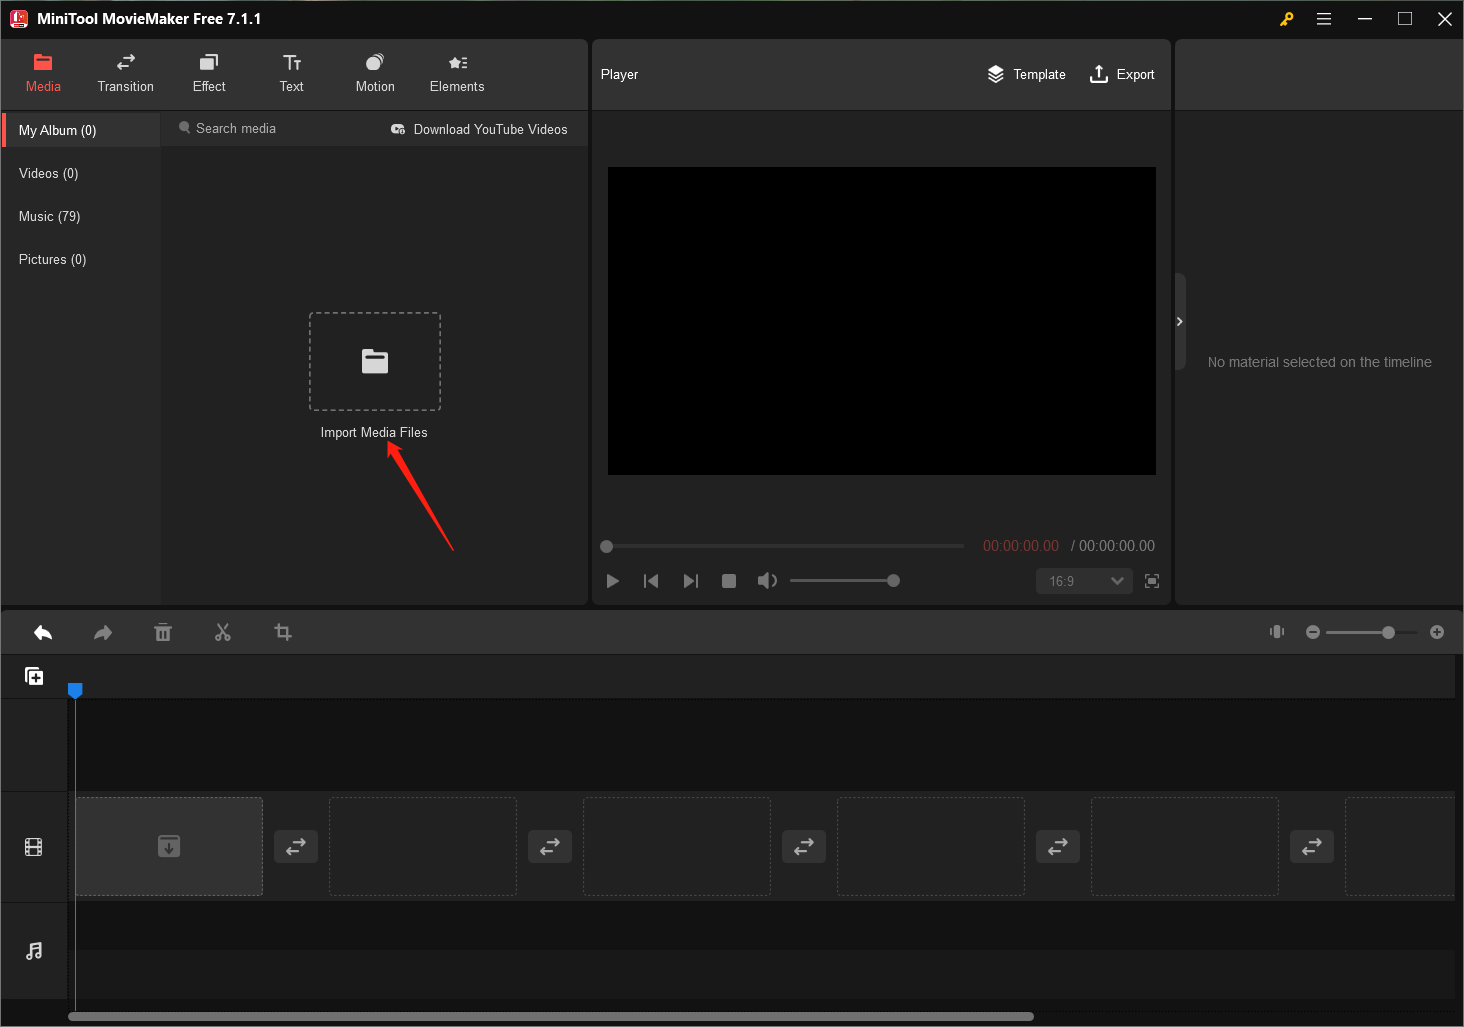
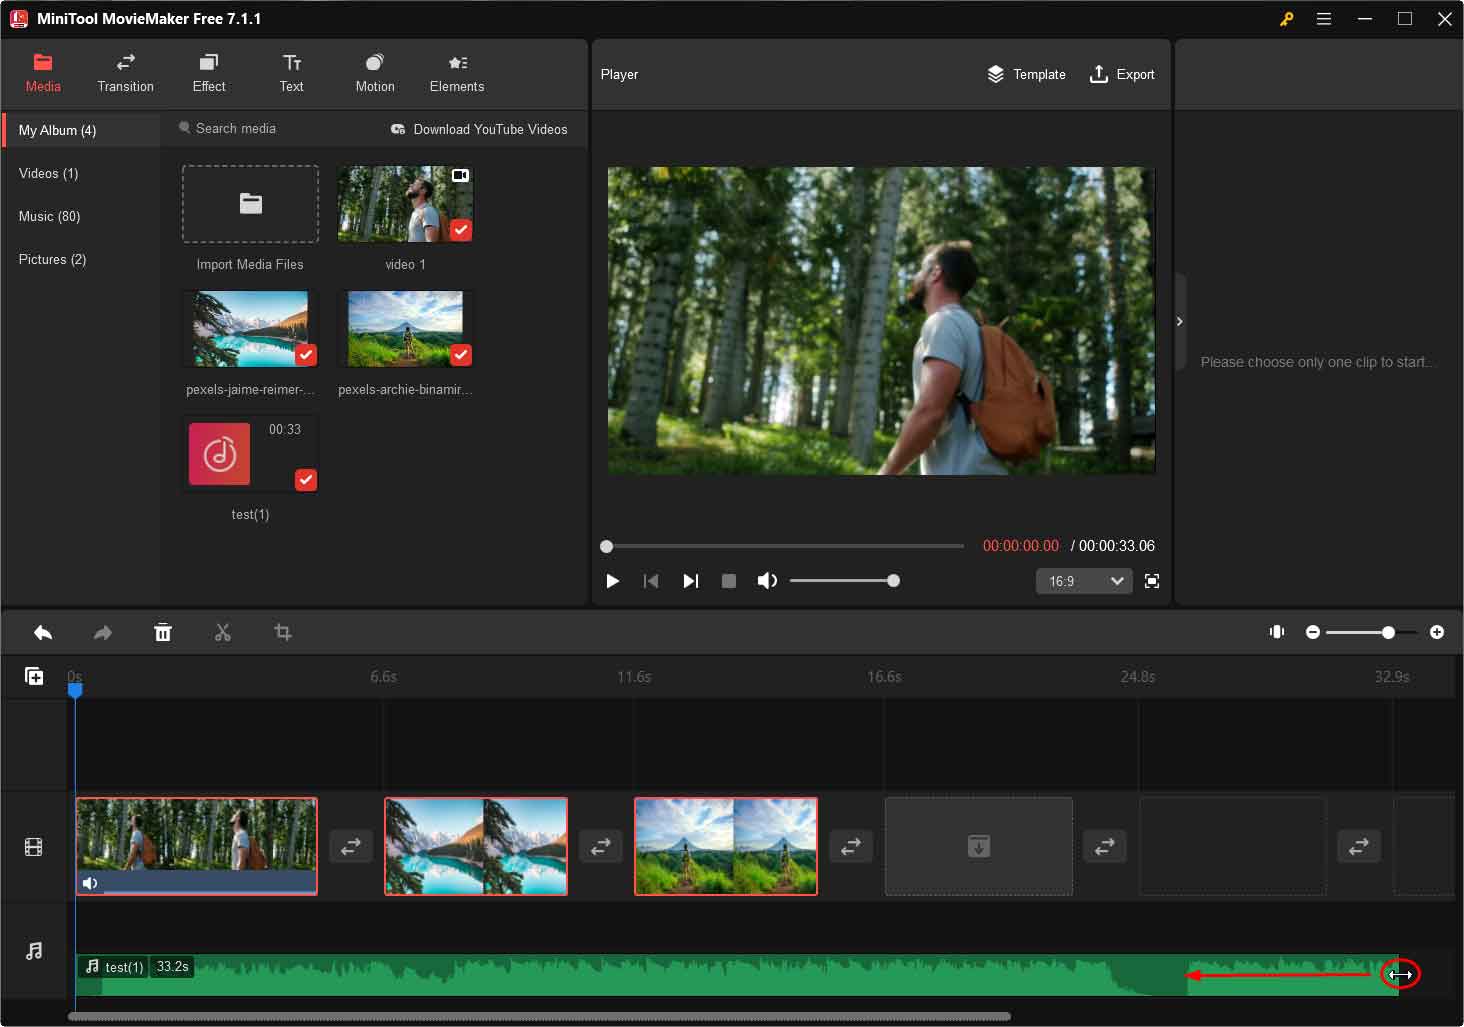
Step 4. Click the plus icon “+” at the bottom right of the uploaded media files to add it to the below timeline. Or you can directly drag and drop them onto the corresponding tracks.
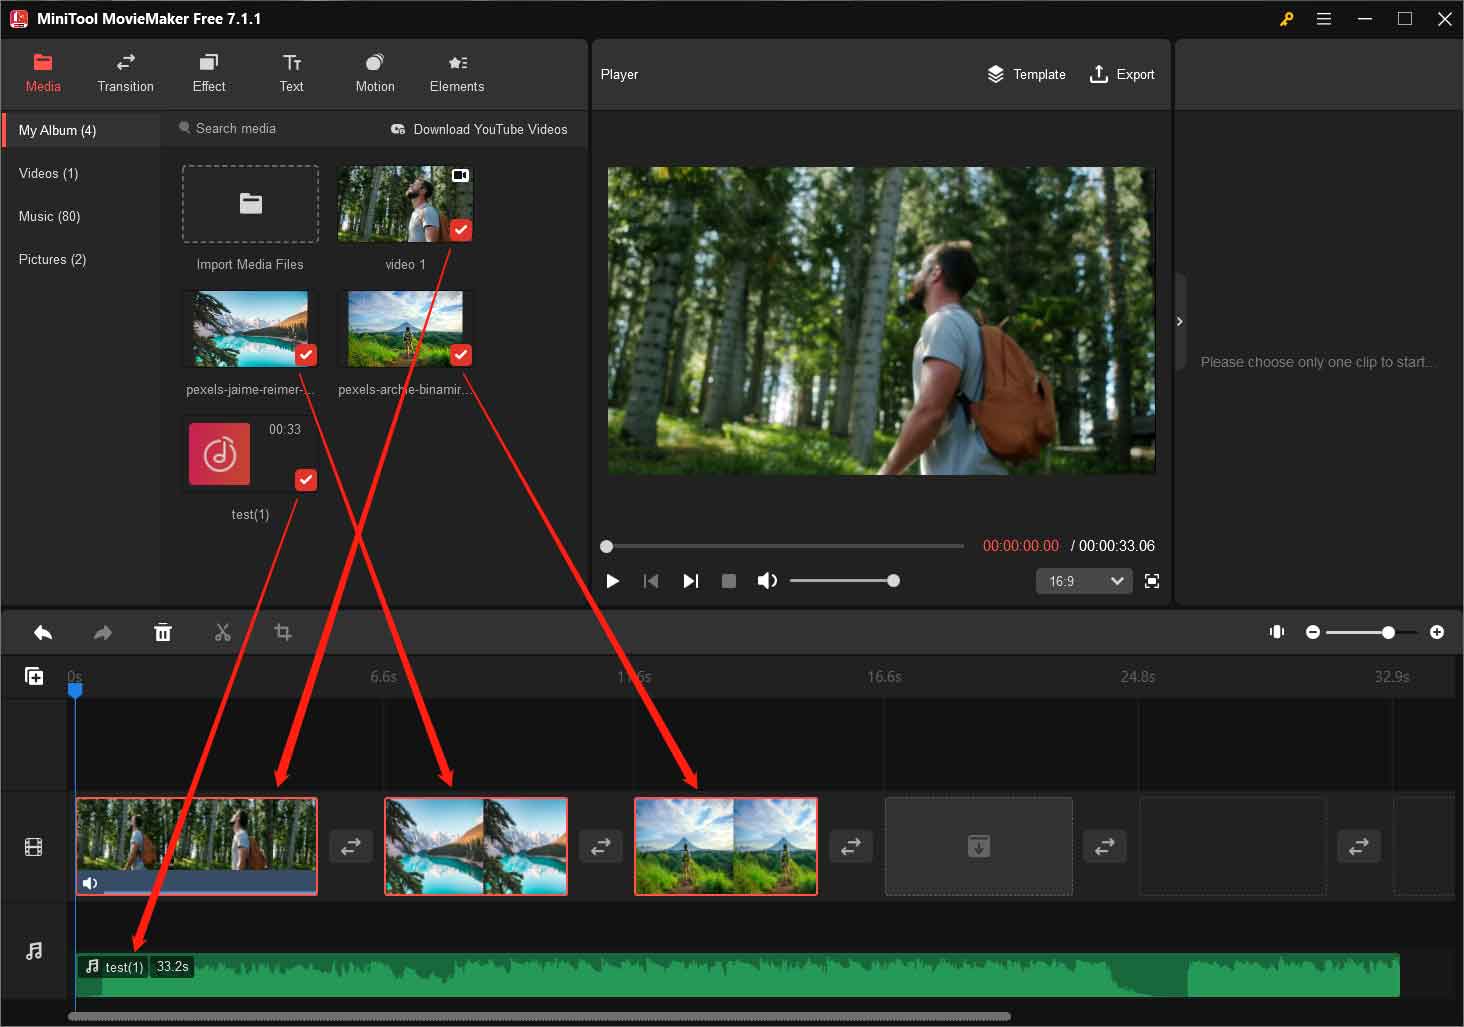
Step 5. You can do some editing to the media files on the timeline track:
Put the mouse cursor at the beginning or end of the audio on the timeline. When it turns into a double-headed arrow, drag the pointer inwards to cut off the unwanted part.
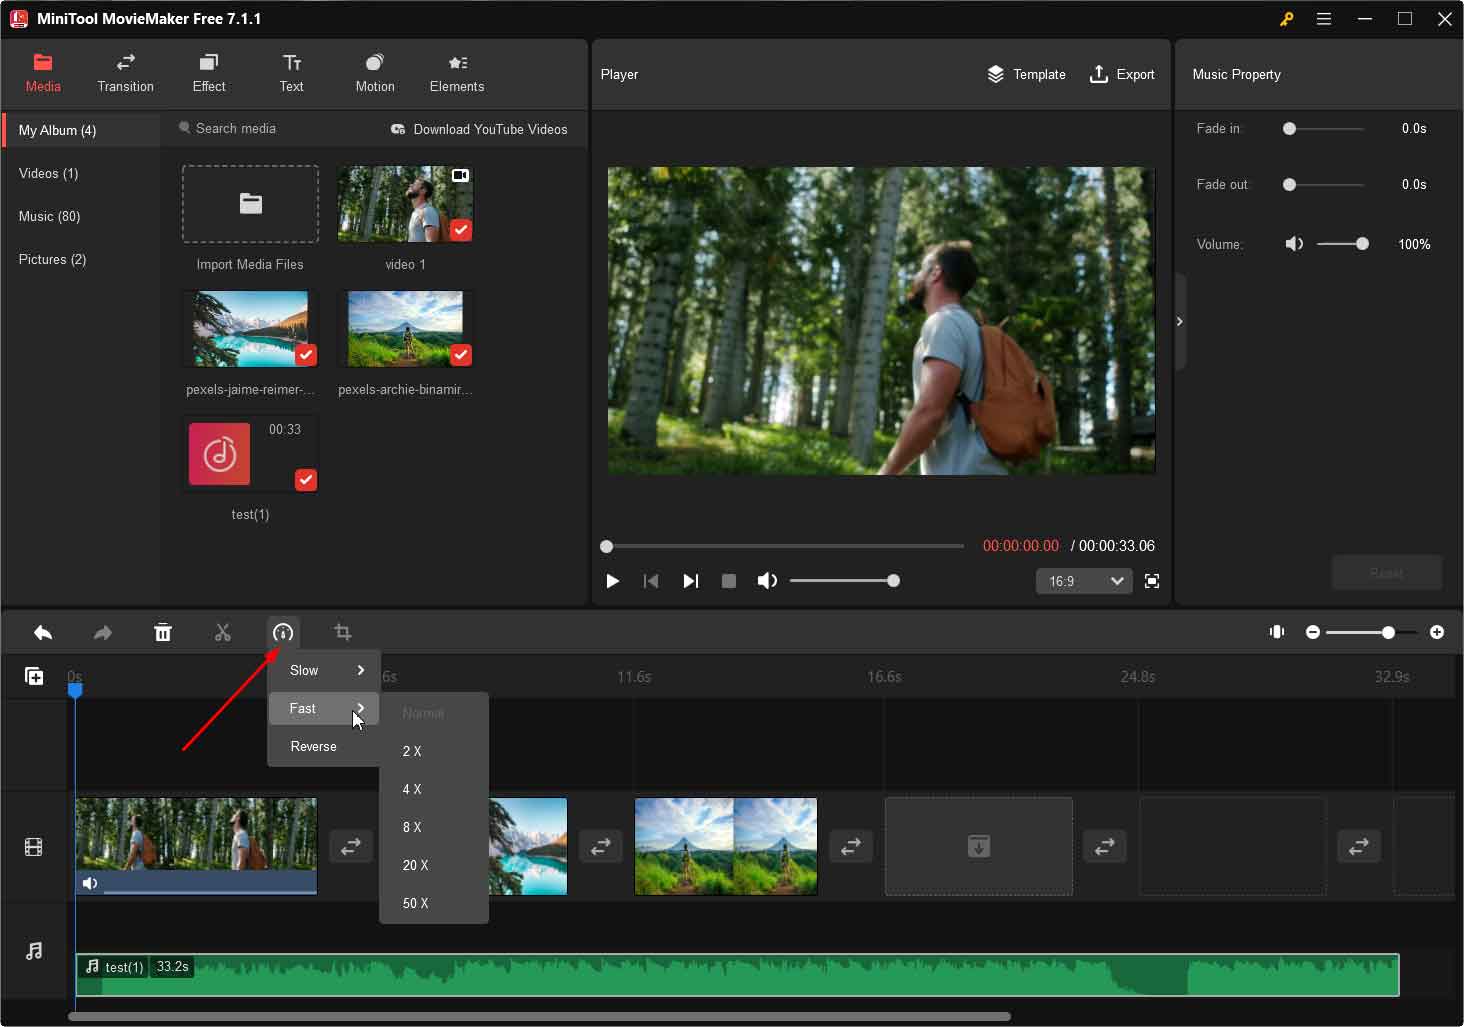
Change M4A Speed / Reverse M4A
Click on the audio to select it. Then, click the dashboard icon on the timeline toolbar to choose whether you would like to slow down the audio or speed up it. You can also reverse the audio, which is not recommended because the reversed audio is a mess.
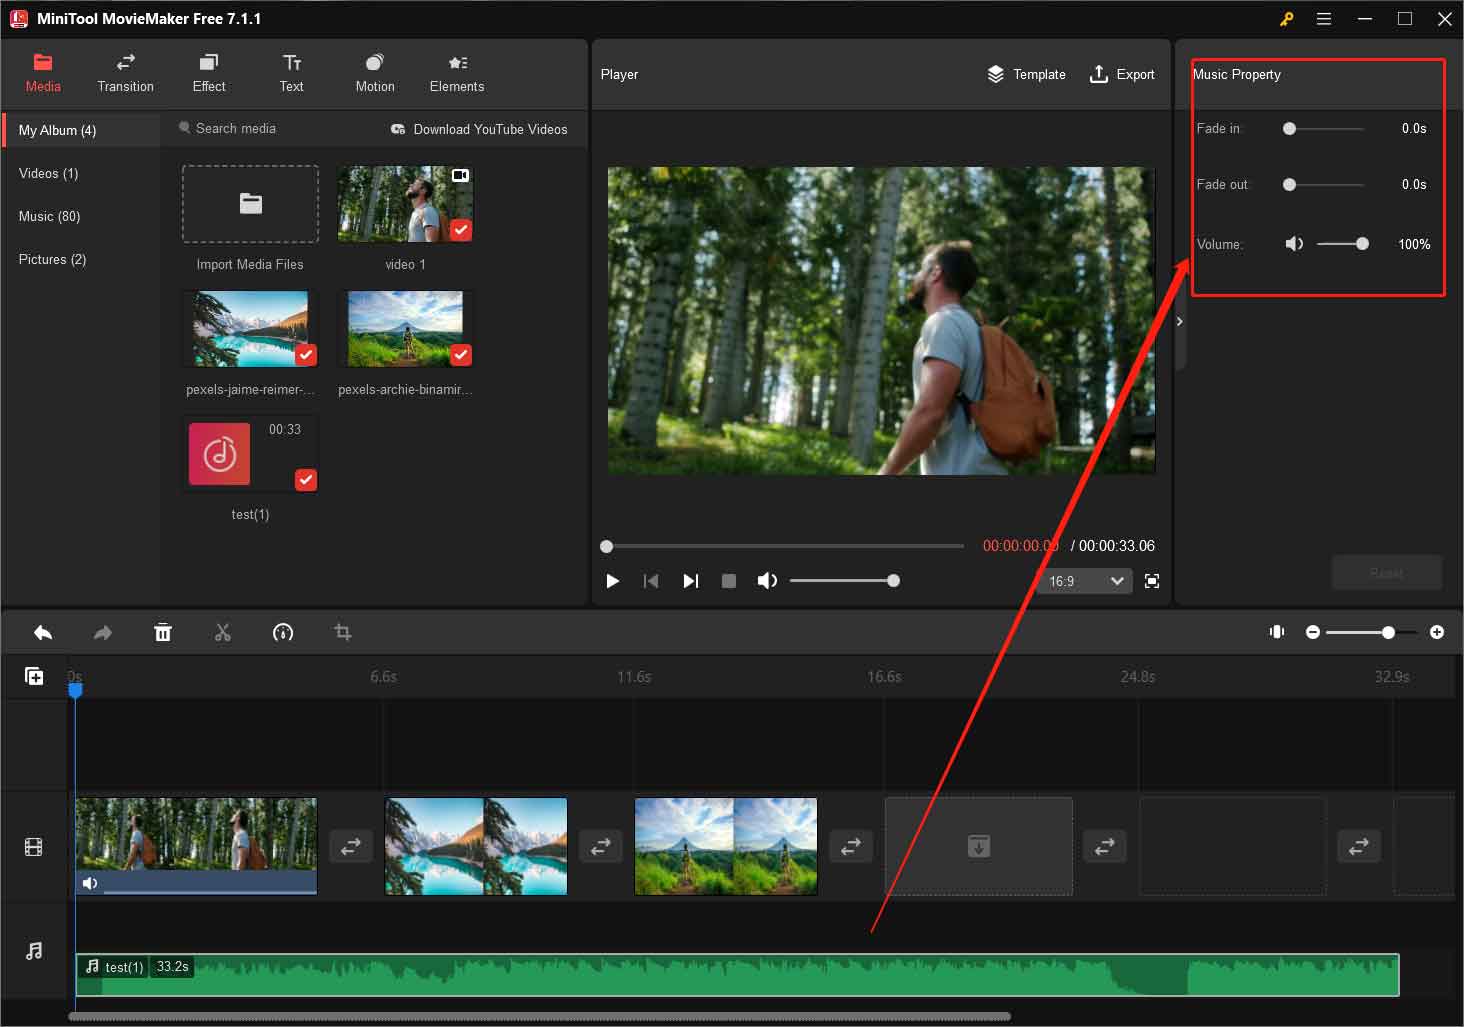
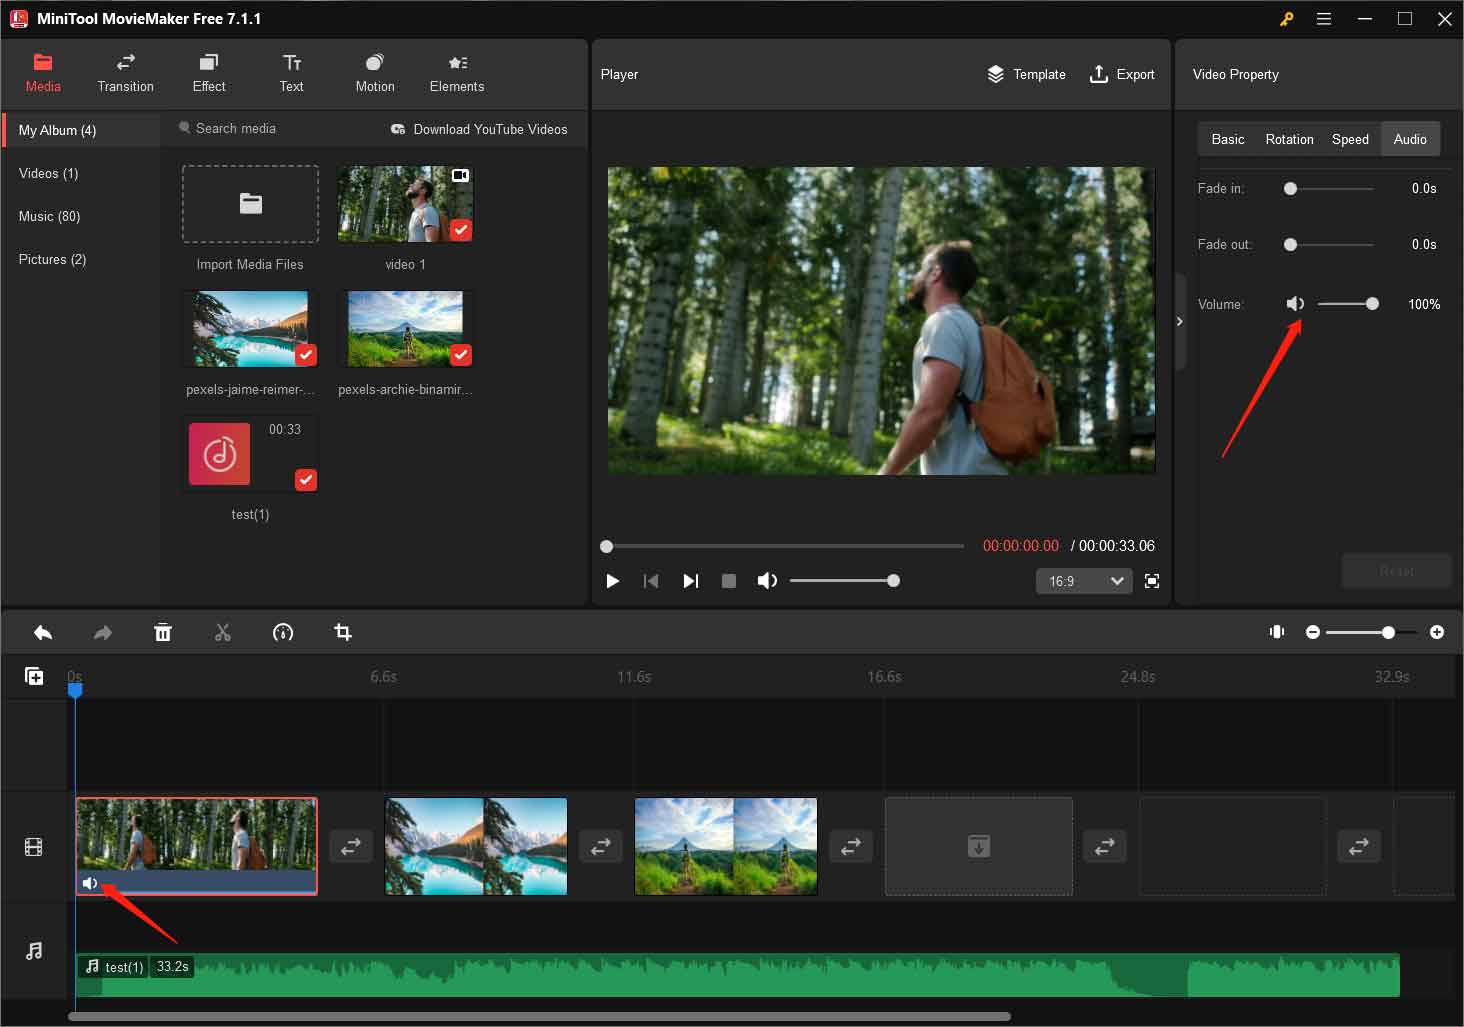
Fade M4A / Change M4A Volume
You can see the Music Property section when the audio file is selected on the timeline. Within the Music Property, you are able to fade in or fade out the audio as well as change its volume.
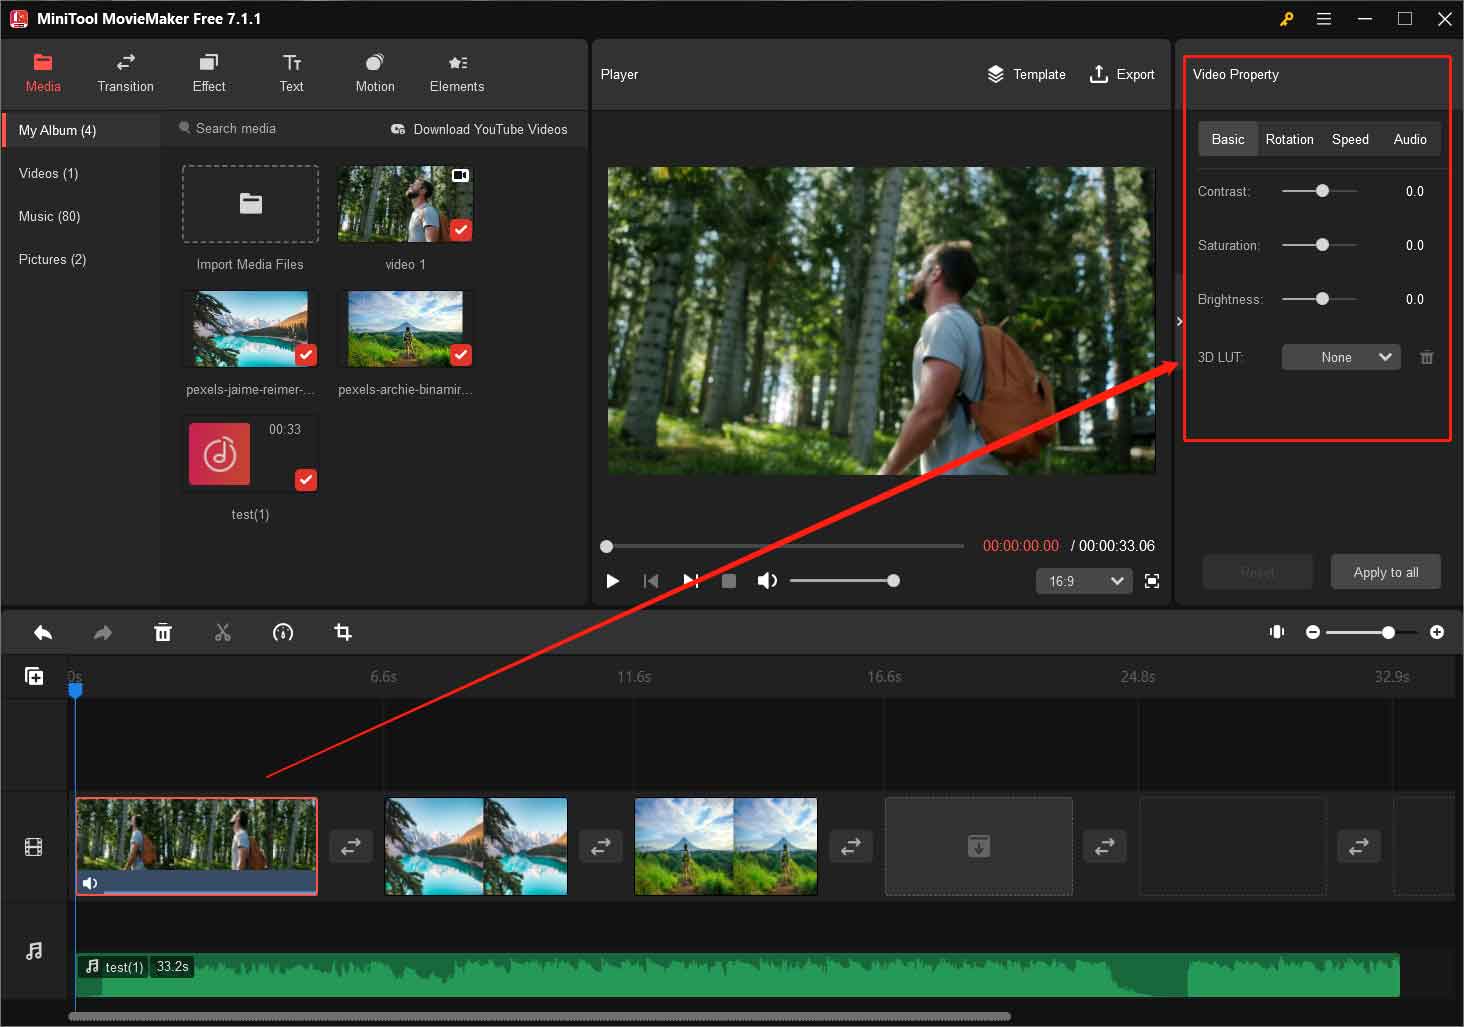
Edit Video Property
When you select the video clip on the timeline, you can edit its contrast, saturation, and brightness in the Video Property in the upper right. You can also flip, rotate, reverse the video or change its speed.
Mute Video Embedded Audio
If there is a built-in audio within the video clip, you’d better mute it since it will interface with the added M4A audio. You can go to the Audio tab within the Video Property section to turn the Volume to 0% or directly click the speaker icon on the video on the timeline.
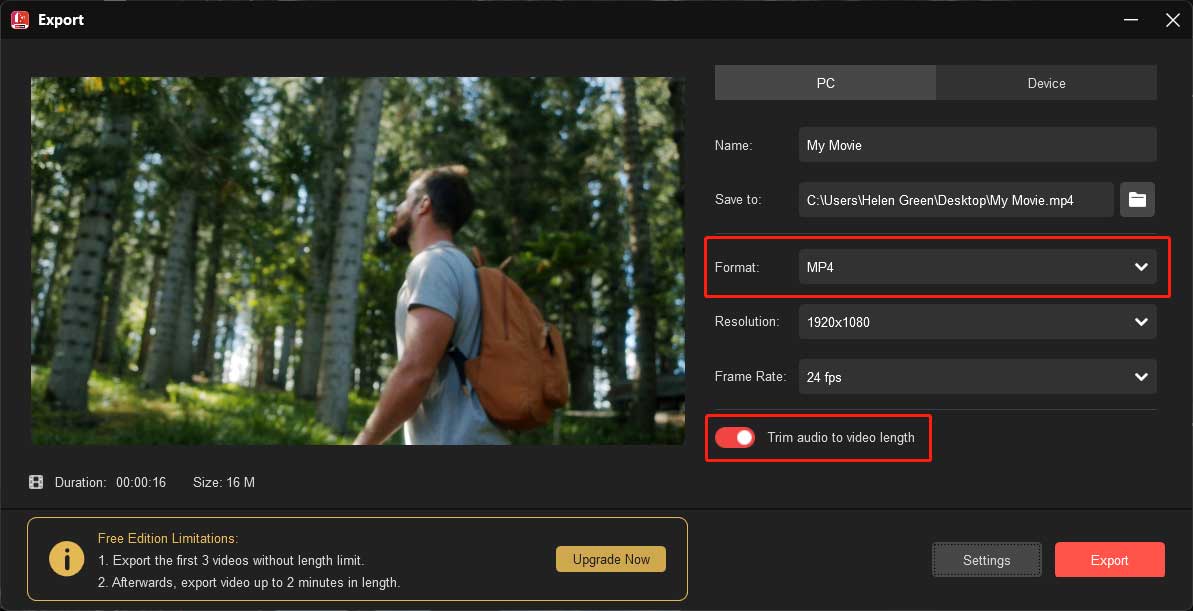
Step 6. Finally, when all settings are done, click the Export option on the upper right of the main interface to save your changes. Then, the Export window will pop up. There, you can specify the name, save location, format, resolution, and frame rate of the new video. Also, you can trim audio to video length to make the M4A match the length of the merged graphic.
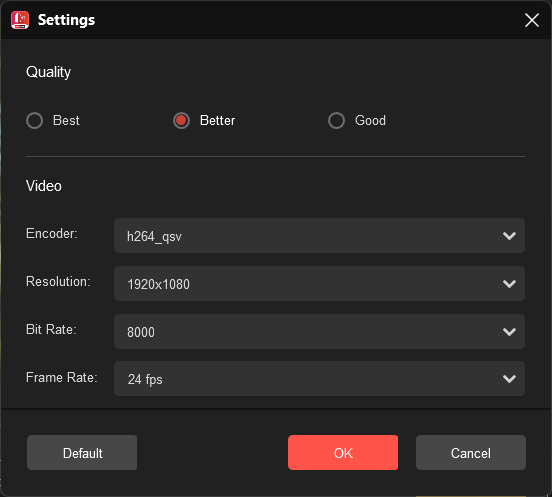
Step 7. If you want to do further editing to the export video format parameters, just click the Settings button at the lower right of the Export window. Then, the Settings popup will appear. Within the small window, you can customize the quality, encoder, resolution, bitrate, and frame rate of the target video.
Step 8. Eventually, click the Export button to start converting M4A to video with image.
Wait until the process finishes. At last, you successfully get what you want with the help of the video trimmer.
How to Transfer M4A to Video by Free M4A Video Converter?
If you just want to convert your M4A audio into a video and don’t care whether there is a graphic or not, you can take advantage of a professional and reliable audio to video converter such as MiniTool Video Converter mentioned in the above content.
Here is a detailed instruction for the conversion process:
MiniTool Video ConverterClick to Download100%Clean & Safe
Step 1. Download and install MiniTool Video Converter on your PC.
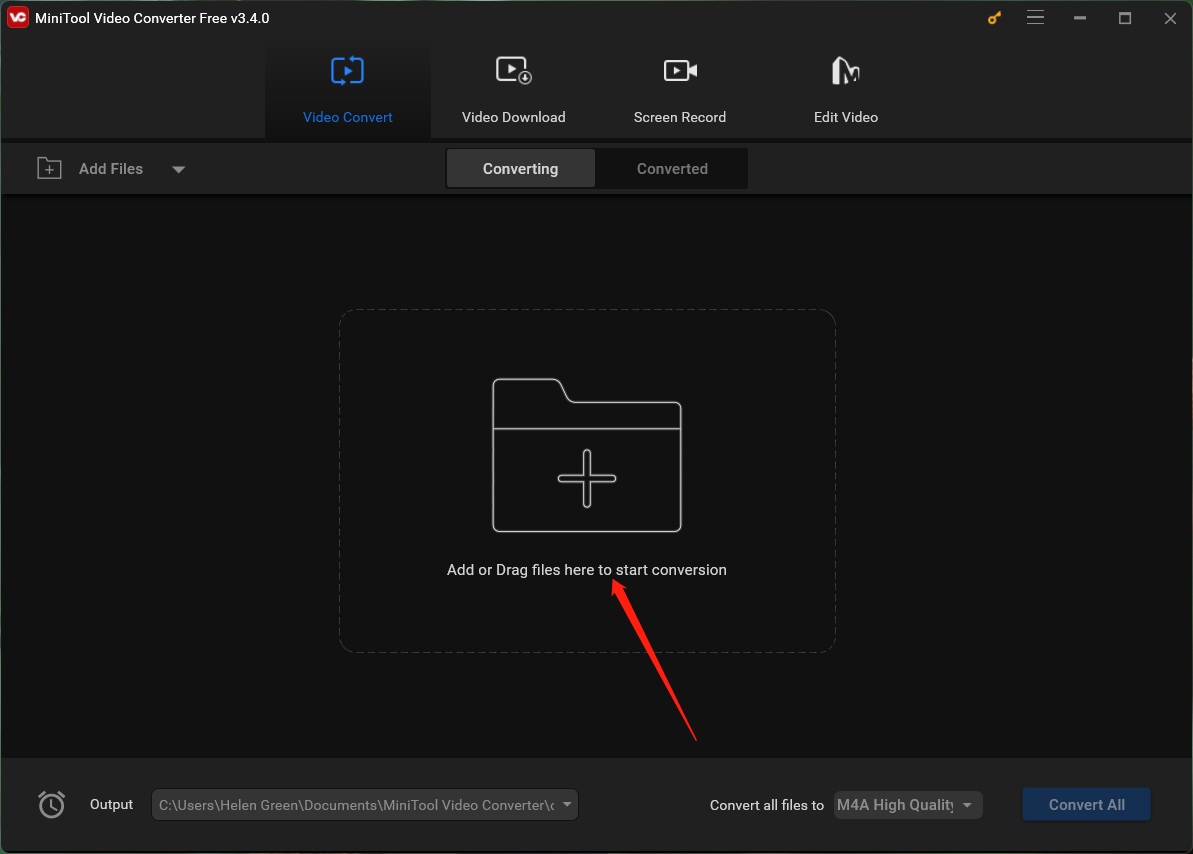
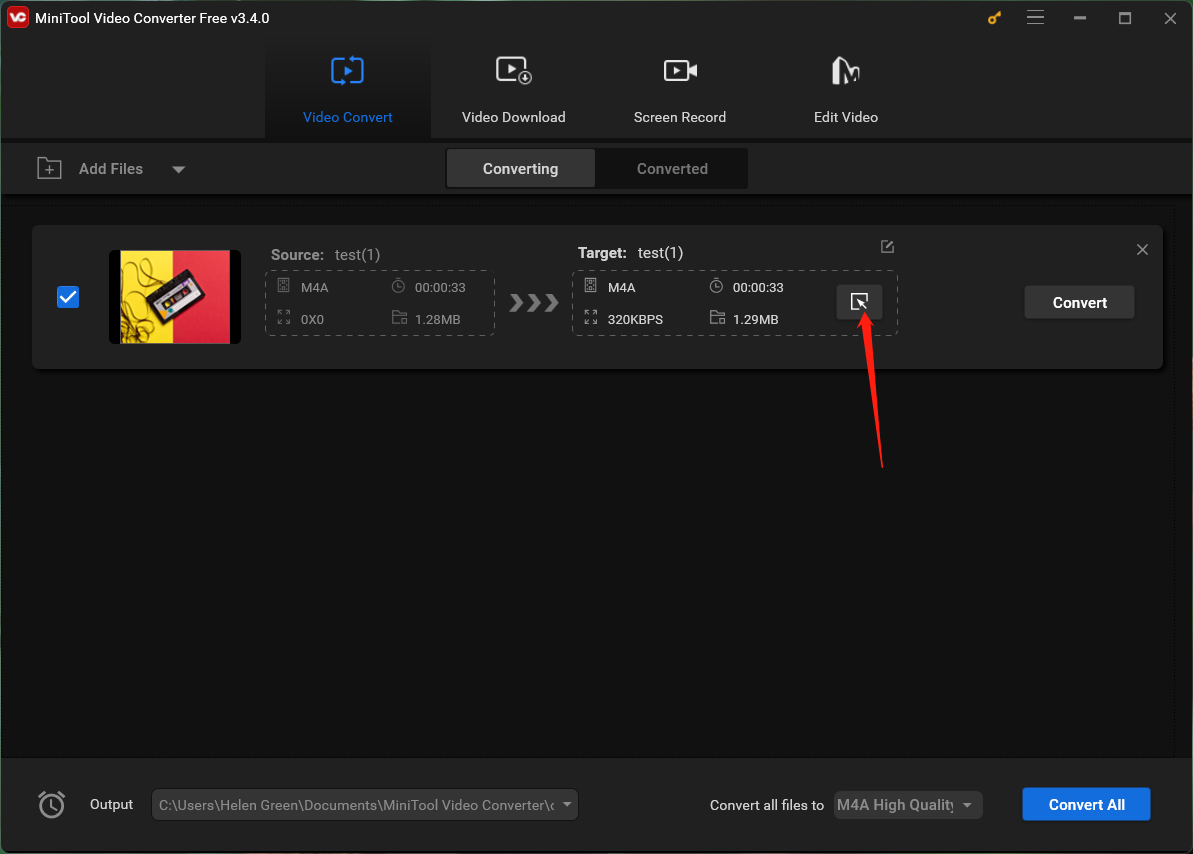
Step 2. Under the Converting subtab of the Video Convert main tab, click the Add or Drag files here to start conversion option to upload your M4A audio. Or you can directly drag and drop the target media file there.
Step 3. Then, it will create a conversion task. Click the settings icon within the Target section.
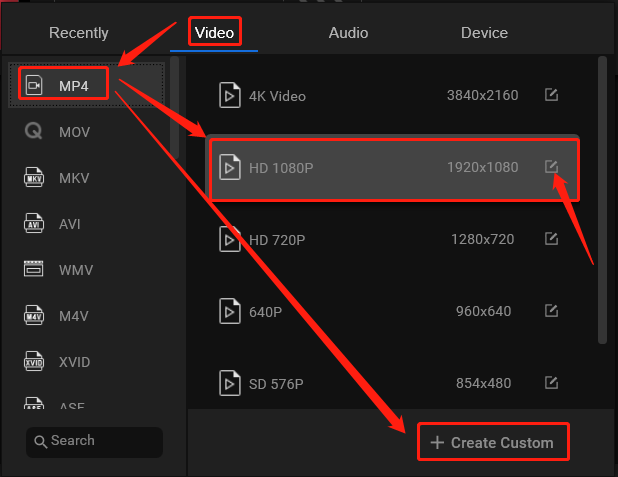
Step 4. In the new popup, switch to the Video tab from the top menu, choose a video format you prefer from the left panel, and pick up a video resolution from the right area. If you want to do more settings to the selected video option, just click the settings icon behind it. Or you can directly choose the Create Custom option at the bottom right.
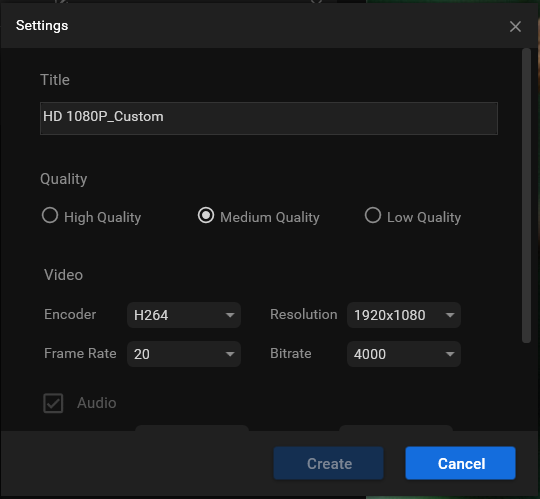
Step 5. In the next Settings window, you can personalize the quality, encoder, resolution, frame rate, and bitrate of the target video as well as the encoder, channel, sample rate, and bitrate of the built-in audio. Don’t forget to click the Create button to save your settings.
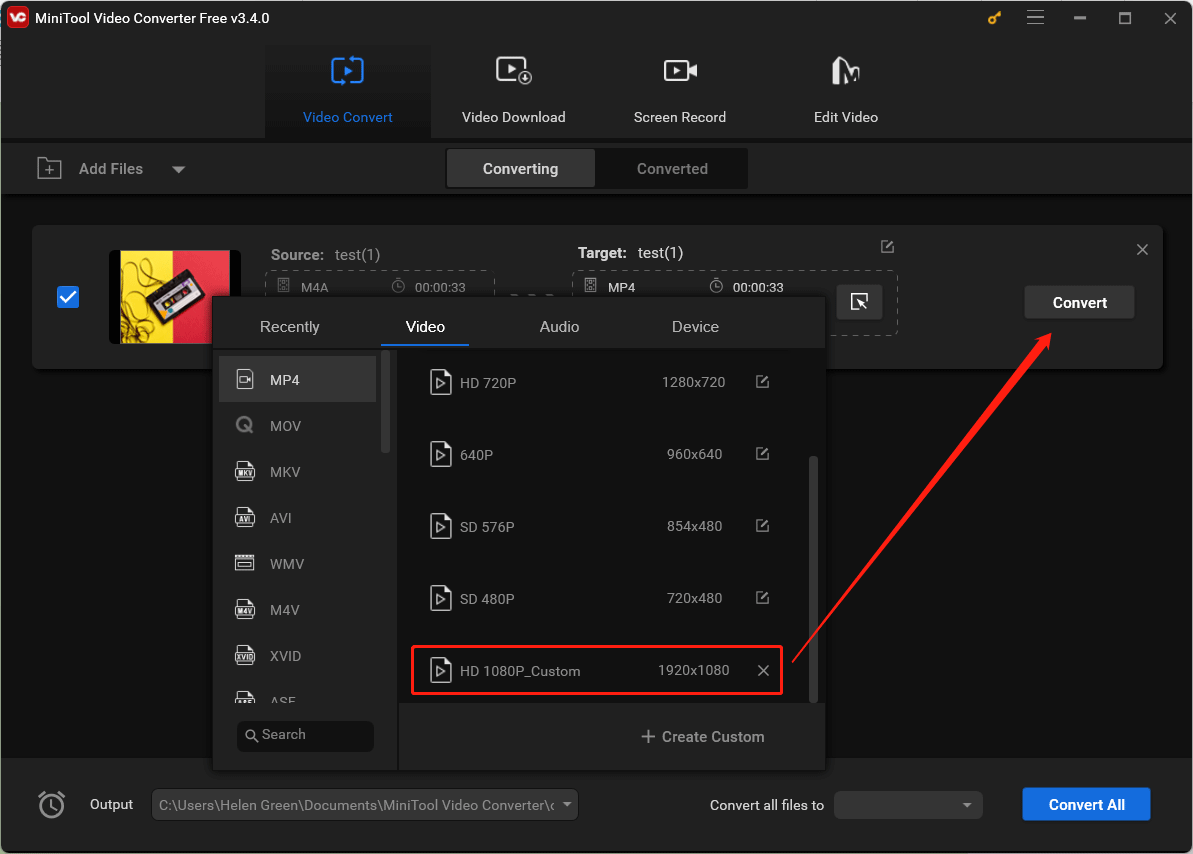
Step 6. You will be redirected to the upper-level window. There, scroll down the video option list to find and select your customized option. Finally, click the Convert button to start the conversion.
Wait until the process is completed. Then, go to the Converted subtab and click the Show in folder button to find your converted media file.
Convert M4a to Video Online
If you only need to do video conversion once and don’t want to download and install any software, you can make use of an online M4A converter like ZAMZAR.
Step 1. Visit https://www.zamzar.com/convert/m4a-to-mp4/.
Step 2. Click the Choose Files button to upload your M4A audio file.
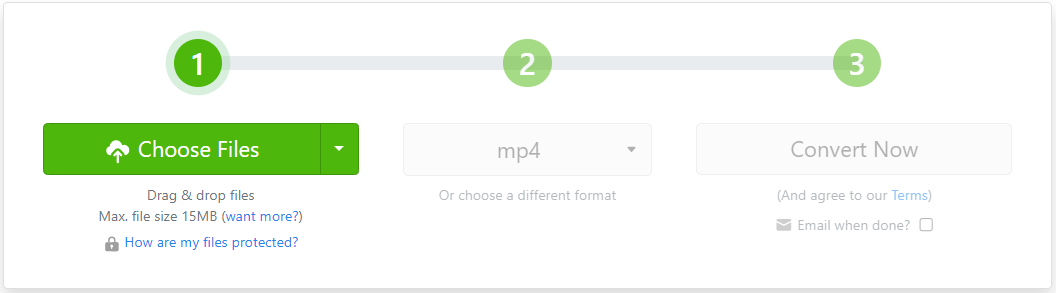
Step 3. Expand the second drop-down to select a video format you want.
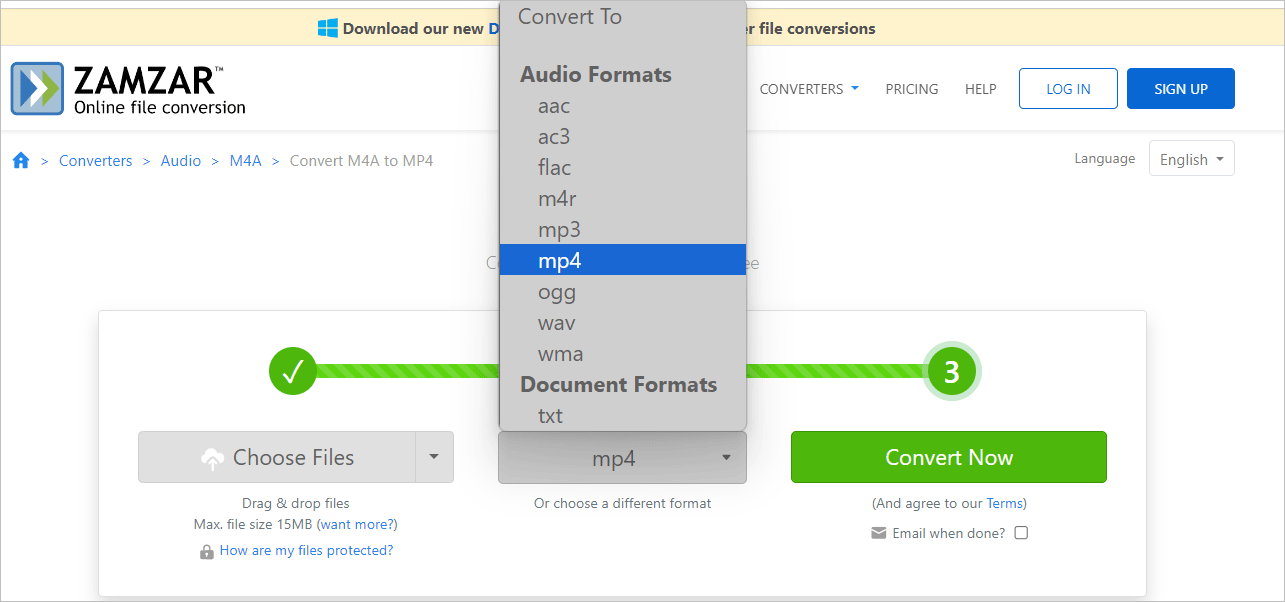
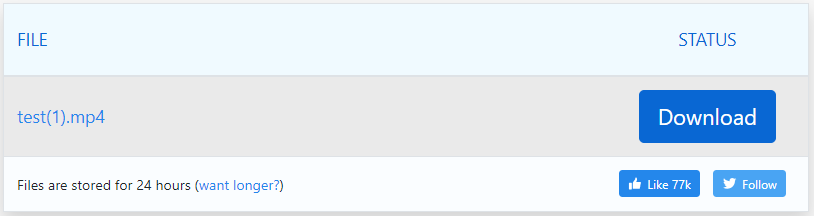
Step 4. Click the Convert Now button to start the conversion.
How to Convert Video to M4A?
Then, vice versa, how to convert a video file into M4A audio? the tools and methods are the same as converting from M4A to video described above. All you need to do is to select a video to M4A converter (e.g. MiniTool Video Converter) and start your task.
Convert YouTube Video to M4A
Specially, some users may want to know how to convert YouTube videos into M4A audio format. If the YouTube videos are online, first of all, you need to download them and save them offline. Then, carry out the format conversion. Yet, how to get YouTube videos offline? You can still rely on MiniTool Video Converter. Here is a quick guideline.
MiniTool Video ConverterClick to Download100%Clean & Safe
Step 1. Go to the Video Download tab from the top menu of MiniTool Video Converter.
Step 2. Search for the target video. Or directly input the URL link of the target video into the address bar and click the Download icon.
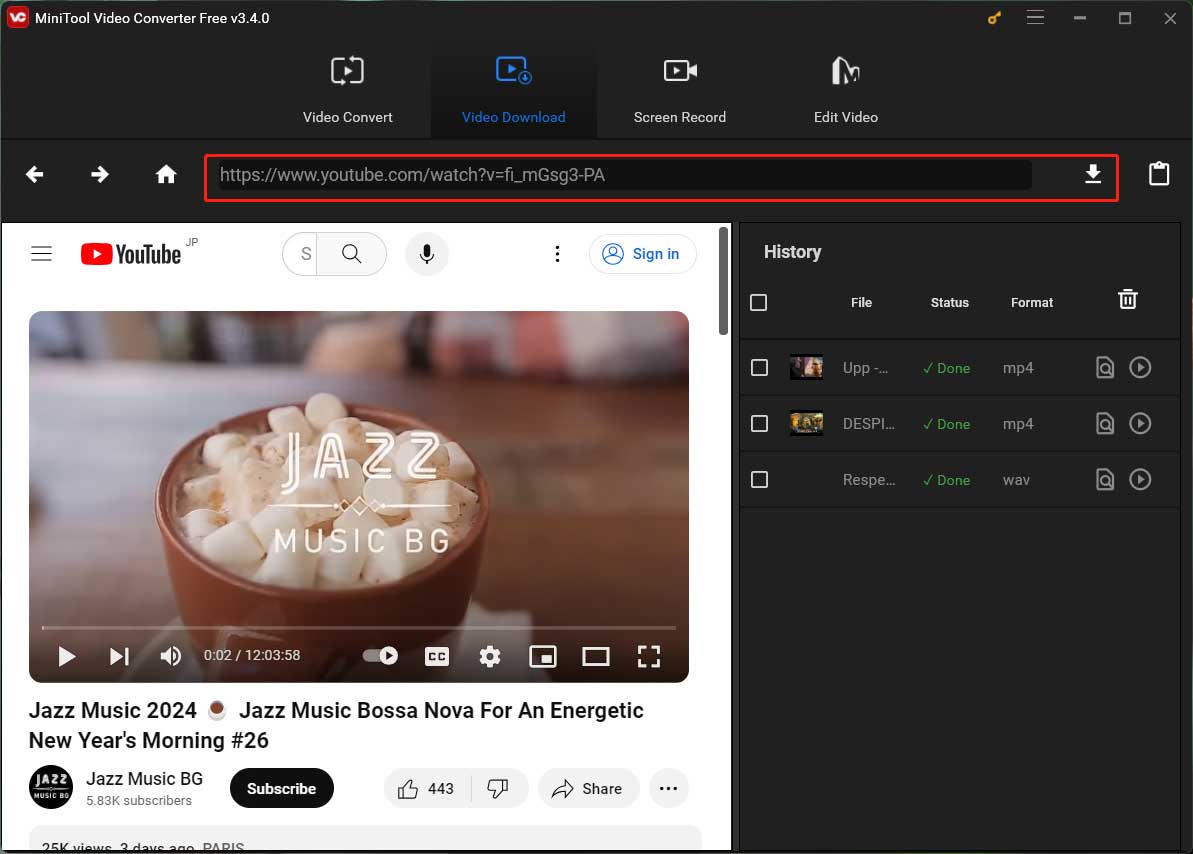
Step 3. In the new pop-up window, select a media format you prefer and click the DOWNLOAD button.

Next, you can convert the downloaded YouTube video into M4A or other formats using the Video Convert feature introduced before.
M4A Video Player Download
Once you get your M4A Videos, you may transfer them to different electronic devices to play. Thus, you may need M4A video players compatible with different hardware equipment. Here are some recommended options that support M4A files and video playback:
- VLC Media Player: VLC is a versatile, open-source media player known for its ability to handle a wide range of audio and video formats, including M4A. It’s available for Windows, macOS, Linux, Android, and iOS.
- Windows Media Player: The default media player for Windows often supports playing M4A audio files. While it might not have extensive codec support for all types of M4A files, it’s a basic option available on most Windows systems.
- iTunes: On macOS and Windows, iTunes can handle M4A files. Though it’s mainly an audio player, it can play video files as well.
- QuickTime Player: For macOS users, QuickTime Player can play M4A audio files and some video content. However, QuickTime may require additional codecs or plugins for specific types of M4A files.
- MX Player: For Android users, MX Player is a highly versatile media player that supports various audio and video formats, including M4A. It’s known for its extensive codec support.
- MiniTool MovieMaker: In addition to being an M4A editor that can help you convert M4A to video with image, you can also use it as a M4A player.
Conclusion
The flexibility of M4A as a container format allows for its adaptation from audio to video by incorporating visuals or other video elements. This conversion process expands the possibilities for content creators and individuals looking to repurpose their audio files for platforms that thrive on video-based content like YouTube. With a myriad of tools and methods available, converting M4A to video has become an accessible and practical solution to cater to diverse multimedia needs in today’s digital age.
About The Author

Position: Columnist
Helen is a tech writer with over 10 years of experience. She specializes in creating easy-to-follow guides for video editing, media file conversion, and computer performance. Helen doesn't just write—she tests every software herself and listens to feedback from users and experts. Her goal is to make complex programs simple so that everyone can solve their tech problems with confidence.
User Comments :