Do you want to create a DIY video? Make a DIY video and make it go viral! This post released by the free video maker of MiniTool provides the best tips and detailed steps to tell you how to make DIY videos.
Nowadays, with the development of various social media and video software, many popular DIY videos have appeared on the Internet and attracted a lot of attention. Do you want to make a DIY video? Let’s see how to make DIY videos.
What Is a DIY Video?
What is DIY? In short, it comes from the “do it yourself” acronym. What are DIY videos? DIY videos are how-to videos that guide viewers through various hands-on projects. These videos feature detailed step-by-step instructions on how to make or repair something, mainly related to crafts, home improvement, or other practical tasks.
The Best Tips for Making DIY Videos
How to make DIY videos? How to make a DIY video engaging? The following 6 best tips will help you.
#1 Clarify the Theme and Content of the DIY Video
First, you need to decide what kind of DIY video you want to make, whether it is a tutorial on making a cake, making a handicraft, etc. There are tons of DIY videos you can watch online, and if you want to start making DIY videos, there are many topics to choose from.
#2 Prepare Scripts and Recording Equipment
Write a clear and concise script to keep your DIY tutorial video on track, avoid unnecessary length, outline each step, and provide helpful explanations to keep it engaging. Besides, the length of your DIY video should match the script’s content. Be sure to eliminate as much superfluous content as possible.
A good device for recording DIY videos is a smartphone with a good camera and microphone. You can buy a tripod or stabilizer to ensure a steady shot and make sure the lighting is right for the best video.
#3 Record DIY Videos
Use the script as a guide when recording, and you should speak clearly with an appropriate pace. Show and explain each process in detail, and provide verbal explanations for important steps or difficult operations. In addition, you can use multiple camera angles or close-ups to highlight important details.
#4 Edit DIY Videos
Remove unnecessary parts by using video editing software. Add transitions, text overlays, and graphics, adjust the speaking audio, or add background music according to your needs. Make sure the video is smooth and maintains a professional look.
#5 Correctly Set the DIY Video Export Format
Determine which platform you want to upload to. Different platforms have different format requirements. For example, if you want to upload on Instagram, you need to make sure the export format is correct.
#6 Optimize for Search and Promote Your Videos
Optimize for search engines when you upload your DIY videos to platforms like Instagram and TikTok by using relevant keywords in your video title, tags, and description. Write engaging thumbnail descriptions and rich keywords to attract your audience.
How to Make DIY Videos on Windows?
Here is a good and easy video editing software – MiniTool MovieMaker to help you make DIY videos.
MiniTool MovieMaker is a free video editor without watermark on Windows with rich functions. It has a simple and clear interface. In addition, you can create videos on any subject with its various templates and function usage guides – no video editing experience required. You can use it to make a DIY video that only takes a few simple steps.
Here are steps to tell you how to make DIY videos.
Step 1. Download, install, and launch the free DIY video editing tool. Then close the promotion window.
MiniTool MovieMakerClick to Download100%Clean & Safe
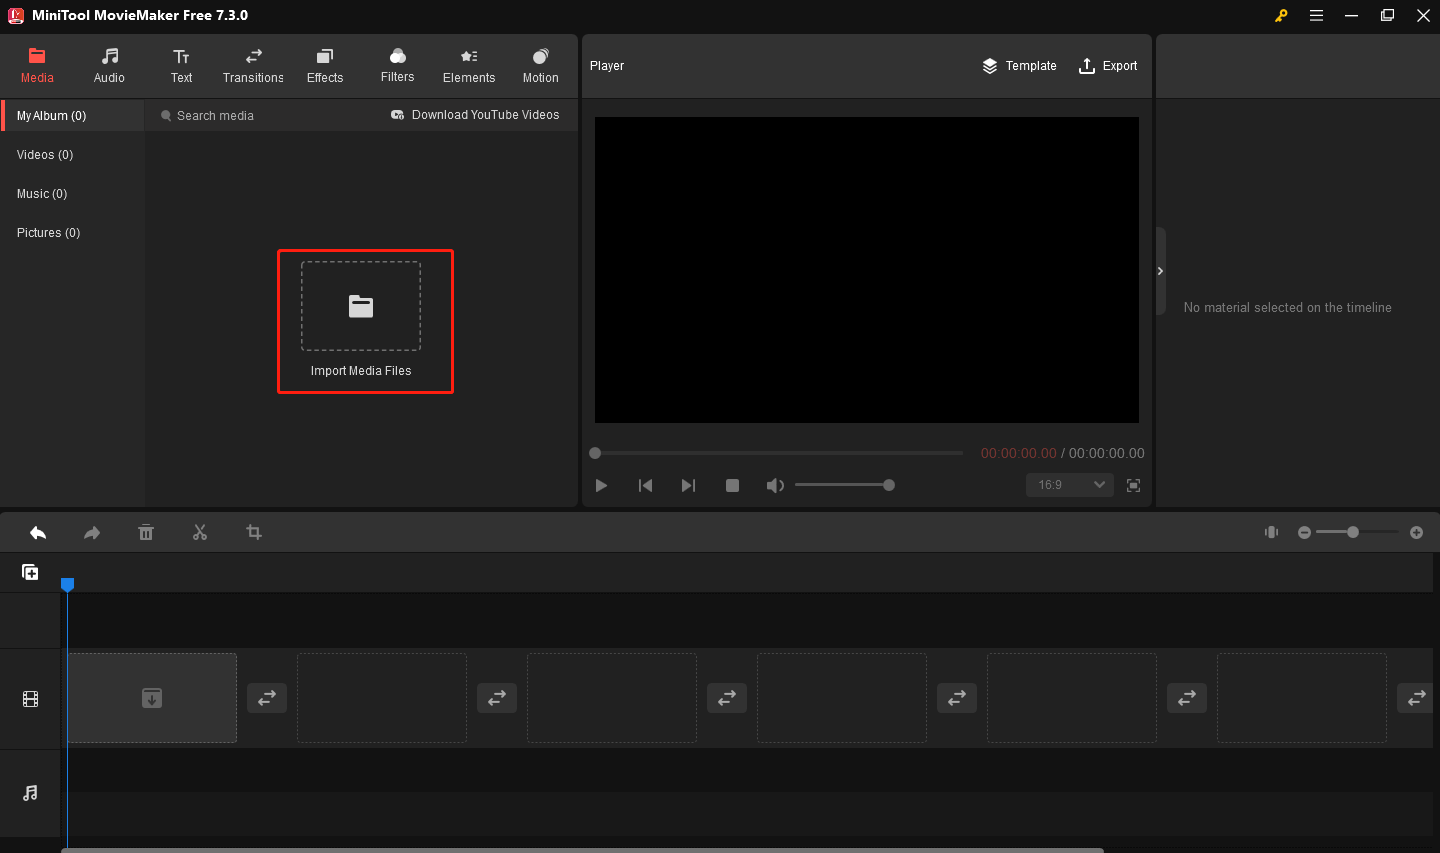
Step 2. Click Import Media Files to import your DIY video materials.
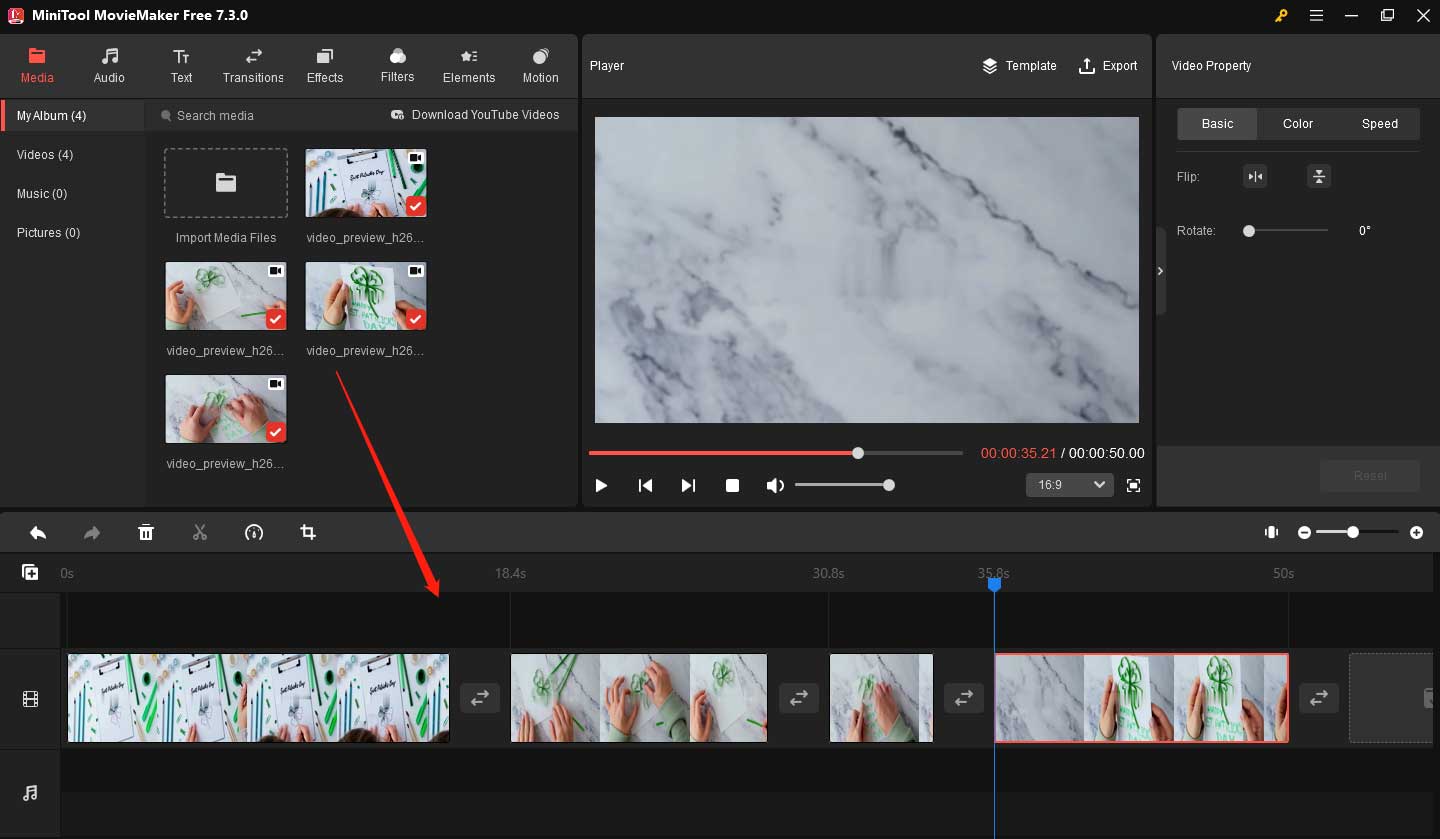
Step 3. Drag and drop the imported video clips to the timeline.
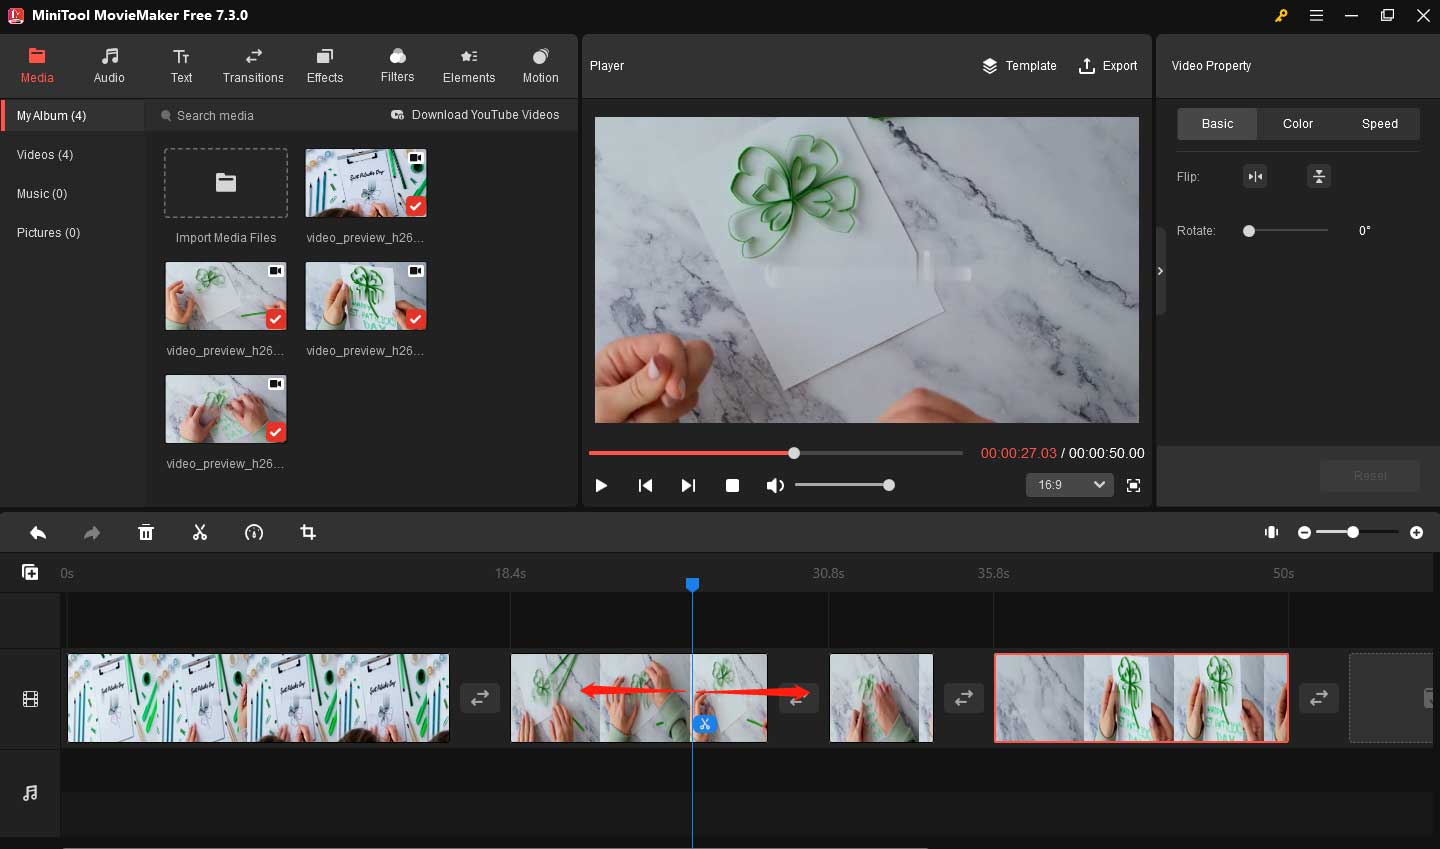
Step 4. Drag the playhead on the timeline to where you want to split.
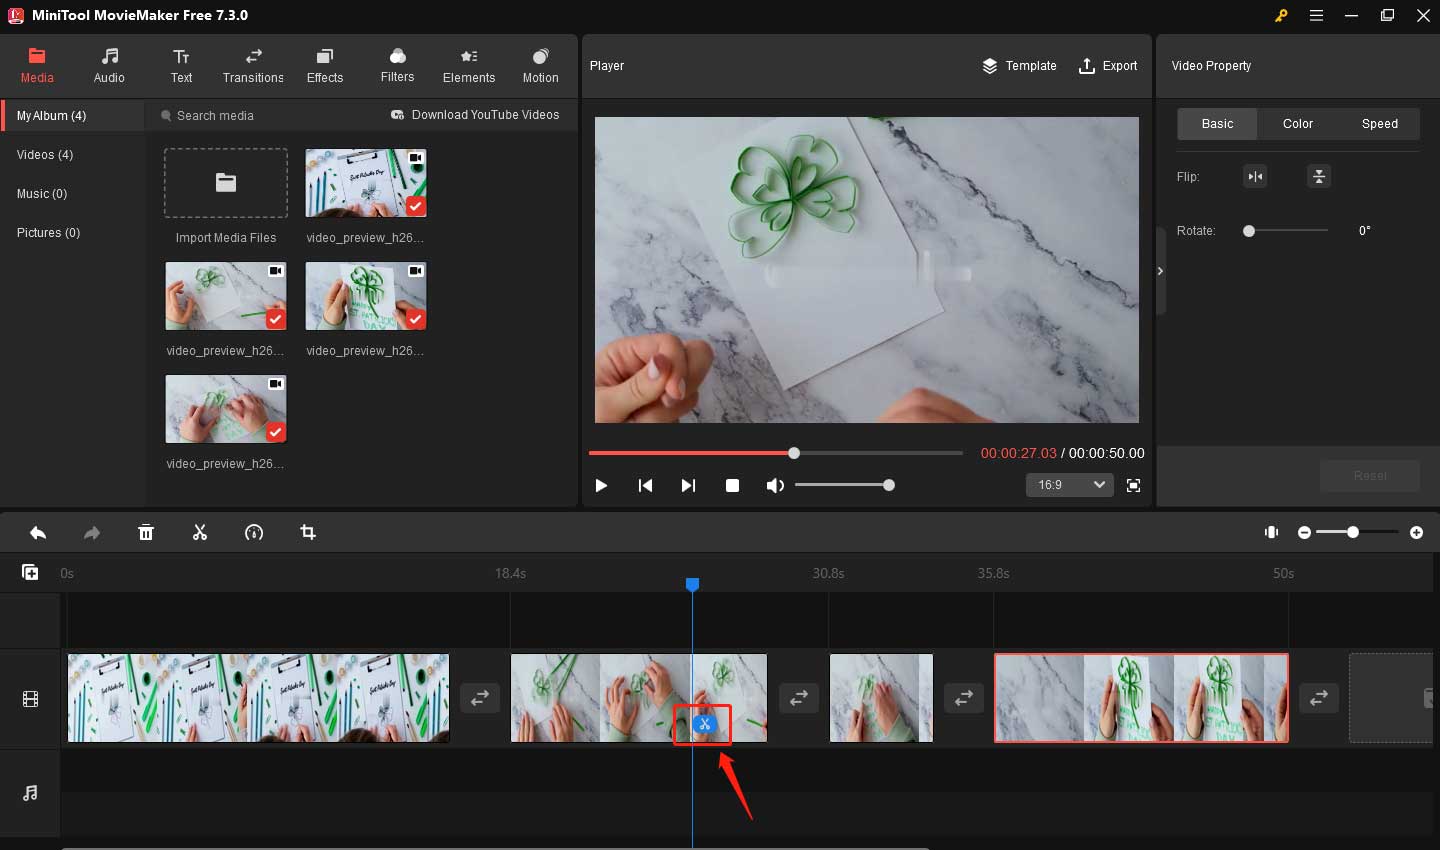
Step 5. Click the Scissors icon on the playhead to split the video clip.
Step 6. Choose the unnecessary part and click the Delete icon above the timeline to remove it.
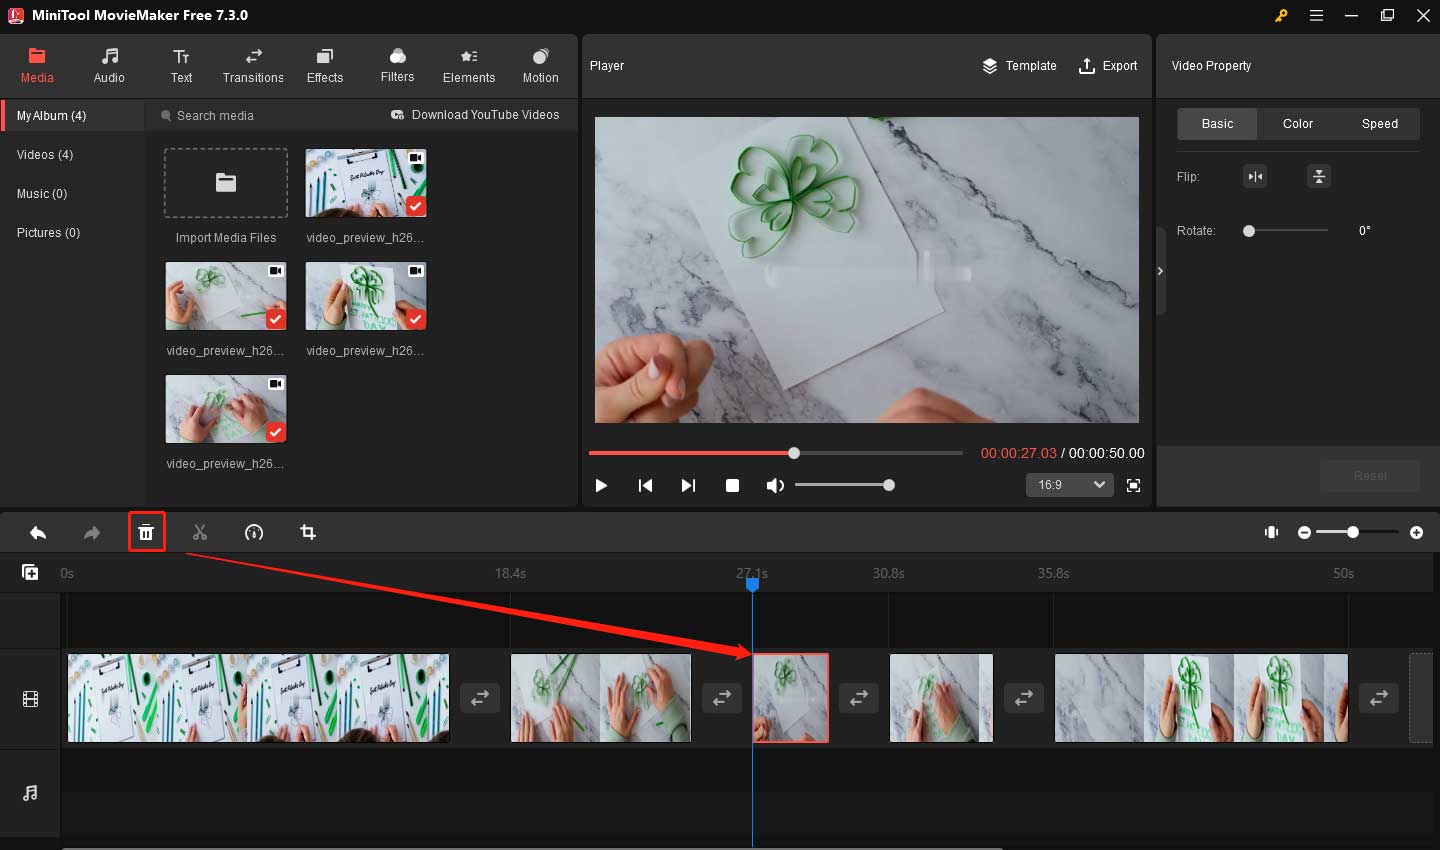
To delete multiple parts, please repeat the above operations.
Step 7. Click Text in the upper menu, you can use many text styles. Click the Download icon on the desired text style to download it.
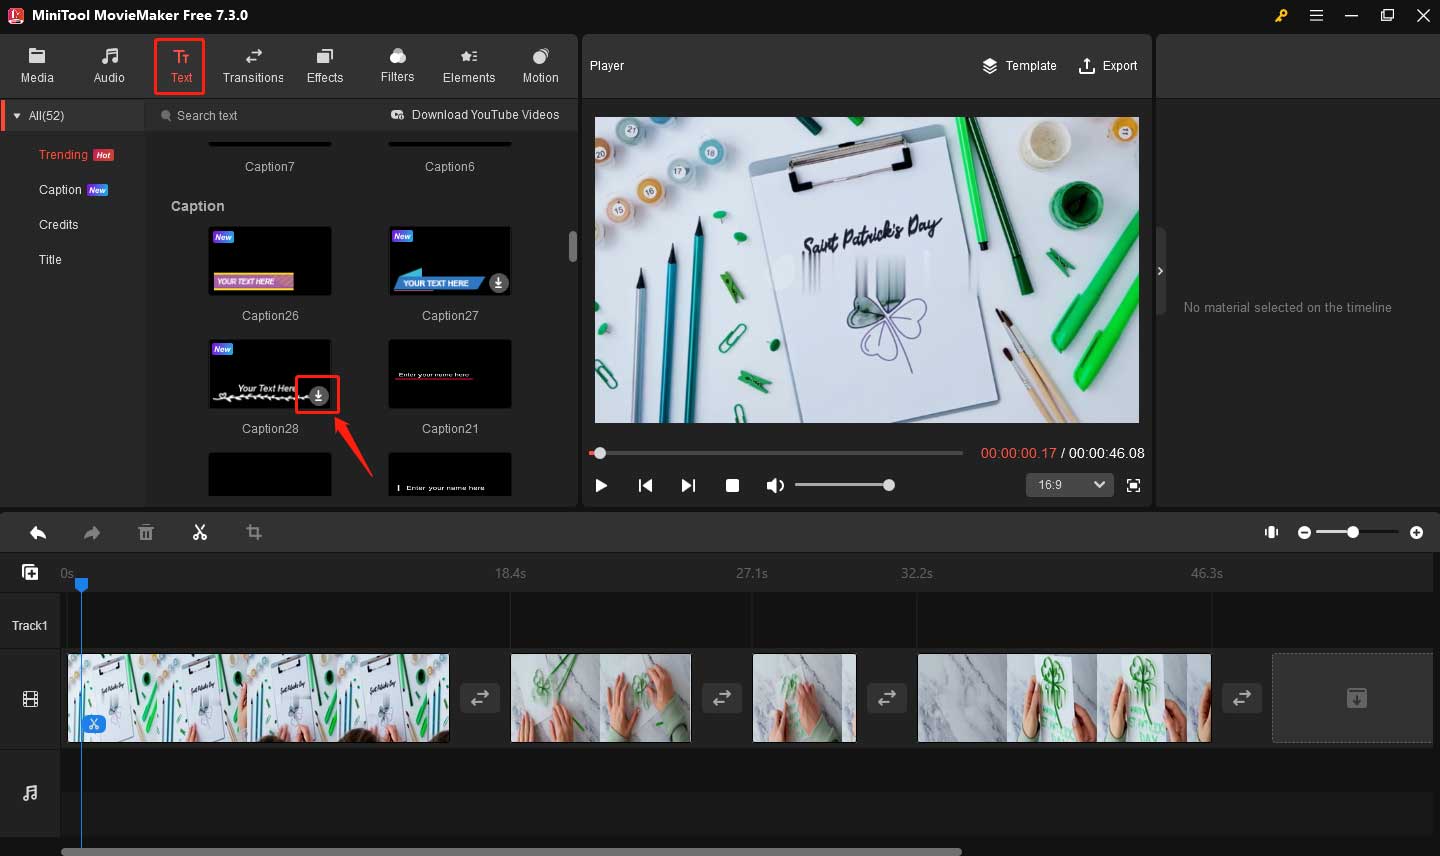
Step 8. Drag the text you downloaded to the target place on the timeline.
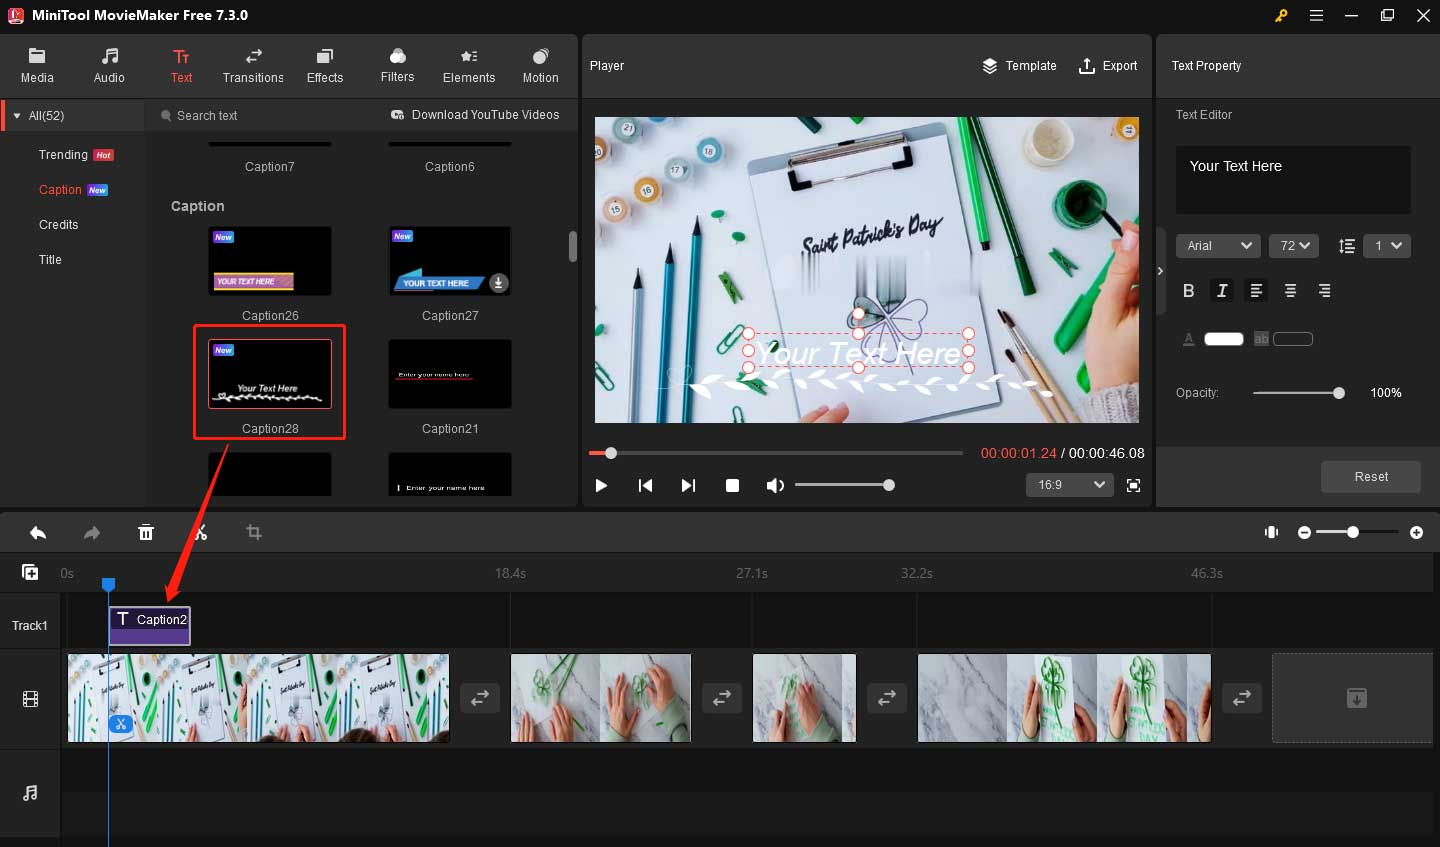
Step 9. Edit the text content in the Text Property area and select its font, size, color, background color, opacity, etc.
Adjust the text duration to fit the video content by dragging the start or end of the text on the timeline when your mouse turns into a double-headed arrow.
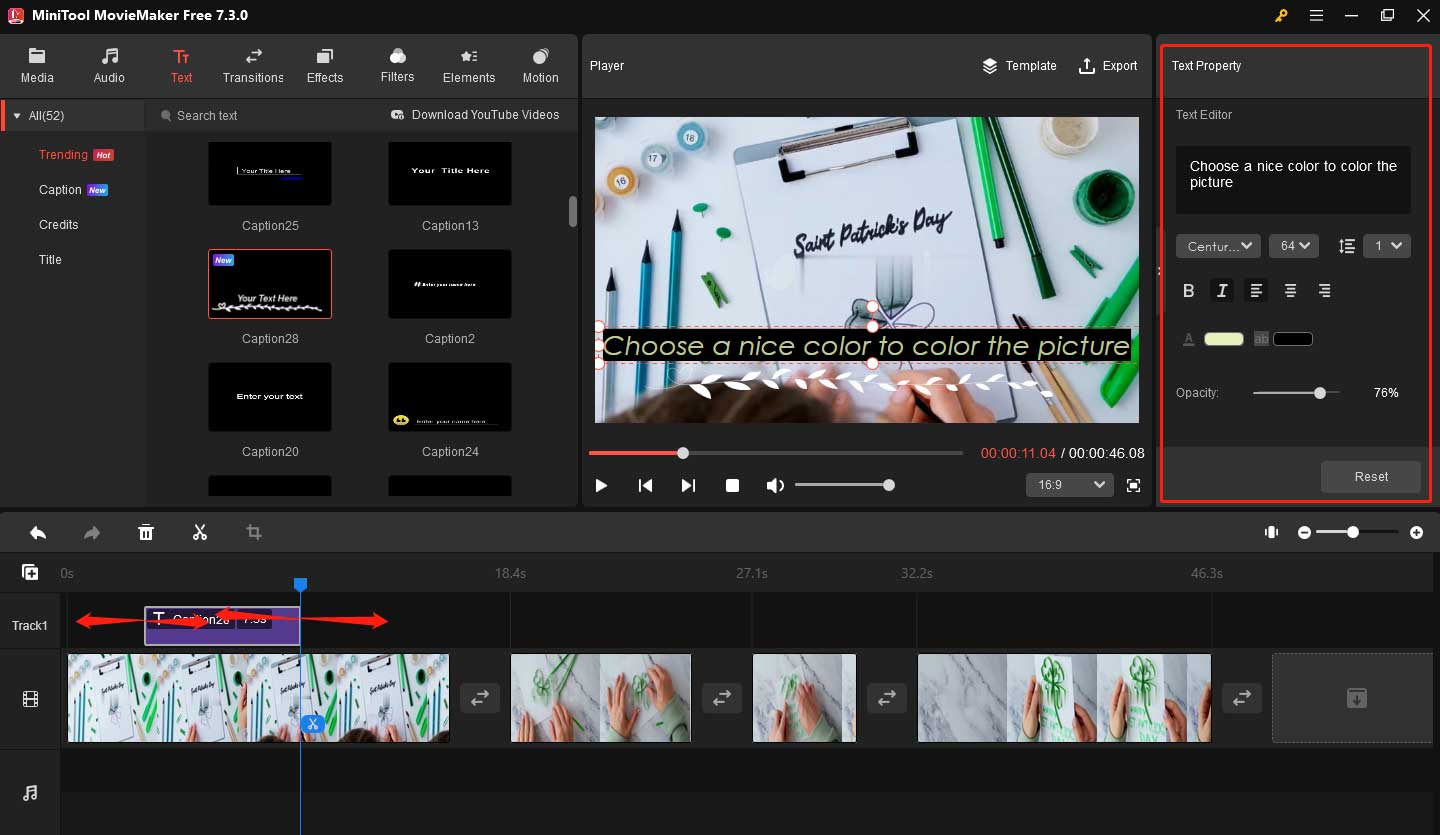
Please repeat the above operations to create multiple texts for your DIY video.
Step 10. You can make additional edits to the DIY video such as adding music, transitions, interesting elements, filters, effects, or motions according to your needs.
You can also change the color and speed of your video, flip, reverse, rotate the video, and more in the top-right Video Property window.
Step 11. Click Export to name your DIY video, choose the format, change the resolution, etc. You can click Settings for more operations.
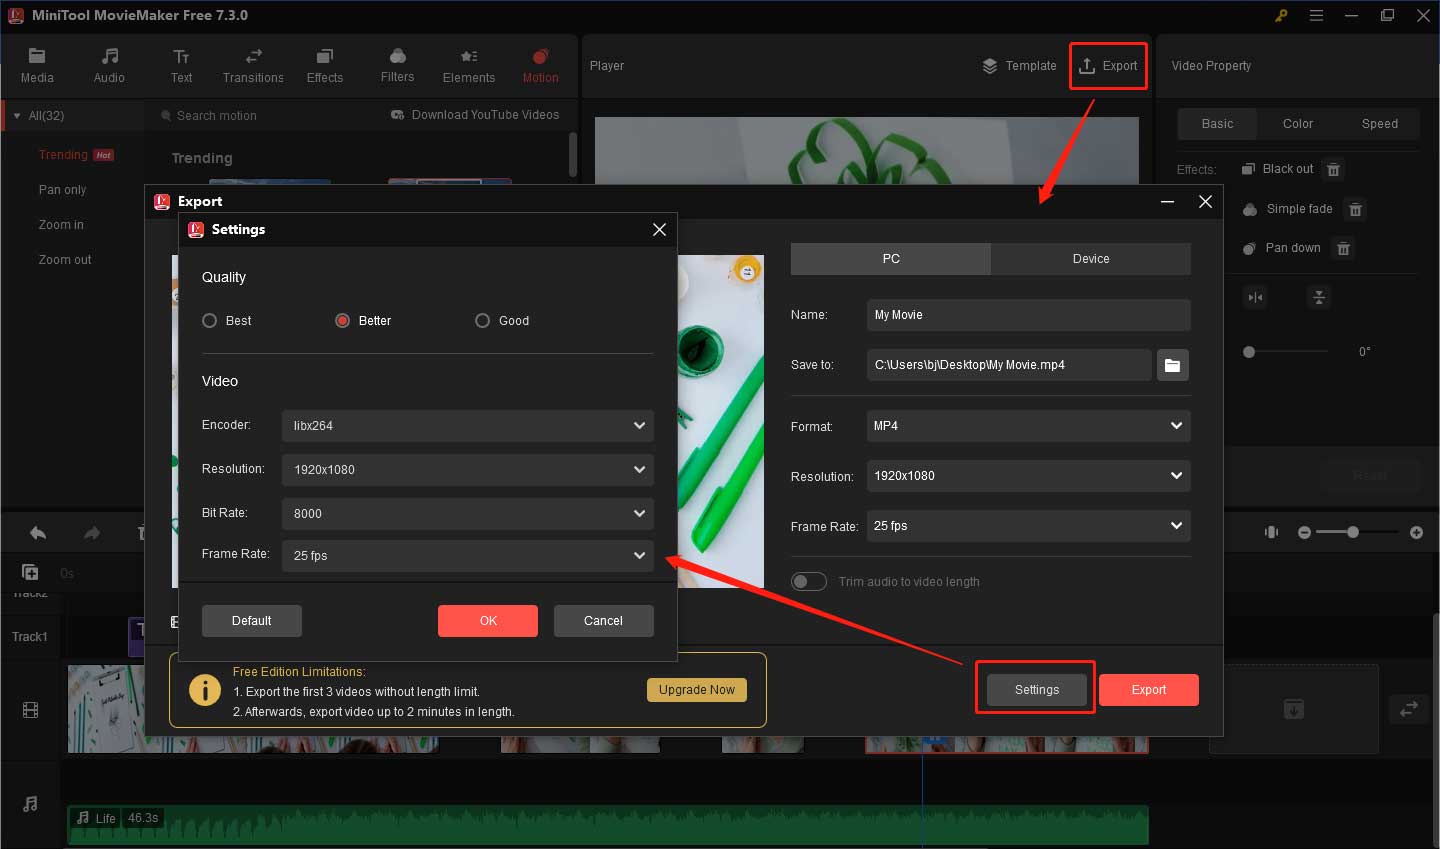
Step 12. In the end, click the red Export button to export your video.
The features of MiniTool MovieMaker
- It is a free and ad-free tool without watermarks and bundles.
- It offers templates including love, travel, family, vlog, etc.
- It allows you to import and export formats such as MP4, GIF, MP3, AVI, MOV, MKV, WMV, etc.
- It enables you to crop, trim, merge, and short videos.
- It provides various texts, audio, filters, transitions, effects, elements, and motions.
- It allows you to add music from your computer.
- It can help you rotate, reverse, and flip videos.
- It enables you to create videos from photos, extract music from videos, and turn videos into photos.
- It supports changing video format, encoding, bitrate, resolution, etc.
Conclusion
This post offers the best 6 tips for making DIY videos and tells you how to make DIY videos. I hope it is useful to you. If you have questions about MiniTool MovieMaker, please get in touch with us via [email protected].


![5 Best Open Source Video Editors [Free]](https://images.minitool.com/moviemaker.minitool.com/images/uploads/2020/07/best-open-source-video-editor-thumbnail.png)
User Comments :