Instagram Reels are short videos you can create and share on Instagram. One way to make your Reels more interesting and dynamic is to add transitions between your clips. This article from a Windows movie maker - MiniTool MovieMaker will provide a complete guide on Instagram Reels transitions, especially how to add transitions to Instagram Reels.
What Are Instagram Reels Transitions
Instagram Reels, a feature that allows users to create and share short videos, has gained significant popularity. They are a great way to showcase your creativity and engage your audience. One of the ways to make your Reels more engaging and creative is to add transitions between clips.
Instagram Reels transitions are effects that change the appearance or movement of the video from one clip to the next, making your video content more attractive and seamless. They help to smoothly switch from one scene to another, adding a professional touch to your reels.
Popular Types of Transitions for Instagram Reels
Before adding transitions to your Instagram Reels, let’s have a look at some popular transitions for Instagram Reels:
Match cut: It matches the foreground or background between two videos and ends or starts with a pose.
Switch object: This transition uses an object to block the screen and change the object or the scene in the next video.
Turn head: Turn your head from facing the camera to facing away, changing the camera angle and the scene in the next video.
Camera motion: Move the camera from slow to fast or vice versa and change the object or the scene in the next video.
Finger snap: This transition lets you switch between scenes or outfits by snapping your fingers.
Throw object: Throw an object to a certain position or place and turn it into the subject of the next video.
Head push: Use your hands to push your head down or up, then change the camera angle and scene in the next video.
Side swipe: This transition lets you slide between different scenes or outfits by swiping the screen with your hand.
Hand shape: Make a shape with your hands, move them towards or away from the camera, and change the outfit or the location in the next clip.
Spin: Spin around and change the outfit or the location in the next scene.
In addition to these, Instagram Reels also offers a range of other transitions, which can be applied to your videos and photos to create engaging and visually appealing content.
How to Add Transitions to Instagram Reels on Mobile
Adding transitions to your Instagram Reels can make your videos more dynamic. The process is similar for both iPhone and Android devices. Here’s a step-by-step guide on how to add transitions on Instagram Reels on mobile:
Step 1. Open Instagram and start a new Reel
Open the Instagram app on your device. Tap the camera icon in the top left corner of the screen, then select Reels at the bottom.
Step 2. Record multiple clips or upload pre-recorded videos
Press and hold the capture button to record your clips, and release the button when you’re done. Or, you can upload your videos or photos from your camera roll to your Reels. Then, tap on the Next button.
Step 3. Add a transition between clips
After recording or uploading your clips, you can add a transition. Tap the Edit Clips button at the bottom left and select Transitions. Once choosing the transition you’d like to use, tap on Done, or tap Apply to all if you want to apply it to all your clips.
Step 4. Review and edit
After adding transitions, tap the back arrow to review your video. If you’re not happy with the transition, you can tap on the clip and select Edit Transition to change it.
Step 5. Post or share your Reel
When you’re satisfied with Reel, tap the forward arrow. Here, you can add a caption, select a cover image, add relevant hashtags, and then choose either to save it as a draft or tap on Share to post your Reels.
An Alternative Way to Add More Transitions to Instagram Reels
While Instagram Reels offers an easy way to add transitions to your Reels, there’s also an alternative way to add more transitions by utilizing a video editor. With it, you can not only add transitions but also make more edits to your Reels.
Which Video Editor to Choose?
MiniTool MovieMaker can be one of the best choices for editing your Instagram Reels. It comes with an intuitive user interface and numerous video editing features. Multiple video and image formats are supported by this tool for import and export, including MP4, MOV, MKV, AVI, WebM, JPG, PNG, etc.
With MiniTool MovieMaker, you can choose from 110+ trending transition effects for your Reels. Transitions in this software are divided into several categories, including Trending, Light, Wipe, Advanced, Diagonals, Iris, PagePeel, and Reveals. It also allows you to customize the duration and transition mode.
Besides, this free video editor without watermark lets you split, trim, crop, rotate, reverse, and flip your Reels. You can also change the video aspect ratio to 9:16 to fit Instagram Reels. Moreover, you can add music, filters, effects, motion effects, and stickers to make your Reels stand out from the sea of other Reels.
Main features of MiniTool MovieMaker:
- It’s easy and free to use.
- It features multi-track editing.
- It offers rich video editing tools and resources.
- It supports popular file formats.
- It provides audio editing tools.
- It allows you to export videos without any watermark.
Add Transitions to Your Instagram Reels with MiniTool MovieMaker
Here’s a step-by-step guide on how to add transitions to Instagram Reels with MiniTool MovieMaker:
Step 1. Click the download button below to download and install MiniTool MovieMaker. After installing, open this video maker, and close the pop-up promotion window to access its main interface.
MiniTool MovieMakerClick to Download100%Clean & Safe
Step 2. Click on the dotted Import Media Files area to import your Instagram Reels footage. Or, simply drag and drop it from your computer to this tool.
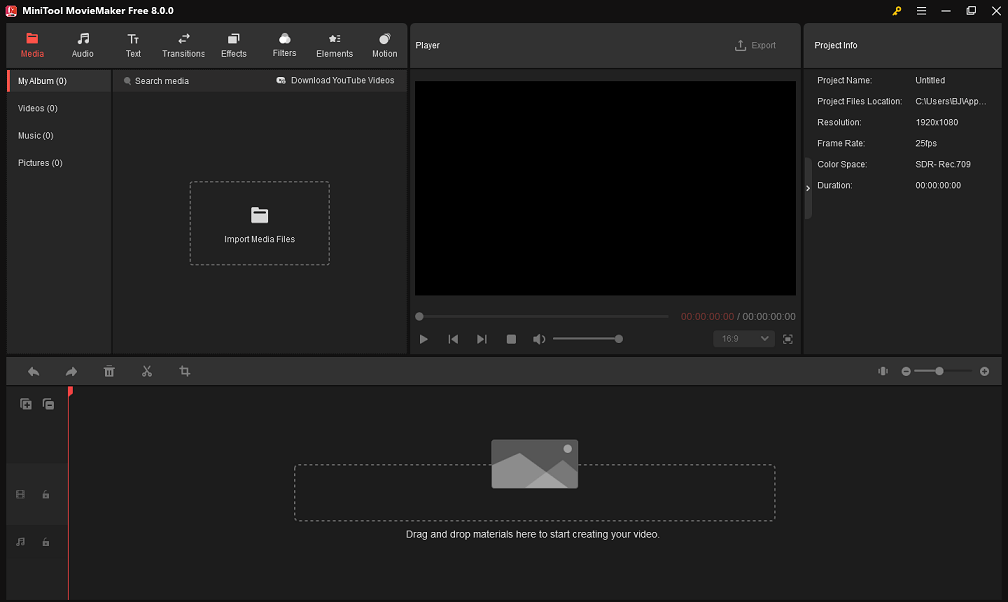
Step 3. Add imported videos to the timeline by clicking the + icon on them or dragging and dropping them.
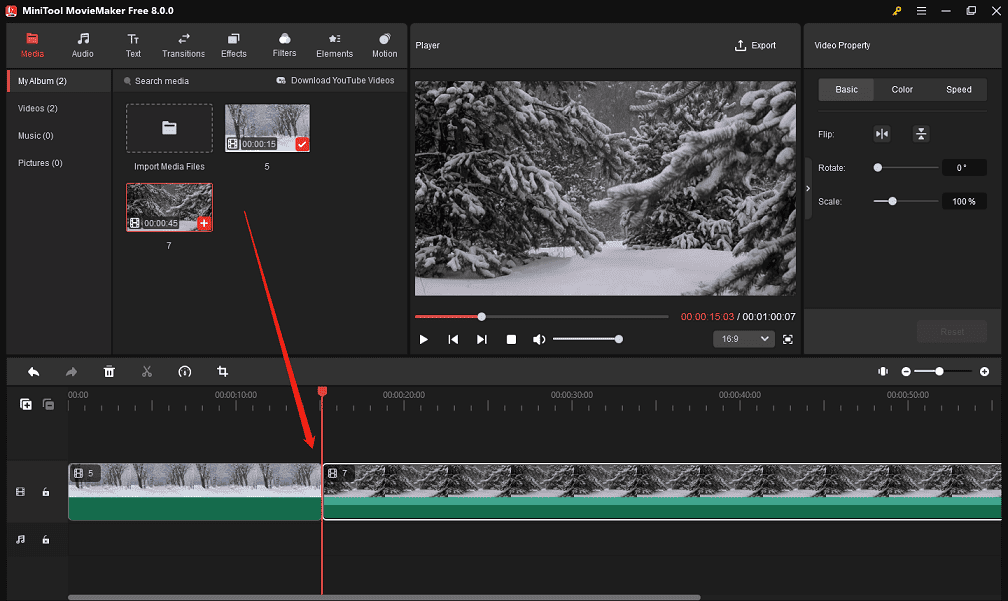
Step 4. Click on the Transitions tab at the top of the screen, select the transition you want, and click the + icon on it. Alternatively, you can drag and drop the desired transition to the location between two video clips.
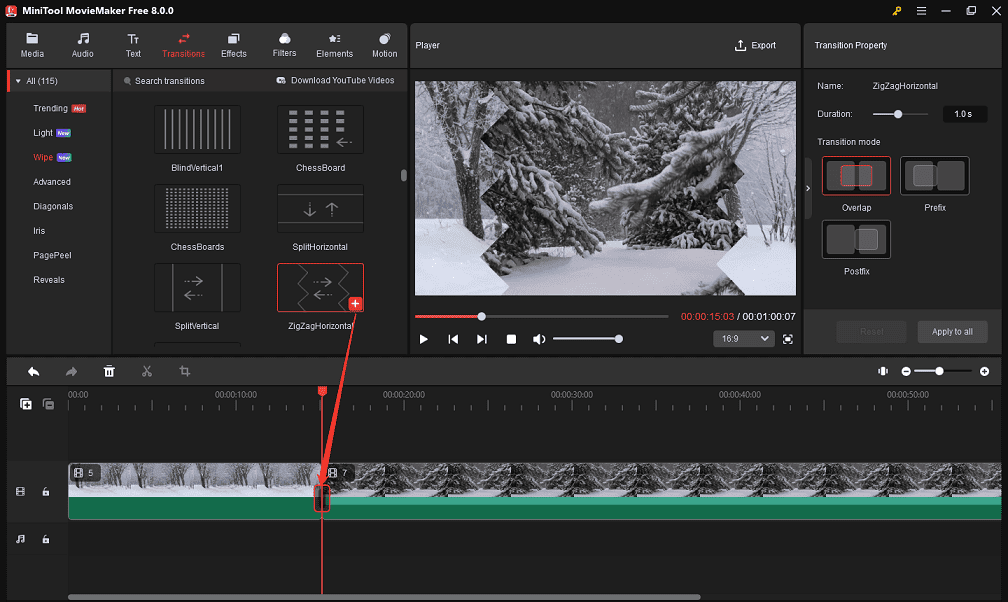
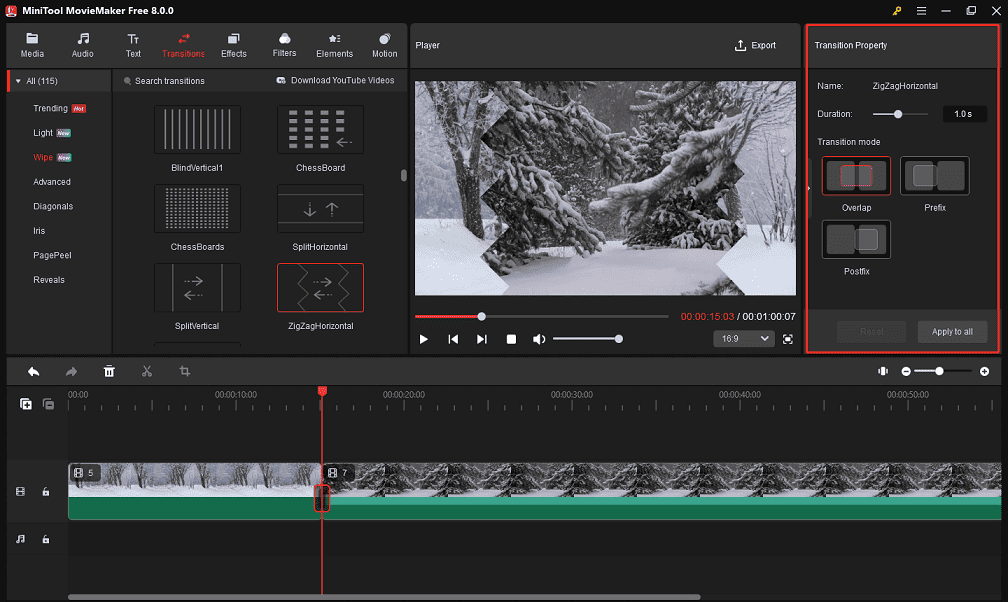
Step 5. Under the Transition Property panel, customize the transition duration and mode. You can click the Apply to all button to add the same transition to all clips if you want.
Step 6. In the Player section, expand the aspect ratio menu and choose 9:16 to change the video aspect ratio for Instagram Reels.
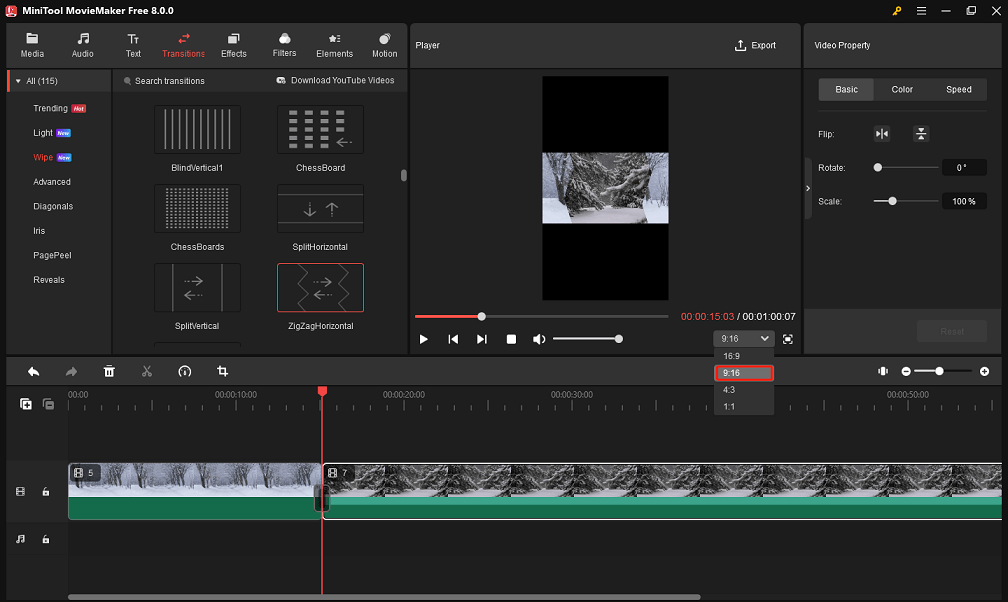
Step 7. Optionally, you can make other edits to your Reels videos, like trimming, cropping, rotating, adding background music, adding titles and captions, changing video speed, etc.
Step 8. Click on Export on the toolbar to save the final video to your computer. Here, you can customize the exporting settings, including save path, format, resolution, frame rate, quality, encoder, and bit rate.
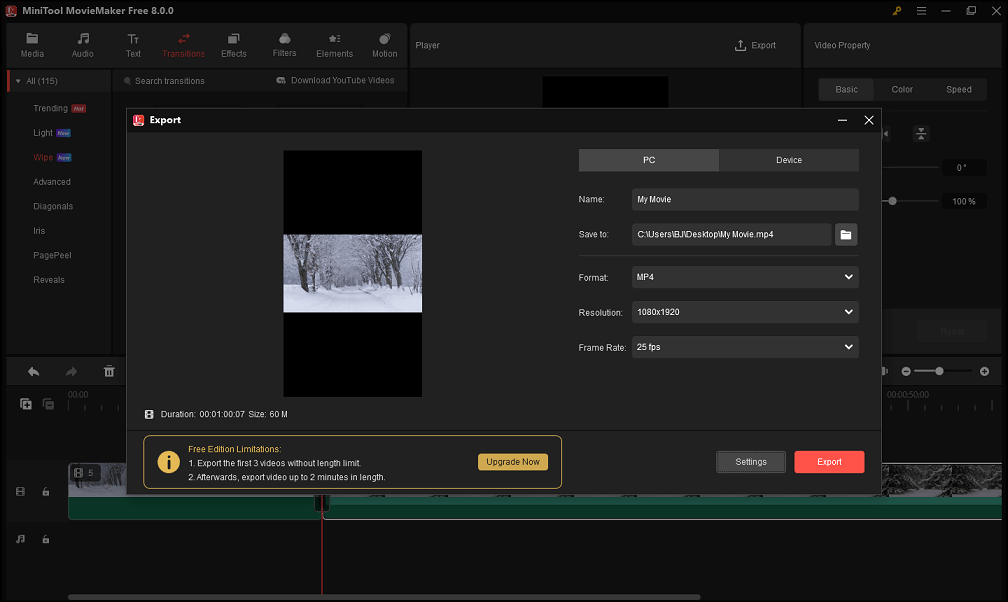
Once you add transitions to your video, you can directly post it to your Instagram Reels.
How to Fix Instagram Reels Transitions Not Showing
Some Instagram users have experienced issues with adding transitions to their Reels. They have reported that the transitions do not show up or work properly. Why can’t I add transitions in Instagram Reels? If you are facing the same problem, you have come to the right place for a solution!
Why Instagram Reels Transitions Not Showing up
There are several possible reasons why Instagram Reels transitions may not appear or function correctly. Here are some of the most common ones:
Poor Internet connection: Instagram, as an online social media platform, requires stable and high-speed Internet to perform its functions properly, and if your Internet is not performing well, then this could be the problem.
App Version: If your Instagram app is out of date, it may have bugs that affect transitions.
Device Compatibility: Some transitions may not be compatible with certain devices or operating systems. Check if your device meets the minimum requirements for using Instagram Reels and ensure it is up-to-date.
User Settings: Your settings within the Instagram app may also prevent transitions from appearing or working properly. For instance, you may have disabled the login info option, which is required for the use of some transitions.
Temporary Glitch: Sometimes, Instagram may experience temporary glitches or bugs that affect specific features, such as transitions. These issues usually resolve themselves after a while.
Best Fixes for Instagram Reels Transitions Not Showing up
If you are facing problems with Instagram Reels transitions not showing up, here are some troubleshooting steps you can try to fix it:
#Check Your Internet Connection
The first thing you should try is to check if the Internet connection on your device is working properly. Make sure your data or Wi-Fi is turned on and working properly. You can test this by swapping connections between Wi-Fi and data to identify which one might be causing the problem.
#Update Your App
Then, make sure you have the latest version of the Instagram app installed on your device. Just go to your device’s app store (Google Play Store for Android or App Store for iOS) and check if there are any updates available for the Instagram app. If there is an update, install it and relaunch the app.
#Restart Your Device
Sometimes, a simple restart can solve many problems with your software. Try turning your device off completely and then turning it back on after a few seconds.
#Check App Permissions
Make sure that the Instagram app has permission to access your device’s camera and microphone. Without these permissions, transitions may not show up or work properly. You can adjust app permissions in your device settings.
#Clear Cache and Data
Clearing the cache and data of the Instagram app can help resolve various issues, including missing transitions. To do this, go to your device settings, locate Instagram, and select Clear Cache and Clear Data.
#Reinstall the App
Another fix you can try is to uninstall the Instagram app from your device and reinstall it. This will ensure that you have a fresh installation with all the necessary features.
#Use a Video Editor to Add Transitions
If none of the above steps work, simply use a video editor like MiniTool MovieMaker to add transitions to your Instagram Reels.
MiniTool MovieMakerClick to Download100%Clean & Safe
Wrapping up
Adding transitions to your Instagram Reels can enhance the overall visual appeal of your videos and make them more engaging for your audience. In this article, we have covered various aspects of Instagram Reels transitions. By following the simple steps outlined in this guide, you can effortlessly add transitions to your Reels.
Additionally, if you encounter any issues with Instagram Reels transitions not showing, you can troubleshoot the problem with the help of these solutions.
If you have any questions or suggestions while using MiniTool MovieMaker, please feel free to leave a comment in the section below or contact us via [email protected].
Read more:
Top 8 Apps for Video Transitions: Connect One Shot to Another
How to Add Music to Instagram Reels? [Ultimate Guide]





User Comments :