MiniTool MovieMakerClick to Download100%Clean & Safe
A common task in digital photography is removing the unavoidable digital noise generated by camera sensors. This digital noise is remarkably similar to the grain effect seen in some film photography, caused by the photosensitive chemicals in the film stock reacting to light.
But what if you want to add grain to an image? It’s less common these days, as fewer people remember the heavily-grained images of the early days of film photography, but the style can have a certain charm.
Learning how to add film grain in Photoshop is a useful creative strategy. Plus, it helps blend in other edits with untouched areas of the image. Some editing processes like warps and blurs can inadvertently remove the noise or grain from an image, creating areas that look “smoother” than the rest of the image.
How to Add Grain in Photoshop?
Step 1. Create the Grain Layer
The process works better when applied to a new layer, rather than working directly on the image. It provides you with a better degree of control and flexibility and keeps your original pixel data untouched if you later would like to adjust or remove the effect.
First, click the New submenu from the Layer menu, then select Layer. Also, you can press the keyboard shortcut Ctrl + Shift + N (on a PC) or Command + Shift + N (on a Mac). The New Layer dialog box will appear in Photoshop, allowing you to customize the settings.
You may also like: Photoshop Desktop Shortcut | Photoshop Keyboard Shortcuts
Next, name your new layer and select Overlay from the Mode drop-down menu. After switching the mode, you can check the below box labeled Fill with Overlay-neutral color (50% gray). Click OK to finish the creation.
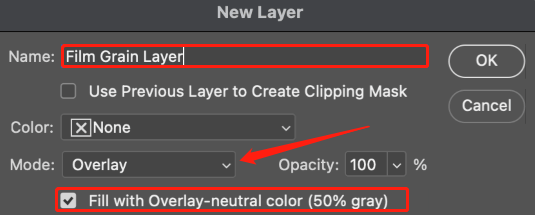
Since the blending mode is adjusted to Overlay, you will not see an immediate change in the image, even if the new layer is filled with neutral gray pixels.
Step 2. Convert to Smart Object
Converting the film layer into a smart object will let you apply filters in a non-destructive manner so you can change the grain color and intensity without needing to start the whole process from scratch again.
In the Layers panel, click the grain layer, open the Filter menu, and select Convert for Smart Filters. Click OK and check the box marked Don’t show again so that the next time you convert a film layer into a smart object, the process will go more smoothly.
At this point, you will see that the thumbnail for the grain layer includes a new icon in the right corner, signifying that the layer is currently a smart object.
Step 3. Add Grain
Still, click the grain layer in the Layers panel, open the Filter menu, click the Noise submenu, and select Add Noise. Then, there will appear the Add Noise filter dialog, which enables you to adjust the amount and type of noise or grain being added.
The default setting of 12.5% color noise in a Uniform pattern looks quite unrealistic. It’s a good idea to adjust the Distribution setting to Gaussian and check the box marked Monochromatic.
In addition, you can adjust the Amount to whatever you want, but keep in mind that you can go back and customize the Add Noise settings at any time since you’ve converted the layer into a smart object. Click the OK button to save the changes.
Step 4. Use Gaussian Blur
With the grain layer still selected, open the Filter menu, click the Blur submenu, and select Gaussian Blur. Customize the Radius setting and toggle the Preview checkbox to compare the results on the image. Once you’re happy, click the OK button.
Conclusion
Now that you’ve learned the detailed guide on how to add grain in Photoshop, you can create something from film effects to totally seamless digital edits. By the way, if you want to further refine your smart filter, you can go there to apply additional adjustments as well.
User Comments :