Are you looking for ways to add subtitles to AVI videos? Don’t worry. In this article from MiniTool MovieMaker (one of the best free video editing software), I will show you step-by-step how to add subtitles to AVI videos.
AVI is a popular video format, and adding subtitles to AVI videos is a great way to make them more engaging and accessible. This article will guide you through why subtitles are important, how to add subtitles to AVI files using various software tools and online platforms, and offer useful tips to enhance your subtitle creation process.
Why Need to Add Subtitles to AVI Videos
Subtitles play an important role in today’s video consumption. Here are some of the reasons why you need to add subtitles to AVI videos:
a. Accessibility
Subtitles make videos more accessible to people with hearing impairments. For individuals who are deaf or hard of hearing, subtitles are not just helpful but they are essential. Adding subtitles allows them to understand the content fully.
b. Language Barrier
If you want to reach an international audience, subtitles in different languages can make your video accessible to people around the world. Therefore, subtitles help overcome language barriers and enable your content to be enjoyed by people who do not speak the language of the original video.
c. SEO Benefits
From a search engine optimization (SEO) perspective, adding subtitles to videos is a smart move. Subtitles can include keywords related to the content, which can improve the discoverability of the video on search engines. This can increase views and engagement.
d. User Preferences
Not everyone likes to watch videos without subtitles. Some people prefer to watch videos with subtitles, especially in noisy environments, like cafes or public transport. By adding subtitles, you cater to these preferences and provide a better user experience.
e. Enhanced Engagement
Subtitles make it easier to follow along with the video, ensuring that important details are not missed. They also allow viewers to rewatch certain parts of the video by pausing and reading the subtitles, which can increase engagement with your content.

How to Add Subtitles to AVI Videos with Software
There are many software tools that make it easy to add subtitles to AVI videos. Let’s explore two popular video editors: MiniTool MovieMaker and Freemake Video Converter.
MiniTool MovieMaker
MiniTool MovieMaker is a free video editor without watermark that allows users to add subtitles to AVI videos. It offers a simple interface, making it ideal for beginners who want to add subtitles without diving into a complicated learning process. Here’s how to add subtitles to AVI files using MiniTool MovieMaker.
Step 1: Download and Install MiniTool MovieMaker
Click the button below to download this software. Once the software is downloaded, follow the installation instructions to set it up on your computer.
MiniTool MovieMakerClick to Download100%Clean & Safe
Step 2: Import Your AVI Video
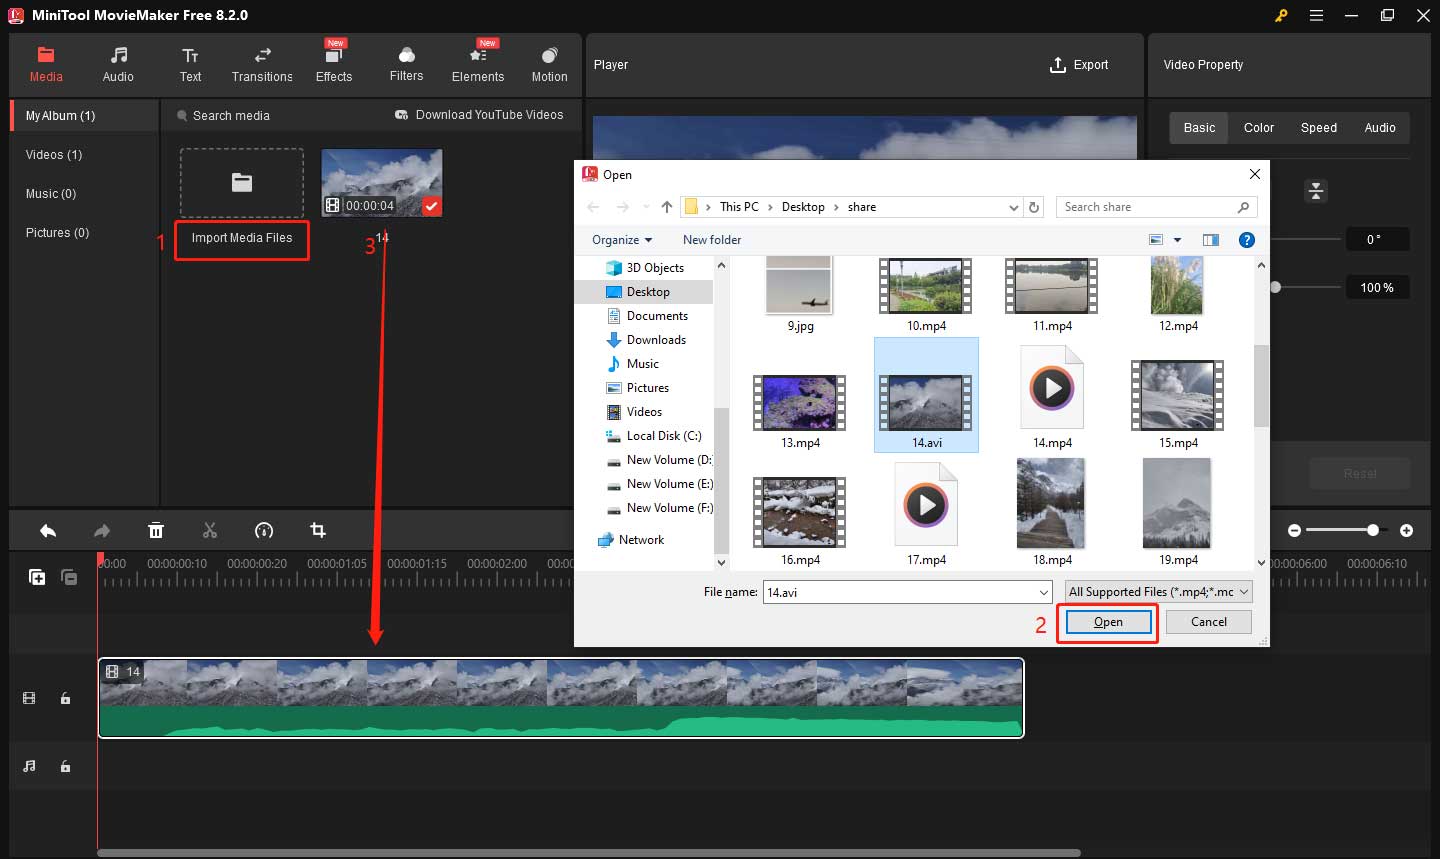
Launch MiniTool MovieMaker and click on New Project. In the main interface, click the Import Media Files area to import your AVI video. A window will pop up, allowing you to browse your file. Select the target video file and click Open to add it to the media library. Once imported, drag the file into the timeline to begin editing.
Step 3: Add the Subtitle Template
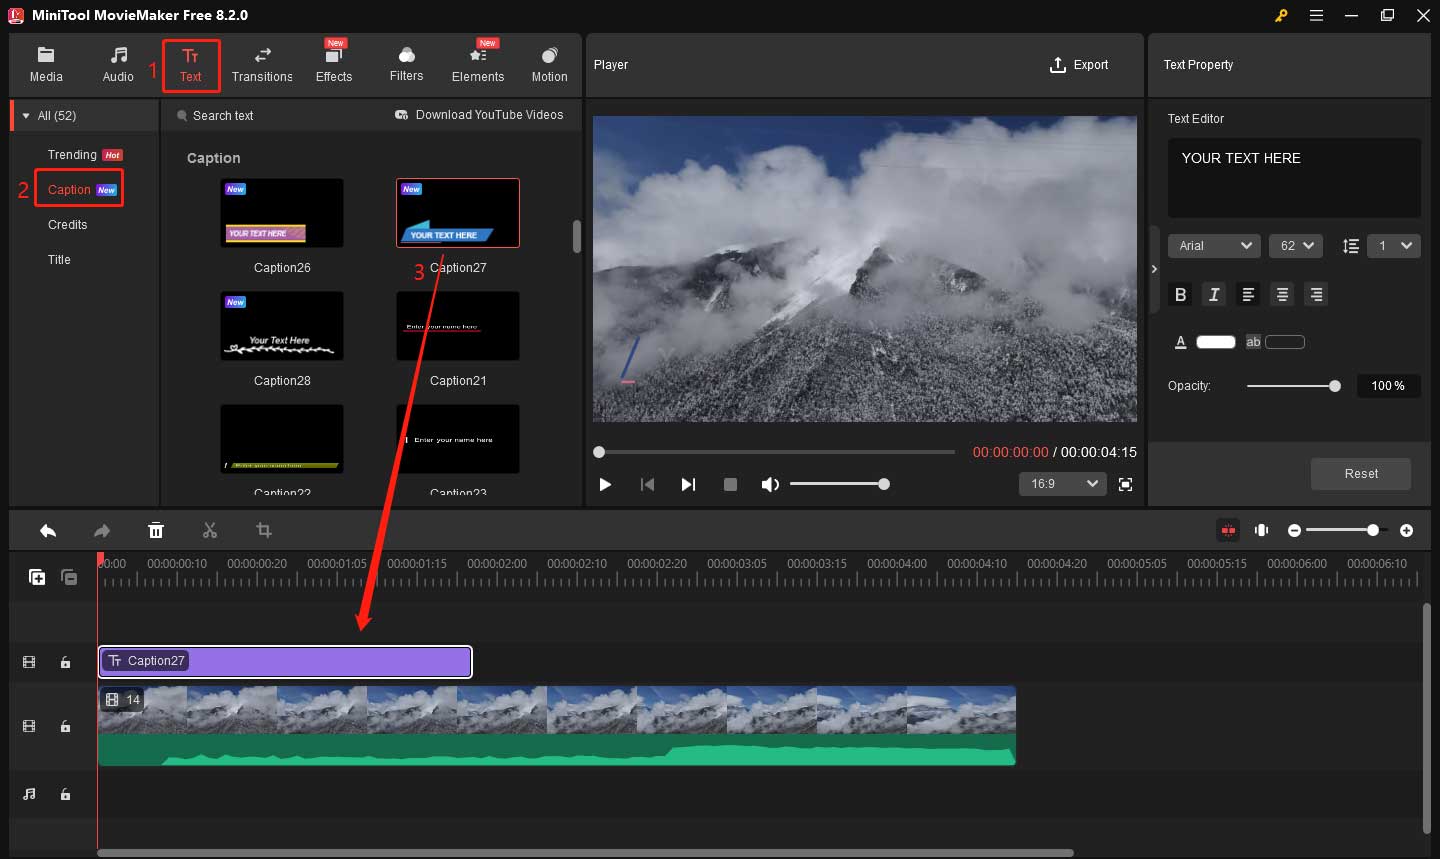
Once the video has loaded, click on the Text tab at the top of the screen. You’ll see four subtab options: Trending, Caption, Credits, and Title. Here, choose the Caption option. Next, you’ll see a list of different caption templates. Choose the caption style you like and drag it above the video in the timeline.
Step 4: Edit the Subtitle
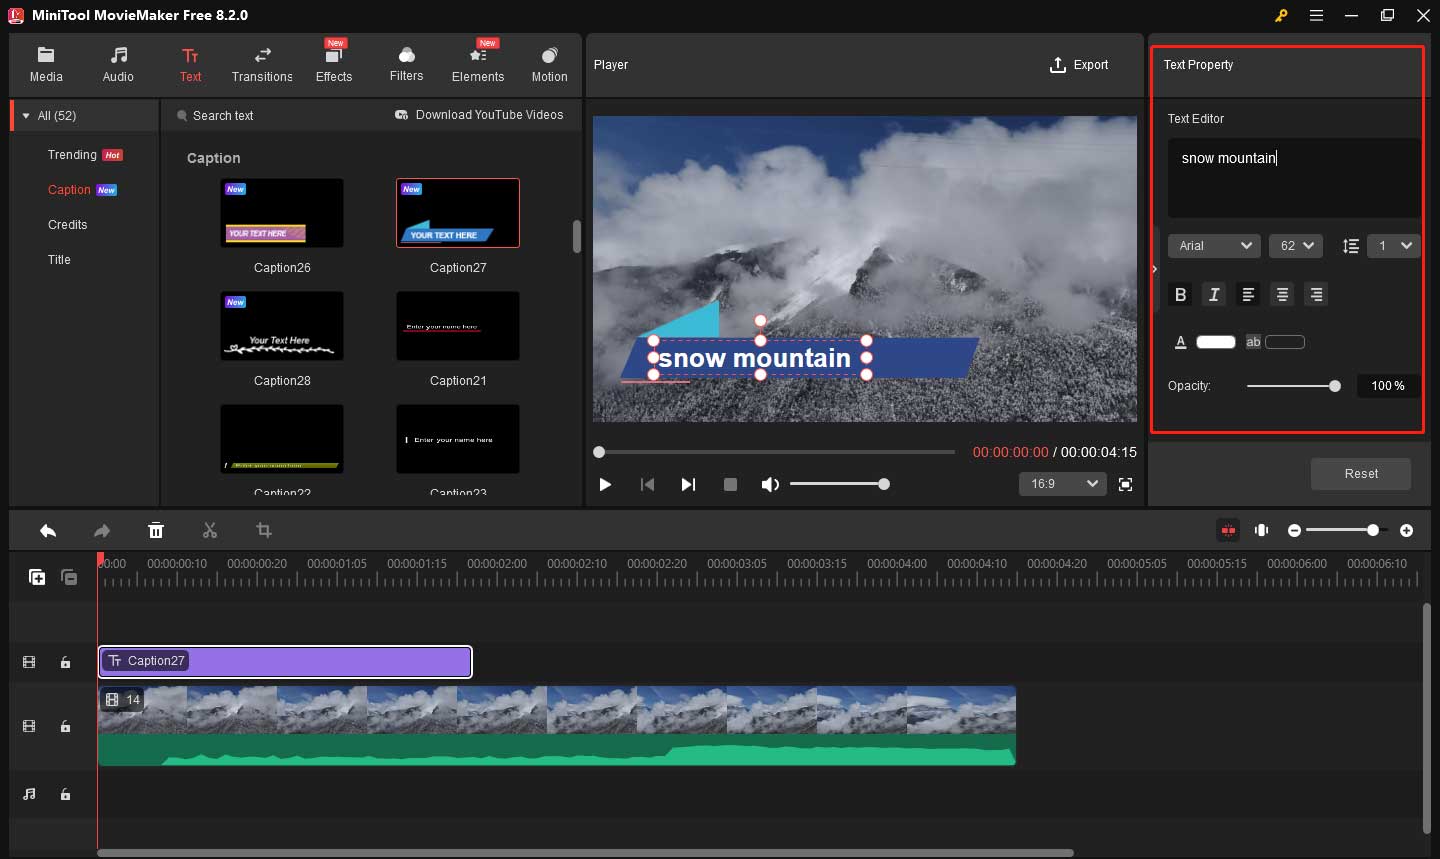
After adding the subtitle template, you can customize the content. Double-click on the text box in the timeline. Go to the Text Property window, and type the subtitle content in Text Editor. Then, you can change the font, size, color, and more. You can also adjust the position of the subtitle on the preview window by clicking and dragging it. Most people prefer placing them at the bottom, but you can move them to any location that works for your video.
Step 5: Sync the Subtitles
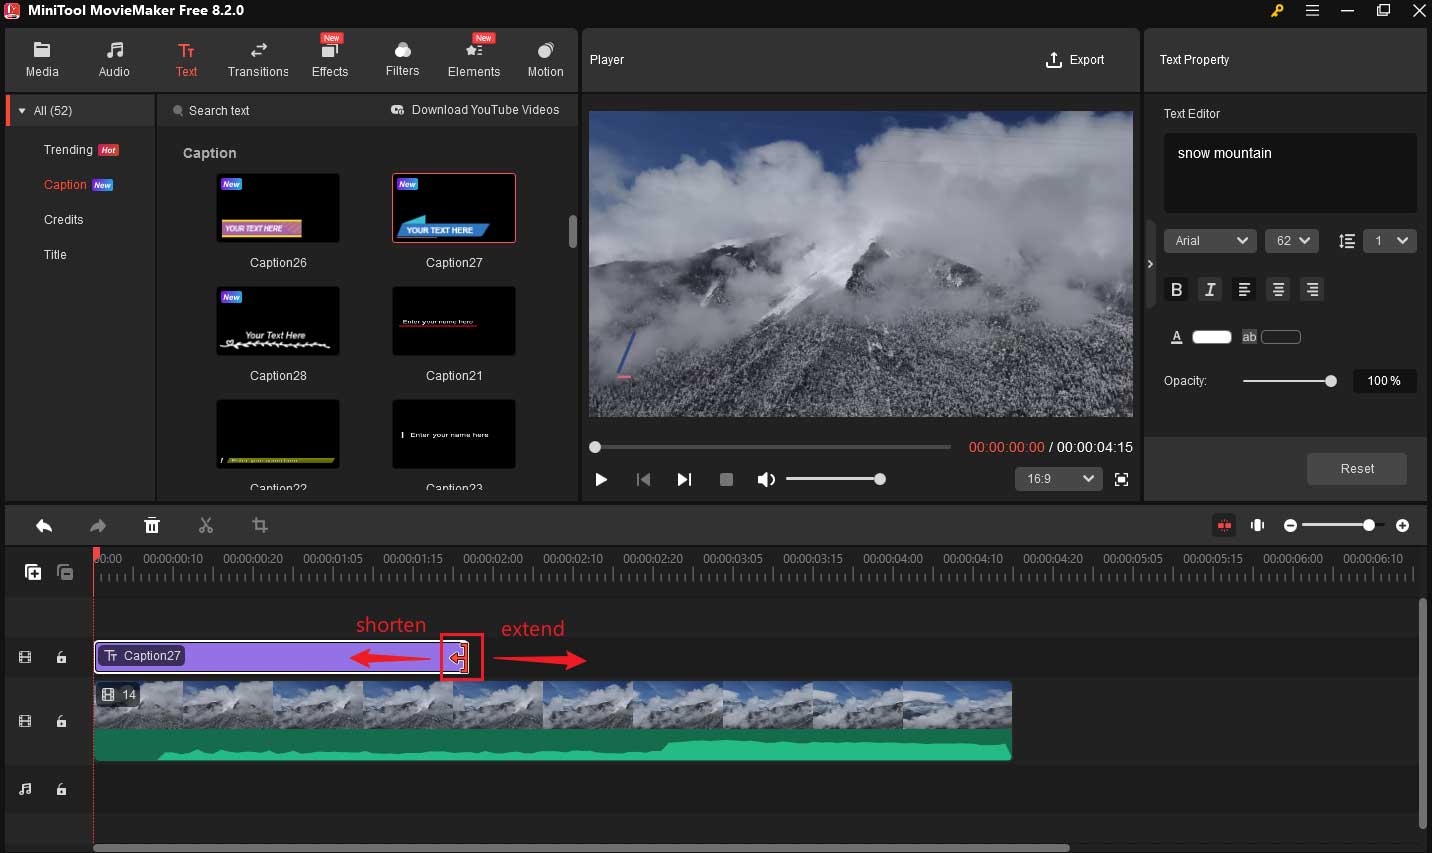
You need to make sure the subtitles appear at the right time. Click on the subtitle text box in the timeline. You can drag the edges of the text box to adjust the start and end time of the subtitle. This ensures that the subtitle appears at the correct moment in the video. If the video has multiple subtitles, repeat this process for each one to make sure they sync properly with the video’s audio and action.
Step 6: Preview and Export
After making the necessary adjustments, it’s time to preview your work. Click the Play (Space) button in the preview window to watch the video with subtitles. Check if the subtitles appear at the right time and if the text is easy to read.
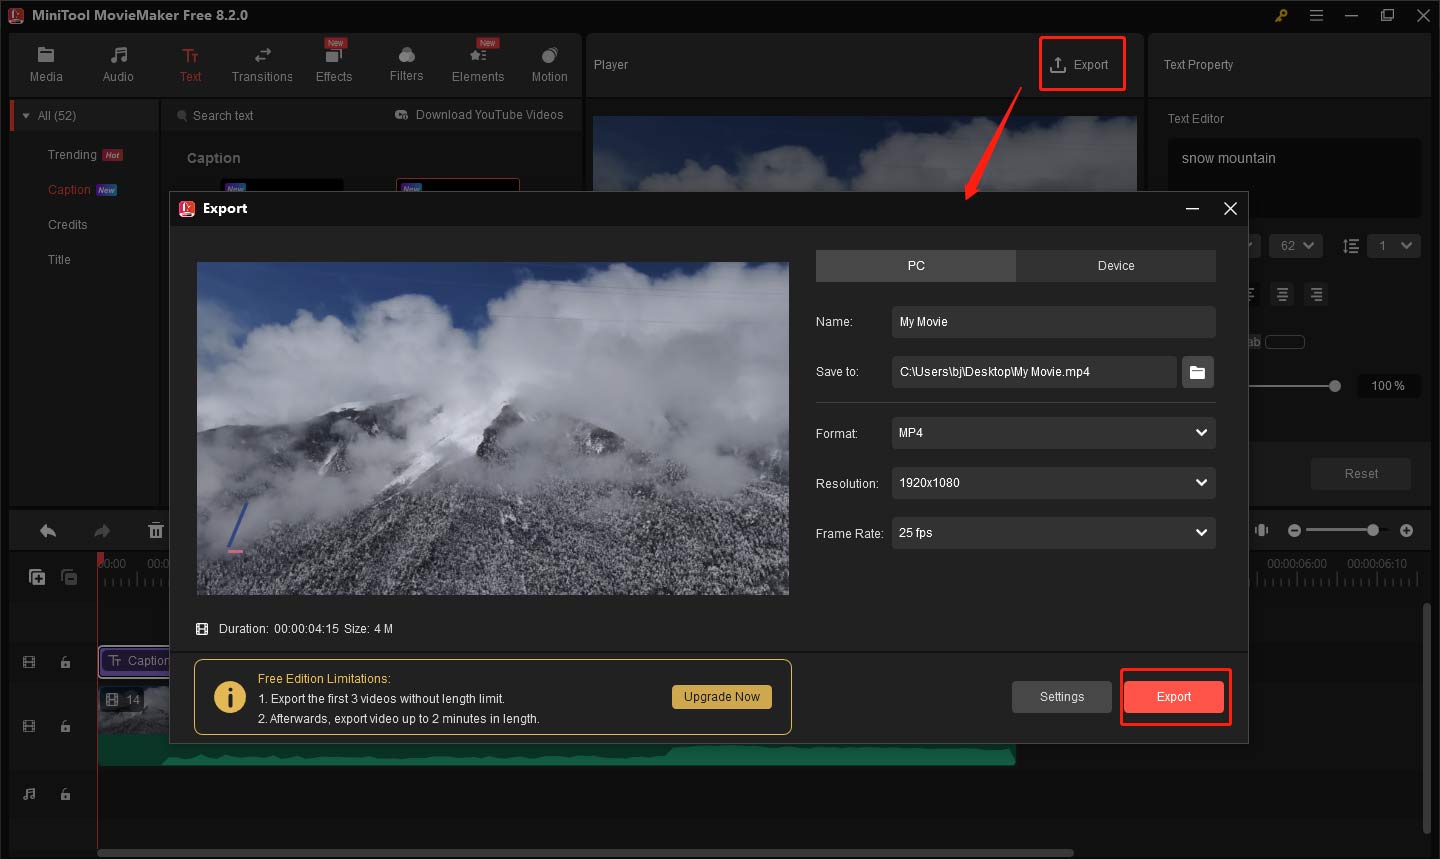
If everything looks good, you can export the video. Click on the Export button located in the upper-right corner. In the output window, give the video a name, select a file location, set the video format, resolution, and more. Finally, click Export again, and the software will process the video and save it with the added subtitles. The export process may take some time, depending on the length and size of the video. Once it’s done, your AVI video with subtitles will be ready to share.
Other features of MiniTool MovieMaker:
- It supports a wide range of video formats, including MP4, AVI, MOV, and more, giving you flexibility.
- It includes a collection of royalty-free music tracks, allowing you to add background music to your videos.
- It offers multiple transition effects to make your video flow smoothly from one scene to another.
- It supports 9 video tracks and 2 audio tracks, so you can create rich video effects.
- It has various filters that can enhance the mood and visual appeal of your videos.
- You can easily cut and trim video, removing unwanted parts without losing quality.
- You can adjust the speed of your video, speeding it up for a fast-paced effect or slowing it down for dramatic scenes.
- You can change the aspect ratio of your video to fit different screens and platforms, such as 16:9 for YouTube or 1:1 for Instagram.
- You can adjust the audio’s volume, and apply fade-in/out effects for a natural transition.
- You can create video from images by simply adding them to the timeline.
- …
MiniTool MovieMakerClick to Download100%Clean & Safe
Freemake Video Converter
Freemake Video Converter is another popular tool that supports adding subtitles to videos. It is mainly known for video conversion, but also offers tools for editing videos.
Step 1: Download and install Freemake Video Converter. Open this app on your PC and click the +Video button to import the target AVI file.
Step 2: Click on the Subtitles off option, choose Add subtitles… to browse your computer and select the subtitle file.
Step 3: After the subtitle is added, you can preview the video to check if the subtitles are correctly synchronized with the content.
Step 4: Once you’re satisfied with the subtitle settings, click the OK button and choose the desired output format for your video.
Step 5: Finally, click the Convert button to begin the process and export the AVI video with the inserted subtitles.

How to Add Subtitles to AVI Videos Online
If you prefer not to install software, online platforms allow you to add subtitles to AVI files directly through your web browser. Let’s explore two popular online tools: Clideo and HappyScribe.
Clideo
Clideo is an online tool that lets you add subtitles to AVI videos without the need to download any software. It’s simple to use and accessible on any device. Here’s how to add subtitles to AVI online using Clideo:
Step 1: Go to Clideo’s website and click the Choose File button to upload your AVI video.
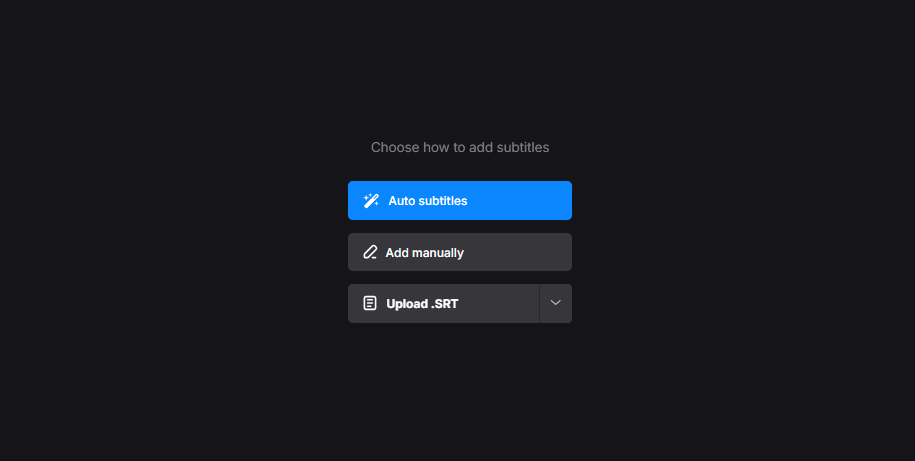
Step 2: Next, you will be given three options: Auto subtitles, Add manually, Upload .SRT. If you already have a subtitle file, you can click on Upload .SRT to upload it directly to the platform. You can also click on Auto subtitles to recognize the subtitles in the video and automatically add them to the video. Alternatively, you can manually add subtitles by clicking on the Add manually button and typing in the text for each part of the video.
Step 3: After adding your subtitles, you can adjust the font style, size, and position of your subtitles.
Step 4: Once you’ve made all the adjustments, click the Export Video button to save the video.
HappyScribe
HappyScribe is an advanced tool for transcribing audio and video content, and it also supports adding subtitles to AVI videos. Here’s how to add subtitles to AVI online using HappyScribe:
Step 1: Go to HappyScribe’s website.
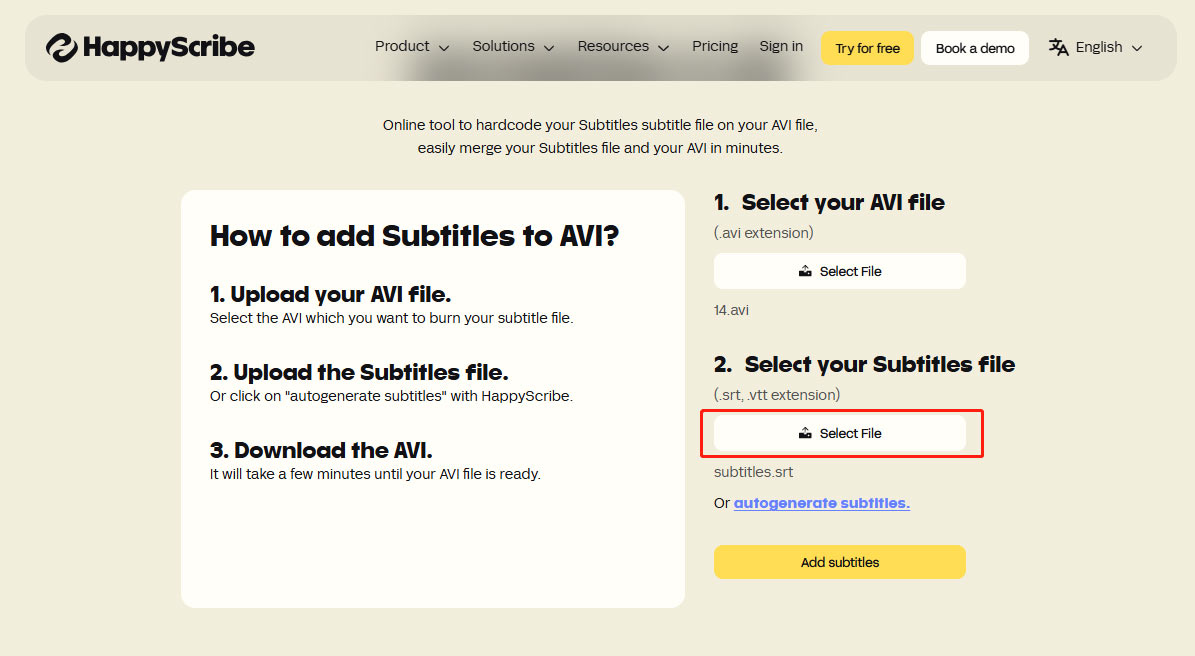
Step 2: Click Select File under Select your AVI file to upload your video files from your device.
Step 3: Click Select File under Select your Subtitles file to upload your SRT or VTT subtitle file.
Step 4: After adding your AVI and subtitles files, click the Add subtitles button to start rendering the video. Once the processing is completed, click the download symbol to save your work.
Tips for Adding Subtitles to AVI Videos
Here are some helpful tips to make sure your subtitles are effective and enhance the viewing experience.
- Timing Is Crucial: Ensure the subtitles appear at the right time and stay long enough for the viewer to read them. Subtitles should not disappear too quickly or linger for too long.
- Keep It Short and Simple: Avoid long sentences. Subtitles should be brief and concise to ensure readability.
- Choose a Readable Font: Use clear, easy-to-read fonts like Arial. Ensure that the font size is large enough for viewers to read easily.
- Contrast and Position: Make sure the subtitles are visible against the video’s background. The white text works well against the dark background. Usually, position subtitles at the bottom of the screen, but avoid covering important parts of the video.
- Proofread: Always double-check your subtitles for spelling and grammatical errors. Mistakes can distract viewers from the content.

Bottom Line
Adding subtitles to AVI videos is a great way to improve accessibility, engage a wider audience, and enhance the overall viewing experience. Whether you use software like MiniTool MovieMaker and Freemake Video Converter, or online tools like Clideo and HappyScribe, the process is easy to follow. Remember to keep your subtitles simple, clear, and well-timed to create the best experience for your audience.
Now that you know how to add subtitles to AVI files, start your creation now! If you have some problems editing your videos with MiniTool MovieMaker, please feel free to contact us via [email protected] for help. Happy editing!
About The Author

Position: Columnist
Yulia has a great passion for life. She enjoys photography and travel, and is always eager to record cherished moment through her lens. This also led to her strong interest in video editing, and she kept learning multimedia-related knowledge, hoping to bring readers better advice on images, audio, video, and related topics.
User Comments :