Do you want to use close-up shots to add greater appeal to your creation? How to add close-up shots to video? You may not be able to get the desired close-up shots when shooting. This article from MiniTool MovieMaker (one of the best free video editing software) will introduce how to achieve it during post-production.
Close-up shots are an essential technique in filmmaking and video production. They can transform the way a viewer experiences a scene by emphasizing small but powerful details. Whether you’re creating a dramatic moment, highlighting a key object, or showing the emotion of a character, close-up shots can enhance your video. In this article, I’ll explore what a close-up shot is, when to use it, and how to add close-up shots to video.
What Is a Close-Up Shot and Why Use It
A close-up shot is a type of camera shot that focuses tightly on a subject, typically a person’s face or an object, making it appear larger and more detailed. For people, this type of photo usually captures the subject from the shoulder or neck up. For objects, people tend to let them fill the entire frame.
Close-up shots are used to highlight details that might be missed in wider shots. They let the viewer connect emotionally with the subject and create a sense of intimacy or focus. Close-up shots can also build tension, convey emotions, or focus attention on important elements within the scene.
For example, a close-up shot of a character’s face can show his (or her) emotional state, such as fear, happiness, or sadness. It can also be used to emphasize a significant object, like a hand gripping a weapon or a piece of evidence that plays a key role in the story.
By narrowing the field of view, close-up shots direct the viewer’s attention to the important elements within the frame. They make the content more engaging and dynamic, and also help the audience connect with what’s happening in the video.
When to Use Close-Up Shots
Close-up shots are versatile and can be used in various situations. Below are a few scenarios where close-ups can be particularly effective:
a. To Show Emotion
Close-up shots are often used to capture the emotions of a character. By zooming in on a person’s face, you can highlight his (or her) expression and convey his (or her) feelings clearly. This is particularly useful in dramatic moments because subtle changes in a person’s expression can communicate a lot more than words alone.
b. To Highlight Key Objects
When there is an object in your video that holds significant importance, a close-up shot can be used to emphasize it. Whether it’s a crucial item to the storyline or a prop that adds depth to the scene, a close-up can draw the audience’s attention to it.
c. To Build Tension or Suspense
Close-up shots are often used in thriller and horror genres to build suspense. By focusing on a character’s eyes, a ticking clock, or an object slowly moving toward danger, a close-up shot can create tension and anticipation in the audience.
d. To Showcase Details
If you’re showcasing a product, a close-up shot can help viewers see textures, designs, and features. For example, a close-up shot of a watch’s face or the stitching on a leather jacket provides the audience with a better understanding of the quality and craftsmanship of the item.
How to Add Close-Up Shots to Video
If you prefer to edit videos on your desktop, a great option is MiniTool MovieMaker. It is a user-friendly video editing application that offers a variety of features, making it an ideal choice for both beginners and experienced editors. It is handy for creating close-up shots, you can use its crop or zoom tool to focus on specific details in your video. In addition, this app has many other features and advantages. Some of them are as follows:
- Easy-to-Use Interface: The software has an intuitive, simple interface, which allows users to quickly understand and navigate through the editing tools.
- No Watermark: Unlike many free video editing tools, MiniTool MovieMaker is a free video editor without watermark. It doesn’t add a watermark to your videos, providing a clean result.
- Drag-and-Drop Functionality: The drag-and-drop feature makes importing and arranging videos, photos, and audio easy, even for beginners.
- Wide Format Support: It supports a variety of video, audio, and image formats, ensuring compatibility with most media files.
- Built-in Transitions: MiniTool MovieMaker offers a variety of transitions that can help create smooth scene changes and professional-looking videos.
- Text Templates: You can easily add text, titles, and credits to videos, perfect for creating intro, and outro videos.
- Special Effects: The software includes multiple special effects to enhance the visual appeal of your video, including filters and visual enhancements.
- Video Speed Control: You can adjust the speed of your videos, enabling you to create slow-motion or fast-motion effects for dynamic scenes.
- Audio Editing: It allows you to add background music, adjust sound levels, or apply sound effects, providing full control over audio.
- Multi-Track Editing: It supports up to 9 video tracks and 2 audio tracks, providing you with flexible layered editing. Therefore, you can create complex project effects more easily.
- Photo Video Creation: It lets you create video from images. You can add background music, transitions, and effects to turn your photo collection into a memorable slideshow or photo video.
These features make MiniTool MovieMaker an excellent tool for anyone looking to create polished, high-quality videos. In the following, let’s see how to add close-up shots to video using MiniTool MovieMaker:
Step 1: Download and Install MiniTool MovieMaker
Before starting editing, you need to click the button below to download free video editor. Then, follow the on-screen instructions to complete the installation.
MiniTool MovieMakerClick to Download100%Clean & Safe
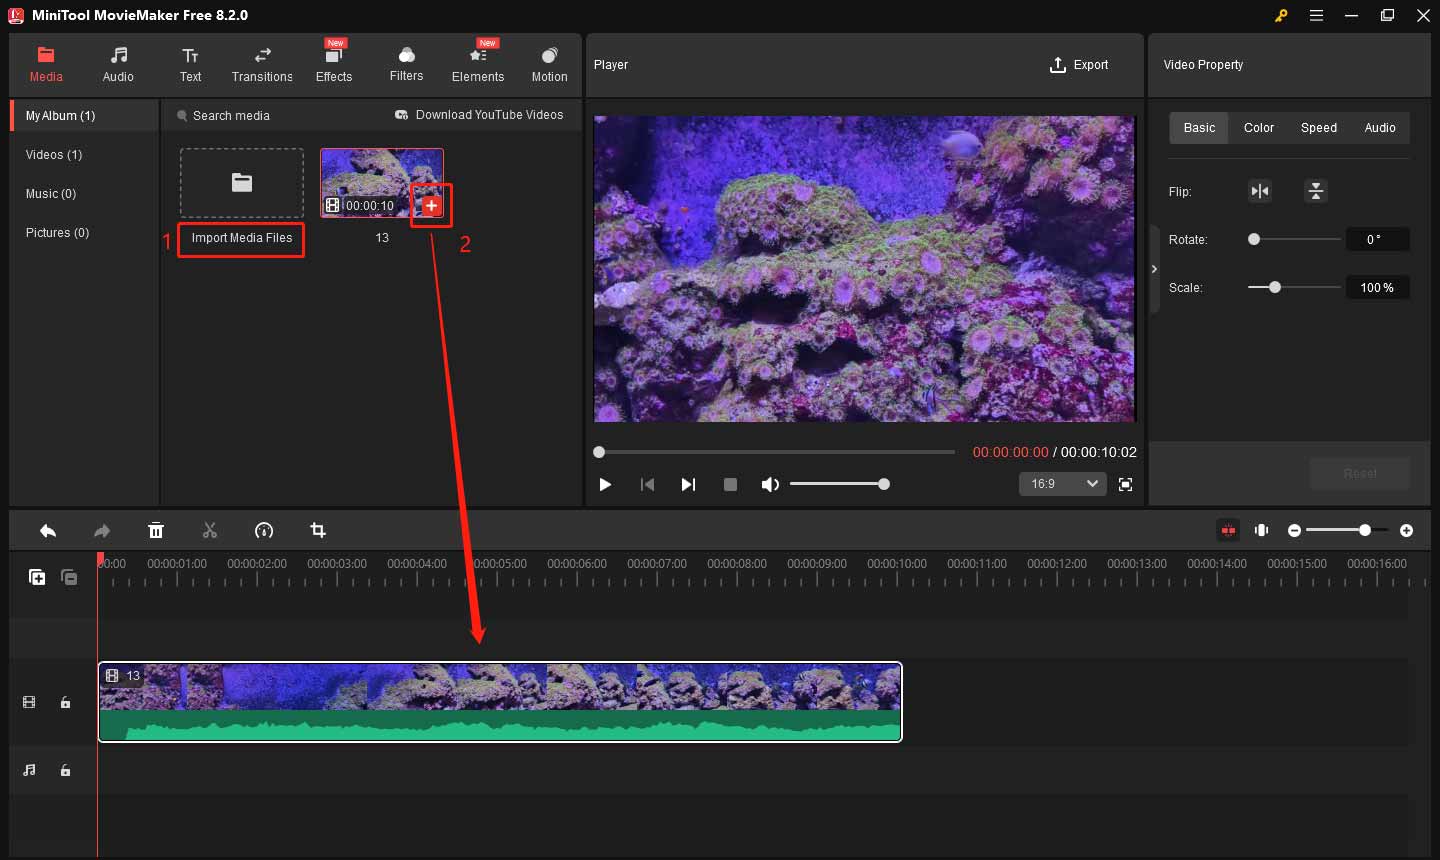
Step 2: Import Your Videos
The first step in creating your video is to import the footage you want to work with. Launch MiniTool MovieMaker and close the promotion window. Then, click the Import Media Files button located in the left corner of the interface. Browse your computer to find the video file you want to edit and select it. After importing, click the plus icon on the video or drag your video onto the timeline at the bottom of the screen.
Step 3: Split the Certain Clip
Now, decide which part of the video you want to create a close-up shot for. To do this, you can split the clip to isolate the specific section. Move the playhead (the red vertical line) to the beginning of the desired close-up section, and click the Split icon on the playhead or the timeline toolbar. Then, move the playhead to the end of the section you want to split, and click the Split icon again. You now have a separate clip that can be zoomed in to create a close-up shot.

Step 4: Create the Close-Up Shots
Once you’ve isolated the clip you want, it’s time to create the close-up shot. There are two main methods you can use in MiniTool MovieMaker to do this: the Zoom tool and the Crop tool.
Method 1: Use the Zoom Tool
One of the easiest ways to create close-ups is to zoom in on the video. Here’s how to do that:
- Double-click on the clip on the timeline that you want to zoom in.
- In the preview window, you will see small handles on the corners of the video. Click and drag the handles outwards to zoom in on the clip.
- Move the clip around in the preview window to adjust which part of the video you want to focus on.
- You can adjust the zoom until the subject or object fills the frame.
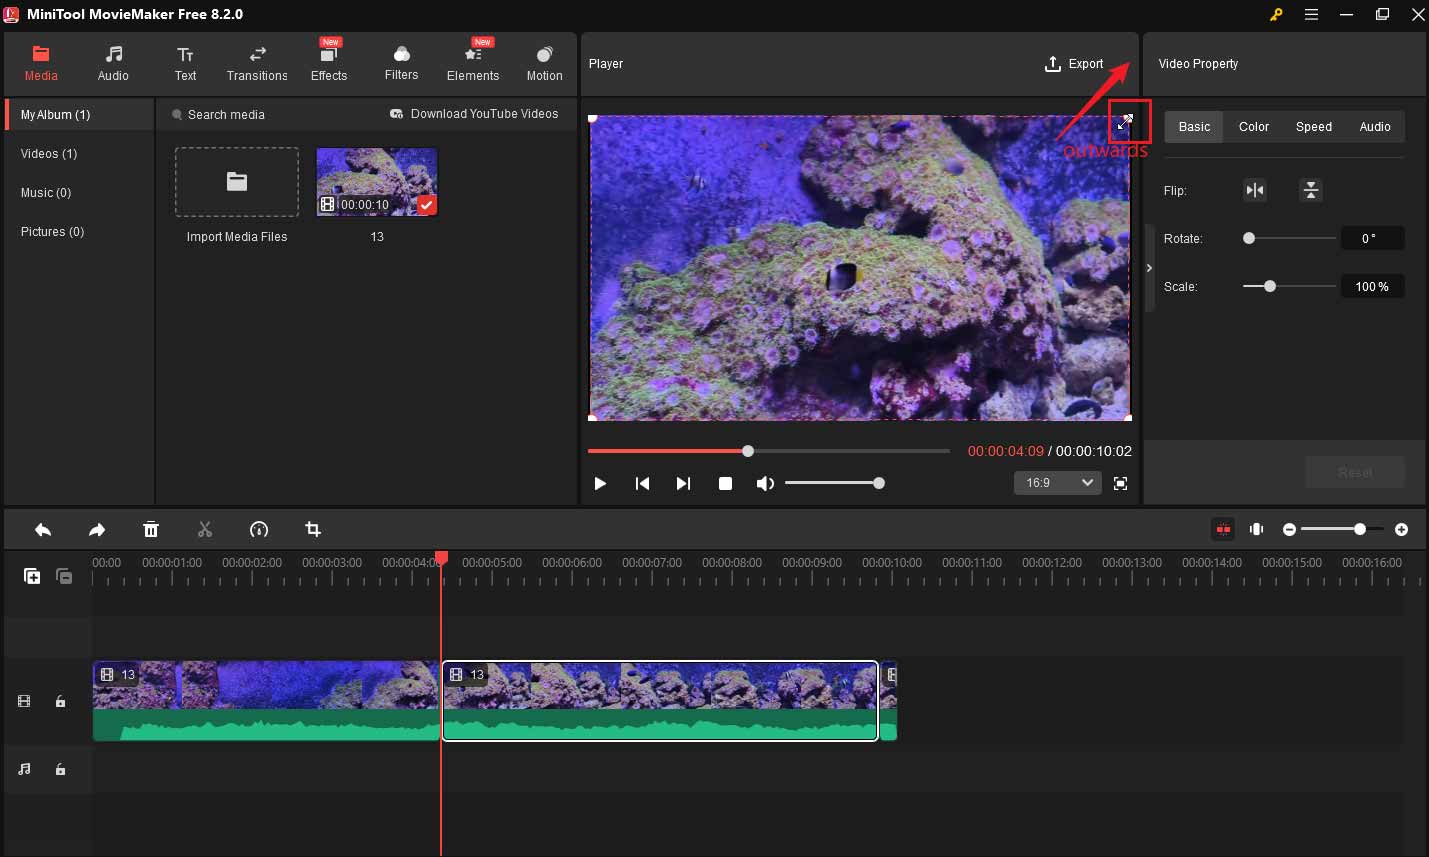
This method is quick and easy, and it allows you to adjust the zoom level directly in the preview window.
Method 2: Use the Crop Tool
Another easy way to create close-up shots is using the crop tool. This method is useful if you need to cut out parts of the video and focus on a detailed section. Here’s how to do it:
- Select the clip you want to edit on the timeline.
- Click on the Crop icon on the timeline toolbar.
- A new window will appear with a red frame on the video preview. You can drag the white handles and move the whole frame to select the area you want to keep in the close-up shot.
- Once you’re satisfied with the framing, click OK to apply the crop.
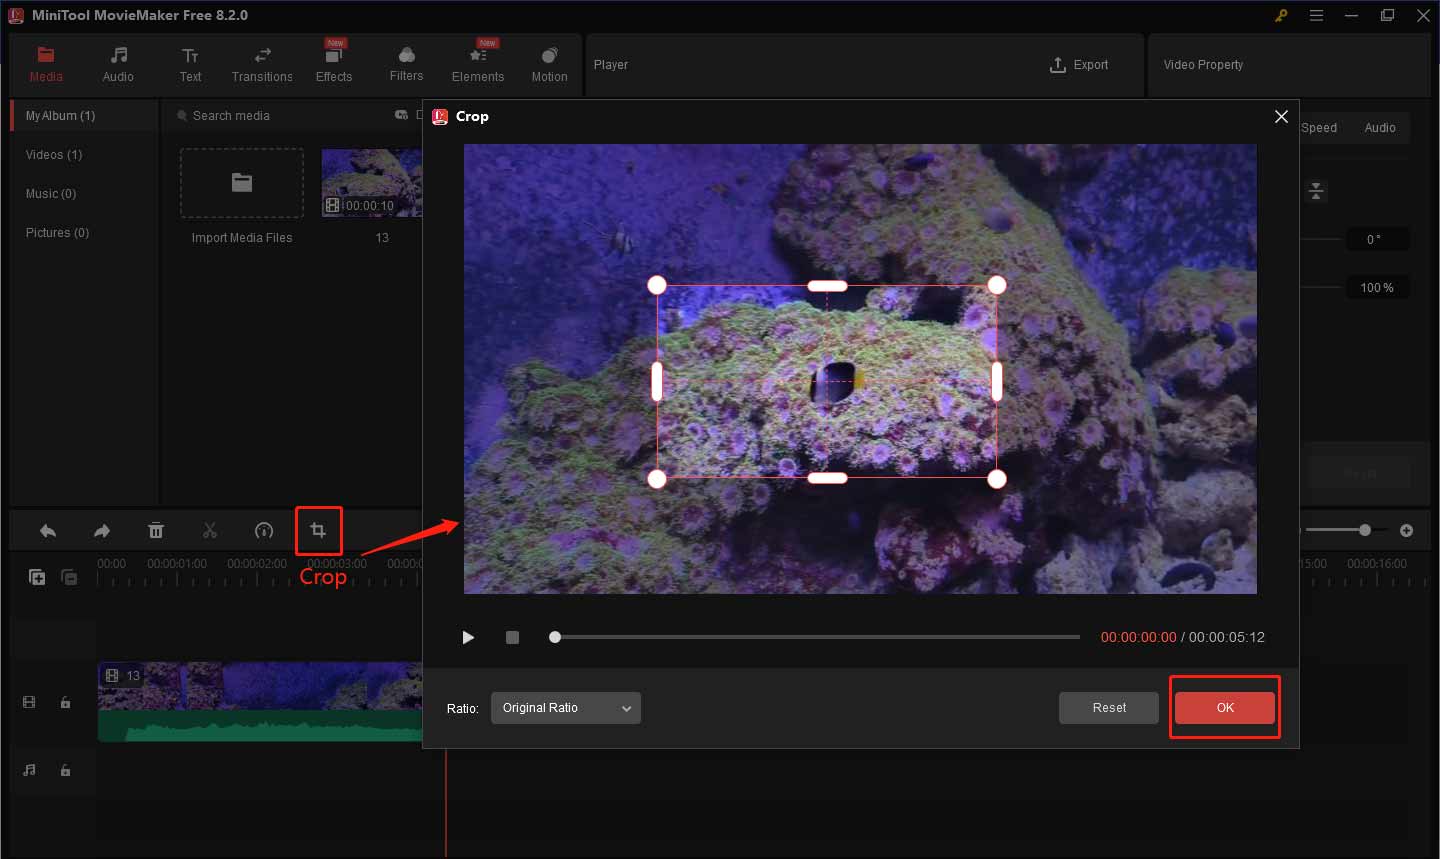
Using the crop tool is ideal when you want to isolate a specific detail or remove any distractions around it.
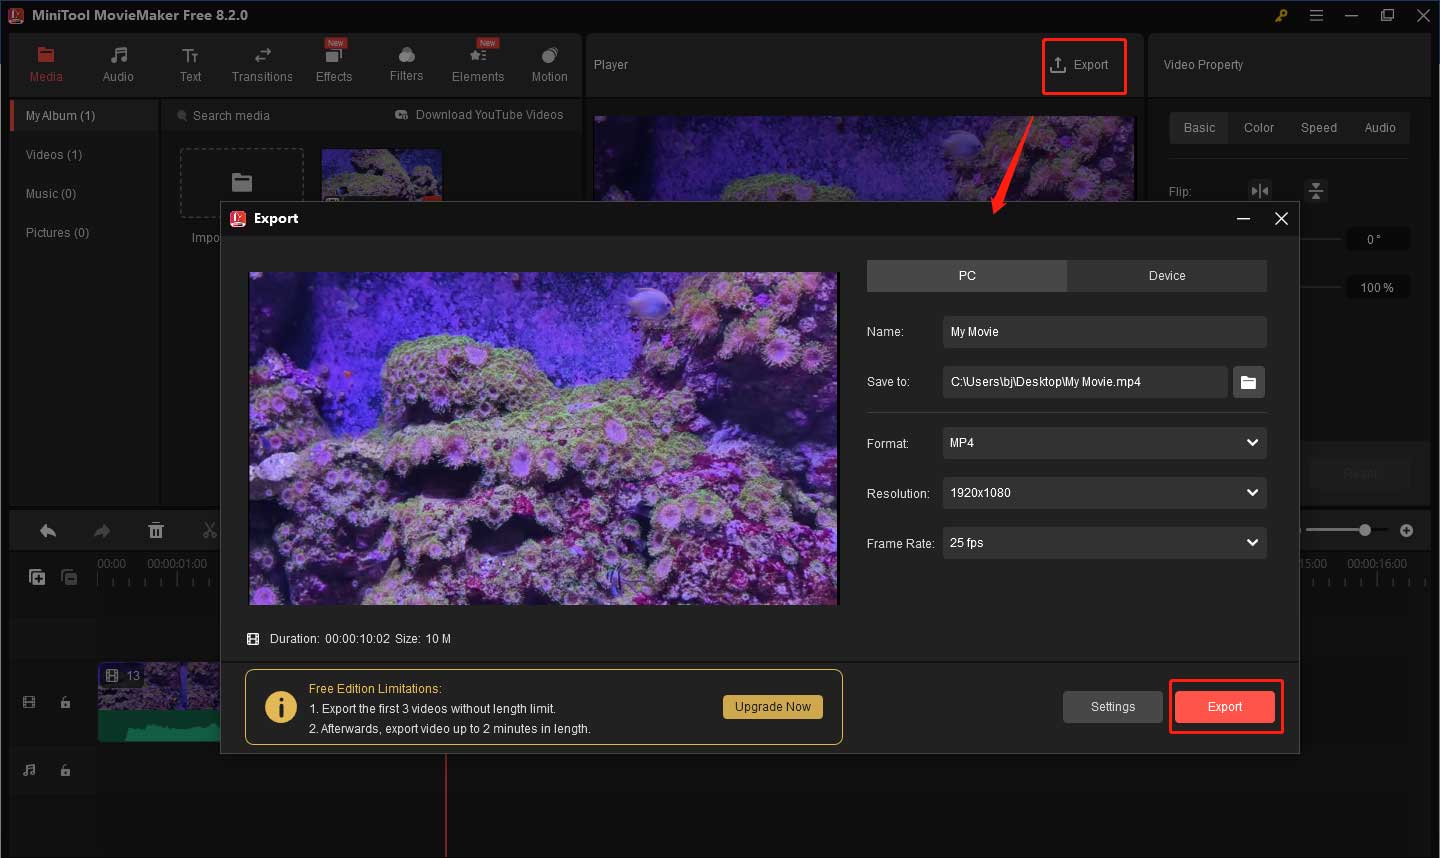
Step 5: Preview and Export
After creating your close-up shots, it’s important to preview your work. Click the Play (Space) button in the preview window to watch how your close-up shots look in the video. Make sure the close-up shot focuses on the right details. If you need to make adjustments, you can click the Undo icon on the timeline toolbar or use the keyboard shortcuts Ctrl + Z to undo the previous step.

If everything looks good, you can export your video. To do this, click on the Export button. Give the video a name, choose your preferred video format and resolution. Then, select the destination folder on your computer and click Export again to save the video. Once the export process is complete, your video will be ready to share. You’ve successfully added close-up shots to your video using MiniTool MovieMaker!
Tips for Using Close-Up Shots
Only when used properly, close-up shots can make your videos more engaging. Here are some tips for making the most of close-up shots in your videos:
Avoid Overusing Close-Up Shots
While close-ups are powerful, using them too often will reduce their impact. Use close-up shots sparingly to ensure they stand out when you need them most.
Show Emotions Clearly
One of the best ways to use close-up shots is to capture a character’s emotions. When a character is happy, sad, or surprised, a close-up shot of their face makes these feelings more intense for the audience.
Frame the Shot Well
When creating a close-up shot, make sure the center of your frame is on the character’s face or key details. Meanwhile, keep the background simple and uncluttered to avoid distracting viewers’ attention.
Match the Video Tone
Finally, consider the tone of the scene when using close-up shots. In a scary video, a close-up shot can make the audience feel scared or uneasy. In a comedy, a close-up can highlight a funny or awkward expression. The close-up should always support the mood and message of the scene.

Bottom Line
This is all about how to add close-up shots to video. I’m sure you know that close-up shots are an essential part of a video, helping you emphasize important details, convey emotions, and engage your audience. With the right approach, close-up shots will help bring your video to life and ensure that your message resonates with viewers.
Adding close-up shots to your video using MiniTool MovieMaker is simple. Whether you choose to use the zoom tool or crop tool, you can easily highlight specific parts of your video for a more professional and engaging final result. Just follow the steps outlined above, and you’ll be able to create stunning videos with close-up shots in no time! If you have some problems editing your videos with MiniTool MovieMaker, please feel free to contact us via [email protected] for help.
About The Author

Position: Columnist
Yulia has a great passion for life. She enjoys photography and travel, and is always eager to record cherished moment through her lens. This also led to her strong interest in video editing, and she kept learning multimedia-related knowledge, hoping to bring readers better advice on images, audio, video, and related topics.
User Comments :