

This post introduces two great Star Wars intro video makers, including MiniTool MovieMaker and WonderShare Filmora. It also explains how to make compelling Star Wars intro videos using the programs.
Extremely fond of the Star Wars series? Today, I will walk you through the process of creating an eye-catching Star Wars intro video using the best video editing apps, including MiniTool MovieMaker and Wondershare Filmora. Let’s dig right in!
Option 1: MiniTool MovieMaker
MiniTool MovieMaker is a convenient and feature-rich Star Wars intro video maker on Windows 11/10. It can help you produce interesting Star Wars intro videos in only a few minutes. Its user interface is easy to navigate. Additionally, it includes both basic and advanced features that are necessary for editing clips related to Star Wars.
You can use it to quickly import videos, photos, and audio files in an array of formats (e.g., MP4, VOB, MPG, WEBM, PNG, JPG, GIF, MP3, WAV, etc.). The software offers a diverse range of text templates, many of which are animated. Whether you need to insert a title card or add text overlays, you can find a suitable style within the video editor.
Furthermore, the software supports exporting high-quality video projects in multiple formats, resolutions, frame rates, and bit rates. As a video editor without watermark, the program does not add a watermark to the exported videos, ensuring clean, professional-looking results.
Here is a step-by-step guide on how to make your own Star Wars intro video using MiniTool MovieMaker.
1. Download, Install, and Open the Star Wars Intro Video Maker
Click the button below to download the software installation package, then open it to complete the installation procedure.
MiniTool MovieMakerClick to Download100%Clean & Safe
Run the convenient and powerful Star Wars intro video maker and close the pop-up window(s) to enter the editing interface.
2. Import Star Wars Gameplay Footage
Click anywhere in the dotted box that says Import Media Files, locate and choose the Star Wars gameplay snippets that you have prepared, then hit the Open button. Alternatively, drag and drop them from your computer’s local folder into the application.
3. Put Clips on the Timeline
The Star Wars gameplay clips you import will be displayed as thumbnails in the Media tab. Click the + icon on each thumbnail separately to put the imported snippets on the video track in the timeline below. Instead, just drag and drop them onto the video track.
4. Add and Edit Your Project’s Text
Click Text in the top menu and select Caption, Credits, or Title from the submenu on the left to get access to the corresponding library.
If you find and download a title template that you like best, drag and drop it onto the timeline (typically at the start of the sequence). After browsing and downloading the credits template you want, add it to the timeline (often at the end of the sequence).
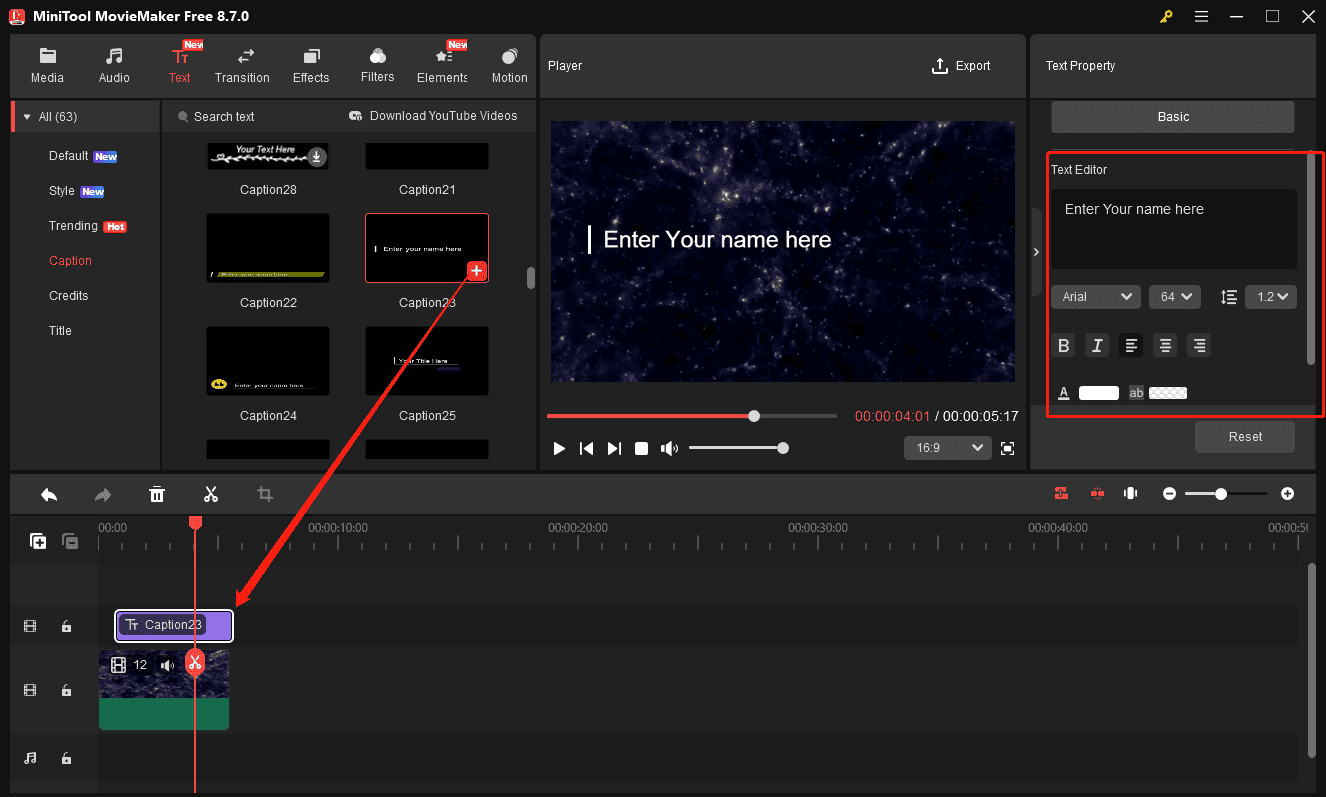
Highlight a title, end credit, or caption in the timeline. The Text Property panel will appear in the upper right corner of the interface. Make the following edits to the text accordingly:
Once you’ve found and downloaded the desired text style from the caption library, drag and drop it above the target clip on the timeline. Or, move the playhead to the point on the timeline where you want to add another downloaded text style and click the + icon on it.
- In the box underneath Text Editor, enter a text description related to your project.
- Select the appropriate font for the Star Wars intro video.
- Decide on the font size you prefer, like 44, 48, 56, 62, 64, etc.
- Select the proper line spacing.
- Make the text bold or italicized.
- Align text to the left, to the center, or to the right.
- Alter the text’s or the text background’s color.
- Determine the appropriate opacity for the text.
5. Insert Music or Sound Effects
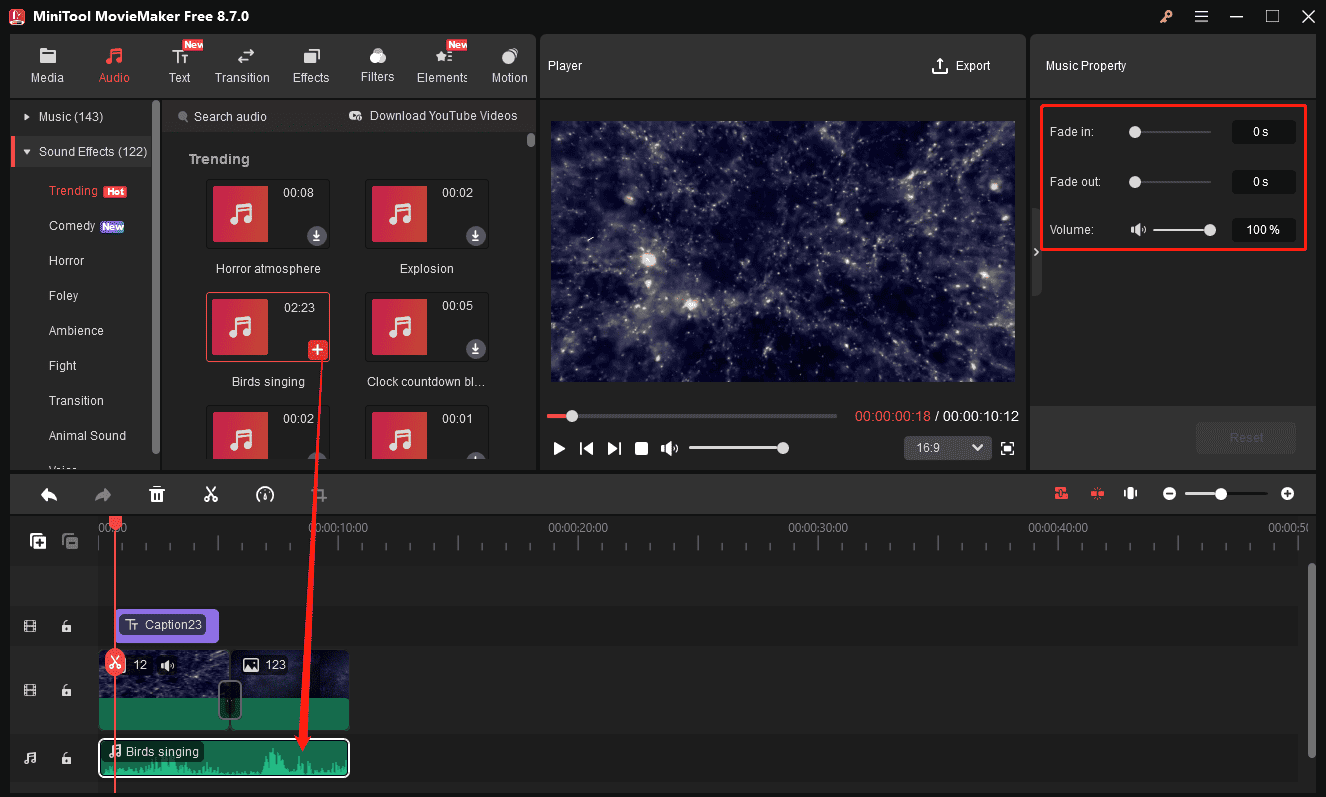
You can also access the best video editing software’s music or sound effects library by heading to Audio > Music or Sound Effects. From there, find and download music or sound effects matching the tone of your Star Wars intro video.
Move the playhead to the beginning of the sequence. Click the + icon on the downloaded music or sound effect. By doing this, it will be added to the audio track beneath the video track.
Keep the music or sound effect of the audio track selected. In the Music Property panel, you can fade in and fade out the music or the sound effect and adjust the volume by moving the respective sliders or entering the proper numbers.
You can use the trim feature to quickly reduce the length of any music or sound effect you add if it exceeds the project’s total duration. To make that happen, hover the mouse pointer over the end of the music or sound effect on the timeline until the Trim icon shows up, then drag the edge to match the project’s overall length.
6. Add Smooth Transitions Between Segments
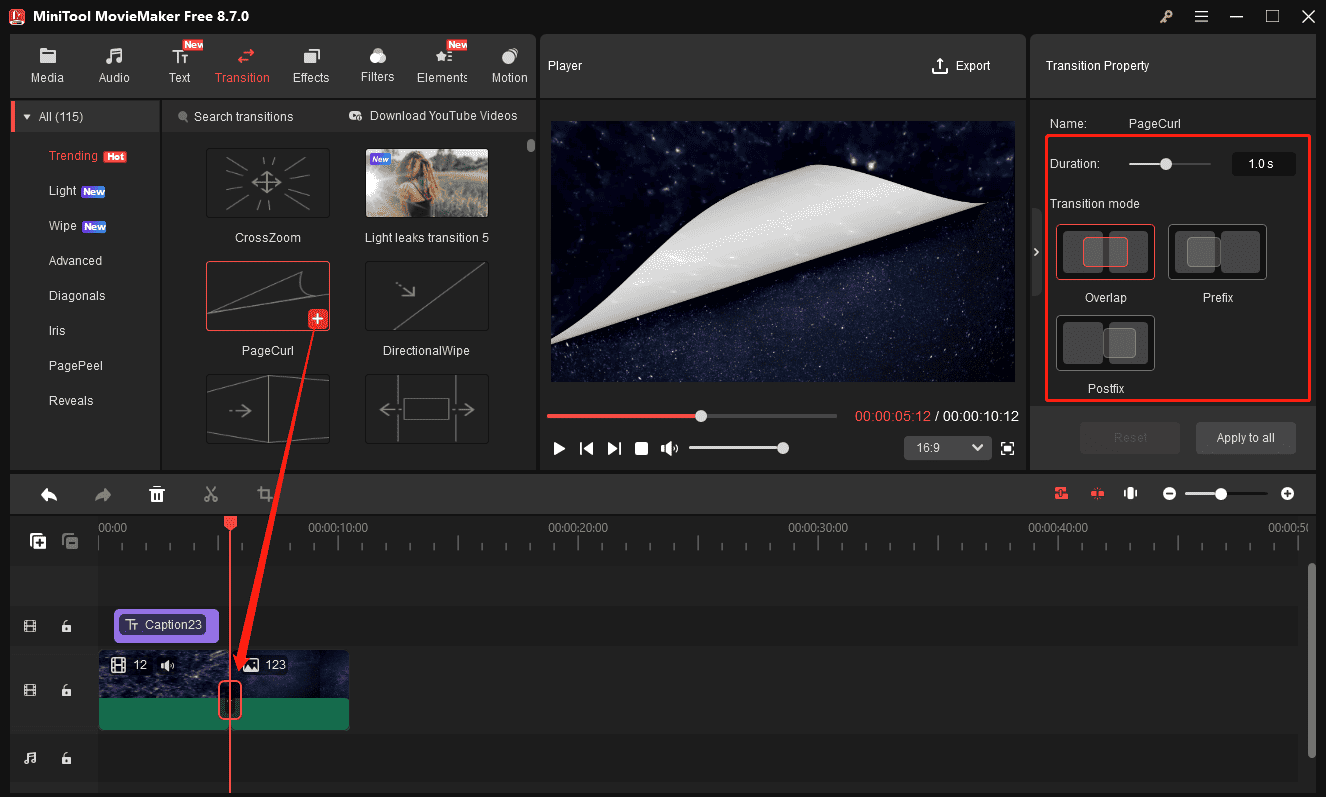
Next, click Transitions in the top menu. Search and download your desired transitions. Drag and drop them individually between the two target segments in the timeline.
Keep any transition on the timeline highlighted. In the Transition Property panel, adjust the duration and mode to your preferences.
7. Perform Further Edits
When you click on a photo or video clip in the timeline, the Image Property or Video Property panel appears in the upper right corner.
In the default Basic tab, you will be able to flip any clip by clicking the Flip Horizontal or Flip Vertical icon, or rotate it from 0° to 360° by sliding the Rotate slider to the left or the right. To make the clip look smaller or larger, slide the Scale slider to the left or the right.
Select the Color tab and change the clip’s contrast, saturation, and brightness, or apply a 3D LUT effect to it. This will enhance its visual appeal.
Switch to the Speed tab and create fast- or slow-motion for the Star Wars intro video by sliding the Speed slider. Then, check the Reverse speed option to play the video clip backward.
In the Audio tab, fade in and fade out the video’s built-in audio and modify the volume as you like.
Apart from that, you have the option to click Effects, Filters, Elements, or Motion from the top menu to explore and download the visual effects that you would like to use, which you can then overlay on top of the clips in the timeline as desired.
8. Export the Star Wars Intro Video
When you’re done creating your Star Wars intro video, you can open the export settings window by clicking the Export button in the upper right corner.
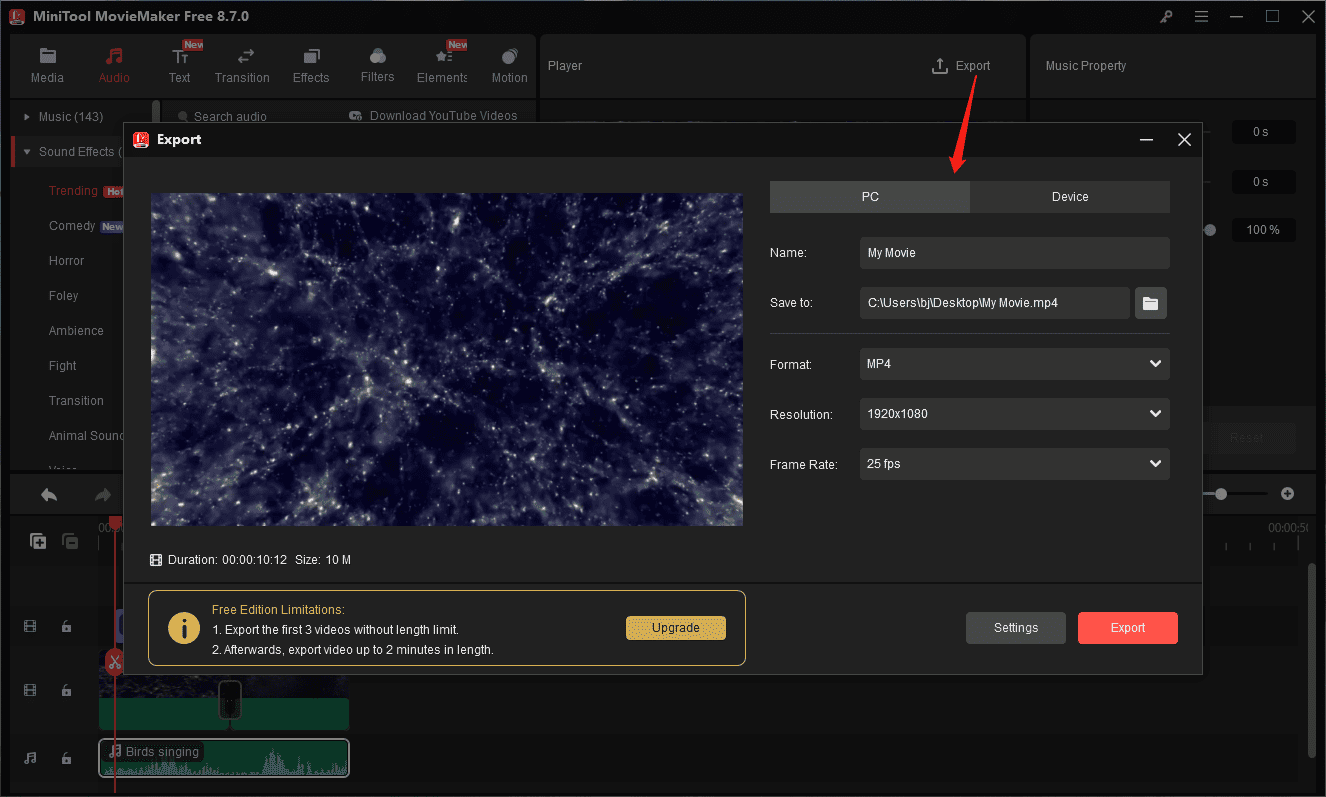
In the PC tab, name your created Star Wars intro video, specify its target folder, and customize the output format, resolution, frame rate, etc. Finally, click the Export button at the bottom to save the created Star Wars intro video to your computer.
MovieMaker by MiniTool is an inexpensive, easy-to-use video editing program. It includes a fair number of effects and gives you easy ways to join your clips, add transitions, and overlay objects and text.https://www.pcmag.com/reviews/minitool-moviemaker
Option 2: Wondershare Filmora
Wondershare Filmora is an easy-to-use Star Wars intro video maker available for Windows and Mac. Its drag-and-drop function is especially handy, enabling users to add and move titles quickly. You can enjoy a wide range of music and sound effects from its audio library.
It is worth mentioning that the software lets you split, trim, crop, flip, rotate, and scale videos or images in just a few clicks. Moreover, it can be used to easily apply transitions, effects, filters, and stickers to video materials.
Below is a quick guide on how to make your own Star Wars intro video using Wondershare Filmora.
1: Get the Star Wars Intro Video Maker
Download, install, and launch the Wondershare Filmora application on your computer.
2: Import Your Footage
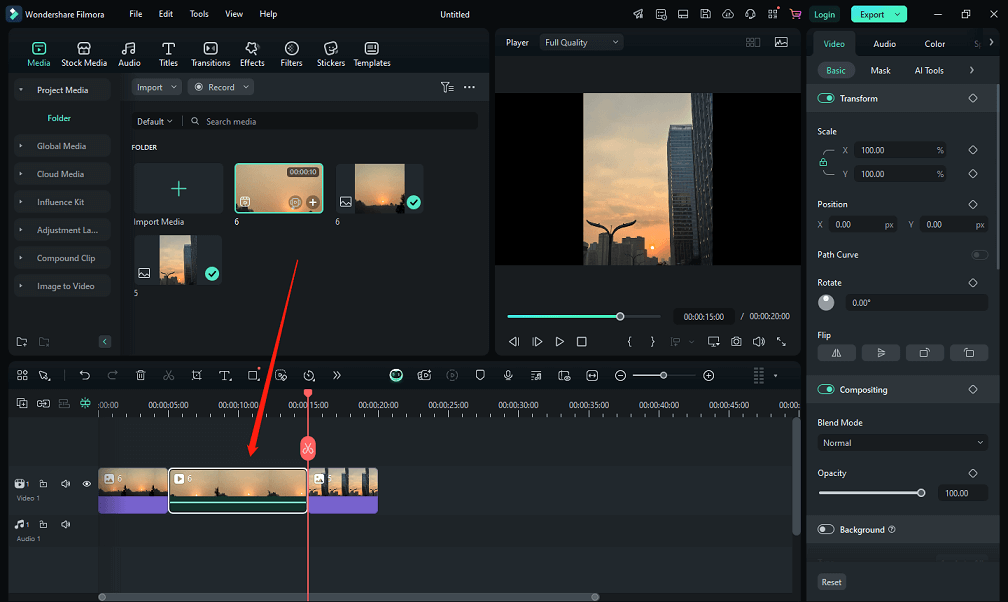
Select New Project to enter the main interface. To import the video and image files you want to use, click the Import button under the Media tab. Next, drag and drop the imported media files to the timeline in the proper order. Or, click the + icon to add them one by one.
3: Add Star Wars Titles
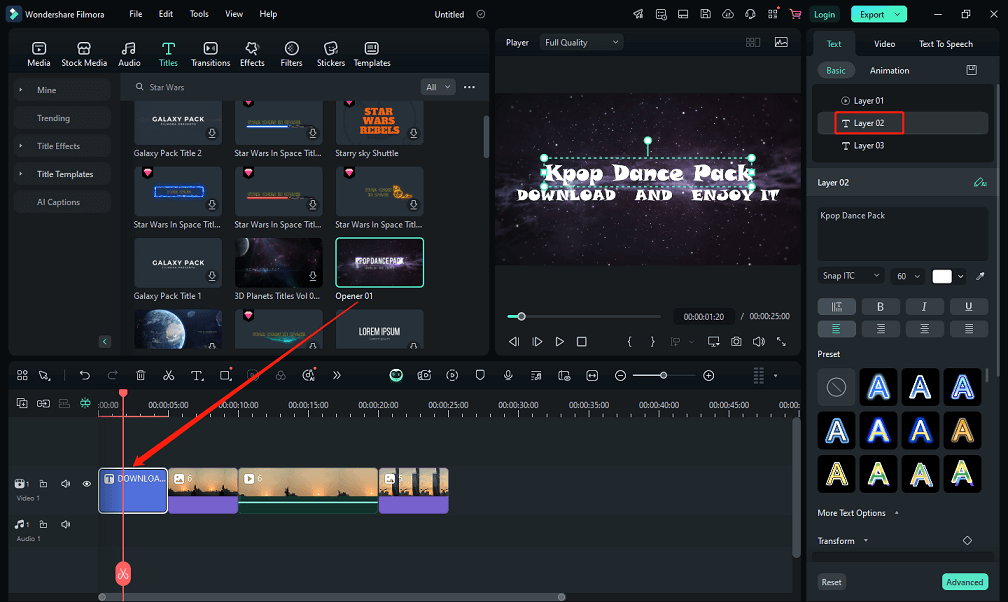
Go to the Titles tab at the top of the interface. Type “Star Wars” in the search box here and press Enter. Select and download a free available title style from the search results. Drag and drop it to the target location on the timeline.
Keep the title on the timeline selected. In the Text panel on the right, make some basic edits to the selected text layer, such as setting the font, size, alignment, and so on.
4: Add Music or Sound Effects
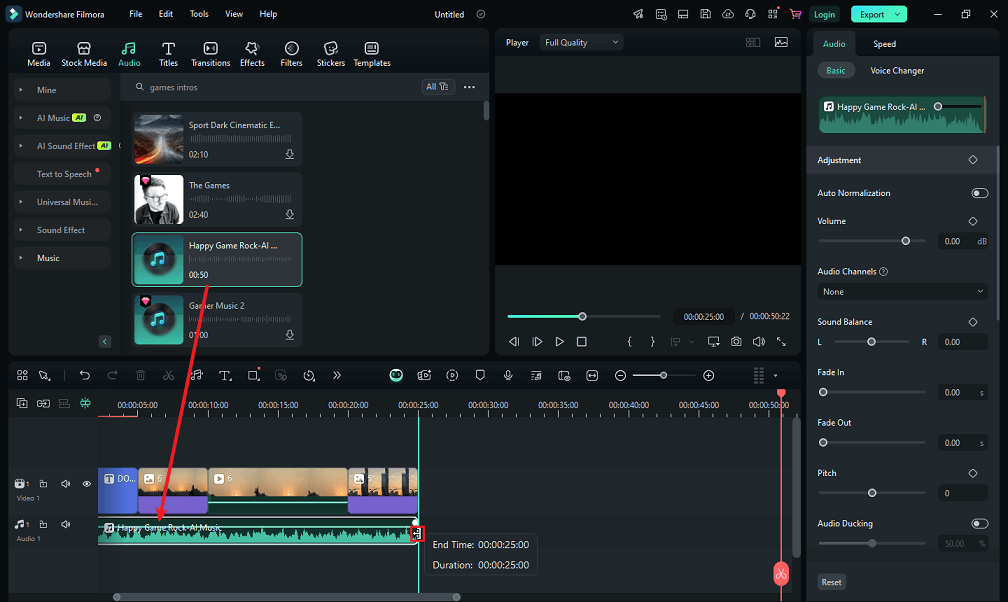
Navigate to Audio > Sound Effect or Music to search and download a free available song. Move the playhead to the start of the sequence and click the + icon on the downloaded song to add it to the timeline.
After that, hover the mouse cursor over the end of the song on the timeline until you see the Trim icon and drag the edge to match the total length of the project.
5: Apply Transitions
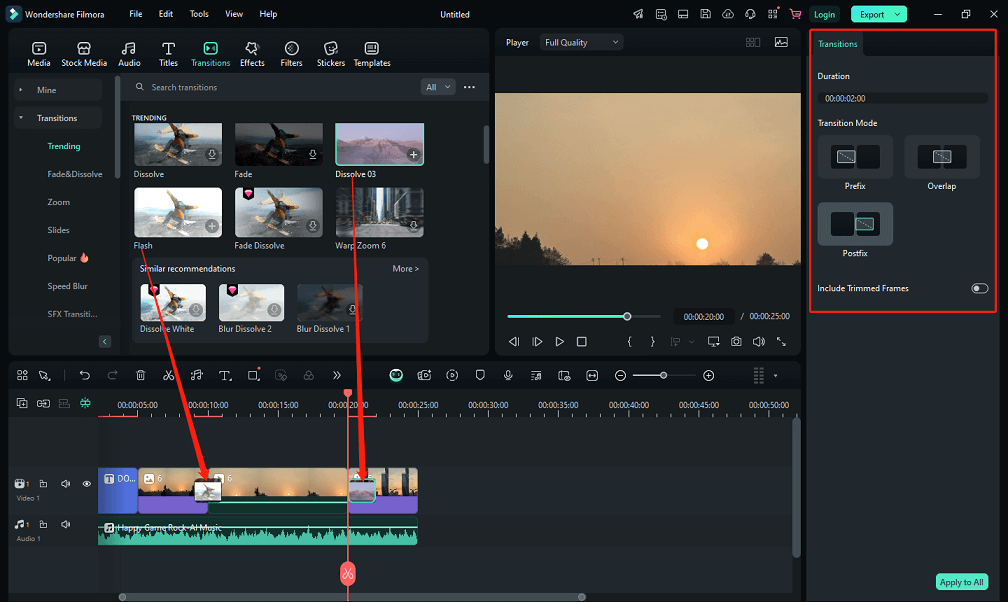
Click the Transitions tab. Find and download your desired transitions. Place them individually between the two target clips in the timeline.
Leave any transition on the timeline highlighted. In the Transitions panel on the right, change the duration and mode to your own tastes.
6: Preview and Export the Video
Click on the Play icon to preview your creation. If you’re happy with this, you can move on to the final step. Lastly, click the Export button in the top right corner to configure some output settings and save the creation to your computer.
Adding titles and text is a snap. Filmora includes more than 200 well-designed templates, some with cool animations.https://www.pcmag.com/reviews/wondershare-filmora
Conclusion
I like the user-friendly and versatile Star Wars intro video makers introduced above. Now it’s your turn! Make your own Star Wars intro video in a matter of minutes by utilizing their effective editing features.
If you have any questions when using MiniTool MovieMaker, please contact us at [email protected].
People Also Ask
About The Author

Position: Columnist
Cora is a tech writer specializing in digital media workflows, with over six years of hands-on experience in video post-production, media transcoding, and screen capture. Her writing is always clear and practical. Cora also produces in-depth software reviews for users across skill levels to help them find the right tool and enjoy video editing.
User Comments :