How to conduct social media video production for platforms like YouTube, Instagram, TikTok, Facebook, Twitter/X, and Vimeo? This article focuses on the video editing process with official or professional video editors and provides step-by-step guides with screenshots. Before that, you can also learn some tricks for making popular videos.
Attention: This tutorial is generally based on the Windows environment, especially in the sections on video editing for different social media platforms.
Nowadays, surfing social media platforms has become an indispensable part of our lives. We will always spend some time of the day streaming videos on social platforms like YouTube, Instagram, TikTok, Facebook, Twitter (now X), etc. We skip the videos we don’t like but stick to the content we prefer. The videos people like vary, but good videos have commonalities – they all generated from good social media video production.
Why Is Video Content Import for Social Media
What’s the importance of video content on social media? What’s the benefits of video content on social media? Or what are the commonalities of good videos? Let’s have a look!
1. Increasing User Engagement
First of all, high-quality videos for social media are highly engaging and tend to get more views, likes, shares, and followers compared with ordinary content. Besides, videos that enable powerful storytelling allow brands to connect with users on an emotional level, building trust and loyalty. Therefore, return on investment (ROI) will increase together with watch time and click-through rate.
2. Enhancing Brand Visibility
Good videos can enhance brand visibility, making your brand more professional and memorable. Users get to know your company from your video. How your videos behave impresses them. Thus, users’ first impression of your company depends heavily on these videos.
3. Keep Competitive
Social media platforms will never lack videos, but not all of them are excellent. If you provide good videos and keep doing so, you will stay relevant and competitive among others.

Social Media Video Production Tips
Before creating video content for social media, there are some aspects you should pay attention to:
1. Apply for Platform Requirements
Since the videos you are going to create are planned to be published on social media, they should meet the requirements of the platforms. Different platforms have different requirements. Just make sure that your videos are eligible for your target platform.
2. Mobile-Friendly
Most people stream on social media via smartphones. Therefore, your videos should be compatible with mobile screens. That is to say, your videos need to be portrait in aspect ratio (usually 9:16), no matter where you create the videos (even on desktops).
3. Legal Video Content
Ensuring the legality of your video content is an important part while focusing on the video quality. Basically, avoid content that involves politics, religion, violence, porn, gambling, drugs, offensive language and gestures, and so on. In addition, DO NOT plagiarize from others’ video content and AVOID using copyrighted music without permission.
Best Practices for Social Media Video Content
Finally, what kind of videos can attract viewers and keep them watching? Here are some video content ideas for social media.
1. Fascinating Title, Cover/Thumbnail & Opening
What makes a good video? It depends on how many views the video has gained and how much watch time its viewers contribute. To put it simply, the more people watch a video and the longer they stay on it, the better the video is. Therefore, it is of great necessity to write a fascinating video title and design an interesting thumbnail to get viewers to click through. Then, use a resonant intro to make viewers stay.
2. Make a List Without the Highlights at the Beginning
You can tell a series of stories or problem solutions in your video, but remember not to put the highlighted one in the first place. A second or third position is suggested, which will keep your audience in your video to watch the highlights.
“Why? Isn’t it true to grab my viewers’ attention in the opening of my video?” You are told to make the first seconds of your video as fascinating as possible to make your viewers stay in your video. This is right. Here, we ask you not to place the most highlighted part of your video at the start. This is also correct. Actually, you can create a video with both an attractive beginning and a meaningful second part, which is feasible without conflict.
3. Apply SEO Strategies
Many SEO (Search Engine Optimization) skills are still applicable in social media videos. For example, you can put your keywords in the title, description, subtitles/captions, and tags of the video; link the target to other videos that have a similar topic; share the video on other platforms; etc. All in all, apply your videos to the algorithm of the media platform.
4. Place CTA at a Proper Time Point
Whether your video aims at selling products or teaching people skills, a CTA (Call to Action) is a good choice to invite people to go to the next stage. You can ask them to take actions directly in your video with words or graphics or give some hints.
Another thing you should take into consideration is where you should add the CTA in your videos. It depends on the content of your video. Generally, CTA should be placed where one section transits to another or where a related topic is being discussed.
5. Good Video Content Ideas for Social Media
- Styling videos like OOTD (Outfit of the Day) (YouTube/TikTok)
- Employee spotlights (LinkedIn)
- Event highlight videos
- “A Day in the Life” videos
- Tutorial videos for cooking, makeup, gardening, etc.
- Gaming highlights
- Unboxing videos
- Specific challenge videos
- Travel guides
- …
Process for Social Media Video Production
Finally, we arrive at the procedure of video production for social media!
Part 1. Create a Plan
As it is always said, good results come from good preparation. If you want your clips to stand out among tons of videos uploaded to social platforms, you have to try your best as early as planning your content.
What do you need to do when planning your video? Let’s make it quick and simple:
- Set video marketing goals: increase brand awareness, boost sales, or just entertain people.
- Find your target audience: youth, middle-aged people, elderly customers, teachers, moms, travelers, employers, etc.
- Decide target video platform: YouTube, TikTok, Instagram, Facebook, LinkedIn, and so on.
- Choose a type of video: long or short videos, tutorials, vlogs, memo videos, product reviews, etc.
Part 2. Write a Script
After finding your target audience, you need to research their interests, pain points, as well as preferences to create a script that resonates with them. Also, your script should be compatible with the social media platform you choose.
It’s always a good idea to plan your content to ensure consistency and avoid last-minute scrambles. During script creation, you need to build content pillars based on identifying themes that align with your goal and your audience’s interests.
Be sure to make a smooth script and keep it as short as possible for people easily lose their interest during long and boring video streams. In addition, a simple script structure is easy to be modified later if necessary.
Part 3. Shoot Your Video Clips
This can be the toughest step for making video content for social media because all sources are generated during this stage. Without good materials, no one can make a good video!
Basically, prepare the right and adequate shooting video equipment for making social media content, ensuring the quality of source clips. If you decide to use a mobile phone to capture the source videos, remember to adjust the phone settings according to your needs. Additionally, take a tripod stand for assistance to prevent camera shaking.
To ensure the clarity of the target object, choose a day and a place with good natural light or manually add sufficient light. Last but not least, it’s necessary to have an external microphone or shoot in a quiet location to eliminate any sound for good sound effects.
Part 4. Edit Your Social Video
With the shooting pieces at hand, it’s time to stitch them together with some modifications like trimming unnecessary parts, adding natural transitions, providing subtitles, embedding relaxing background music, etc.
Part 5. Upload and Track Your Video Performance
When you finally get the well-edited video for your target social platform, upload it at the proper time. Then, keep a close eye on the new video and focus on its performance. You can rely on an analytics tool to help you do the data collection and analysis. Most social media platforms themselves offer built-in analysis tools.
According to the performance of the target video, conduct corresponding adjustments, including but not limited to re-editing the uploaded video, changing the style of your future videos, altering your posting schedule, and so on.
![How to Make Your Snapchat Videos Longer? [The Ultimate Guide]](https://images.minitool.com/moviemaker.minitool.com/images/uploads/2022/10/how-to-make-your-snapchat-videos-longer-thumbnail.jpg)
How to Create Video Content for Social Media
You are recommended to use high-quality and appealing photos and video clips that are relevant to your content; write clear, concise, and engaging words to grab attention; ask questions and encourage interactions to trigger people’s interests; tell anecdotes, experiences, or customer stories to build community; as well as share user-generated content (UGC) to get closer to your audience.
Next, we will introduce how to create good video content for social media one by one, mainly focusing on the video editing part.
How to Make a YouTube Video
As one of the most popular video streaming platforms, YouTube has nearly 3 billion monthly active users, who collectively watch more than one billion hours of videos every day. This makes YouTube the second-most-visited website in the world, right behind Google Search, the main service of YouTube’s mother company.
Therefore, it’s common to create a good video for YouTube in your daily life.
YouTube Video Specs
Before starting to edit the shooting video for YouTube, you’d better know the YouTube video specification requirements. In general, you are suggested to upload videos that are as close to the original high-quality source format as possible. However, you should also know that YouTube will always re-encode uploaded videos to increase playback quality.
The video and audio formatting specifications are a little bit complicated due to the various situations. Here, let’s make it simple to show you the official recommended requirements:
- Video container: MP4
- Video codec: H.264
- Audio codec: AAC-LC or Opus or Eclipsa Audio
- Resolution and aspect ratio: 1920x1080P (16:9)
- Frame rate: 60 fps, 50 fps, 48 fps, 30 fps, 25 fps, 24 fps, etc.
- Bitrate: generally, video bitrate between 5 Mbps – 100 Mbps (50 or 80 Mbps are common) and audio bitrates at 128 kbps (mono channel), 384 kbps (stereo channel), or 512 kbps (5.1 channel)
- Color space: BT.709 for SDR uploads
For more details, please refer to “YouTube recommended upload encoding settings” and “video and audio formatting specifications”.
How to Edit YouTube Videos
YouTube does have its own video editing tool. After uploading your video to the YouTube platform, you can edit it immediately.
Let’s have a look at the detailed process.
Step 1. Get Access to YouTube Video Editor
1. Sign in to YouTube Studio.
2. Select Content from the left panel.
3. Click on the thumbnail/cover or title of the target video or mouse over the title of the target video and click on the Details icon (pen) to go to the video details page.
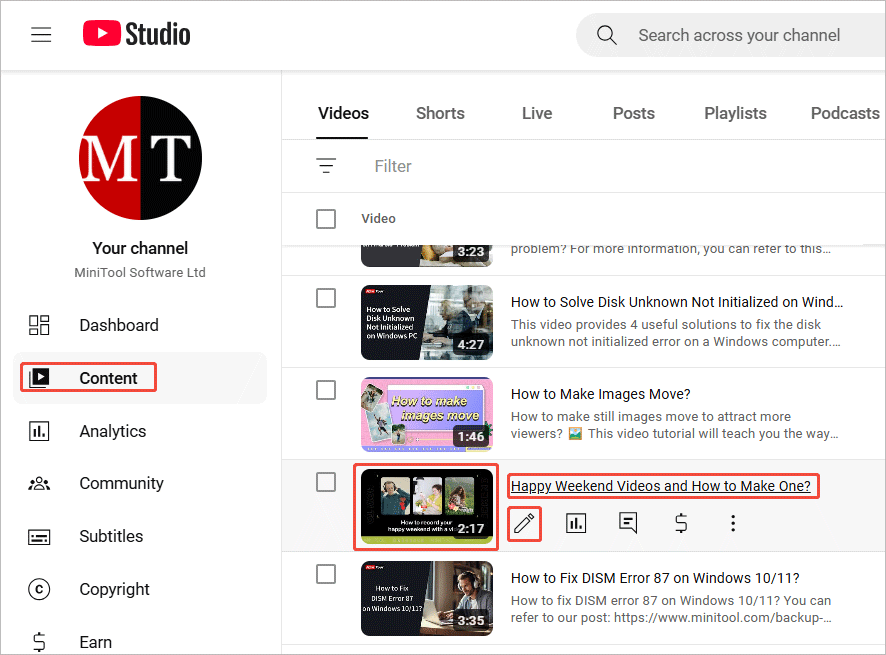
4. There, choose Editor from the left menu to display all the video editing features on YouTube.
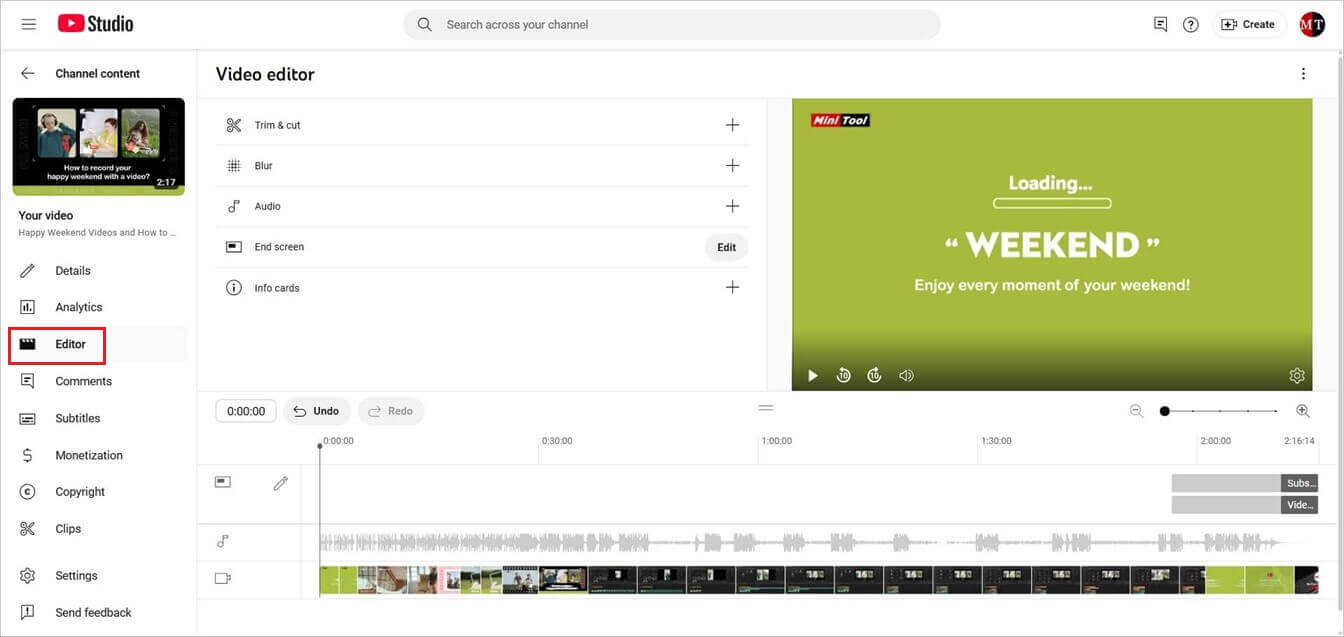
Step 2. Edit the Target YouTube Video
# Trim and Cut
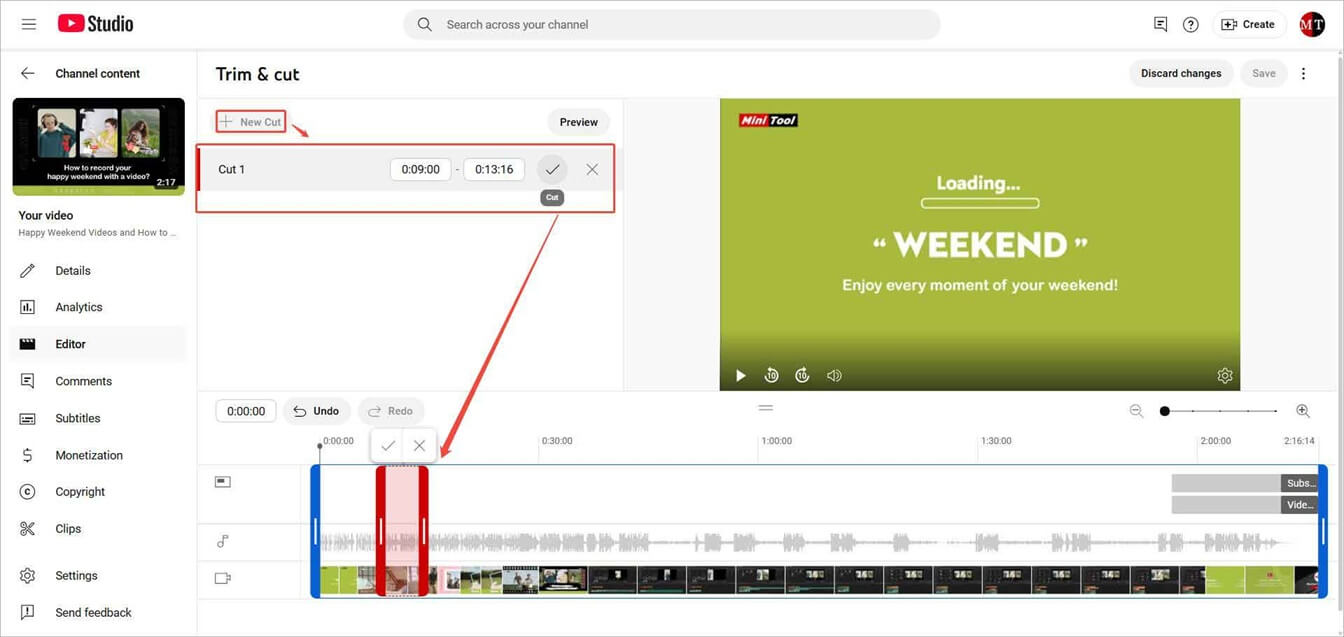
If there are redundant parts in your video, you can remove them with the Trim & cut feature.
1. Click on the Trim & cut option on the video editor page.
2. Then, you will see a blue frame appearing on the timeline. According to the unwanted part’s location, you can pull either end of the target video inwards to trim and cut it. In this way, you can remove the start or end part of the video.
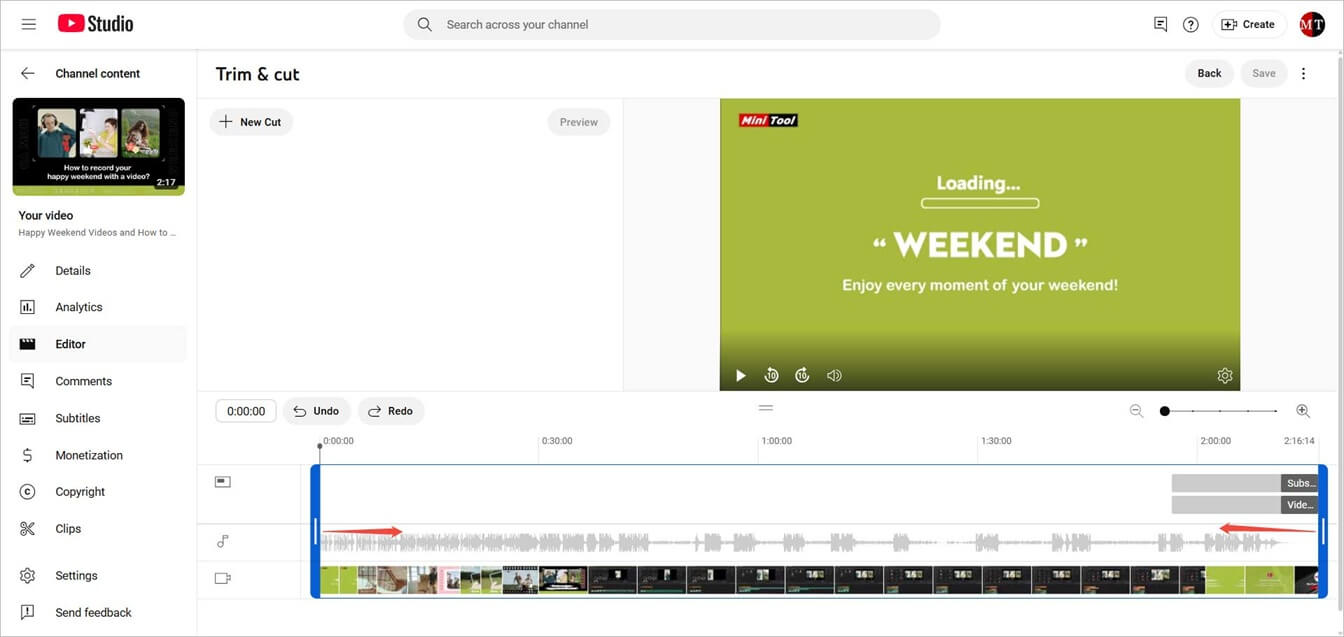
Or you can click the New Cut option, specify the new cut period (period plan to remove), and click the Cut icon (hook) to confirm. Thus, you are able to remove the unnecessary part located in the middle of the video.
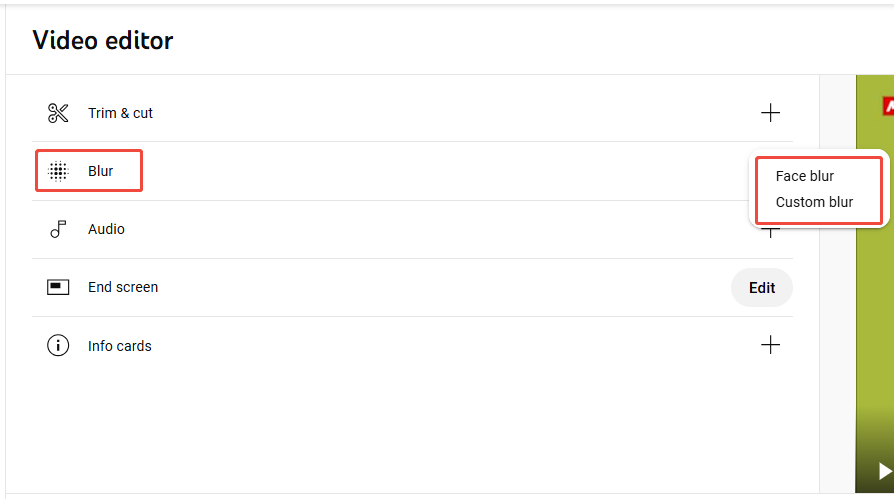
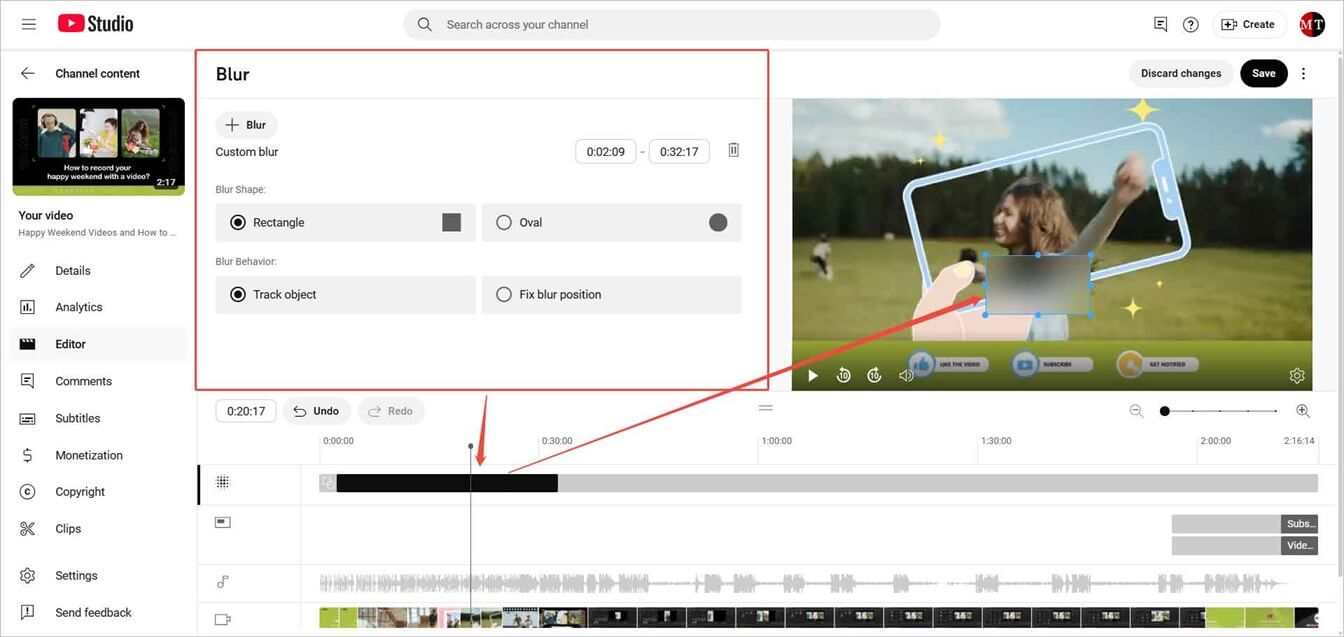
# Blur
If there is something you’d like to hide in your video like personal info or someone’s face, you can take advantage of the blur feature.
Click the Blur option from the upper menu and choose between Face blur and Custom blur.
If you select the Face blur option, it will automatically detect faces in your video. Then, you can pick up the faces you want to blur.
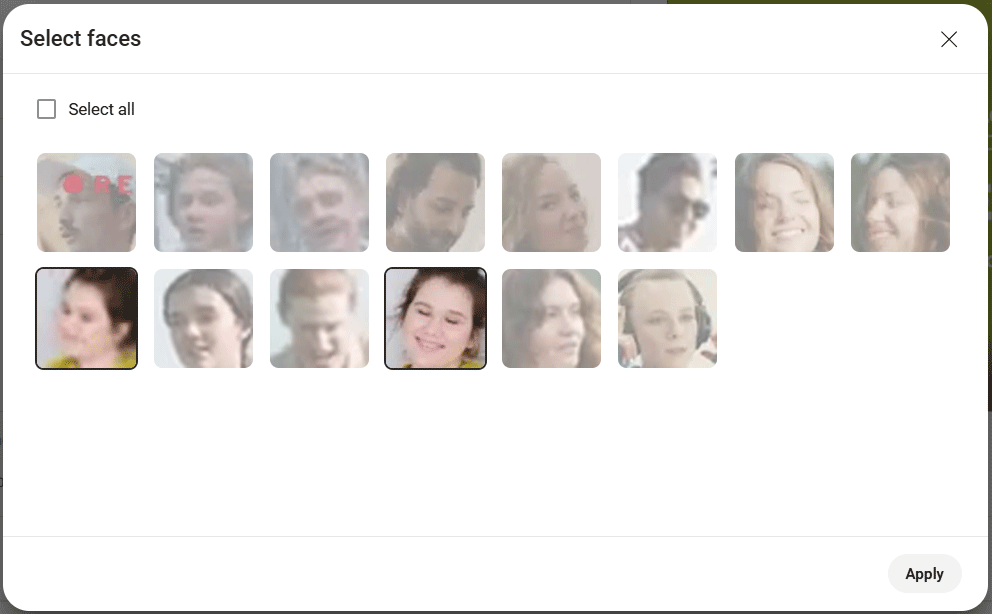
However, automatic detection does not always satisfy your needs. As compensation, you can manually adjust the size and screen location of the blur shape in the preview window. Besides, you can change the duration of the blur effect. Put your mouse on the target blur block on the timeline. When it turns into a double-headed arrow, drag it leftwards or rightwards.
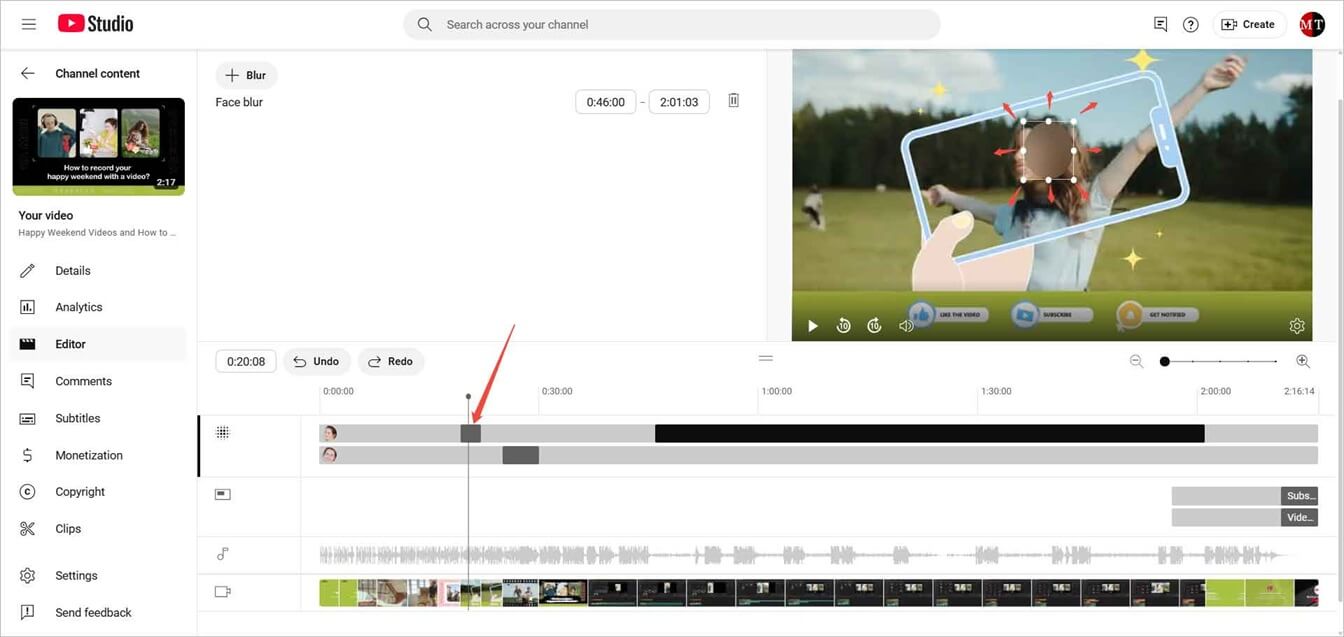
If you choose the Custom blur option, you need to manually set the period, blur shape (rectangle or oval), and blur behavior (track object or fix blur position). Of course, you are able to resize, reposition, and change the duration of the blur shape within the preview window and timeline.
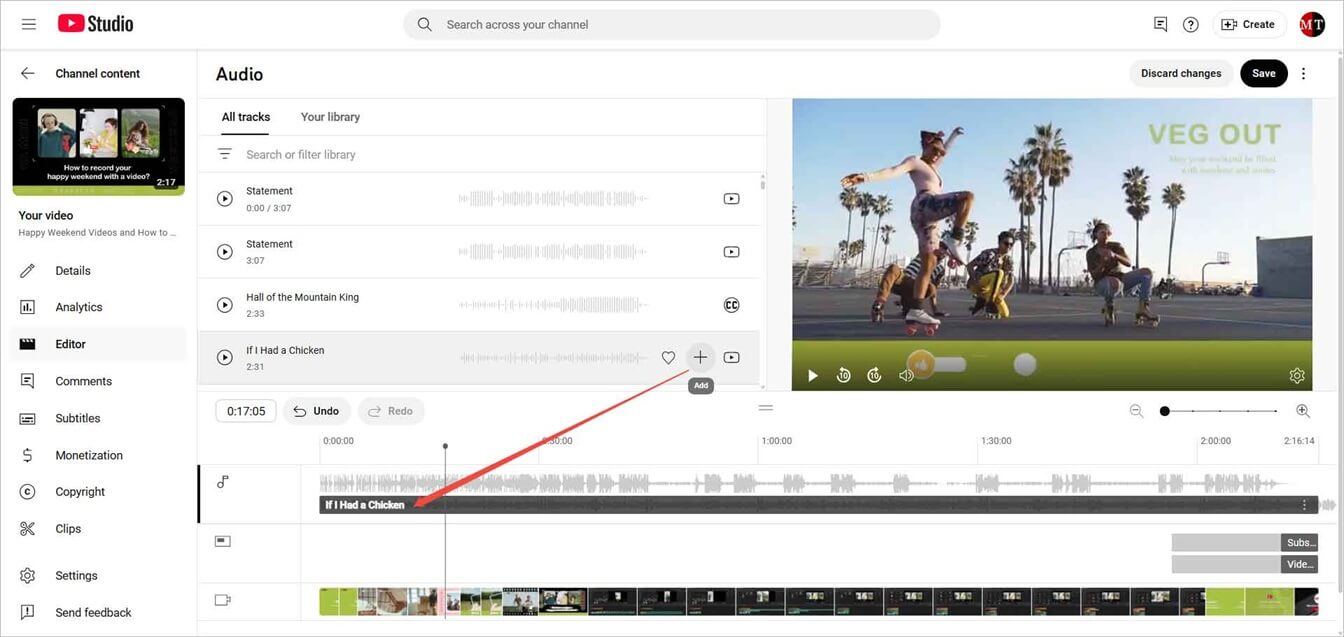
Add Audio
If you find your video a little bit boring, it’s a good idea to add some background music to it. In the YouTube video editor, click the Audio option, find a proper track in the YouTube audio library, and click the Add icon (plus) to put it into your video. You can adjust the period for when to enable the background music on the timeline.
Step 3. Save the Changes
Finally, you can save all the edits you have made to your video. It will take effect immediately.
That’s all the video editing features provided by the YouTube video editor, useful but few. They can’t satisfy most YouTubers’ needs. Besides, you can’t access the official editor before or during uploading. Therefore, many people choose to rely on a third-party YouTube video editor for their video editing.
Best Software to Edit YouTube Videos
MiniTool MovieMaker is a professional but easy-to-use video editor without watermark that offers all common video editing features. You can use it for free to create stunning YouTube videos for your audience.
Here’s a brief list of its functions:
- Combine video clips, photos, and audio clips into a video.
- Split or trim the video/audio.
- Crop the video or photo.
- Change video aspect ratio.
- Add background music, subtitles/captions, transitions, filters, motions, 3D LUT, or animated stickers to your video.
- Multi-track editing: add video overlay to create picture-in-picture (PiP) videos or split-screen videos.
- Flip or rotate the video or photo.
- Fade in or fade out the audio or change its volume.
- Change the speed of the video or audio.
- Reverse the video/audio.
- Scale the video/photo.
- Adjust the contrast, saturation, and brightness of the video/photo.
Next, let’s take making an overlay video for example to see the detailed steps for creating a YouTube video with MiniTool MovieMaker.
MiniTool MovieMakerClick to Download100%Clean & Safe
Step 1. Get MiniTool MovieMaker
Download, install, and launch this free video editor on your Windows PC.
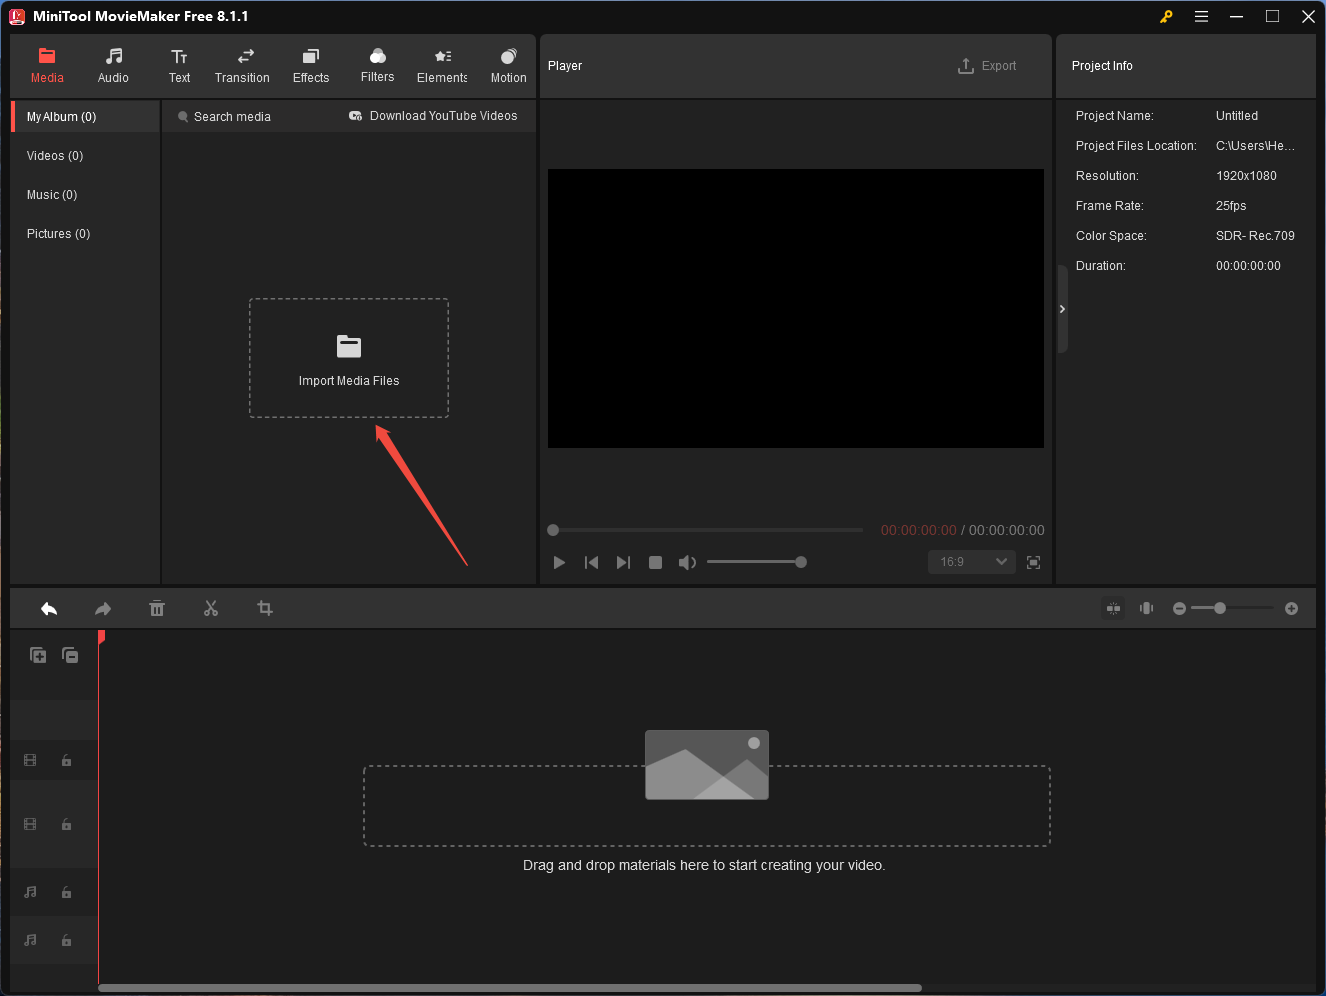
Step 2. Add Source Files
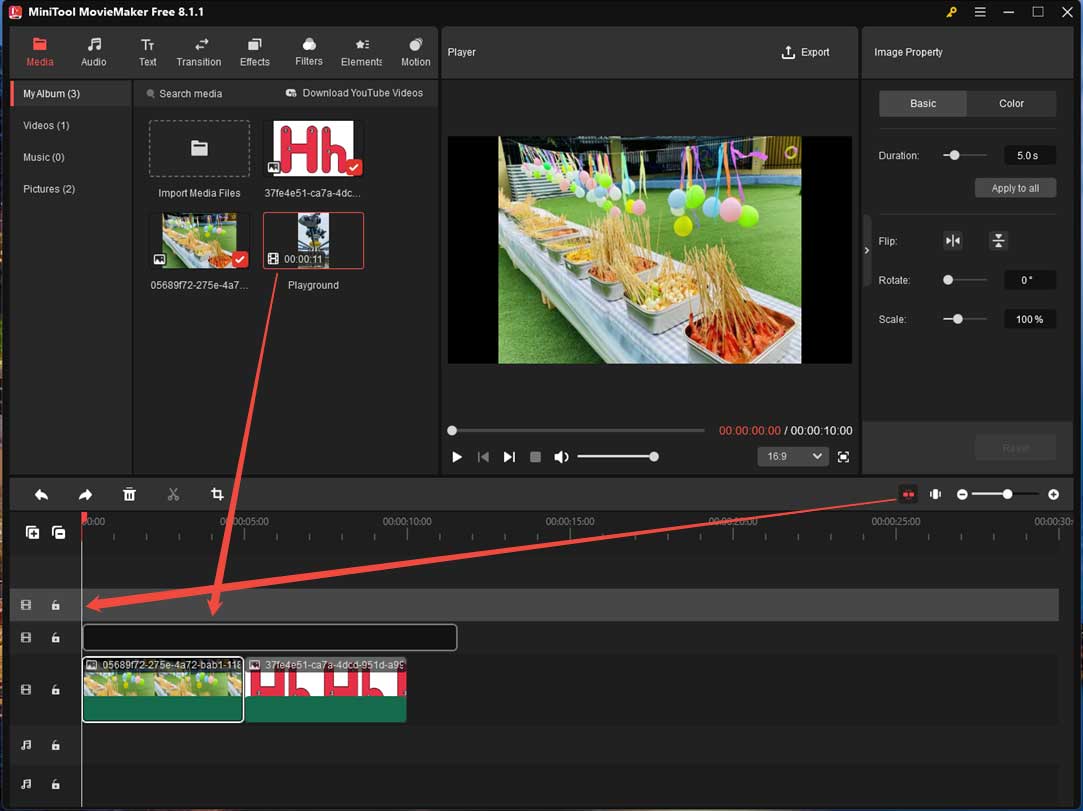
Click the Import Media Files option to upload your source video clips, photos, or audio files. Or directly drag and drop them into the Import Media Files area.
Then, add these files onto the timeline by clicking the plus icon on them or directly dragging and dropping them onto the track. At the same time, make sure the video aspect ratio is set to YouTube’s preferred 16:9.
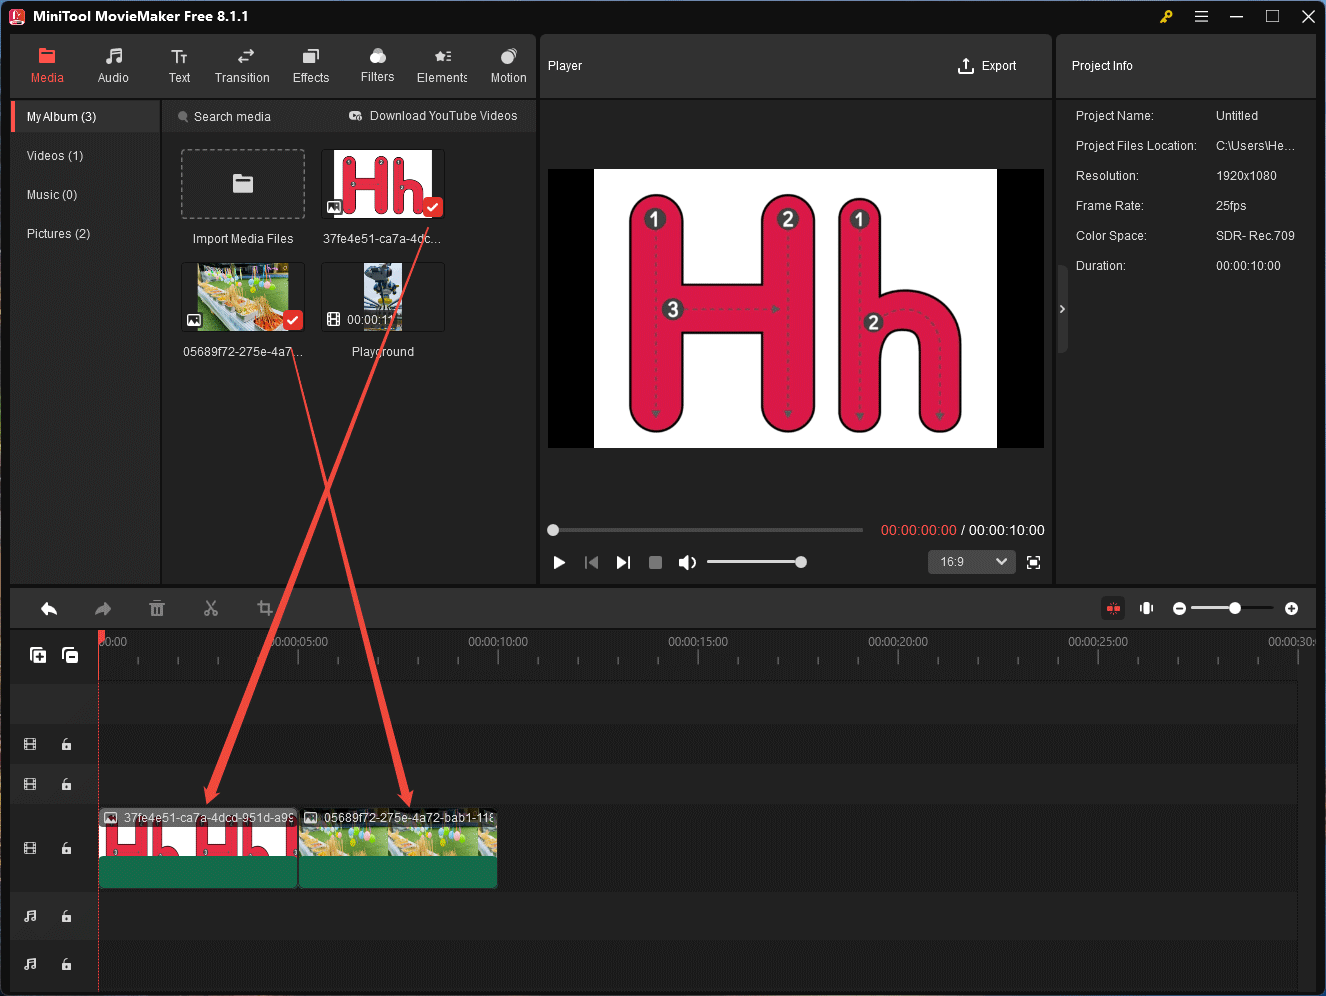
Step 3. Add and Edit Overlay
1. Drag and drop the target overlay video or photo onto the timeline track, right above the target background clip. You are recommended to enable the Timeline Snap feature to help you align two clips automatically.
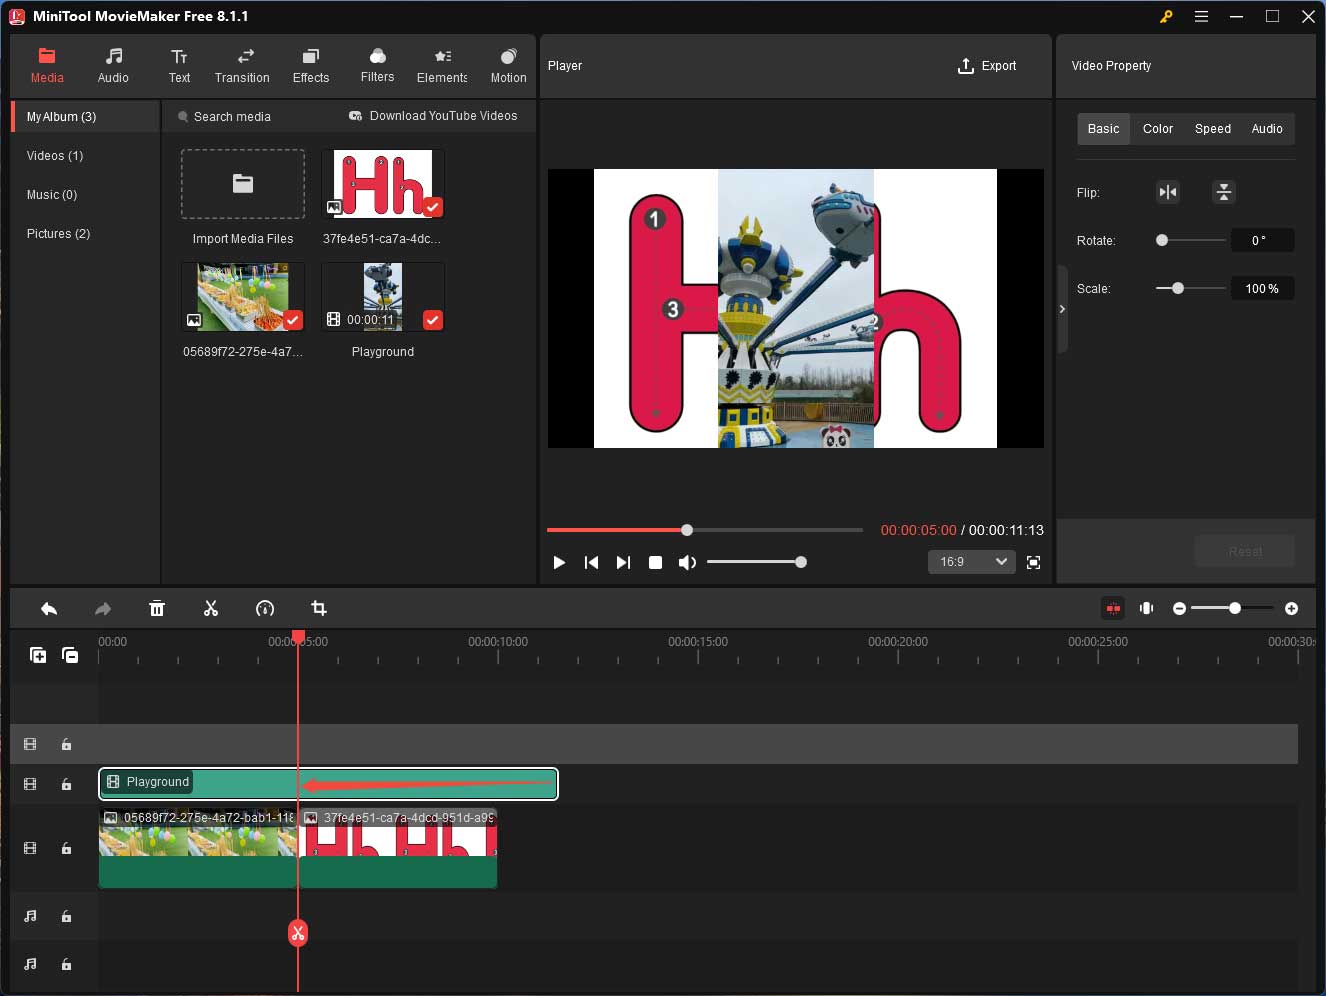
2. Trim the overlay video length to make it align with the background clip. Just put your mouse at the edge of the overlay video and drag it inwards when the mouse cursor turns into an arrow.
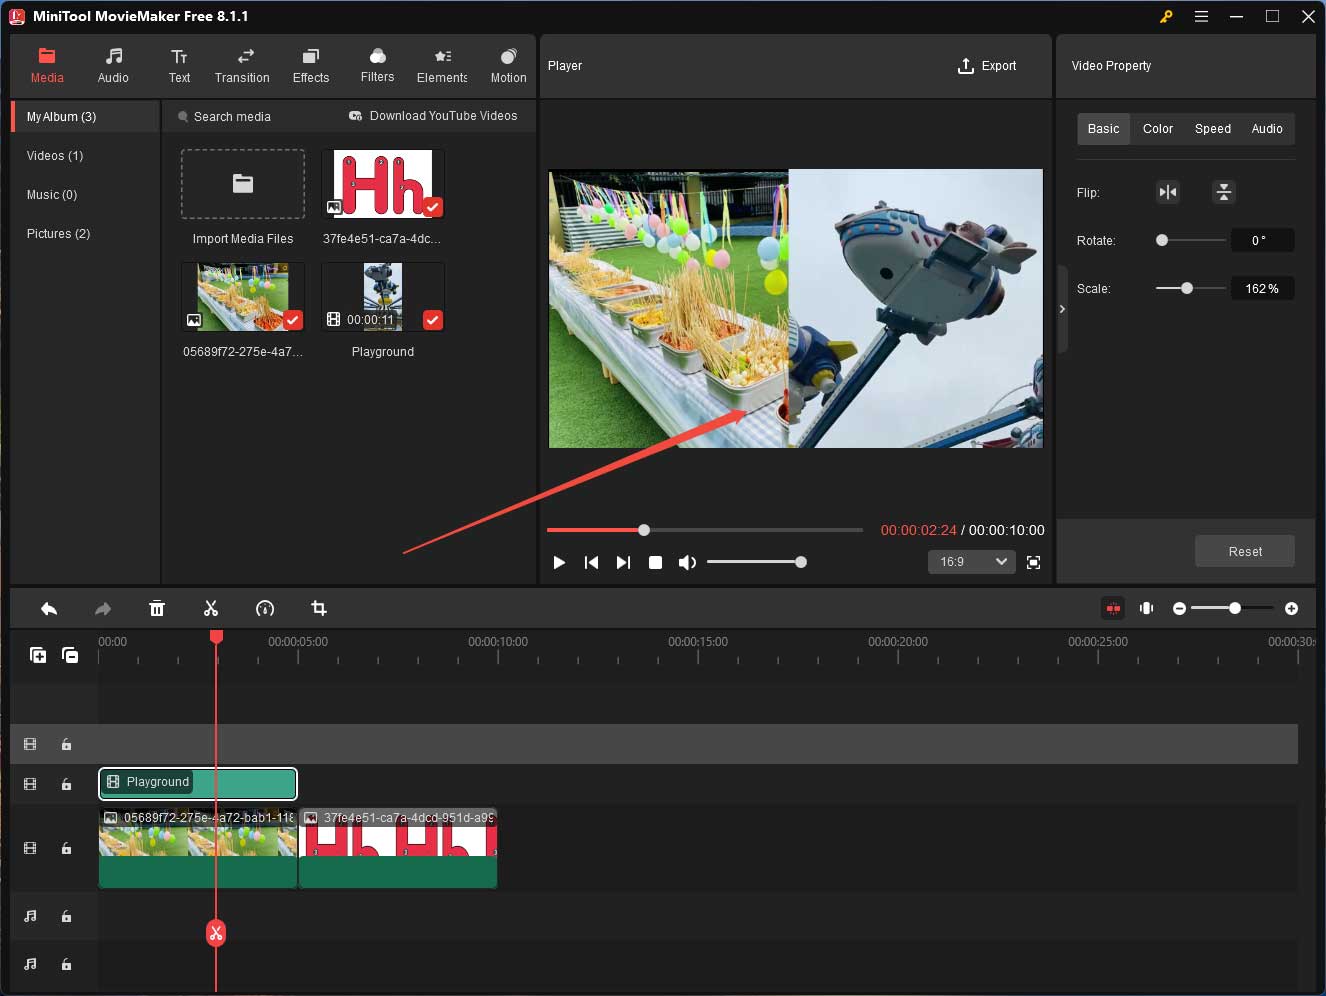
3. Resize and change the location of the overlay video in the preview window to make it match the background clip. Of course, you can make the same edits to the background clip.
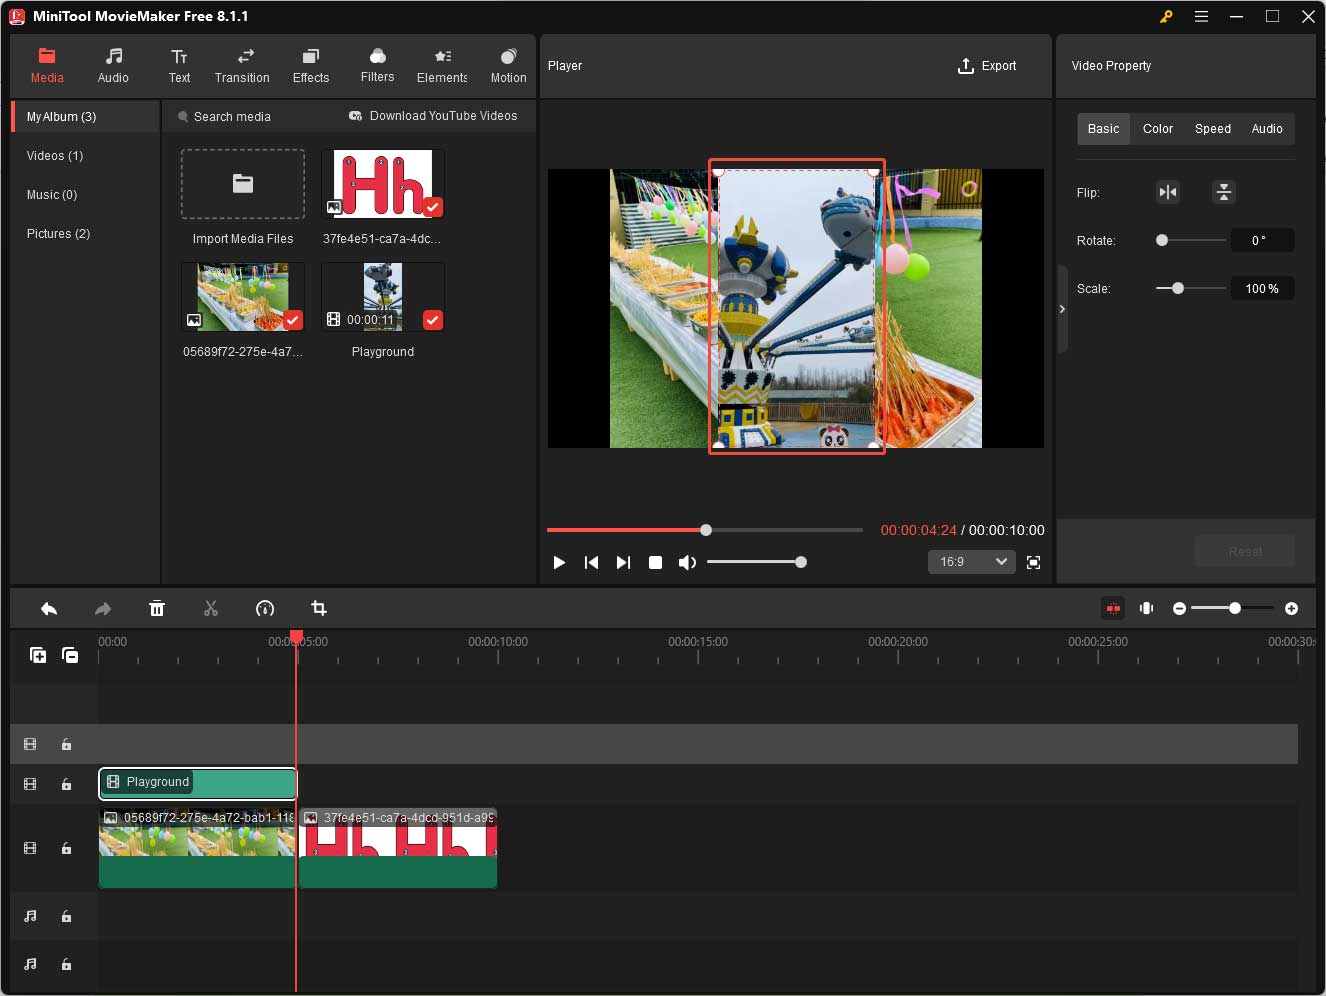
4. Preview the edits to make sure they satisfy your needs before going to the next step.
5. You can add a photo overlay the same way as the above steps. Also, MiniTool MovieMaker enables you to add other kinds of overlays to your video like texts and animated stickers. Just find your target overlay from the top menu and drag and drop it onto the track right above the target clip. Here we take the animated elements for example to show you the guide.
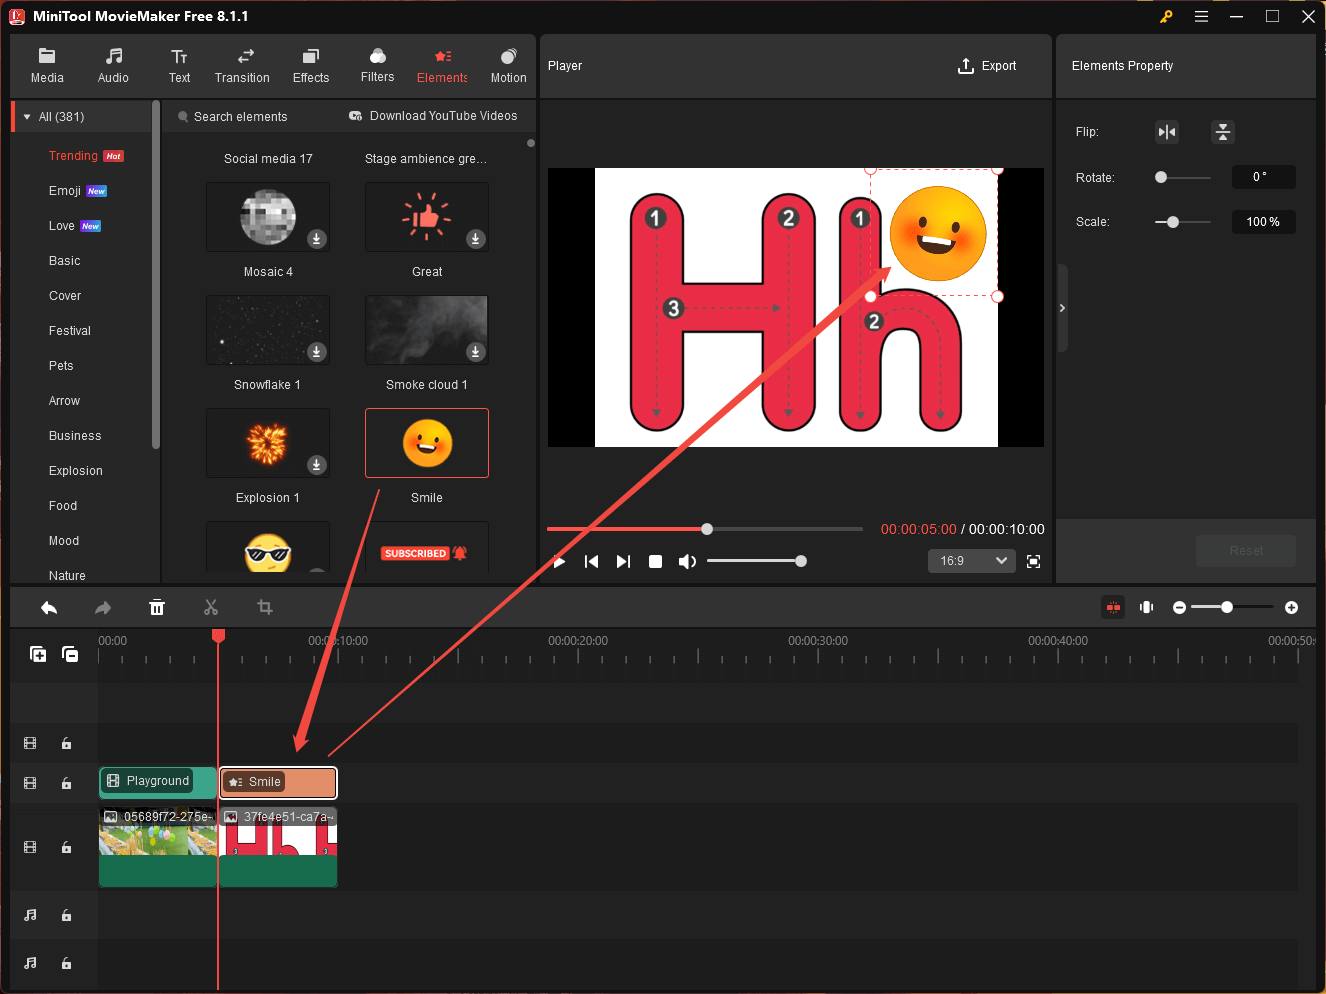
6. Adjust the size and location of the animated overlay in the preview window. Then, specify the duration of the overlay on the timeline.
7. Do other edits to your video if you have extra needs.
Step 4. Preview and Export Final Video
Preview the final result. If everything is what you want, just click the Export option on the upper right of the preview window.
In the Export window, set up the video format to MP4, resolution to 1920×1080, and frame rate to match YouTube’s recommended video specs. To further customize video quality, encoder, and bitrate, just click the Settings button.
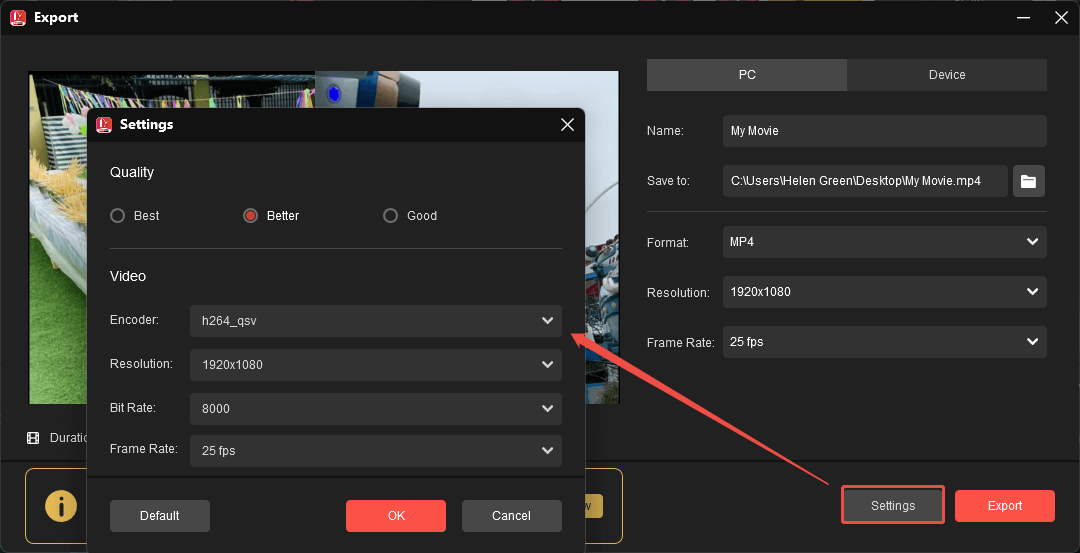
Finally, click the Export button to save all changes.
When you get the well-edited YouTube video, upload it to your YouTube channel at the proper time.
How to Make a Reel on Instagram
Instagram is a photo and video-sharing social app owned by Meta (formerly Facebook). It enables users to edit their media files while uploading them to the platform.
Instagram Video Specs
Before learning how to edit your videos while uploading them to Instagram, let’s see the reel video requirements.
- Aspect ratio: between 1.91:1 and 9:16
- Resolution: at least 720P, 1080P is recommended
- Frame rate: minimum 30 fps
- Cover photo: 420px by 654px, or 1:1.55 ratio (recommended); jpg or png
How to Edit Videos for Instagram
First of all, let’s look at what you can do to your videos when uploading them to Instagram.
Step 1. Get Access to Instagram
Launch the Instagram desktop application or open its webpage. Then, sign in to your account.
Step 2. Upload a Video to Instagram
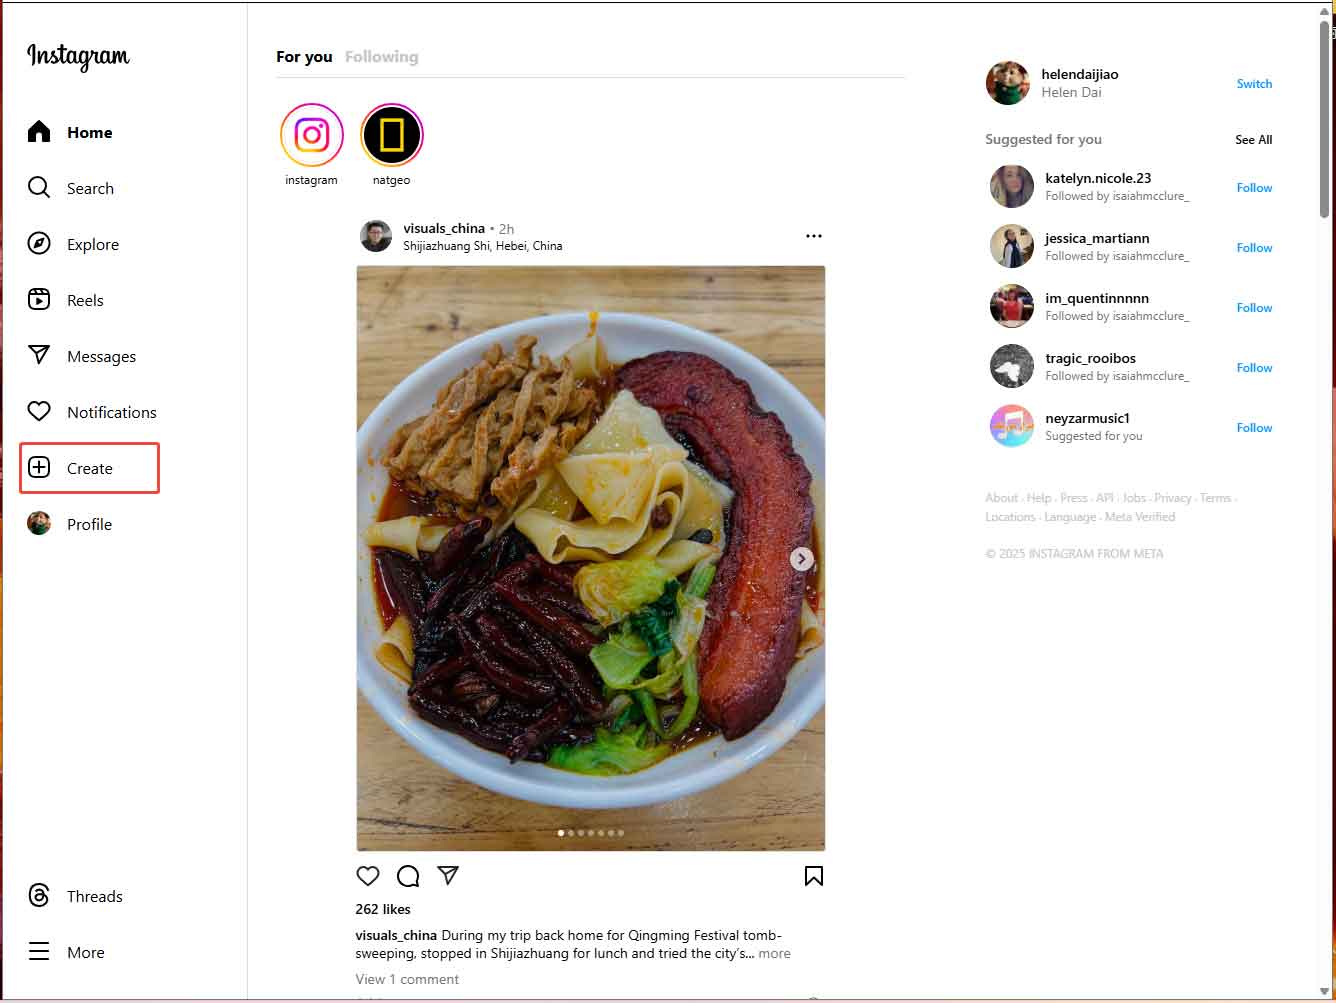
On your homepage, click the Create option on the left menu. Then, select the video you plan to upload to Instagram.
Step 3. Edit the Video
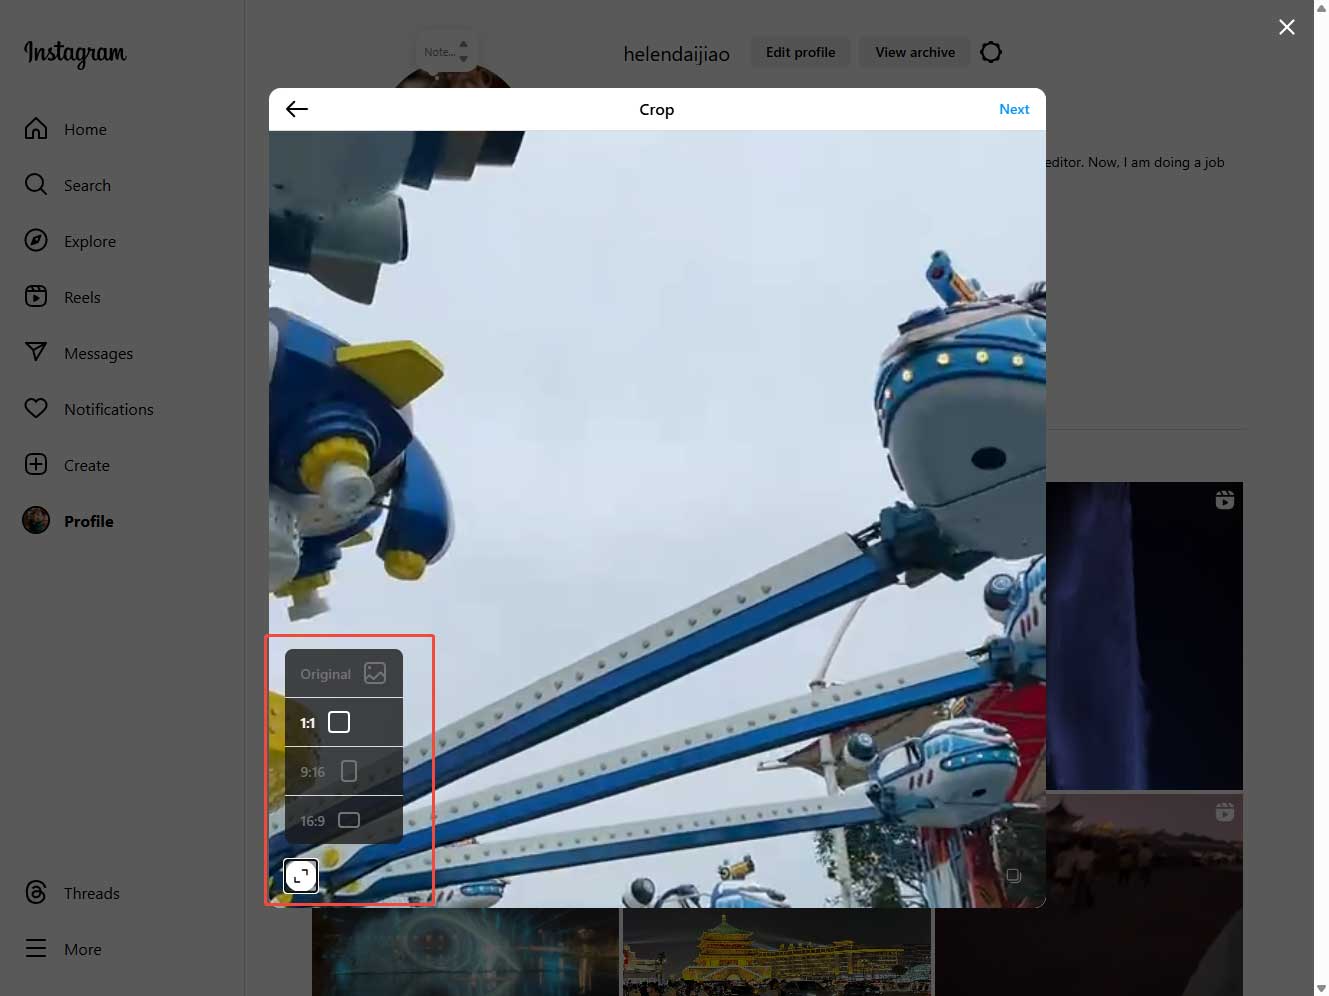
Click on the Select crop icon at the bottom left to choose an aspect ratio for your Instagram reels.
Click Next to enter the Edit Window. There, you need to select a cover photo from the generated frames or from your computer storage. If you want to remove the start or end of the video, just use the trim feature. Besides, you can mute your video sound.

Step 4. Complete Uploading the Video to Instagram
Click Next and complete the rest process to share your Instagram reels.
These are all the video editing features in the desktop version of Instagram. If you want more advanced features, you need to use the Instagram mobile app, which can satisfy most users’ needs with the following features:
- Add texts, stickers, music/voiceover/audio, special effects, captions, filters, etc. to your video.
- Adjust the brightness, contrast, warmth, saturation, fade, highlights, shadows, vignette, and sharpening of your video.
- Change your video speed.
- Split your video.
- Change your sound volume.
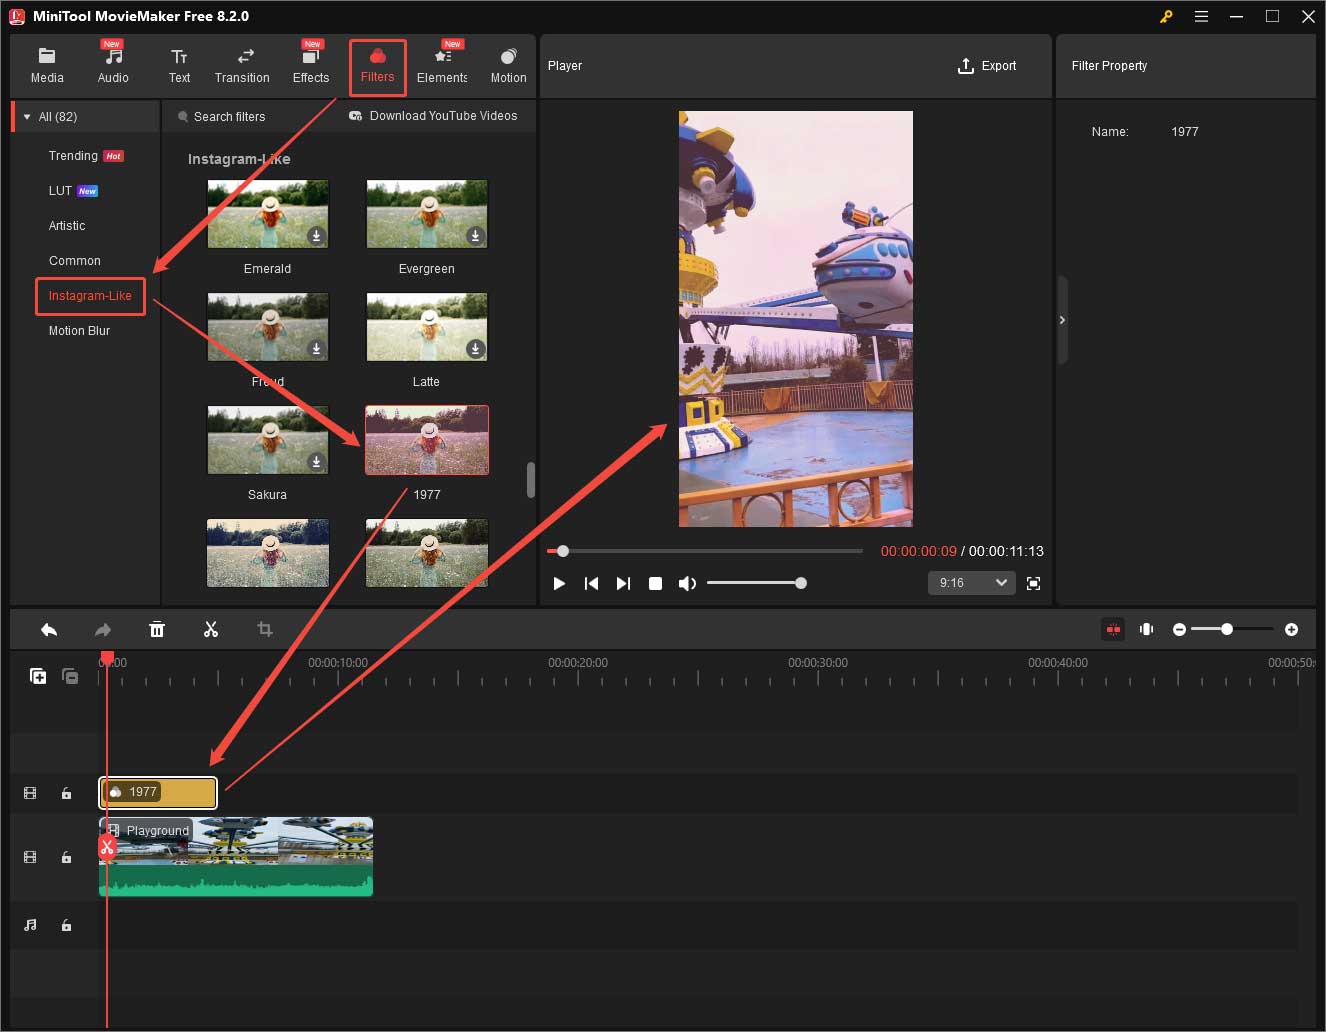
If you insist on using the desktop version of Instagram and are not satisfied with the built-in video editing tool, you can rely on a third-party Instagram video editor like MiniTool MovieMaker mentioned above, which provides the features in the Instagram phone app. Specifically, MiniTool MovieMaker offers Instagram-like filters.
How to Make a TikTok Video
The third social media video production platform that I would like to introduce is TikTok, which has made itself popular based on short-form videos. However, you can still post a video for up to 60 minutes.
TikTok Video Specs
Here are the detailed specifics of TikTok videos.
- Video size: maximum 30GB
- Video duration: up to 60 minutes
- Video format: major formats, MP4 recommended
- Video resolution: 1080p, 1440p, 4K
- Aspect ratios: 16:9 for landscape, 9:16 for vertical
How to Edit TikTok Videos
Similar to YouTube and Instagram, you are able to refine your TikTok video during the uploading process. Still, the editing features are few and simple.
Step 1. Start the TikTok desktop app or website and sign in to your account.
Step 2. Click the Upload button from the left Menu.
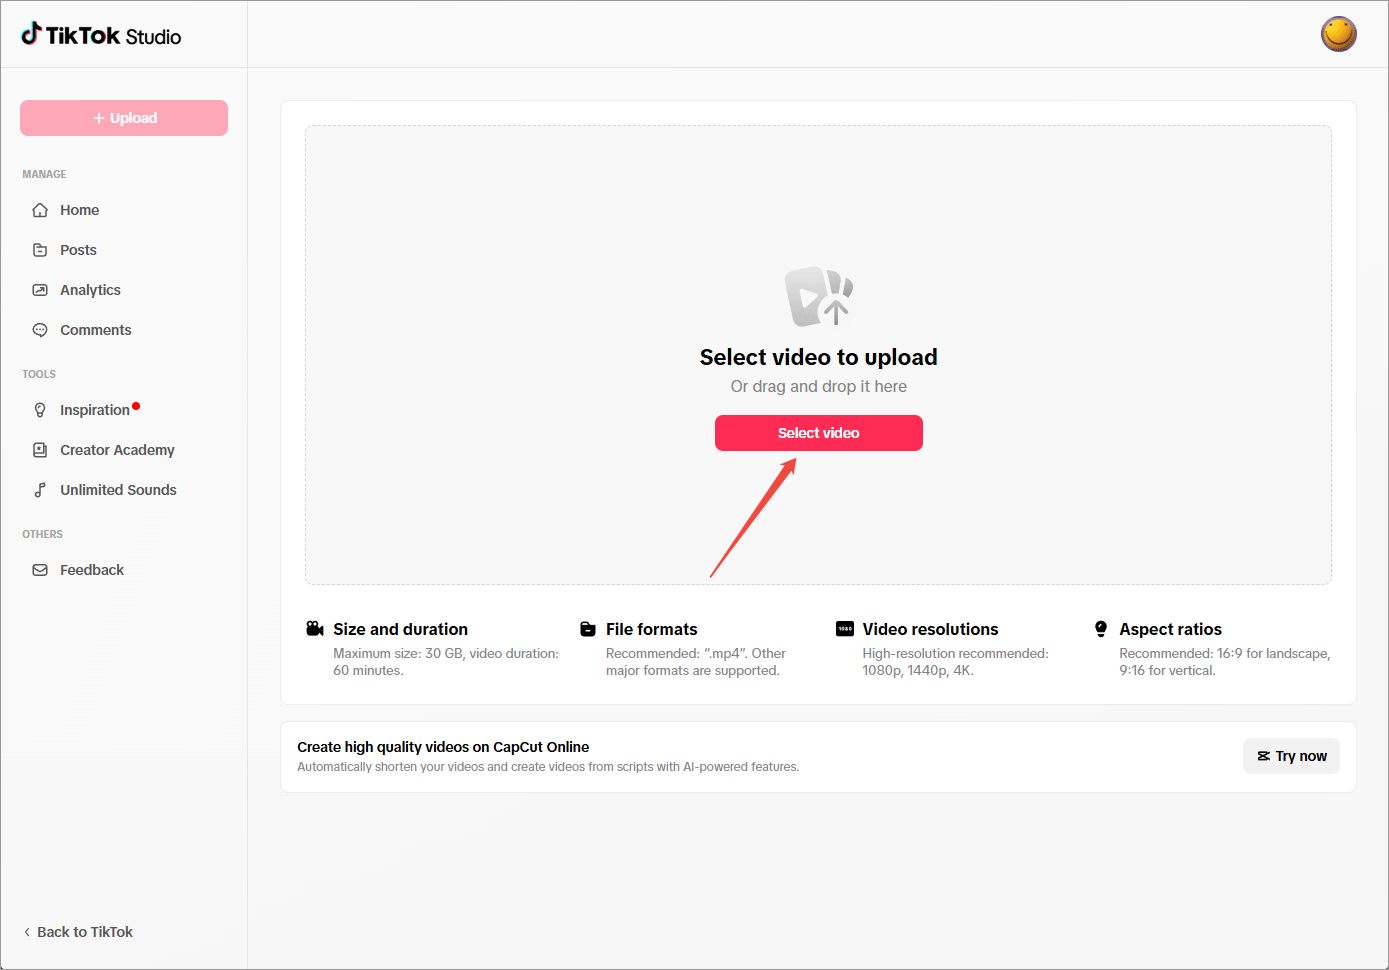
Step 3. Next, in TikTok Studio, click the Select video button to upload the target video.
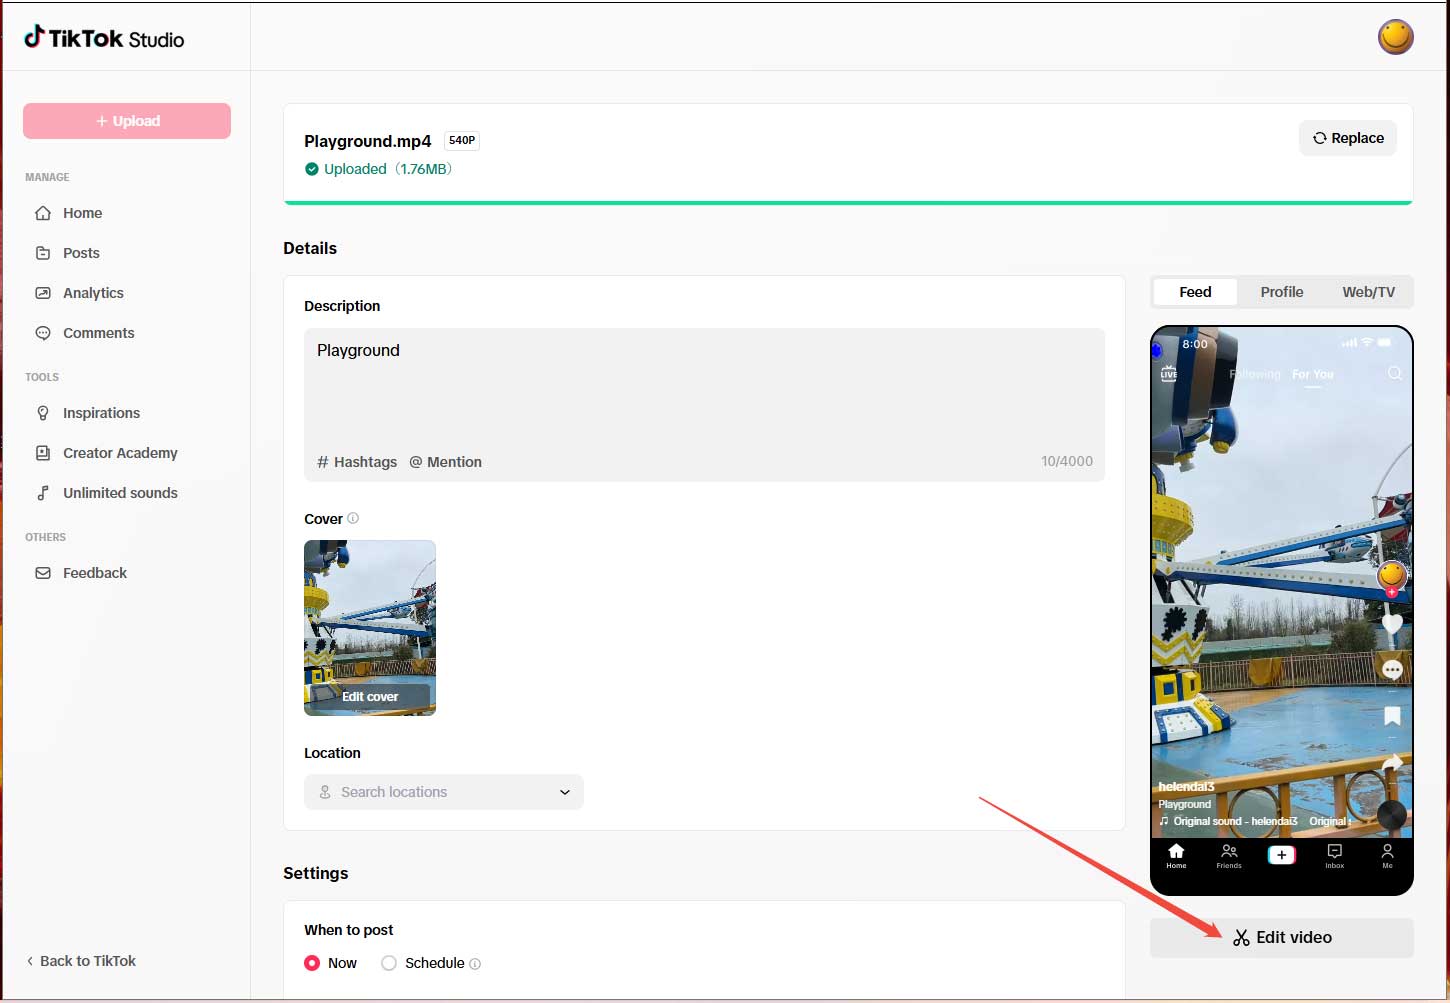
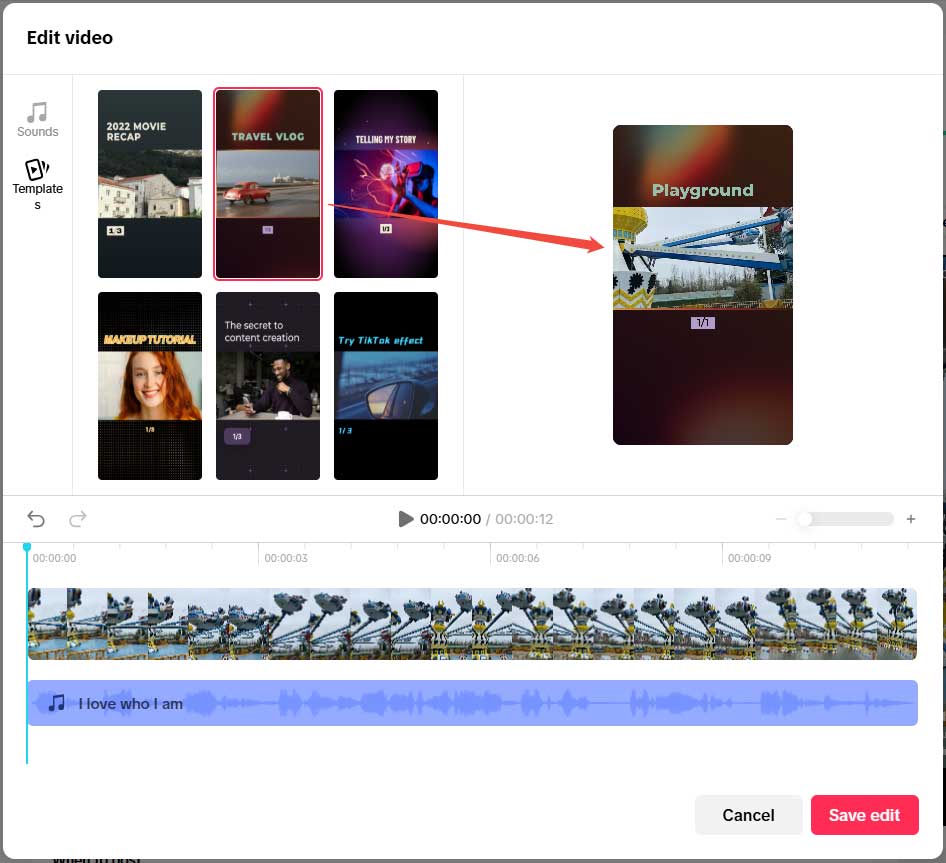
Step 4. On the video posting page, click the Edit video button to trigger the video editing pop-up.
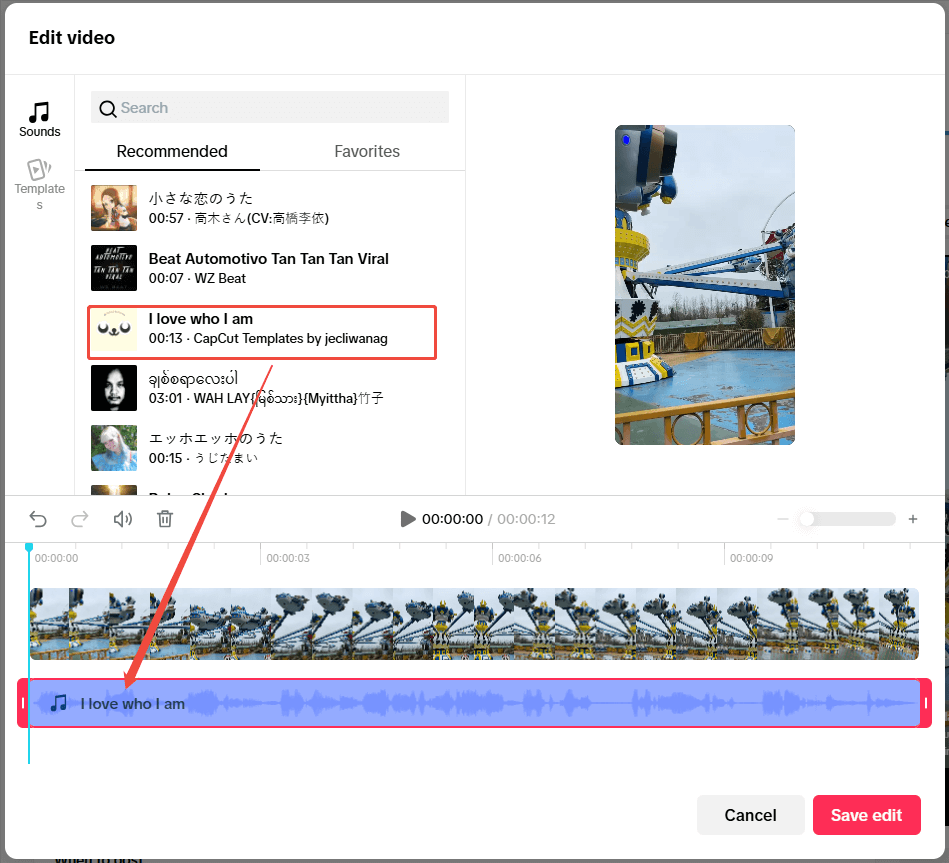
Step 5. In the Edit video window, choose background music for your video.
Step 6. You can also pick up a template for your video.
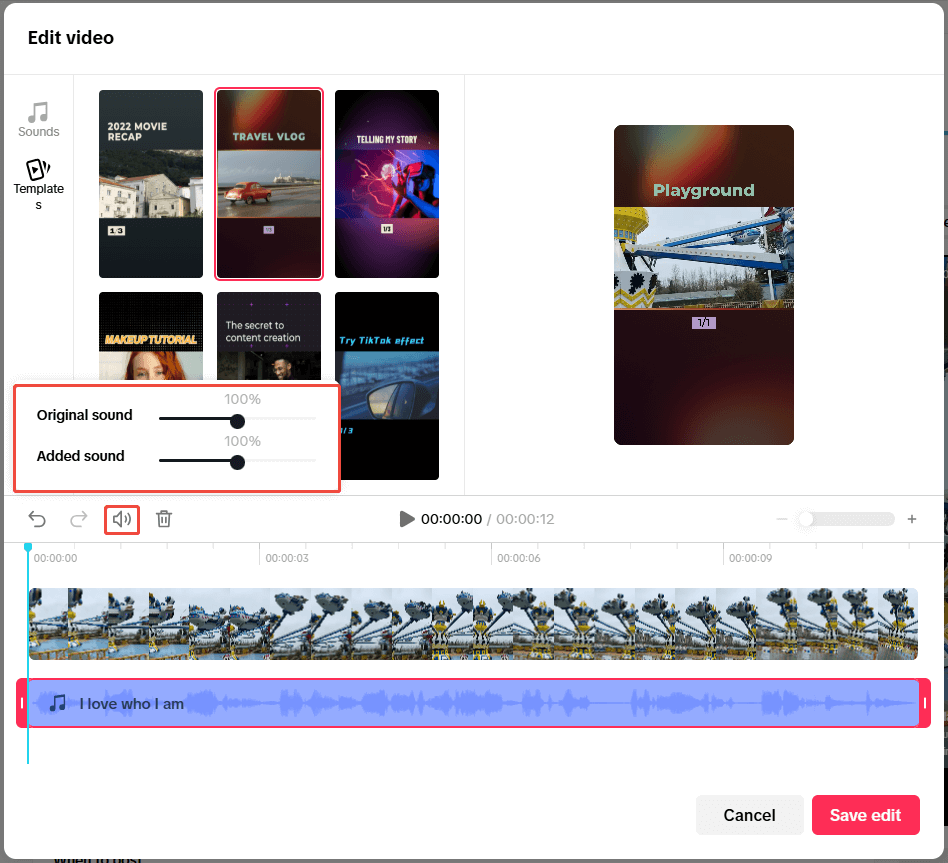
Step 7. Click the speaker icon on the timeline to change the sound volume.
Step 8. Split the video by dragging the needle to the target location and clicking the split icon.
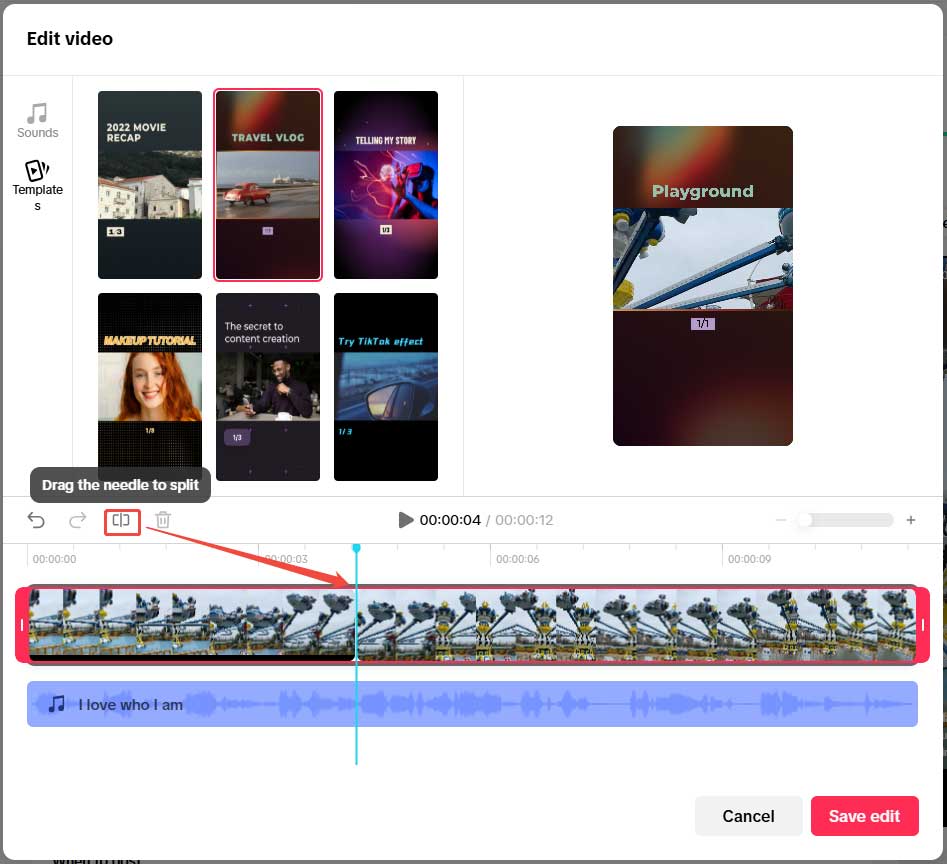
Step 9. Repeat the split operations to spare out the unwanted section. Select it and click the Delete icon.

Step 10. Click the Save edit button to save all changes.
Finally, fill out the other sections on the video posting page and click the Post button to share your video to TikTok.
Most people find that the editing features during the TikTok uploading process are too simple to satisfy their needs. Thus, TikTok recommends CapCut online to create high-quality videos.

Best App to Edit TikTok Videos
Just click the Try now option in the above screenshot. Then, you need to connect your TikTok account to CapCut to use CapCut online. The following will take the popular template feature of CapCut for example to show you how to edit your TikTok video within the CapCut web version.
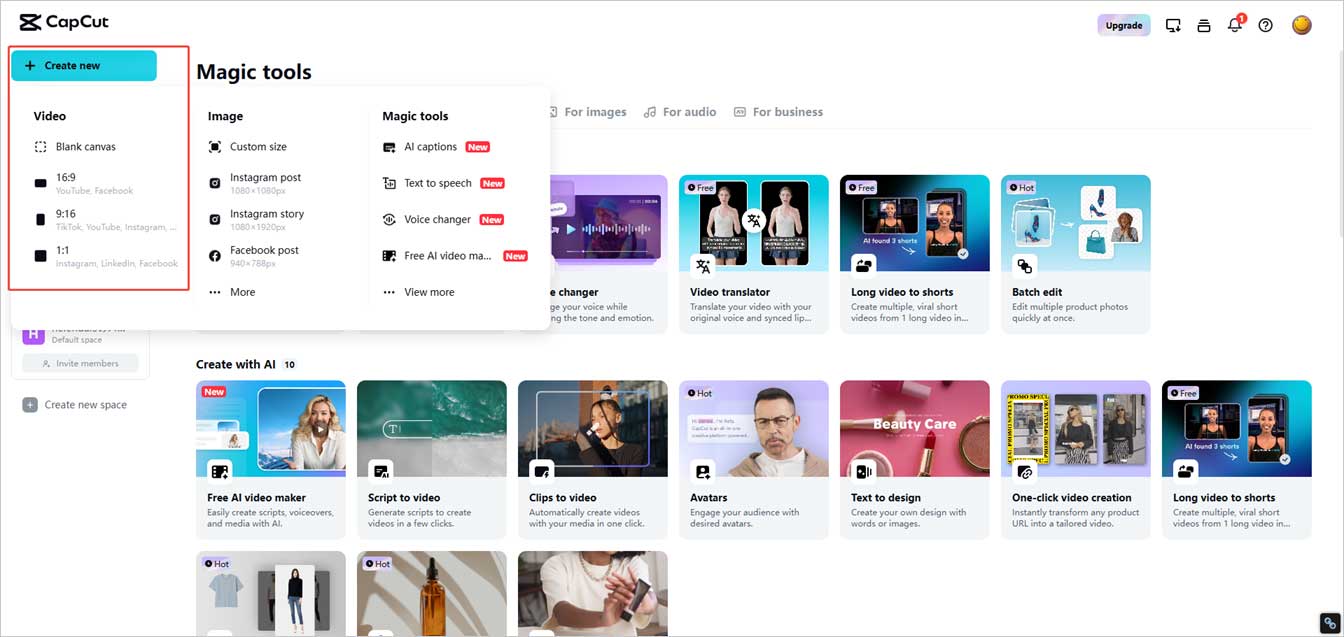
Step 1. Start by Creating a New Video
Click the Create new button from the upper left and select an aspect ratio to begin.
Step 2. Choose a Template
In the main user interface (UI) of the online CapCut, switch to the Templates tab from the left menu. Then, choose a template you like.
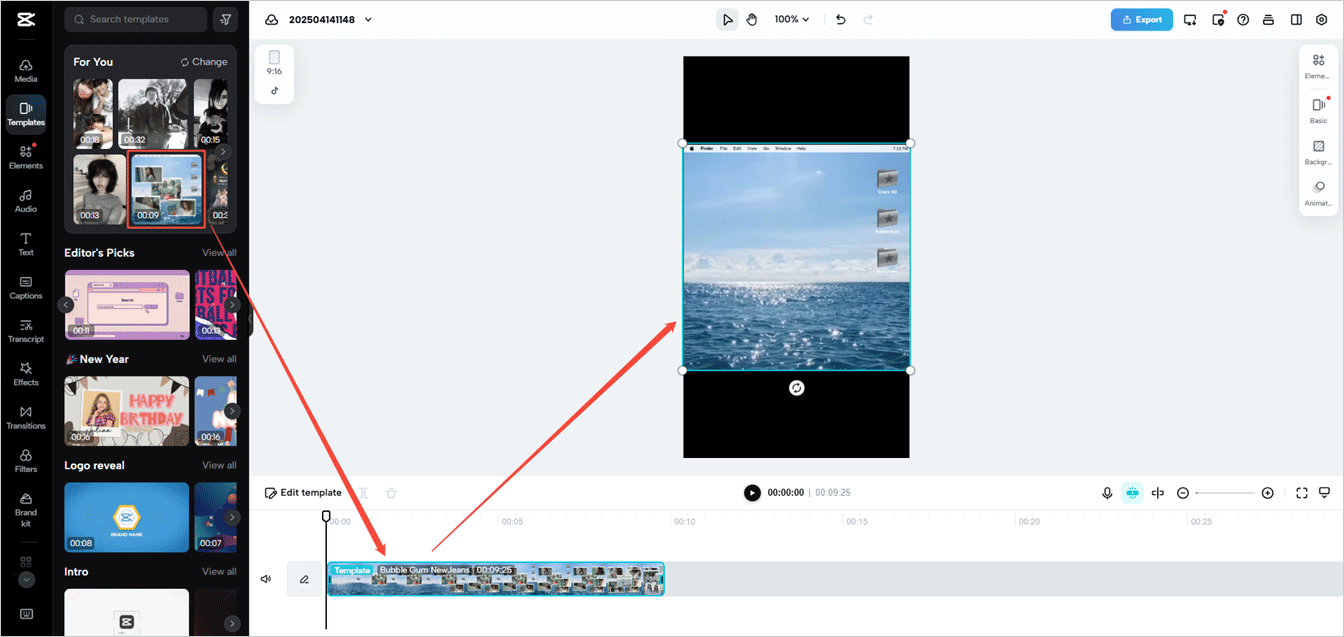
Step 3. Use the Template to Create a Video
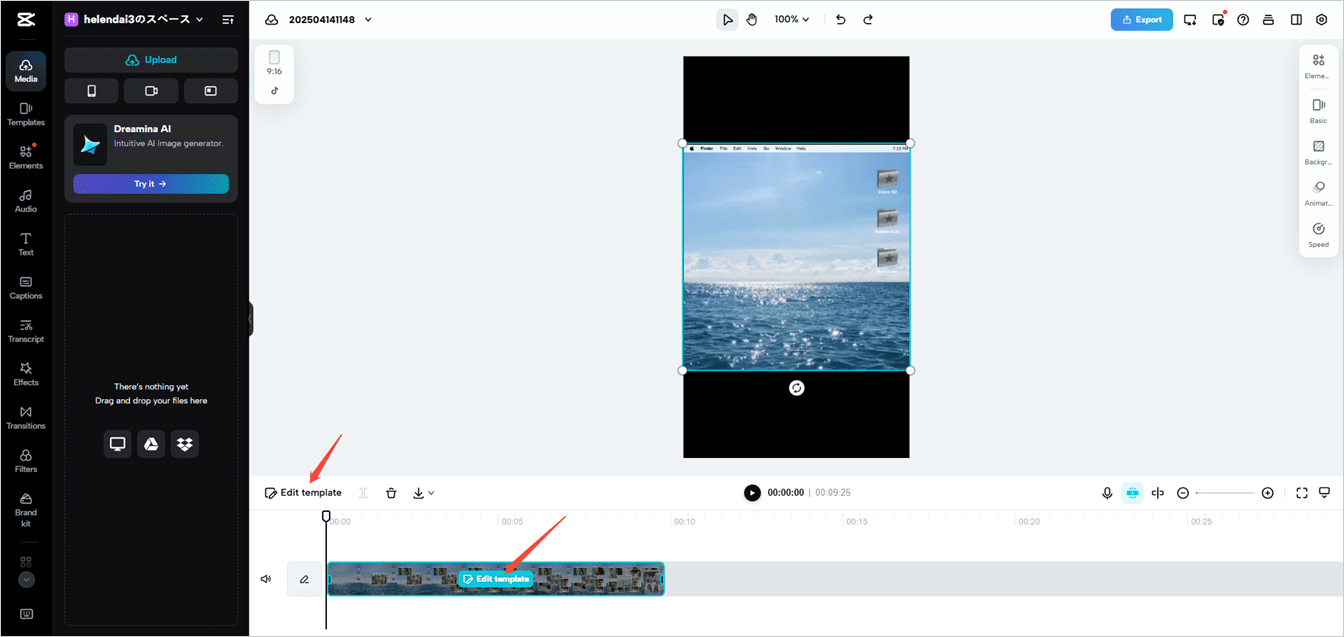
1. Mouse over the template video on the timeline and click on the Edit template option. Or, directly click the Edit template option on the timeline toolbar.
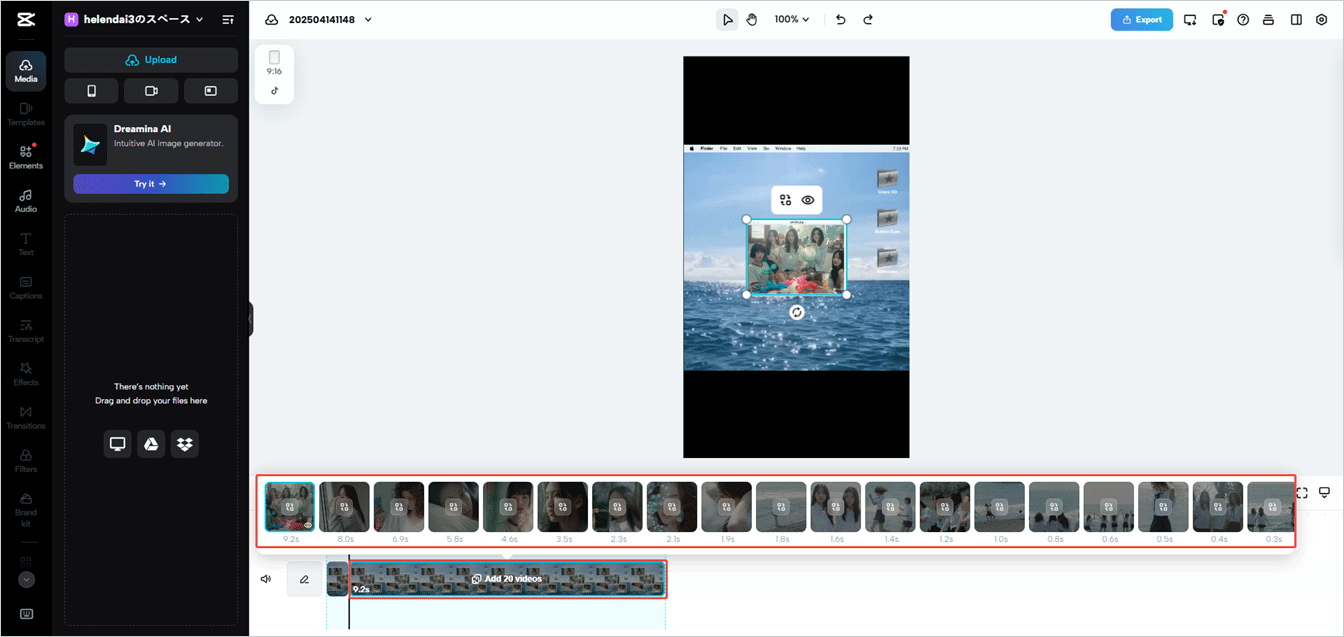
2. A video sub-track will appear, displaying all the editable elements. On the sub-track, you can replace a specific element with a video clip or photo. If you don’t want this element, you can directly hide it. In the preview window, besides replacement and hiding, you can still rotate or resize the element.
3. Once you have replaced the element with your clip, you can click the Edit icon on the clip and choose to replace, crop, or hide it.
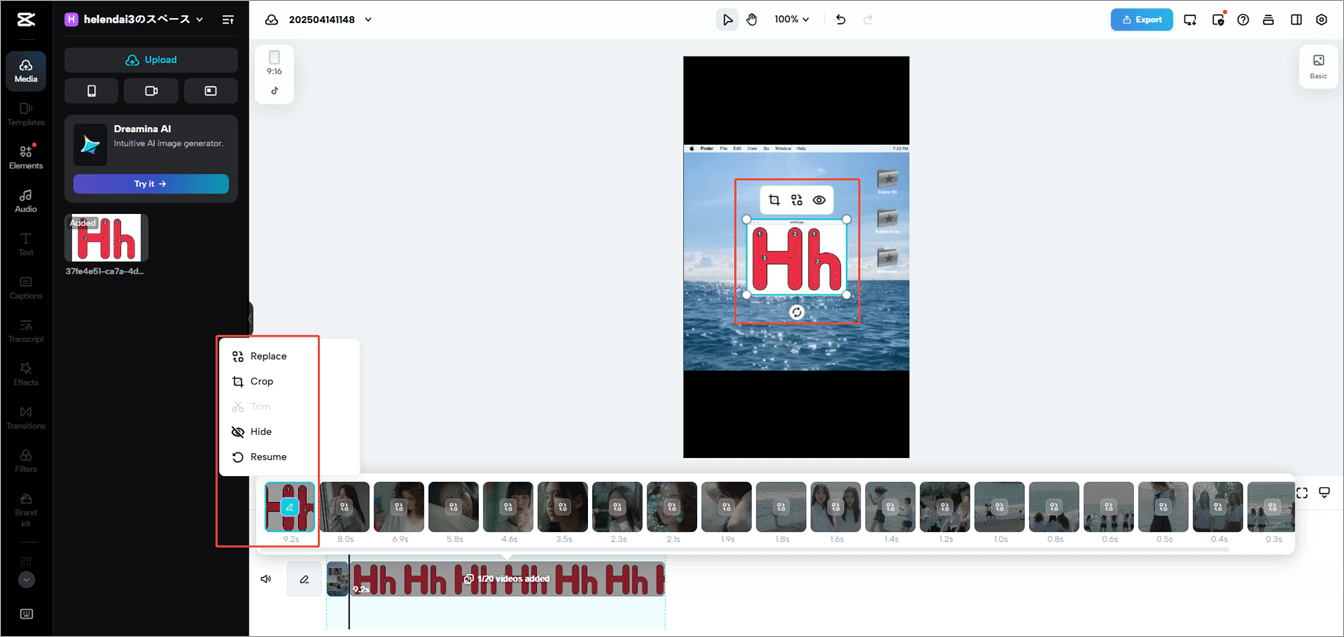
If you select Crop in the above option list, a Crop window will pop up. There, you are able to shrink the size of the clip or rotate video in a clockwise or counterclockwise direction.

4. Click the Add cover option at the beginning of the timeline. In the Add cover popup, specify the cover of the new video. You can manually select a frame from the entire video or from the highlighted frames. In addition, you can upload your own cover photo from local storage.
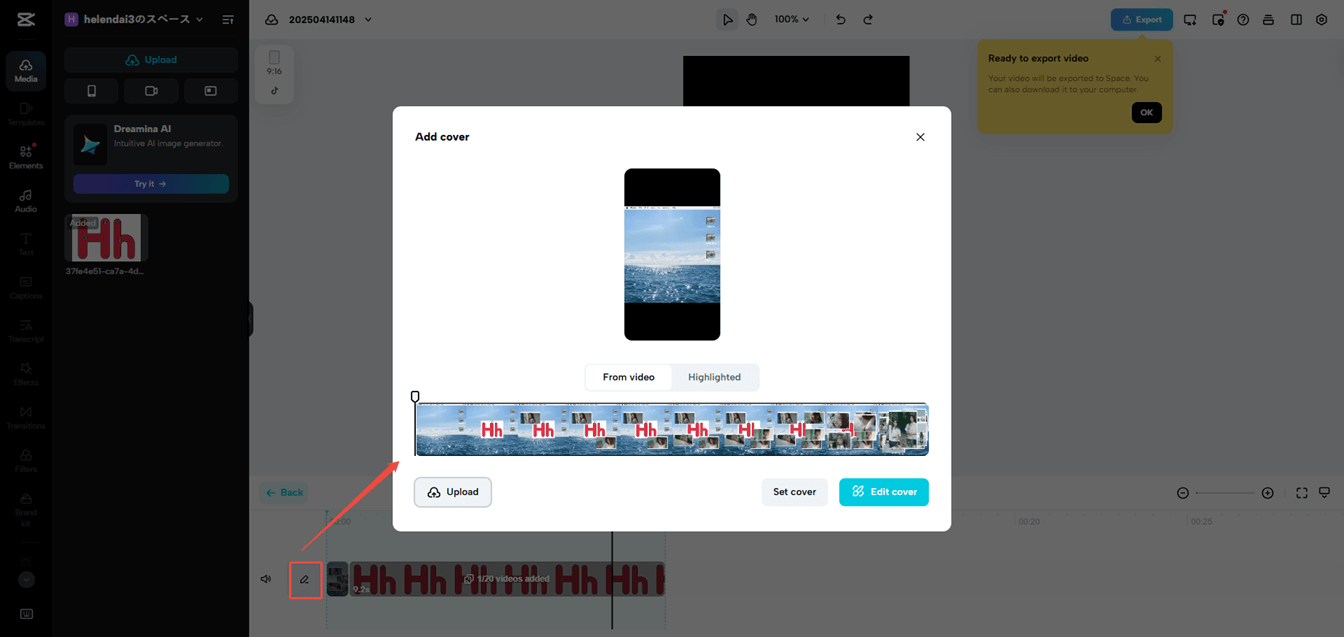
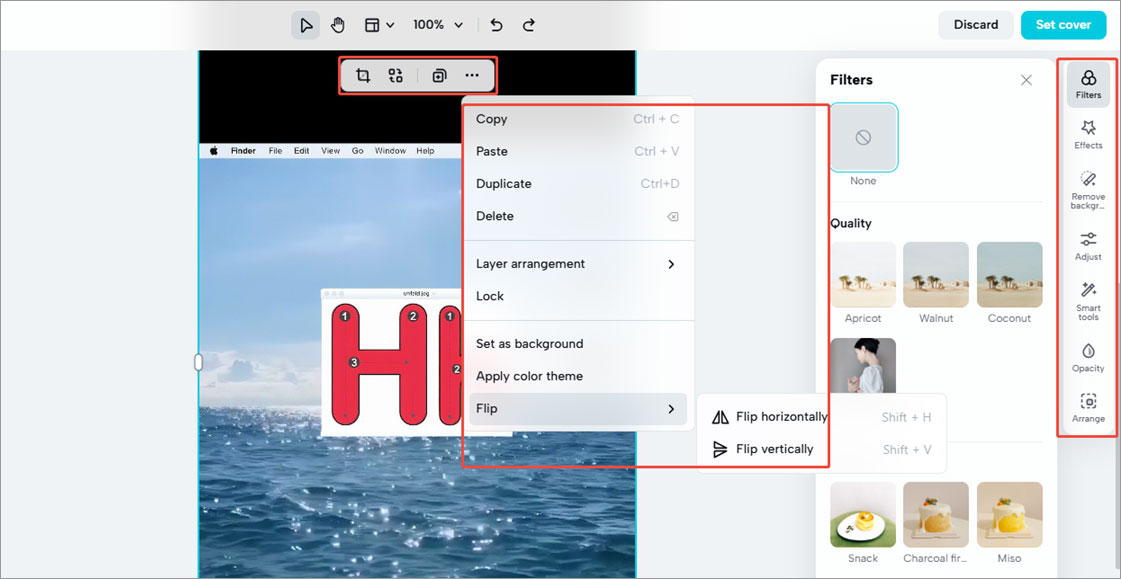
5. Click the Edit cover button from the bottom right corner of the Add cover window to go to the Edit video cover page. There, you can do some edits to your cover photo, including cropping, replacing, flipping, adding filters/elements, etc.
Step 4. Save the Video
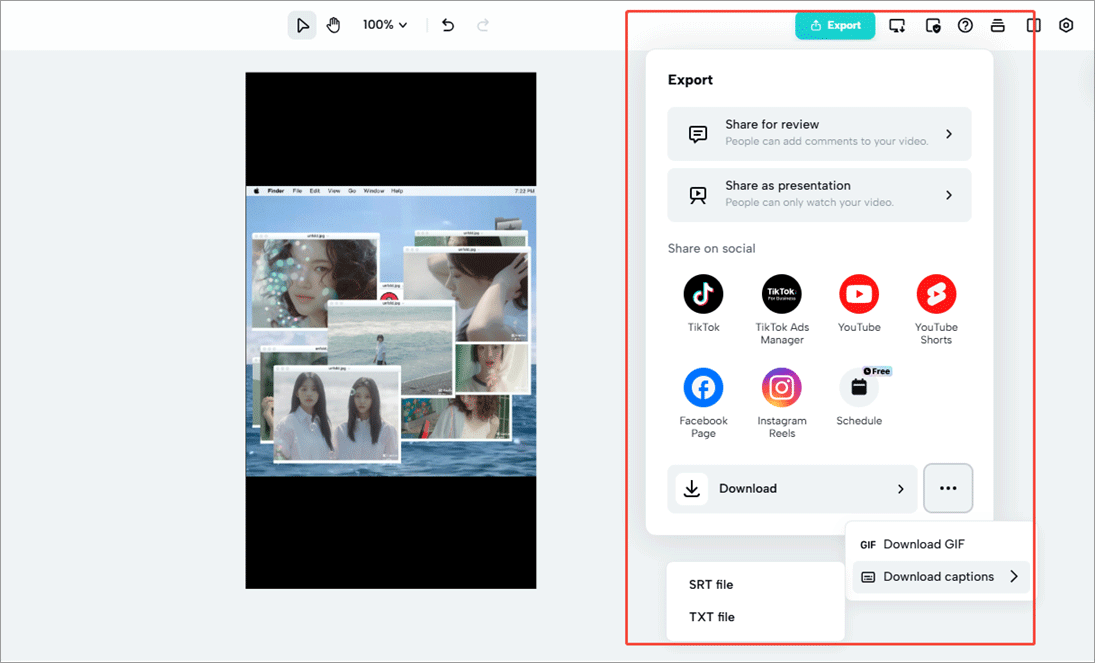
Finally, click the Export button in the upper right to share the video for review or for presentation. You can directly share it to popular social media platforms like TikTok, YouTube, Instagram, and so on. Your video will export to the online space by default. You can further download the video to the local device. GIF and text downloads are also supported.
CapCut provides numerous video templates of different topics, including new year, logo reveal, intro, outro, daily vlog, travel vlog, gaming… Just pick one that suits your needs. Besides the template feature, CapCut offers a lot of other video editing features and many AI-based automatic decorations.
If you don’t want your videos to be saved online, you can install the desktop version of CapCut to make offline editing. Anyhow, CapCut can satisfy most people’s needs, even if you are a professional user.
![8 TikTok Video Makers to Create Cool Videos for TikTok [PC/Phone]](https://images.minitool.com/moviemaker.minitool.com/images/uploads/2023/06/tiktok-video-maker-thumbnail.jpg)
How to Make a Reel on Facebook
When talking about popular video social platforms, Facebook is one that you can’t miss. Its website is the third-most-visited website and its app is the most downloaded app of the 2010s. Now, let’s see how to create a video for uploading to Facebook.
Facebook Video Specs
In preparation for making a video to publish on Facebook, you need to know the requirements that Facebook has for its videos.
- Recommended video dimensions: 1280×720
- Minimum width: 1200 pixels
- Aspect ratio: 16:9 (Landscape) to 9:16 (Portrait)
- Maximum file size: Up to 10 GB
- Recommended video formats: MP4 or MOV, and more
- Video length: 240 minutes or less
- Audio codec: Stereo AAC with 128 Kbps or more is recommended
If you export your video from editing software to upload to Facebook, these custom settings are recommended:
- Recommended video format: H.264 video with AAC audio in MOV or MP4 format
- Aspect ratio: No larger than 4000px wide and divisible by 16px
- Frame rate: At or below 30 fps
- Audio: Stereo audio with a sample rate of 44.1 kHz
For more complete requirements, please refer to Facebook’s official webpage.
How to Edit a Reel on Facebook
To begin with, you can make use of the simple editing features provided by Facebook’s desktop version while uploading a video to its platform.
Step 1. Go to Facebook
Open the Facebook desktop application (similar to the Facebook web version) and sign in to your account.
Step 2. Start to Create a Reel
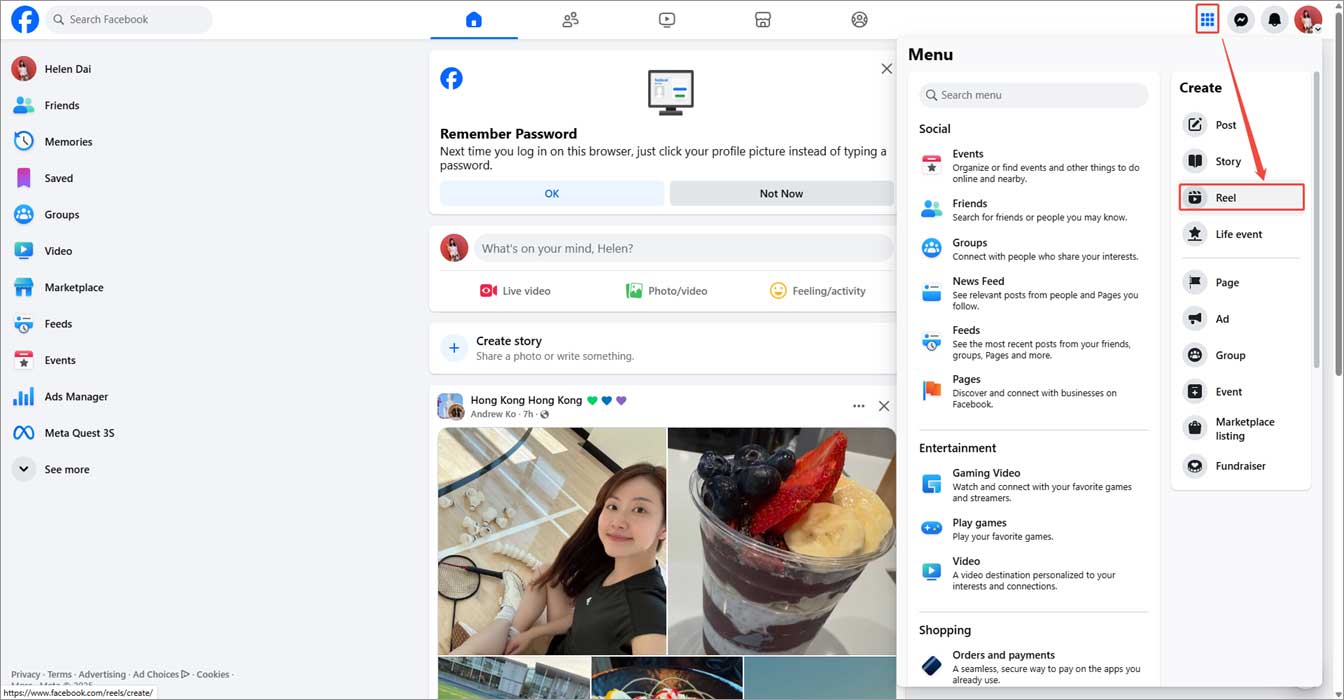
Click on the Menu icon in the upper right and choose Reel.
Step 3. Upload a Video
Click the Add video option to upload your video or directly drag and drop your video there in the upper left section. Then, click Next.

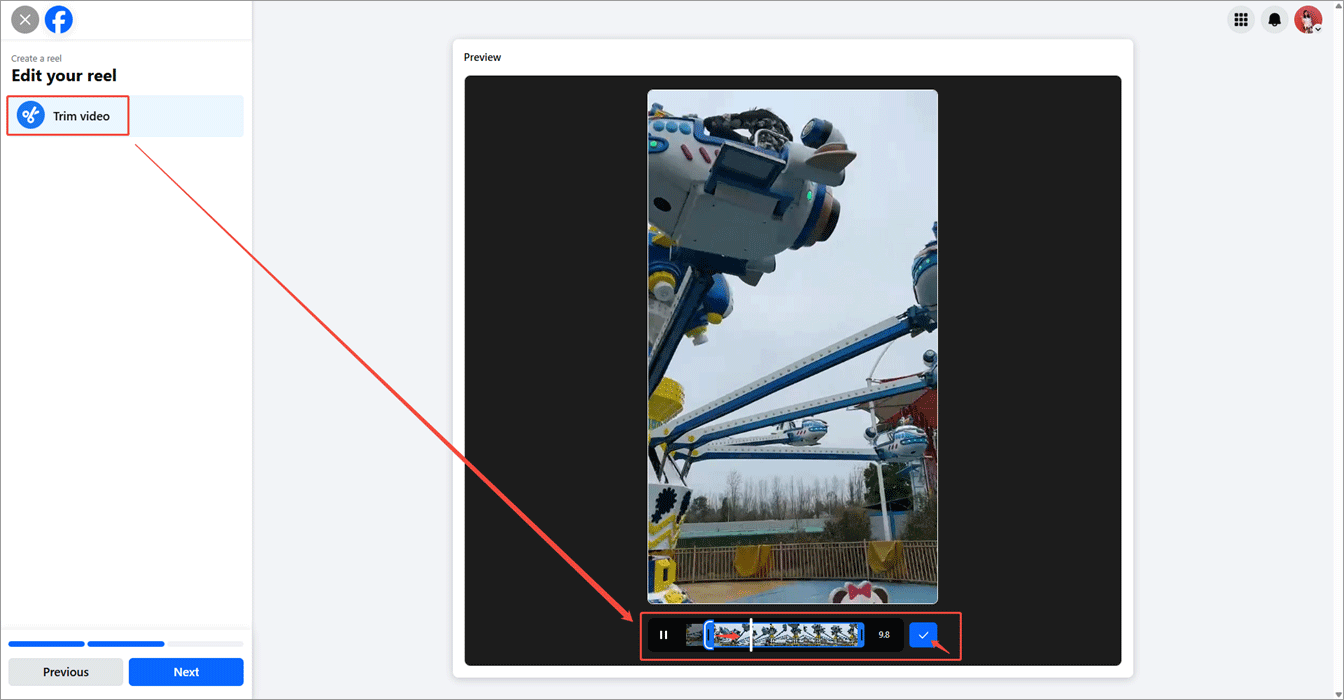
Step 4. Trim Facebook Video
Next, click Trim video in the upper left. Drag the frame edge rightwards or leftwards to cut off the beginning or end of the video. Remember to click the tick icon next to the simple timeline to save the changes.
Step 5. Complete the Rest Operations and Publish the Video
Continue with the next step and finish the rest of the process. Finally, click the Publish button to share your edited video.
As a conclusion, the only editing feature that Facebook offers for its users is the basic video trimming, which obviously can’t satisfy most people’s needs. Therefore, users need to rely on another powerful video editor to help them polish videos before uploading to Facebook.
How to Make a Video for Facebook?
If you are considering which Facebook video maker to choose, the former CapCut is recommended. It has not only an online version but also an offline application. let’s see how to create a Facebook video from scratch with the help of CapCut!
Step 1. Get CapCut Prepared
Download, install, and launch CapCut on your computer.
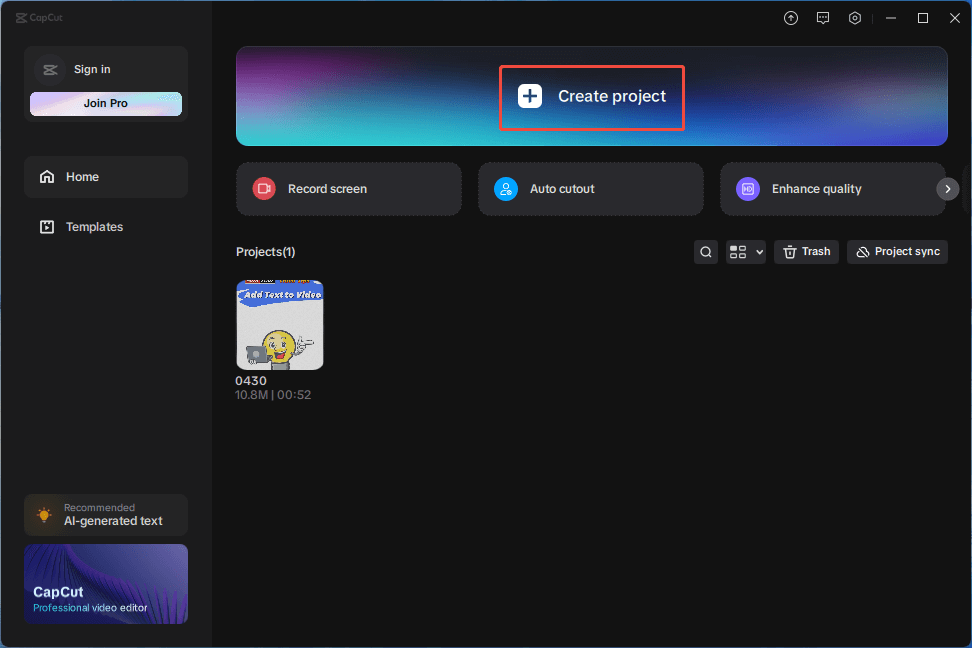
Step 2. Create a New Project
Click the Create project option to start a project for video creation.
Step 3. Add Your Source Media Files
You can either click the Import option under the Media tab in the top left to explore the target files or directly drag and drop them from your computer into CapCut.
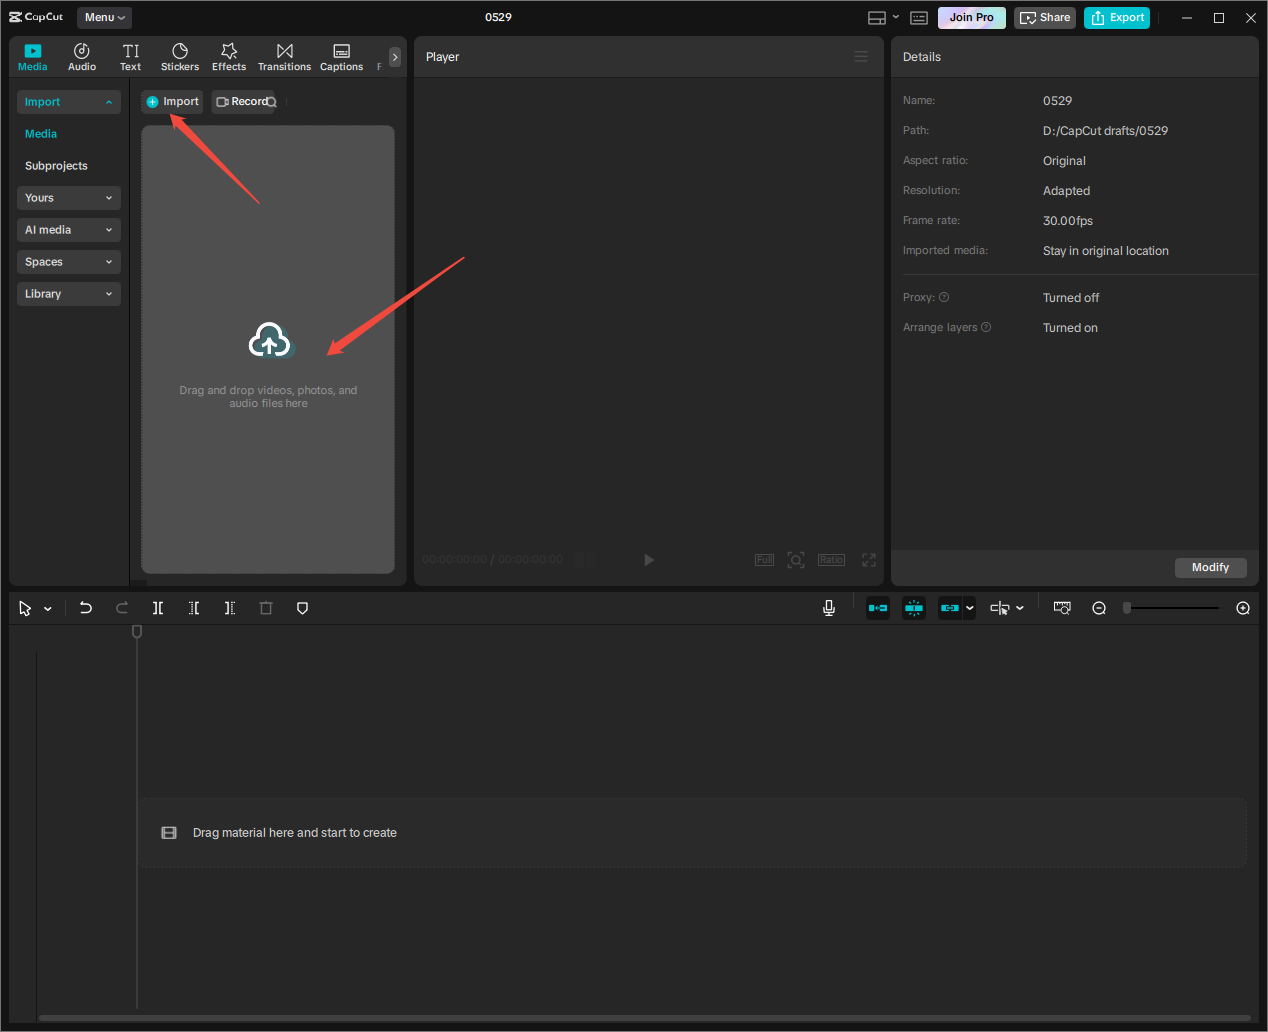
Then, add the imported files onto the timeline in the order you want. Of course, you can adjust the file order directly on the timeline by dragging and dropping.
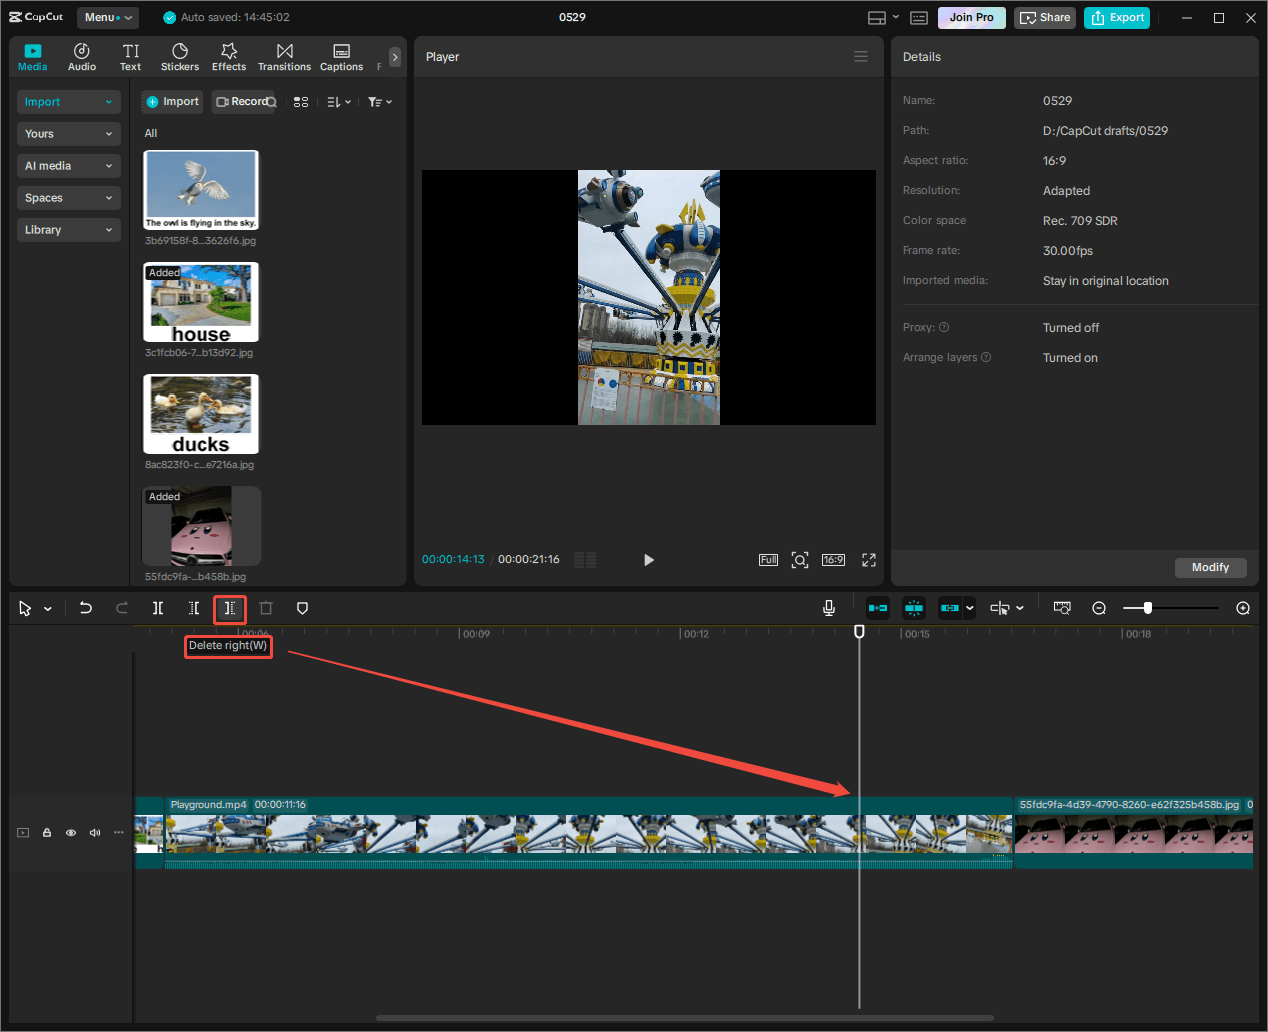
Step 4. Trim Extra Part of Your Video
Firstly, preview your video and locate the start point of the unnecessary part with the playhead on the timeline. If, from this point on, the rest of the content is unwanted, you can directly cut it off using the Delete right option on the timeline. The similar operation (Delete left) goes to the situation when you need to remove the beginning section of a clip.
Step 5. Add Background Music to the Video
To begin with, you need to mute the built-in audio of your video. Just click the speaker icon on the video track.

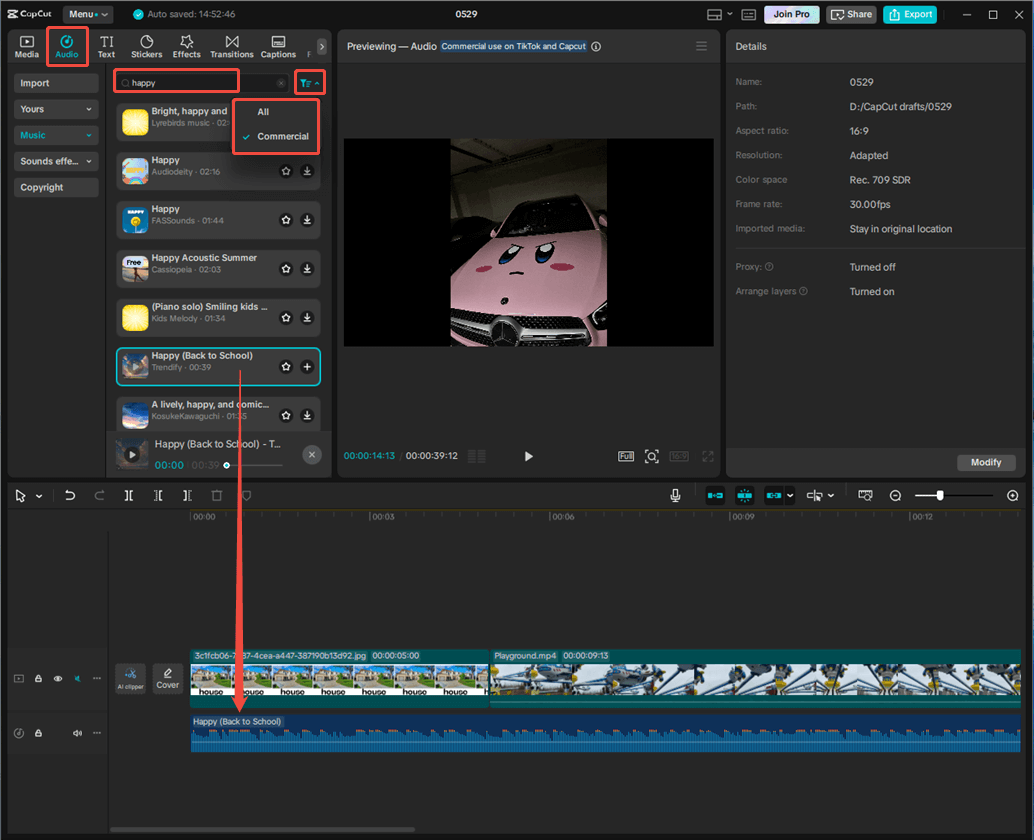
Then go to the Audio tab from the top left menu, search for your target music with related keywords, filter music for Commercial if you plan to use this video for commercial purposes, choose a song you like, and add it to your video.
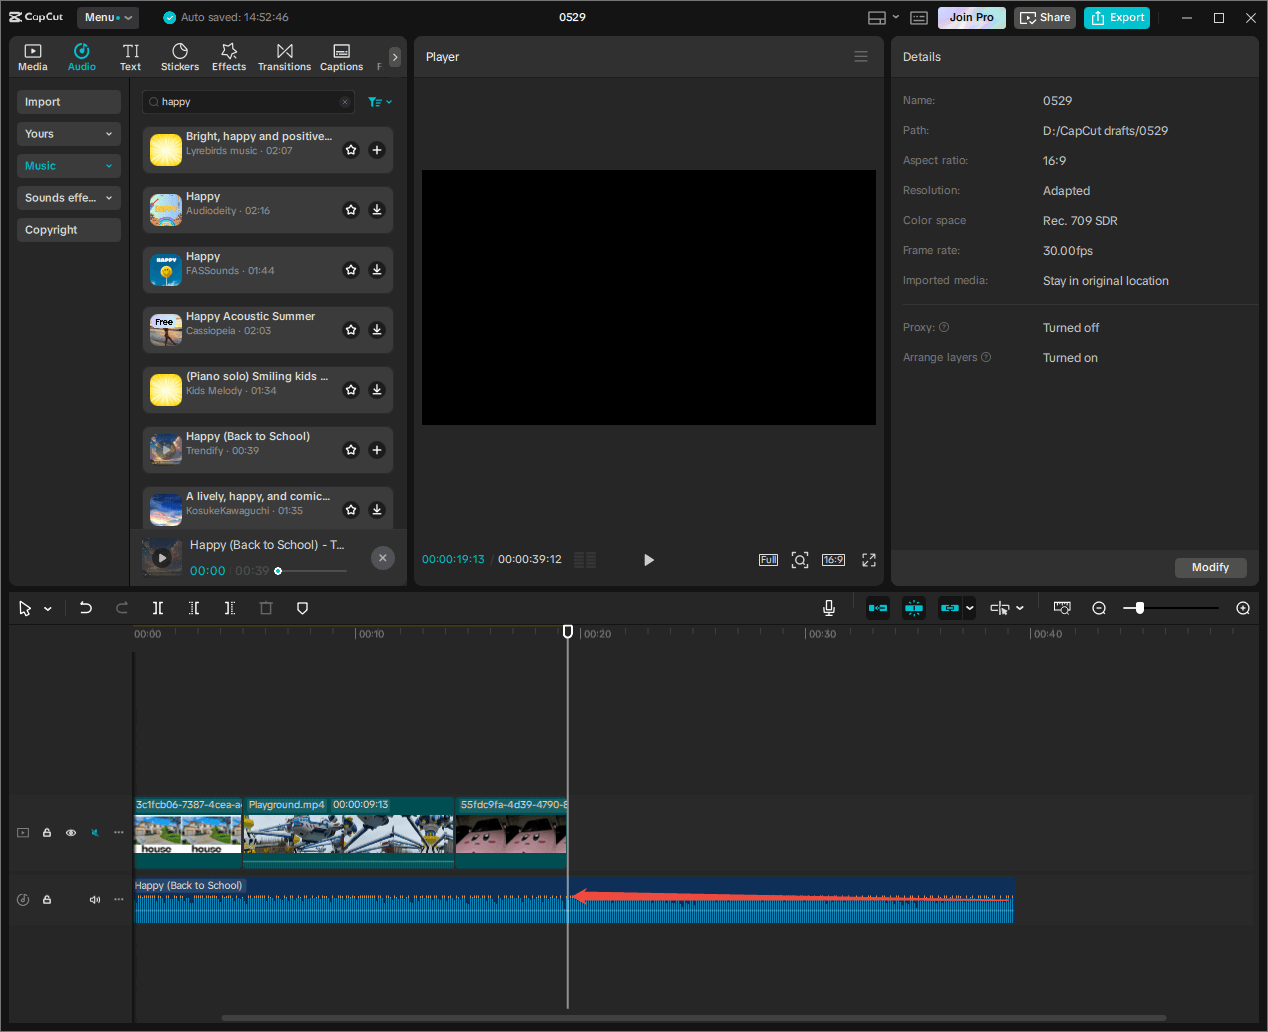
Next, trim the background music to make its length align with the video in CapCut. You can cut the extra part of the music using the trim feature described above. Or you can directly drag your mouse to cut off the unnecessary music period. Just put your mouse on the endpoint of the music, when its cursor turns into two arrows, drag it leftwards.
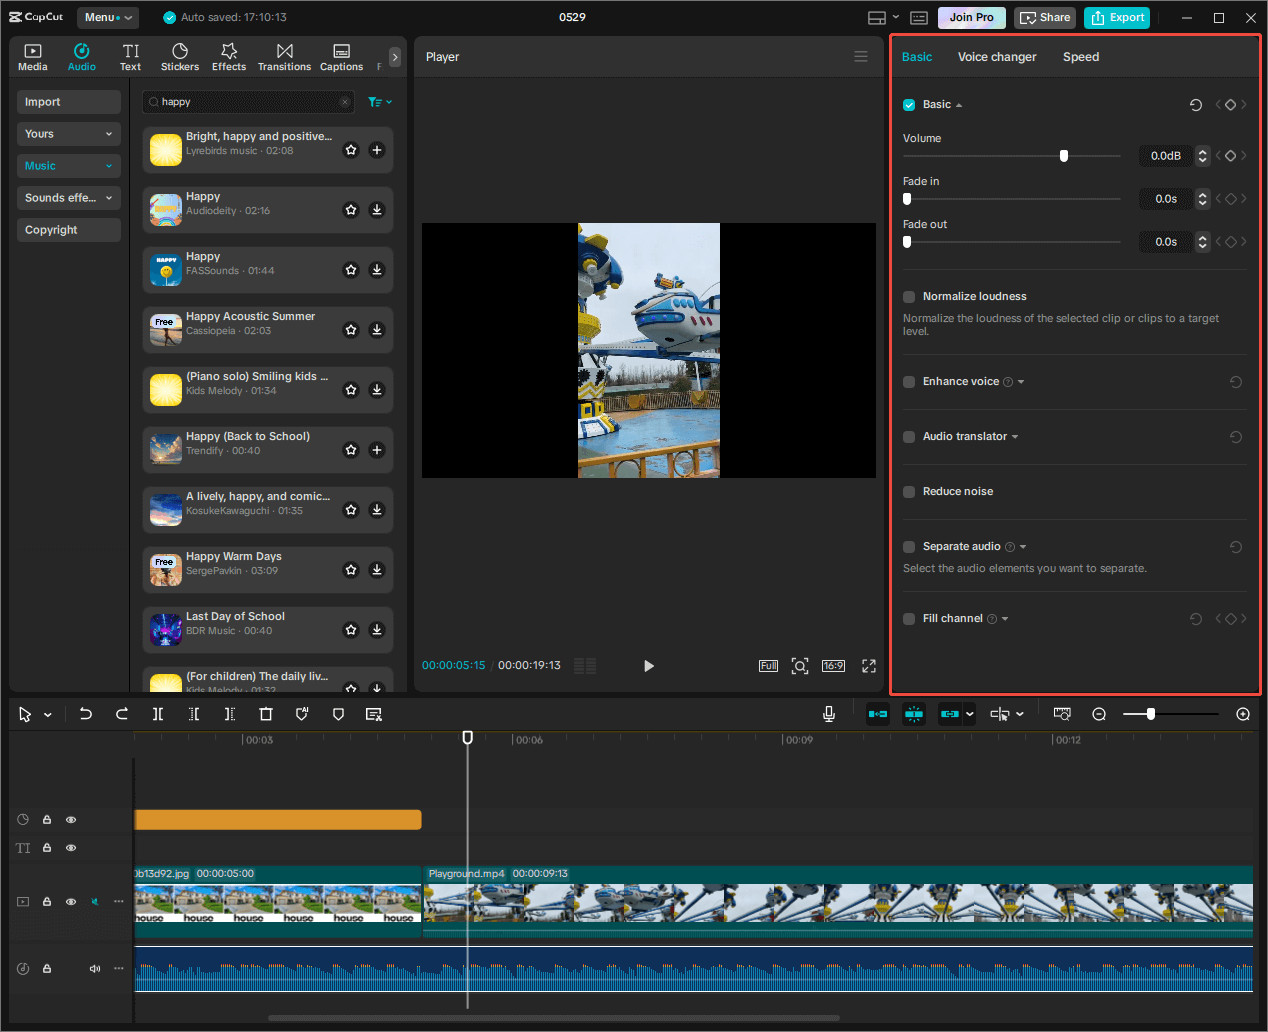
Finally, you can edit the background music in the following aspects:
- Change volume
- Fade in/out
- Normalize loudness
- Enhance voice
- Audio translator
- Reduce noise
- Separate audio
- Fill channel
- Add a voice filter
- Add a voice character
- Turn speech to song
- Change audio speed
- Change audio pitch
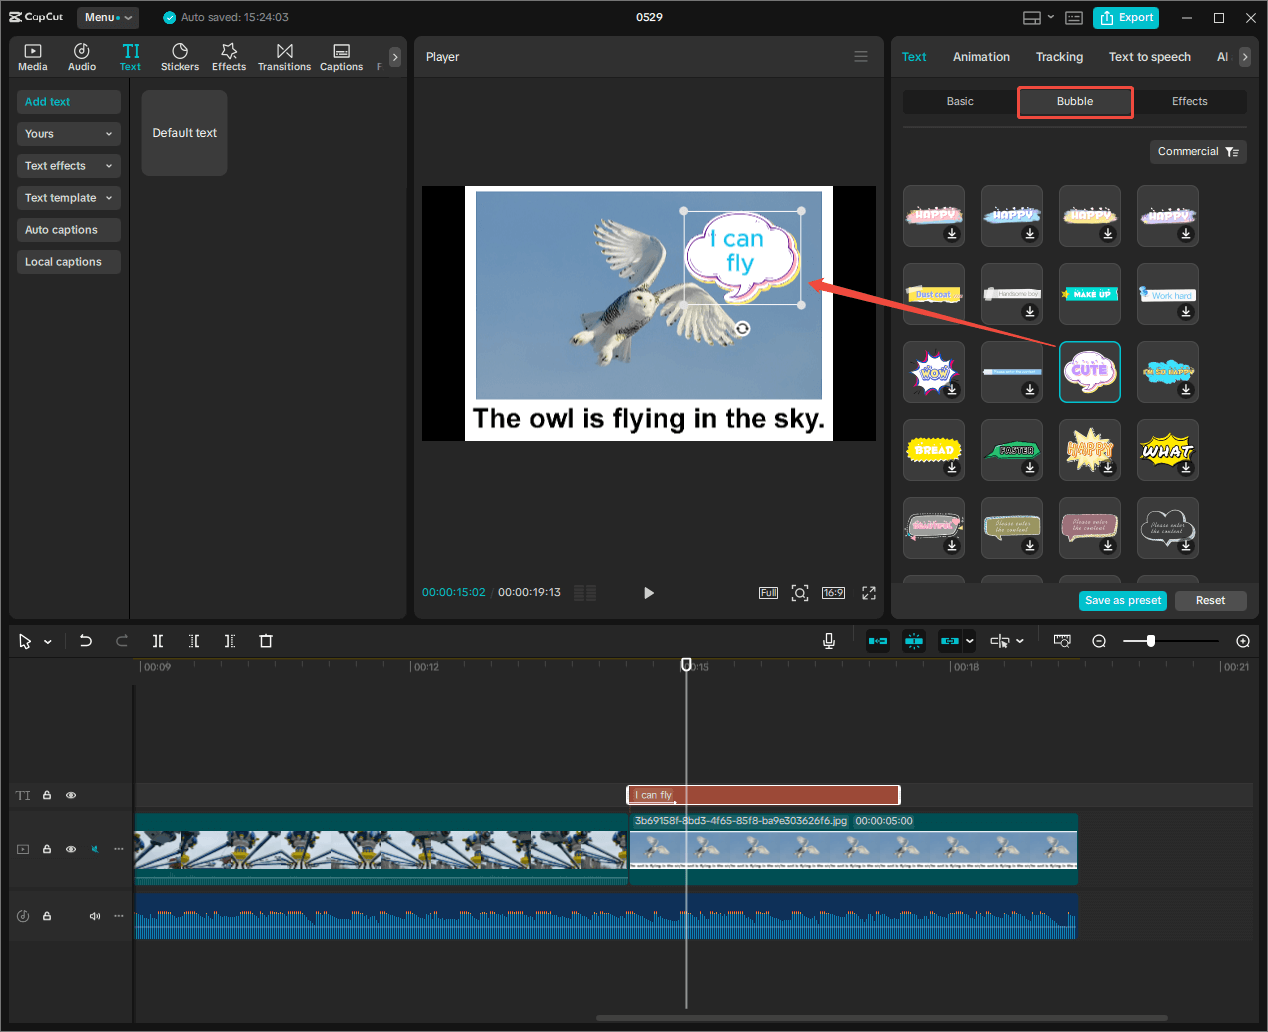
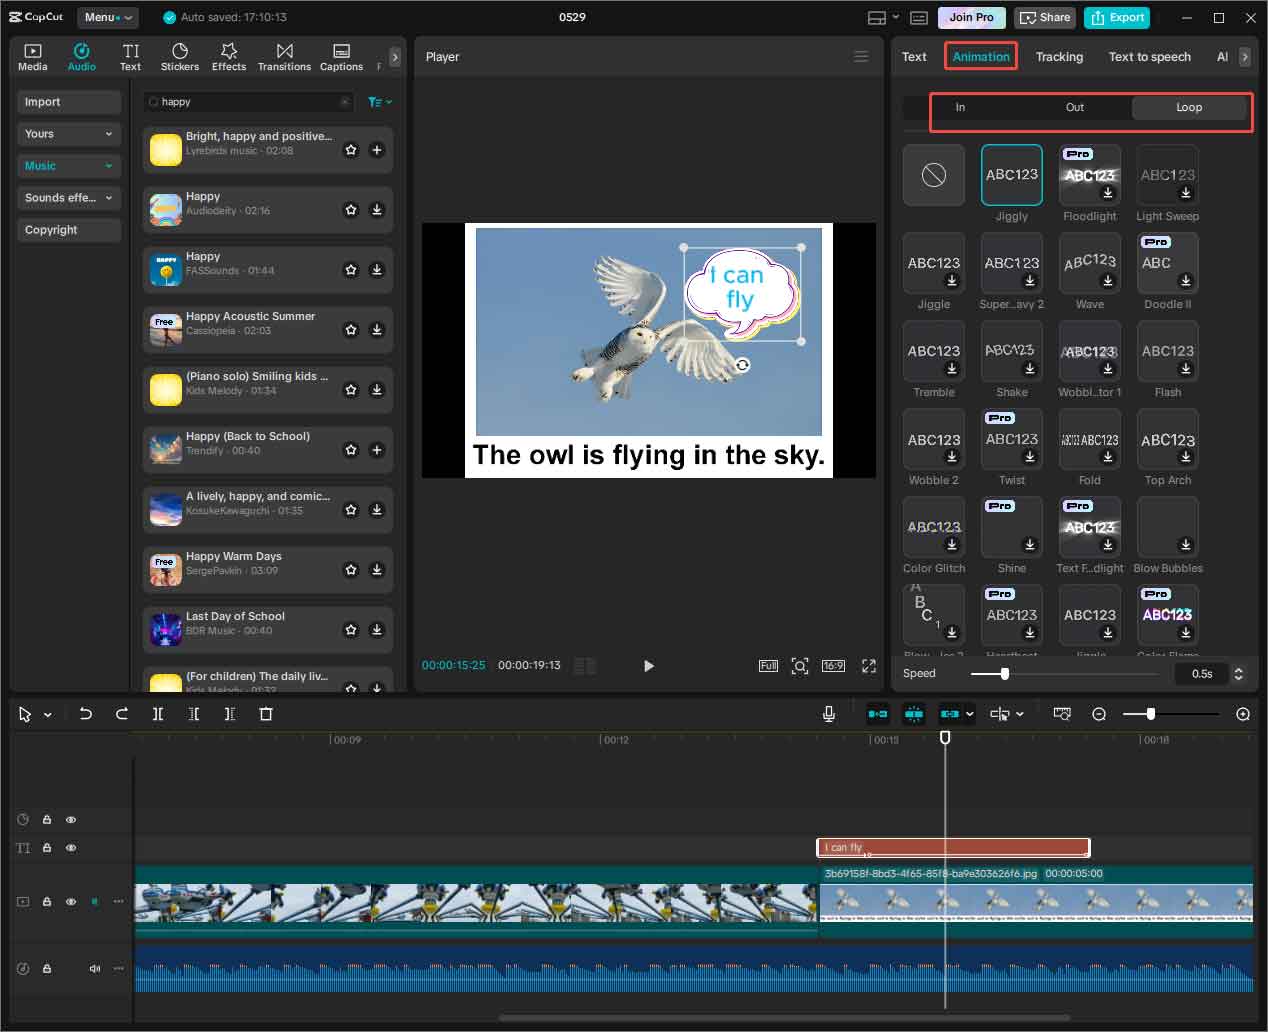
Step 6. Add Text to Your Video
Switch to the Text tab. There, add a default text first. Then, you can decorate your text with the basic content parameters just like in Microsoft Word, but more powerful than it.

Besides, you are able to add beautiful bubbles to your text, making it more fascinating to viewers.
Moreover, you are allowed to add entrance, exit, and loop animation effects to your video text in CapCut. Thus, your text will become dynamic and vivid.
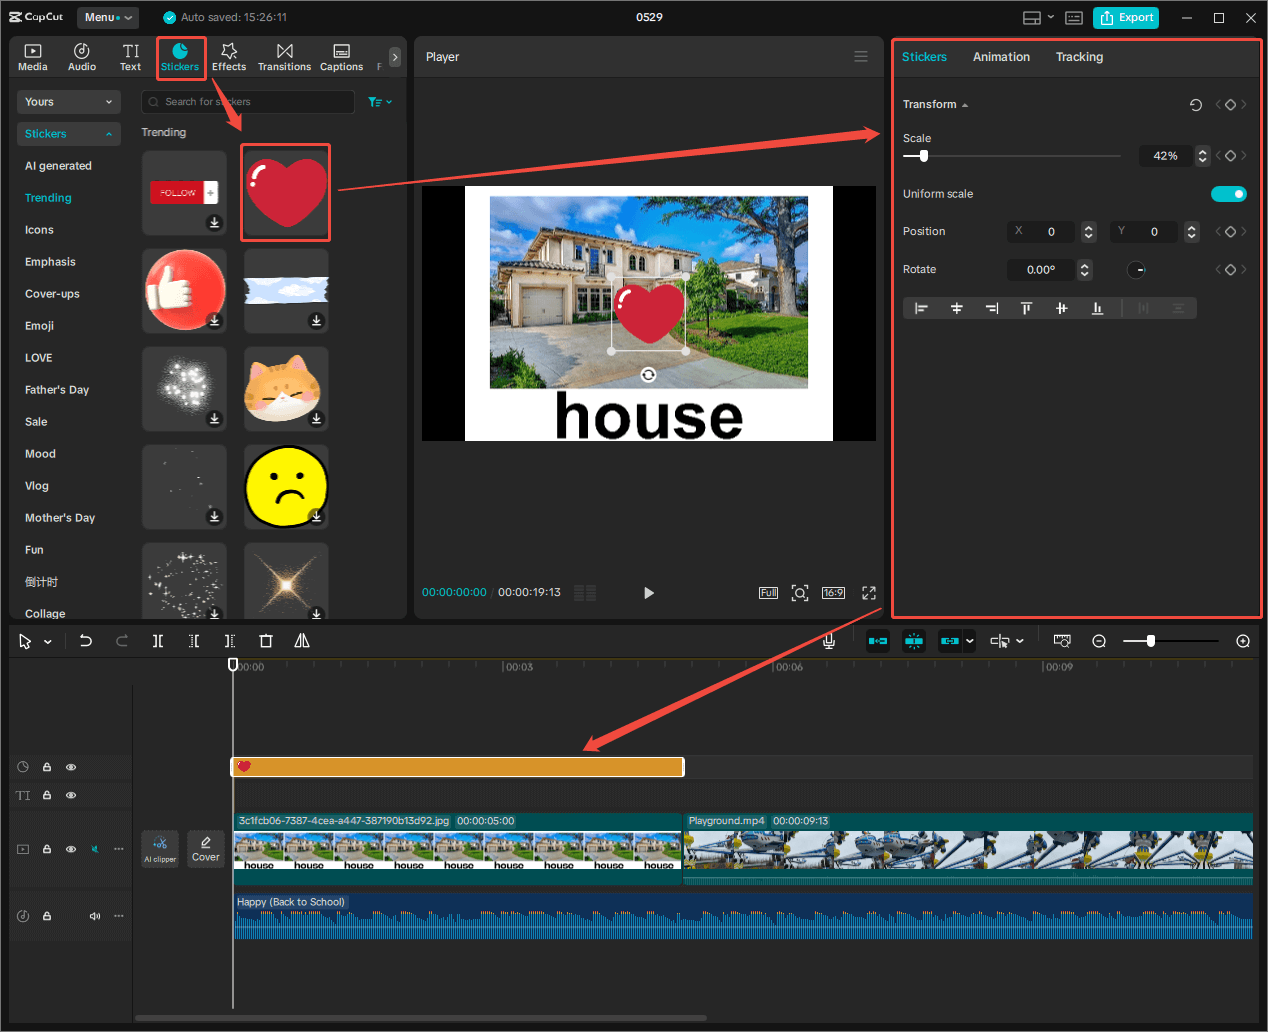
Step 7. Add Funny Stickers to Your Video
If you want to make your video more interesting, you can add some cute stickers to it. Just pick a moment where you think is boring and may lose your viewers, shift to the Stickers tab, pick out a proper animation, and apply it.
That’s not the end. You need to adjust the size, location, motion, etc. of the sticker to make it fit into your video smoothly without any inharmony.
There are so many features in CapCut that can help you optimize your video and improve your video engagement. However, I can’t list them all here. So, I’d like to leave the rest of them for your exploration.
Step 8. Export Your Video
Finally, when you have completed all the editing work, you can save your video in a format suggested by Facebook, including H.264 video code, MP4 format, 30 fps frame rate, and AAC audio codec.

When you get the refined video, you can upload it to your Facebook account and I’m sure you will get a lot of views, likes, and shares.
How to Make a Video for Twitter/X
After talking about Facebook video editing, it’s time for Twitter video creation.
Twitter/X Video Specs
Below introduces both recommended and allowed video specifications on Twitter.
Recommended:
- Video Codec: H264 High Profile
- Frame Rates: 30 FPS, 60 FPS
- Video Resolution: 1280×720 (landscape), 720×1280 (portrait), 720×720 (square). Subscribed users can upload a 1080p video and get 1080p playback. Unsubscribed users can upload a 720p video and get a 720p playback
- Aspect Ratio: 16:9 (landscape or portrait), 1:1 (square)
- Minimum Video Bitrate: 5,000 kbps
- Audio Codec: AAC LC
- Minimum Audio Bitrate: 128 kbps
Advanced:
- Frame rate: up to 60 FPS
- Dimensions: between 32×32 and 1280×1024
- File size: maximum 512 MB
- Duration: 0.5 seconds and 140 seconds
- Aspect ratio: between 1:3 and 3:1
- Must have 1:1 pixel aspect ratio
- Only the YUV 4:2:0 pixel format is supported
- Audio must be AAC with Low Complexity profile. High-Efficiency AAC is not supported
- Audio must be mono or stereo, not 5.1 or greater
- Must not have an open GOP
- Must use progressive scan
Edit Videos for Twitter
Unlike other social media video production mentioned above, Twitter/X doesn’t allow you to modify the video content during or after uploading to its platform. Therefore, you have to well-define your clip before posting it on X.
To edit a Twitter video, this time, we take Clipchamp for example, which is a professional video editor owned by Microsoft.
Step 1. Get Clipchamp Ready
If you are using Windows 11 Build 22572 or later, Clipchamp is preinstalled on your computer. If not, you need to download and install it on your PC first.
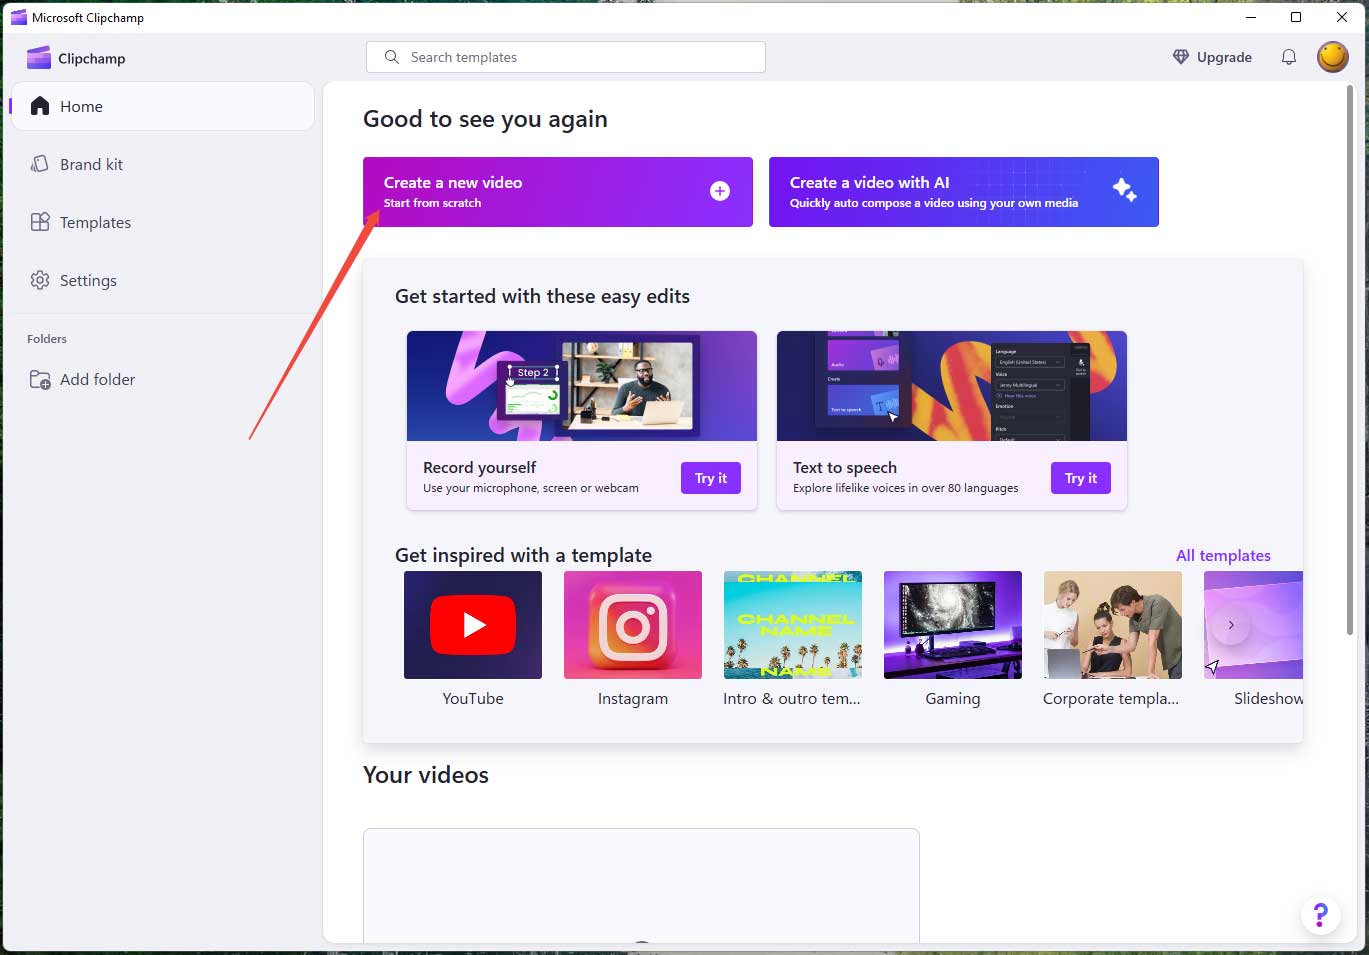
Step 2. Start Creating a Video and Add Files
Open Clipchamp and click the Create a new video option on its Home page.
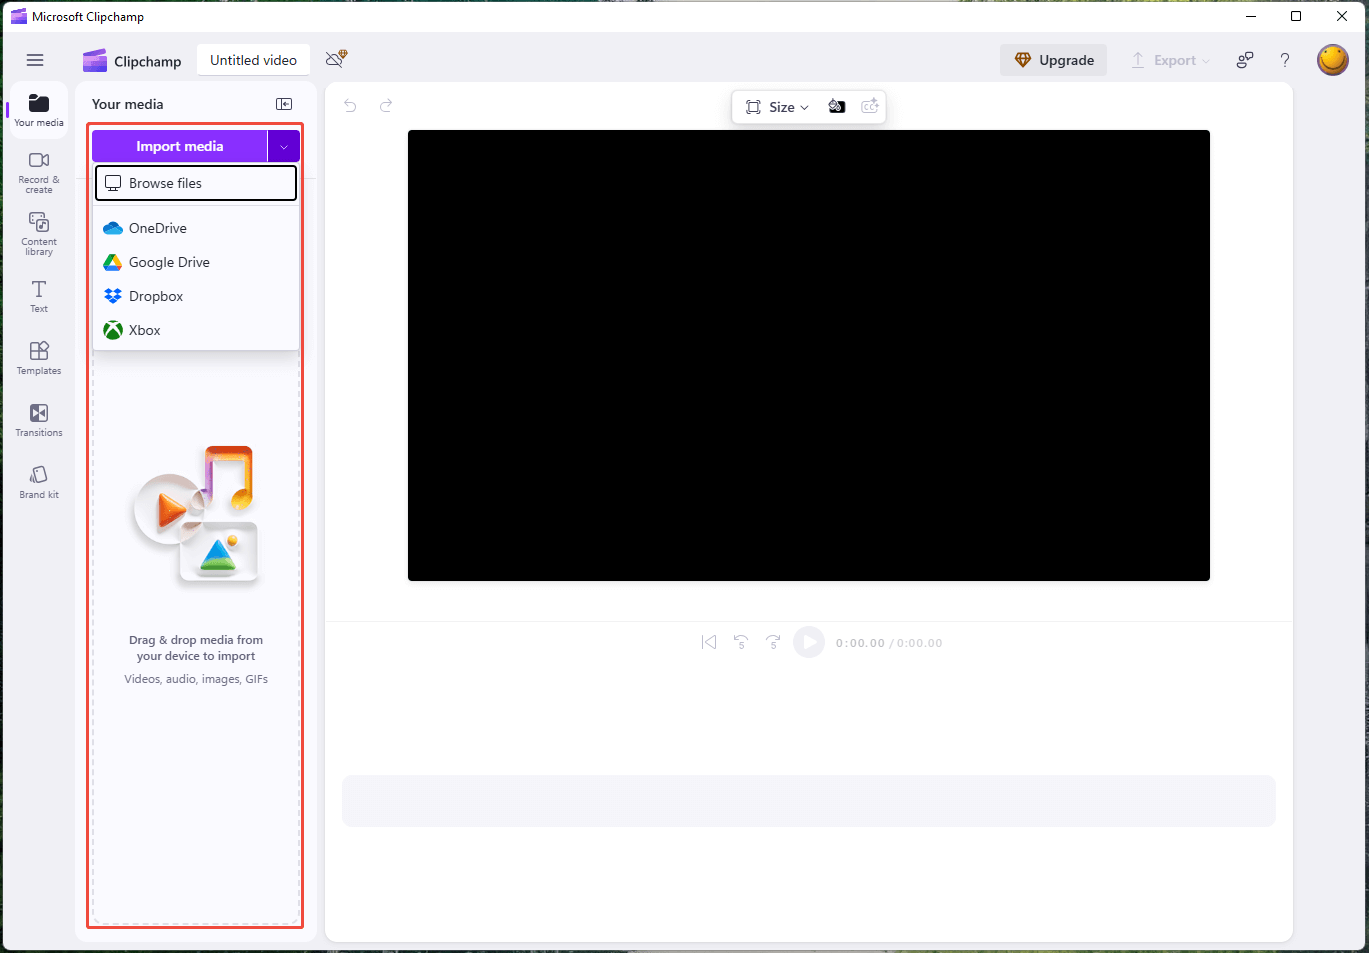
Then, you should add your source files to Clipchamp. Click the Import media option in your media tab and choose where to upload your media files from, local storage or online cloud drives.
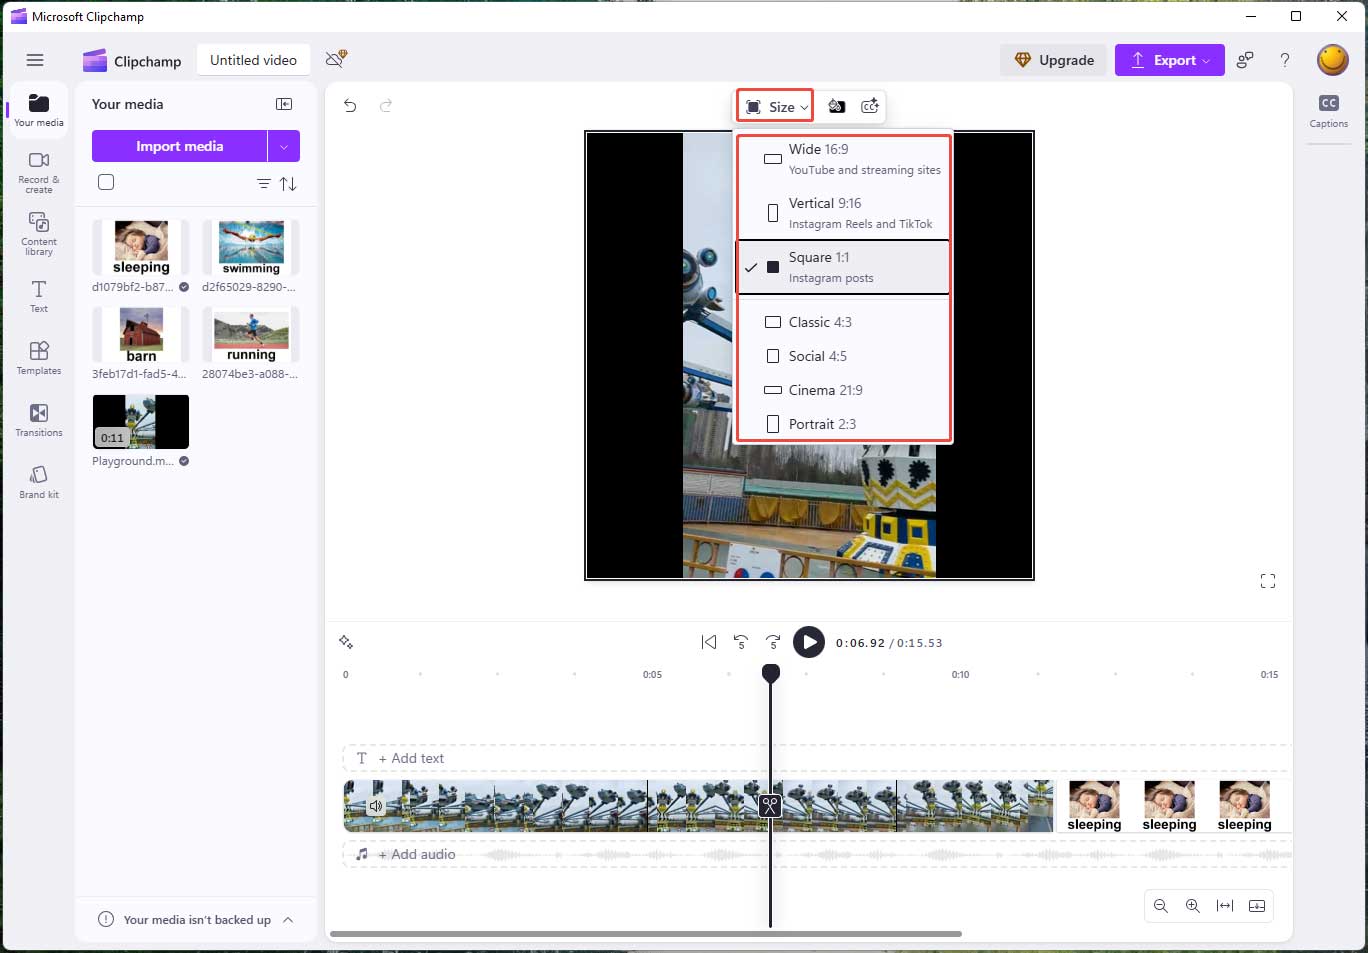
Step 3. Set Video Aspect Ratio
After adding your media files onto the timeline, the first edit you are suggested to do is to set a proper aspect ratio for your video. Just click the Size option at the top of the preview window and make your choice. Remember, Twitter only supports the aspect ratios between 1:3 and 3:1 and landscape (16:9), portrait (9:16), or square (1:1) are recommended.
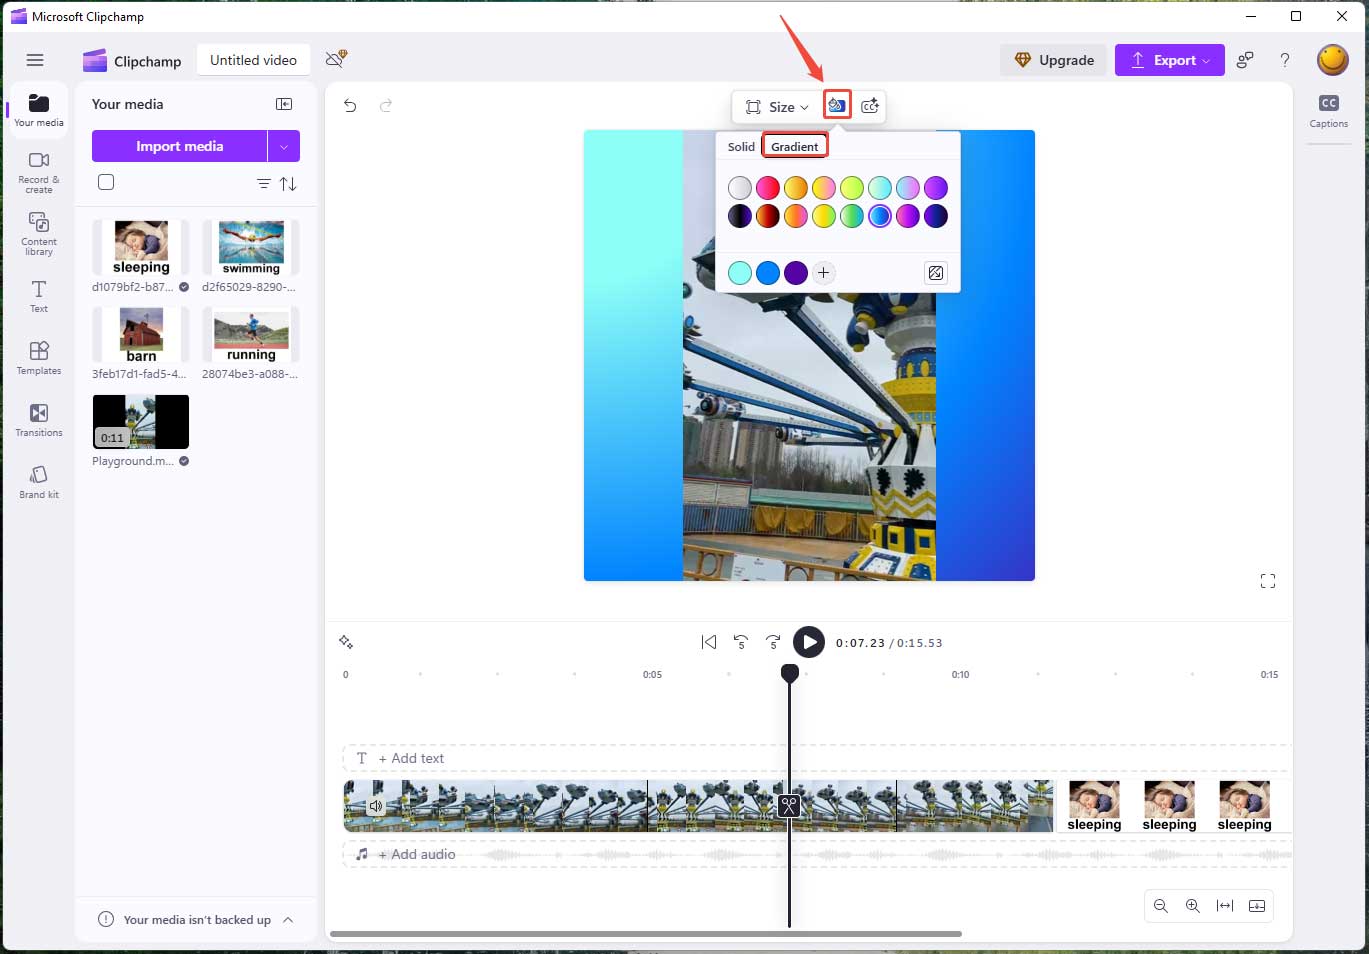
Step 4. Set Background
Sometimes, some of your source files are not well-fitted to the aspect ratio you selected. As a result, there will be black bars either on the left and right or on the top and bottom. As compensation, you can add a suitable background color to remove the black bars.
Click the Background color icon next to the Size option, choose a background color type (Solid or Gradient), and pick a color that matches your video. You’d better select a color that appears frequently in your video.
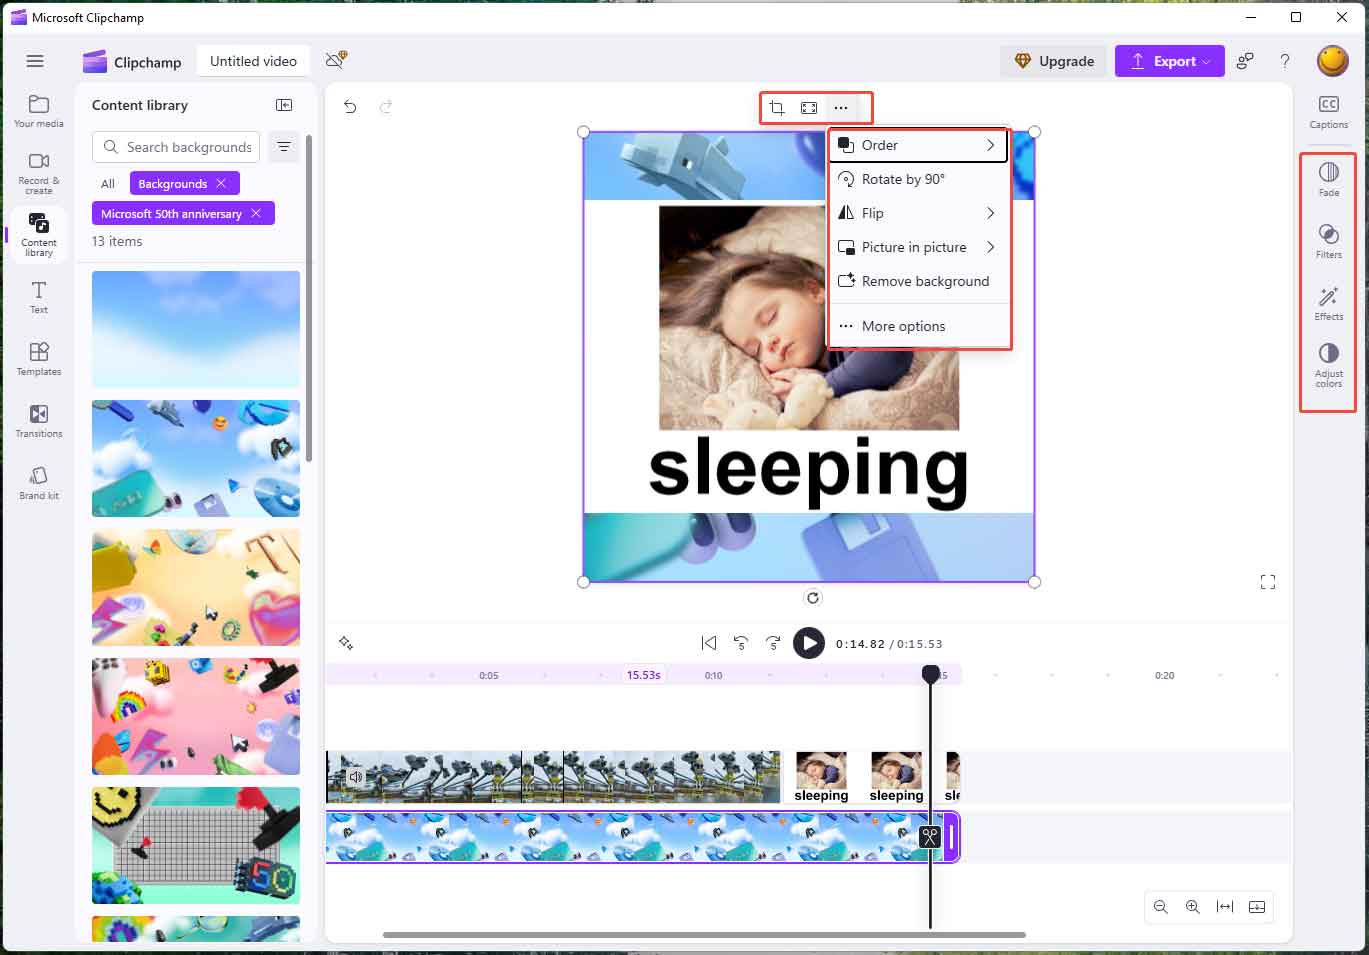
If the background color doesn’t satisfy your needs, you can further rely on the background feature. Navigate to the Content library tab, unfold the Visuals category, and choose Backgrounds.

Pick up a beautiful background and add it to your video. Moreover, you can do some refinement to the background like crop it to match your video aspect ratio, rotate/flip the background, add filters/effects to the background, and so on.
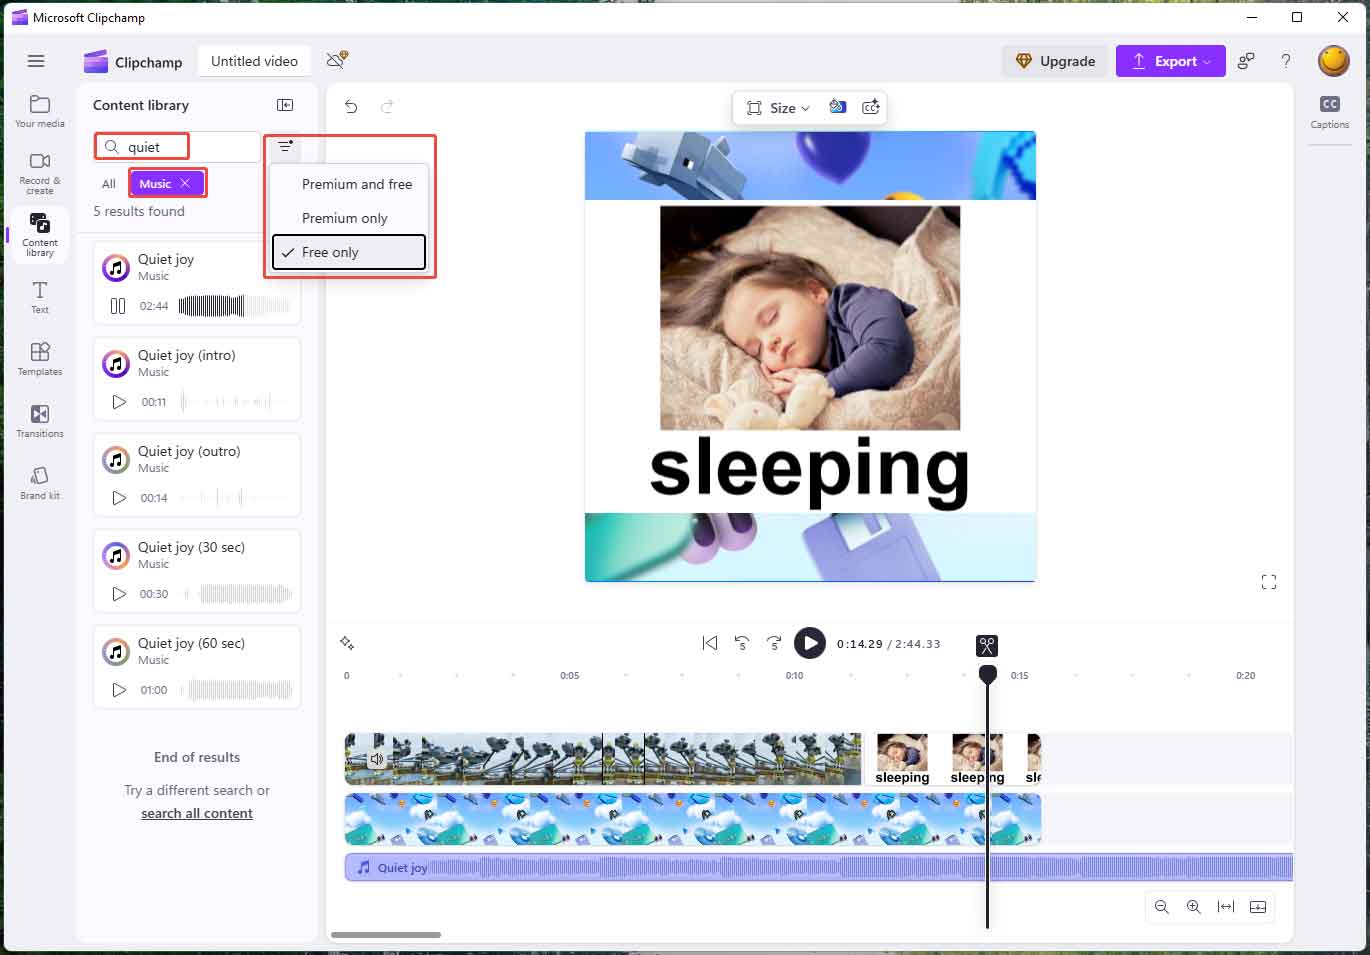
Step 5. Add Background Music
Until now, a piece of music for the occasion is necessary. Expand the Audio category from the Content library and choose Music. Then, you can input the keywords that most describe the music you want into the search box to help you figure out proper choices.
However, some songs are only available for premium users. To exclude these options, just click on the filter icon next to the search box and select Free only.
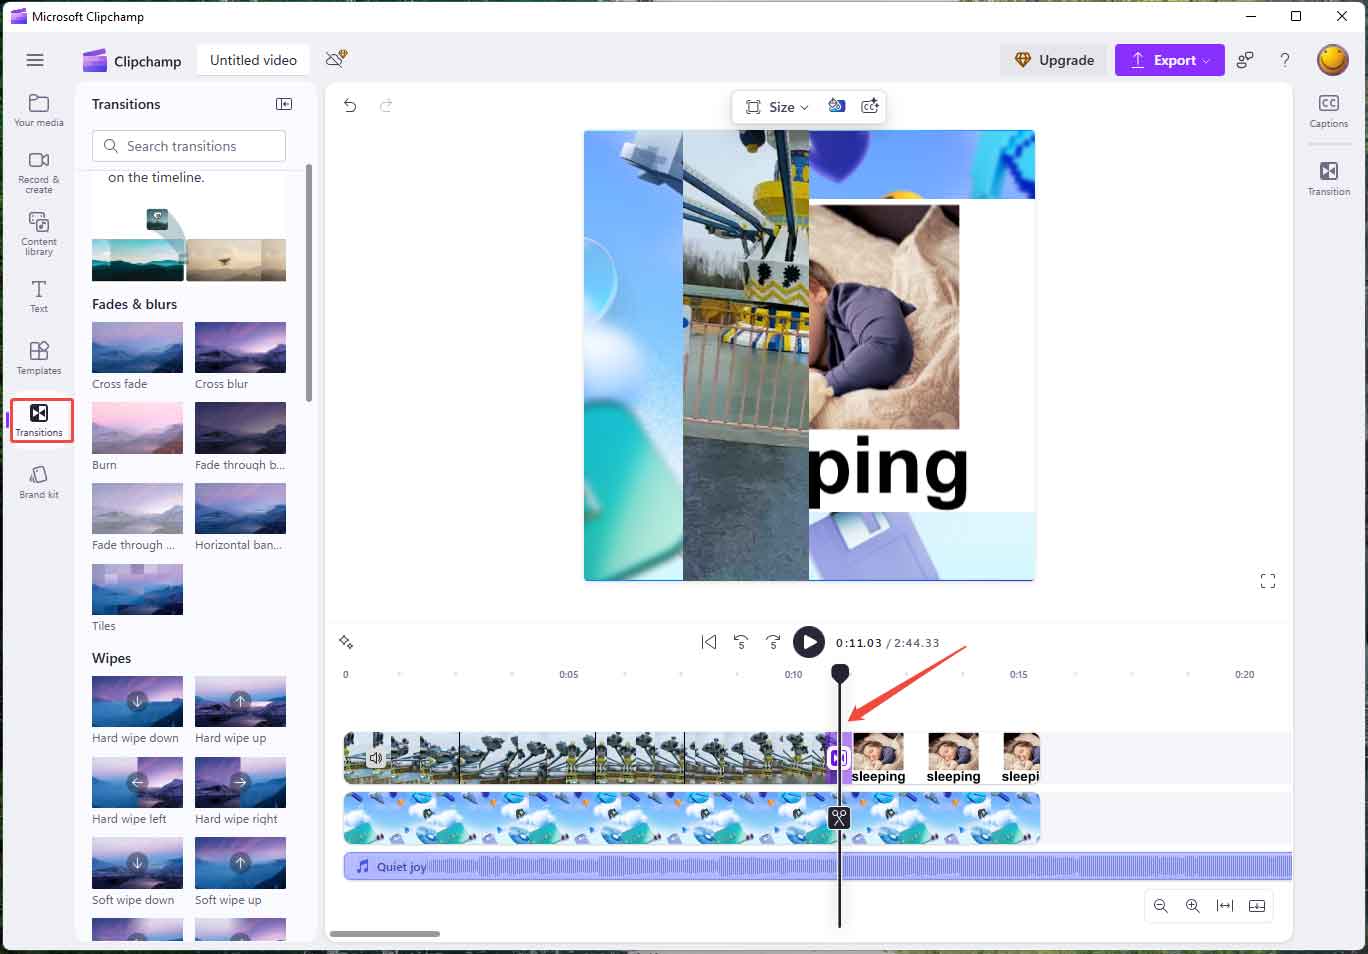
Step 6. Add Transitions to Your Video
If you have more than one clip in your video, using a transition between two clips can give a smooth switch from one clip to another. Generally, go to the Transitions tab, find your desired transition and put it between the two clips. Done!
A viral video can never miss fine edits like text description, sticker decoration, color painting, speed adjustment, etc. Just optimize your video according to your needs with Clipchamp.
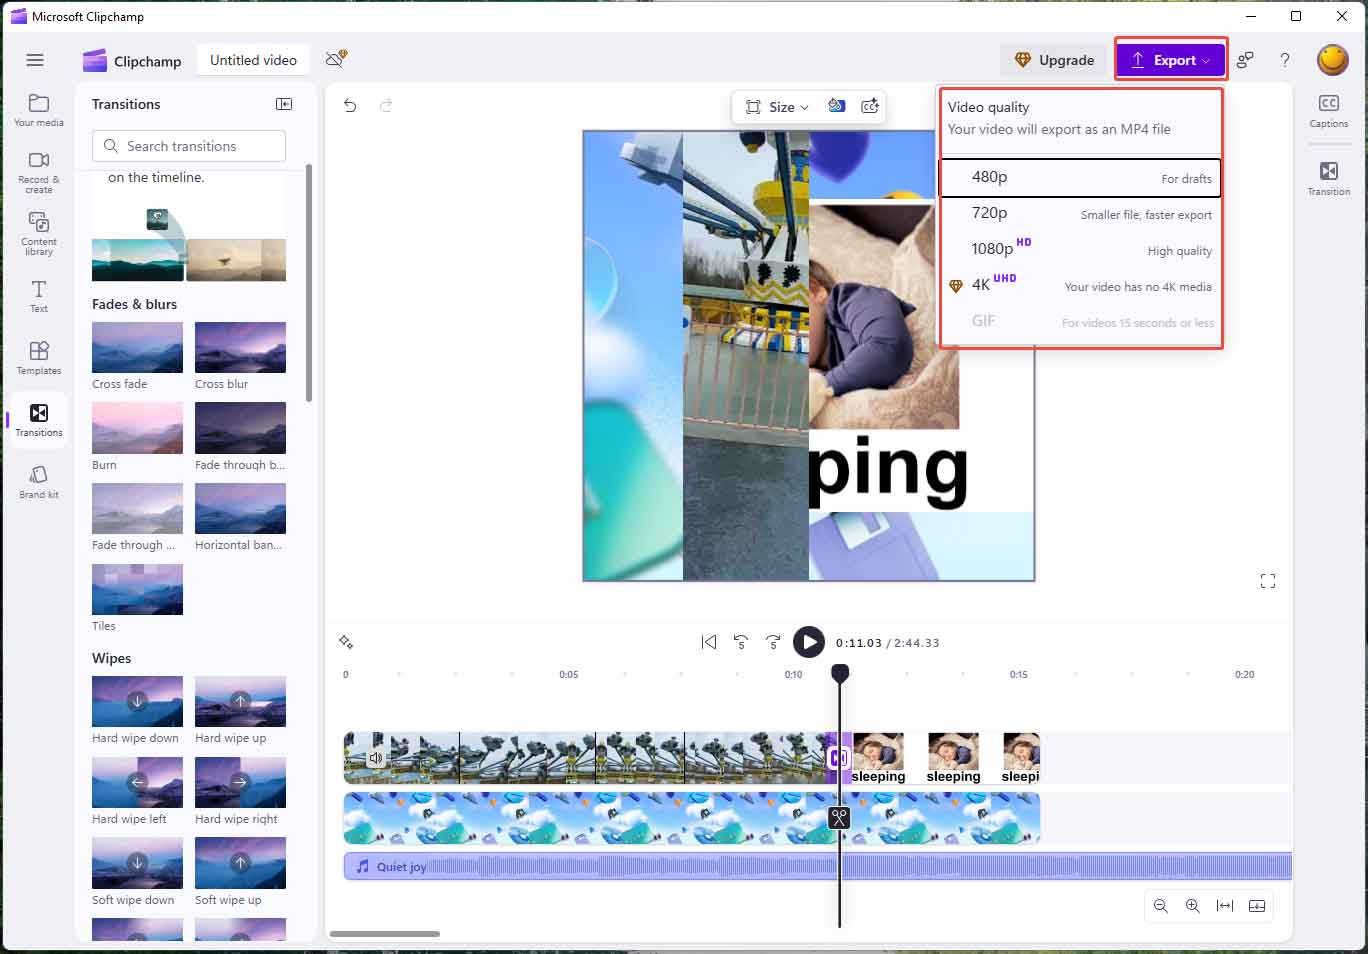
Step 7. Save Your Video
When you get all edits done, it’s time to save the changes and export your video. Click the Export button from the top right and select a resolution you prefer, but remember to be compatible with Twitter’s dimension requirements.
Nice work! Are you ready to post your video to Twitter?
How to Make a Vimeo Video
Vimeo is a famous video hosting, sharing, and services provider that focuses on the delivery of high-definition videos across many devices. It operates on a SaaS (software as a service) model.
Vimeo Video Specs
The following are the Vimeo official recommended video settings:
Video Codecs
- H.264
- H.265 (HEVC)
- Apple ProRes 422 (HQ)
Frame rate (constant frame rate instead of variable frame rate)
- 23.98
- 24
- 25
- 29.97
- 30
- 50
- 59.94
- 60
Bit rate (variable bitrate)
Resolution
Pixel aspect ratio of 1:1 or square pixels.
| Format | Resolution (px) |
| SD 4:3 aspect ratio | 640 x 480 |
| SD 16:9 aspect ratio | 640 x 360 |
| 720p HD 16:9 aspect ratio | 1280 x 720 |
| 1080p HD 16:9 aspect ratio | 1920 x 1080 |
| 2K 16:9 aspect ratio | 2560 x 1440 |
| 4K UHD 16:9 aspect ratio | 3840 x 2160 |
| DCI 4K UHD 17:9 aspect ratio | 4096 x 2160 |
| 4K Monoscopic 360 2:1 aspect ratio | 4096 x 2048 |
| 4K Stereocopic 360 2:1 aspect ratio | 4096 x 2048 |
| 8K UHD 17:9 aspect ratio | 8196 x 4320 |
Color Primaries and Matrix Coefficients
All accepted, but Vimeo recommends BT.2020 (Rec. 2020) or BT.709 (Rec. 709).
Color Transfer Characteristics
For standard (SDR) videos, Vimeo supports a wide range of transfer characteristics. For HDR videos, it only supports the PQ (SMPTE 2084) or HLG transfer function.
Bit depth
10 or greater.
Scan type
Progressive and recommend deinterlacing videos.
Audio Codec
AAC-LC (Low Complexity AAC)
Data rate
320 kb/s
Sample rate
48 kHz
How to Create a Video on Vimeo
After learning the above specifics, you can now create a qualified Vimeo video. There are two choices for you: creating a Vimeo video either by a third-party video editor or with the Vimeo built-in video creator. Here, we will take the official video creation feature for example to show you the steps.
Step 1. Access Vimeo Video Creator
Visit the Vimeo website and log in to your account. Then, click the Create option to access the video creation page.

Step 2. Upload Media Files
Click the Upload option in the left section to add your media files for creating a Vimeo video.
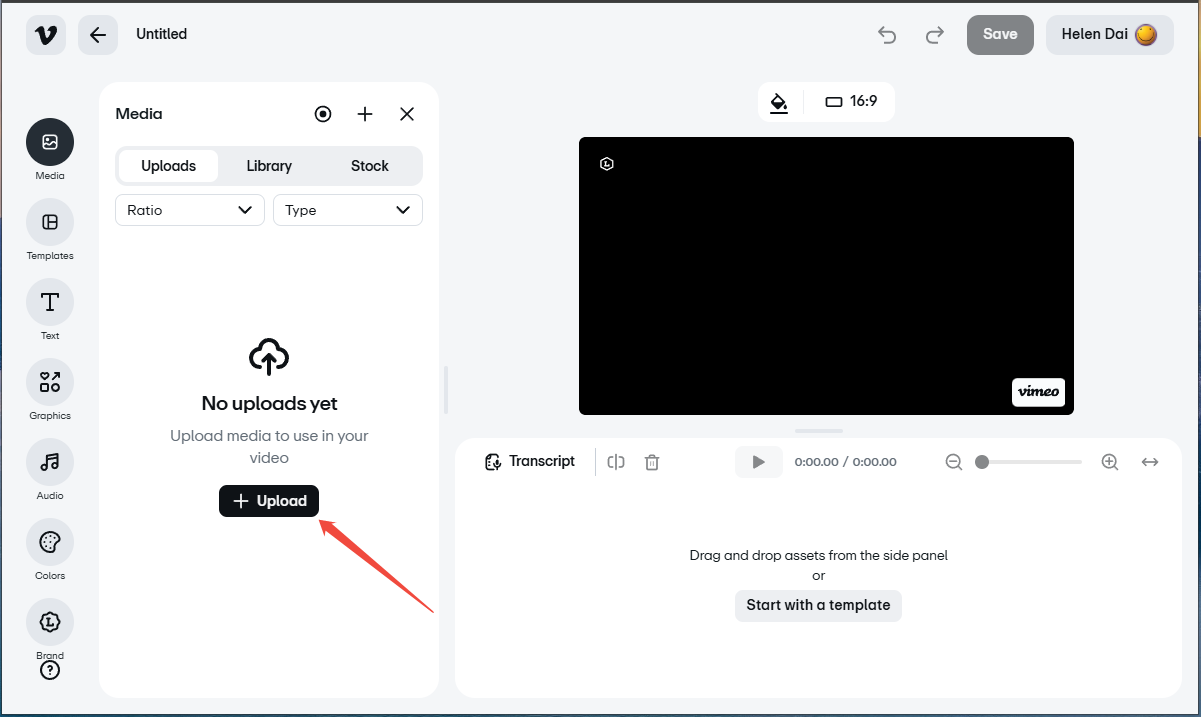
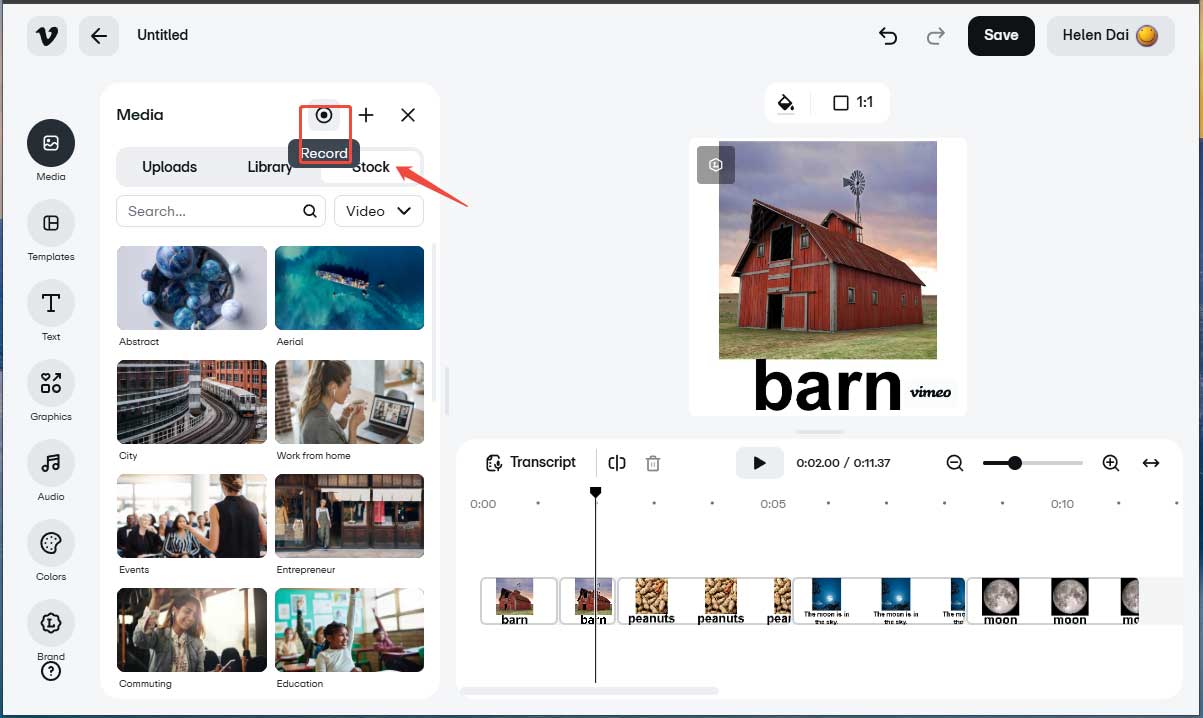
Besides uploading recorded video files, you can use the Record feature in Vimeo to capture a resource clip for your video. Or, use the materials in the Stock library.
Step 3. Create a Video in Vimeo
Next, take your patience to make a beautiful Vimeo video.
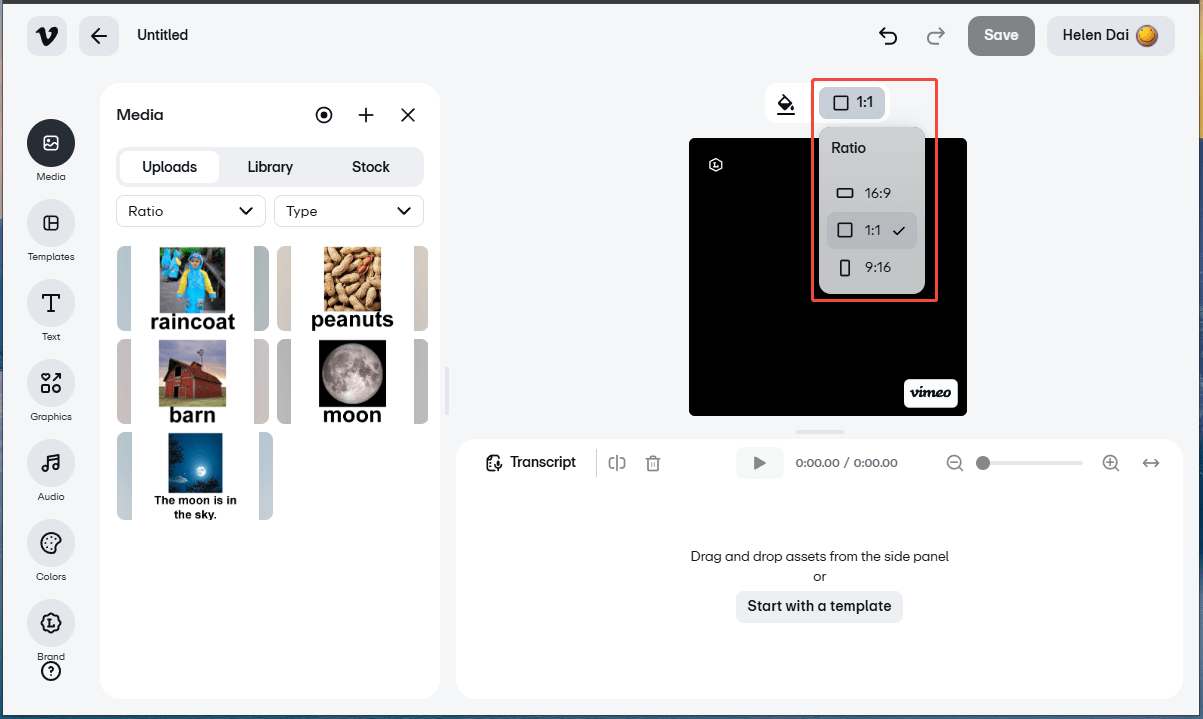
Set Video Aspect Ratio
First of all, click the Ratio option at the top of the preview window and select a Vimeo-compatible video aspect ratio. Here, we choose the common 1:1.
Then, add the uploaded media files to the timeline.
Crop Video
Click on the target clip on the timeline to select it. Click the Crop icon on the preview window, expand the Crop ratio drop-down menu, and choose a crop ratio to crop the selected clip accordingly. Then, click the tick icon to save the change. Since we have chosen a 1:1 video aspect ratio, here we need to select the square crop ratio.

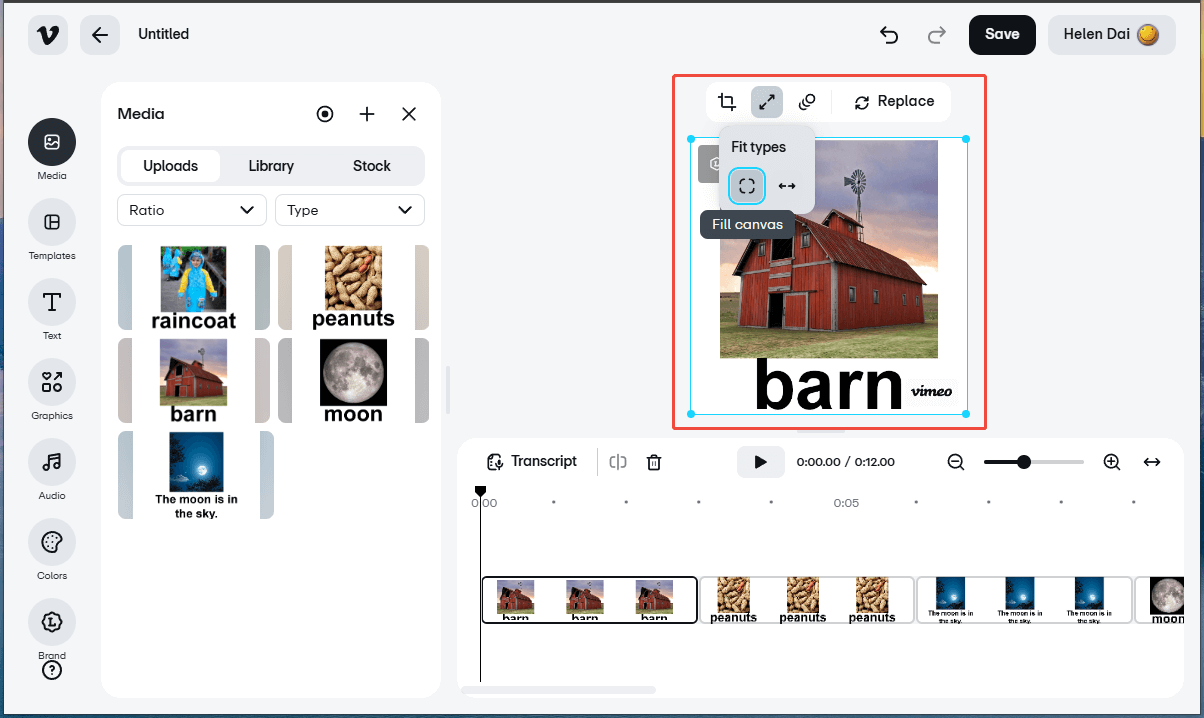
Match Video to Canvas
Click the Fit types icon at the top of the preview window and select Fill canvas or Fit to canvas. This can help you minimize the chance of generating black bars in the video.
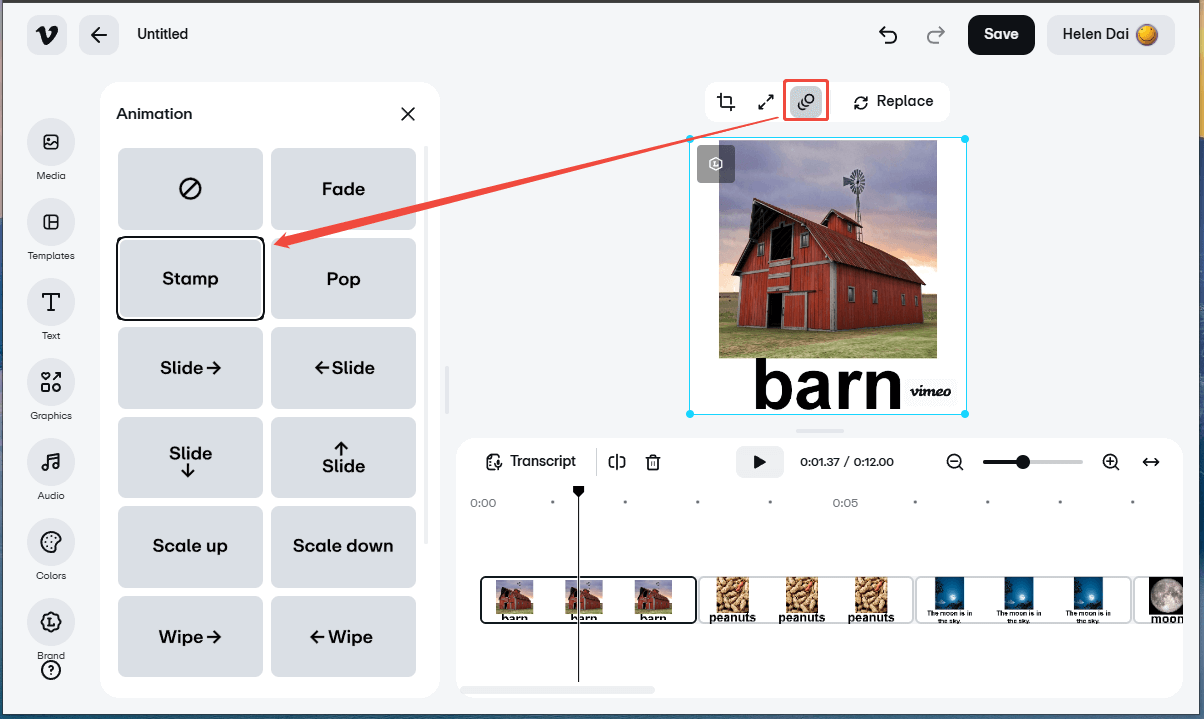
Add Animation to Video
Next, click the Animation icon at the top of the preview window and select an animation type from the left pop-up list.
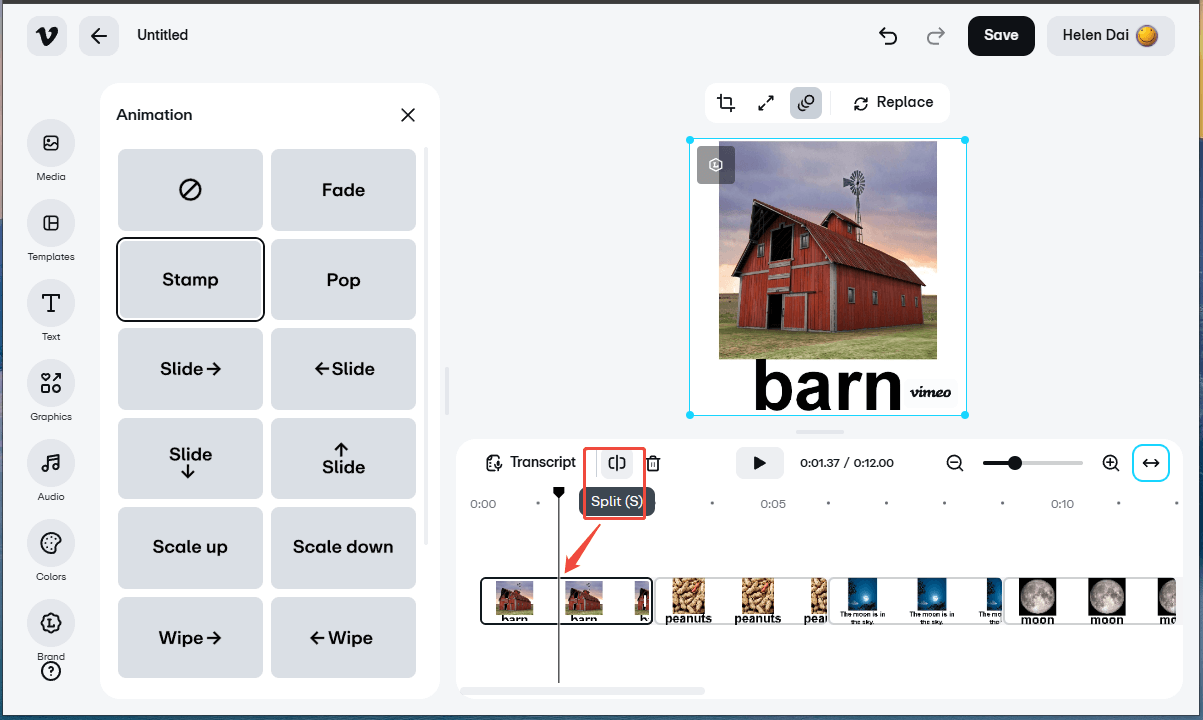
Split Video
If you want to insert something like a transition or another clip within a consequent clip, you need to first split the current clip. Move the playhead where you want to make the insertion and click the Split icon on the timeline toolbar. The target clip will be cut into two pieces immediately. Then, you can continue to add elements between them.
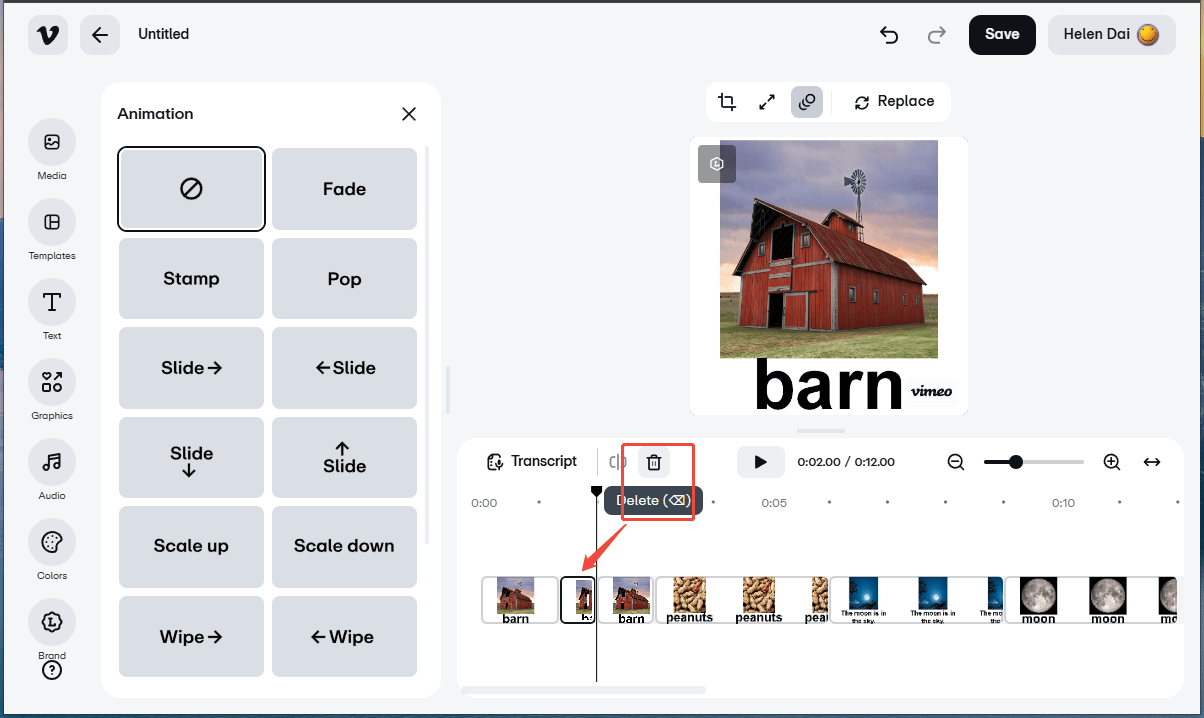
Delete Video Clip
If there are unwanted parts in your video, you can remove them after separating them using the split feature mentioned above. Split one or more times to separate the unnecessary clip, then click on the clip and click the Delete icon on the timeline toolbar.
After removing the unwanted clip, there will be a gap between the former and latter clips. While common video editors will automatically fill the gap by moving the latter clips forward, the Vimeo video editor won’t do so. Therefore, you have to delete the gap manually.
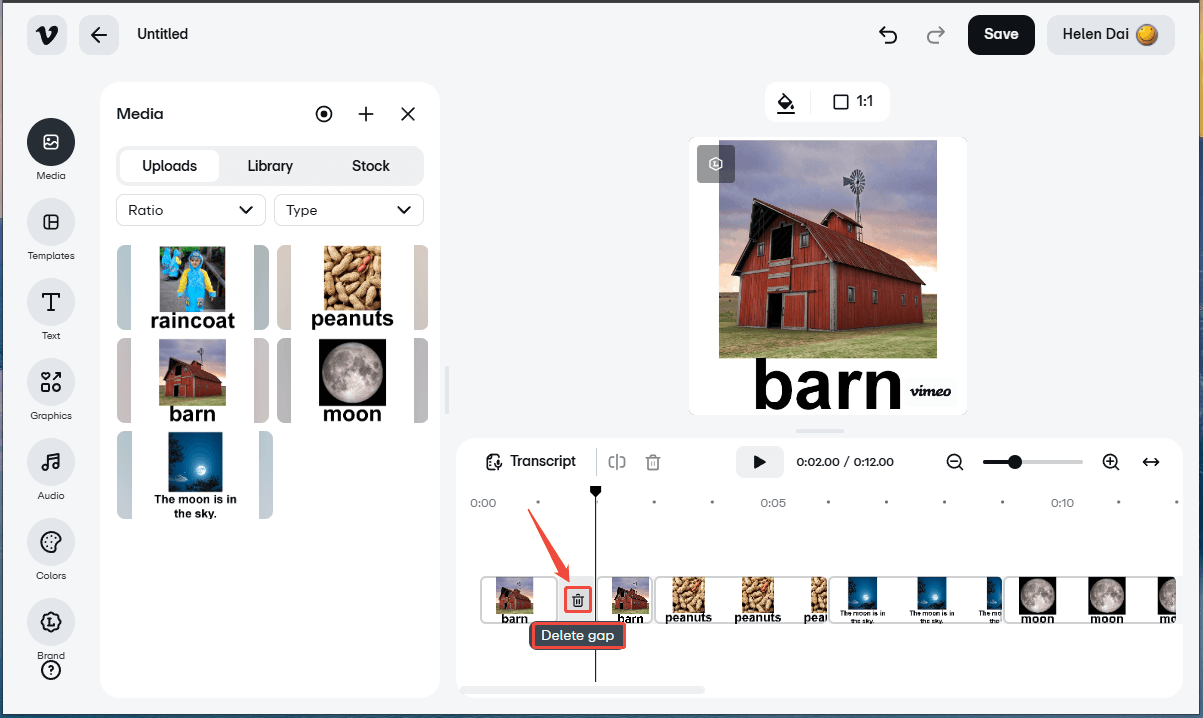
You may find this annoying, but it won’t be a matter for users who just want to insert something there. They can fill the gap with the desired new clip.
Other Video Editing Features
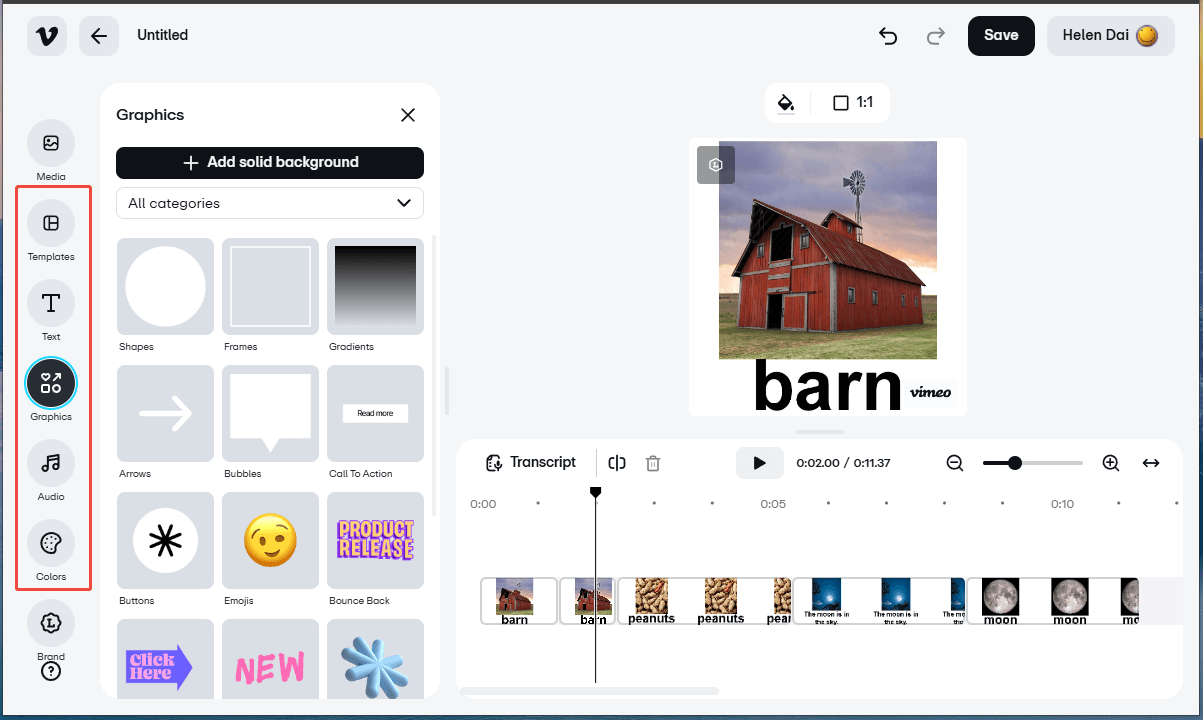
Besides, there are many more video editing features in the left panel of the Vimeo video editor.
- Templates: quickly create Vimeo videos for various cases.
- Text: add texts to your video to describe a special moment.
- Graphics: add widgets (shapes, frames, gradients, buttons, emojis, etc.) to optimize your video.
- Audio: add sound effects to your video either from the Vimeo audio library or uploaded by yourself.
- Colors: add beautiful colors to make your video more fascinating. (Paid feature)
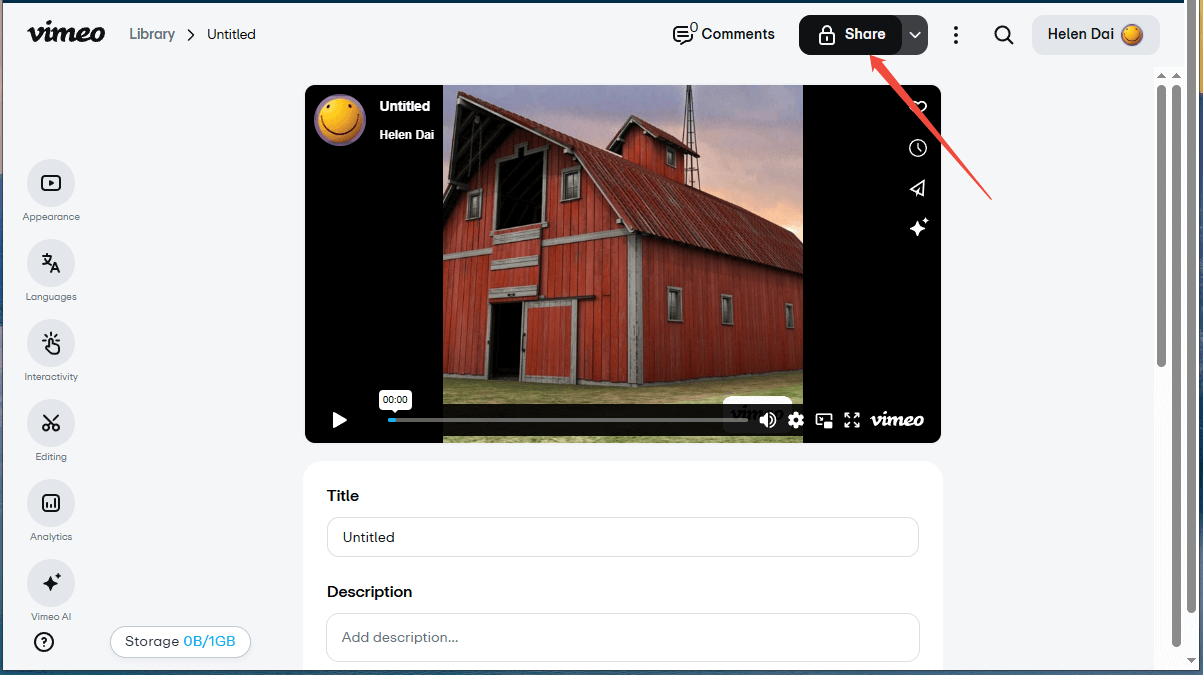
Step 4. Save and Share Vimeo Video
When you complete all the editing work, just click the Save button on the upper right to save your Vimeo video. Then, you can click the Share button right there to share your video on Vimeo.
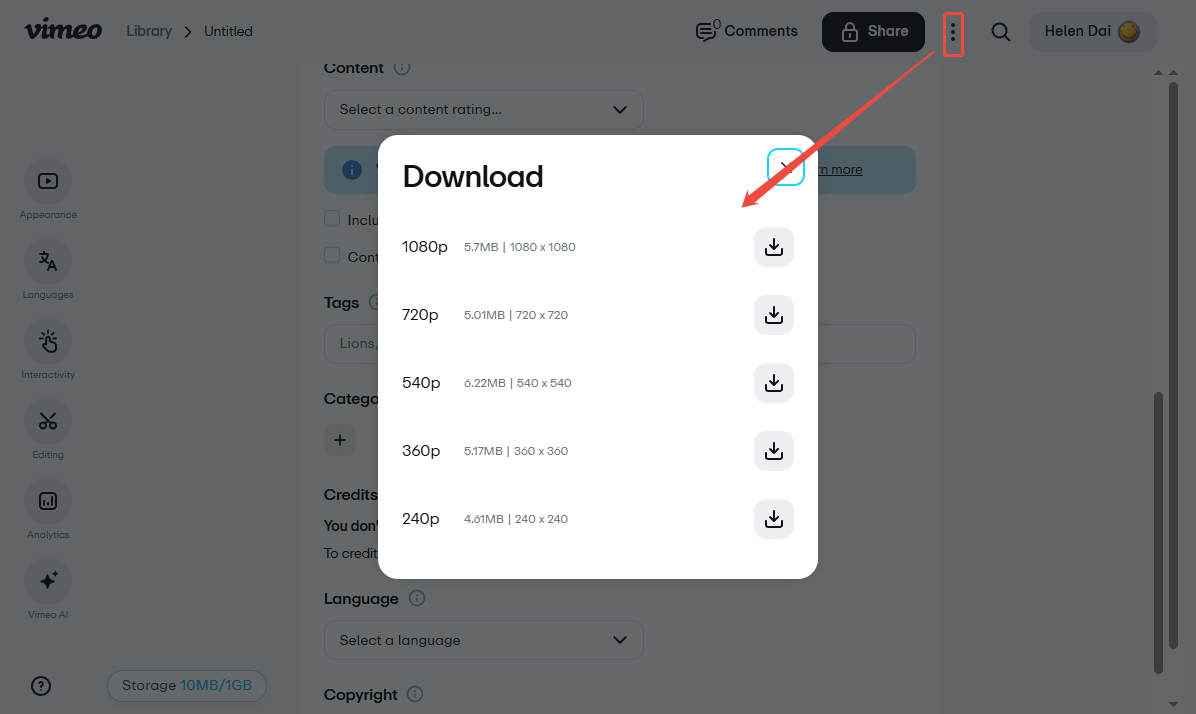
Step 5. Download Vimeo Video
Of course, you can download your Vimeo video for offline playback. Click on the File actions icon next to the Share button and select a video resolution to download.
That’ all for making a Vimeo video with the official video editor, which is convenient for users who want to create a video and directly share it to Vimeo. However, the created video will have a big Vimeo logo on its bottom right corner. If you don’t want such a logo, you can rely on third-party Vimeo video editors like the video creators described above.
Conclusion
Once again, good video contents behave better on social platforms. They gain more views, likes, shares, and comments. People like to interact with them and follow the ideas. If you want to make your videos popular and learn how to do social media video production, just refer to the tricks in this article.
Finally, if you encounter any problem while using MiniTool MovieMaker, don’t hesitate to contact [email protected] for help! Or directly leave your comments below!
About The Author

Position: Columnist
Helen is a tech writer with over 10 years of experience. She specializes in creating easy-to-follow guides for video editing, media file conversion, and computer performance. Helen doesn't just write—she tests every software herself and listens to feedback from users and experts. Her goal is to make complex programs simple so that everyone can solve their tech problems with confidence.
User Comments :