Want to make a slow motion in a certain part of a video? Do you know how to slow down part of a video? If you don’t know how to do it, don’t worry. This article from MiniTool MovieMaker (one of the best free video editing software) will show you different methods.
Slowing down a part of a video is an editing technique that can significantly enhance the viewer’s perception of a particular moment. In this article, I will discuss why you need to slow down part of a video, explore the tools you can use for video speed manipulation, and provide step-by-step instructions on how to slow down part of a video using popular video editing tools like MiniTool MovieMaker, CapCut, and Clideo.
Why Slow Down a Part of a Video
Slowing down a part of a video can serve several purposes, each adding its own style to the video. Here are some common reasons why you need to use this technique:
Aesthetic and Dramatic Effect
Slowing down a video can add a dramatic and cinematic feel. For example, you can use slow motion to emphasize a key action or moment in the video, like a person catching a ball successfully. It draws the viewer’s attention to that moment, making it more memorable.
Highlighting Details
Sometimes, you may want to highlight small, intricate details that viewers might miss. Slowing down allows you to show these details clearly. For instance, if you are showcasing a tutorial or demonstration, slowing down some key steps can help viewers understand better.
Comedy or Fun Effect
In some cases, slowing down a video adds a humorous touch. For example, if a character trips or does something funny, slowing down that part of the video can turn it into a comedic moment.
Creating Smooth Transitions
Slowing down a segment of a video can also be used in transitions. For example, when you want to transition from one scene to another, slowly decelerating the current scene can give a smooth, flowing effect. It can feel more natural and less jarring to the viewer.
Focusing on Emotional Impact
Certain moments of a video carry emotional weight, such as a heartfelt goodbye, a victory celebration, or a surprising plot twist. Slowing down these moments helps enhance the emotional impact, allowing the viewer to process the emotion.
Tools You Can Use
There are several video editing tools available that allow you to slow down specific parts of a video, along with other features that can enhance your editing experience. Here are some popular tools:
#1 MiniTool MovieMaker
MiniTool MovieMaker is a beginner-friendly, free video editor without watermark that offers a variety of editing features, including the ability to slow down specific parts of a video. It allows you to control video speed with simple steps. In addition to speed adjustments, you can also use it to cut video, trim video, create video from images, and more. It supports 9 video tracks and 2 audio tracks, so you can create rich video effects. Even if you’re a beginner, you can easily use all its features without any editing experience.

MiniTool MovieMakerClick to Download100%Clean & Safe
#2 CapCut
CapCut is a popular video editing app for creating short videos. You can easily change the speed of the video evenly or unevenly. Besides speed adjustments, CapCut offers a variety of tools, such as filters, effects, text overlays, transitions, and music integration.
#3 Clideo
Clideo is an online video editing platform that allows you to slow down part of a video directly from your web browser. Clideo also offers additional video editing tools, including options to merge videos, compress video files, add subtitles, and convert videos to different formats. It’s a convenient and quick tool for anyone looking to make basic edits without downloading any software.
#4 Adobe Premiere Pro
Adobe Premiere Pro is a professional video editing application used by filmmakers, content creators, and video professionals. It provides highly precise control over video speed and can slow down specific portions of a video with great accuracy. Besides speed control, Premiere Pro offers a comprehensive set of features, including multi-track editing, advanced transitions, color grading, special effects, and audio editing. It’s perfect for those looking for a more advanced video editing experience.
How to Slow Down Part of a Video in MiniTool MovieMaker
If you don’t know which video editing tool to choose, I recommend MiniTool MovieMaker. Whether you’re a beginner or an experienced person, it can meet your requirements. Let’s see how to slow down part of a video in MiniTool MovieMaker.
Step 1: Download and Install MiniTool MovieMaker
First, click the button below to download free video editor. Then, follow the on-screen instructions to install it on your computer. Once it’s installed, launch the program.
MiniTool MovieMakerClick to Download100%Clean & Safe
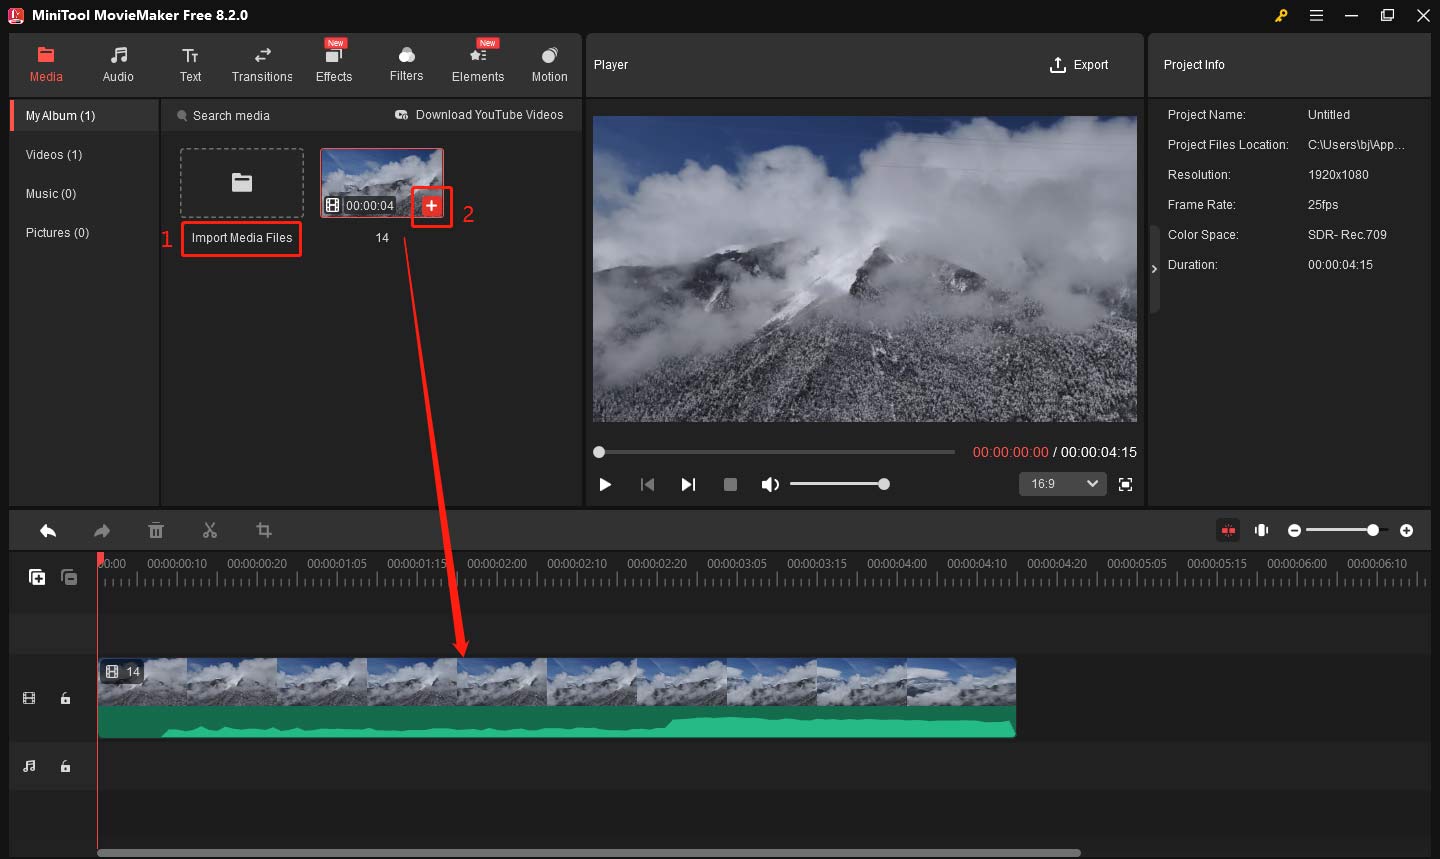
Step 2: Import Your Video
To get started, close the promotion window and click on Import Media Files to add the video you want to edit. Once the video is imported, click the plus (+) icon on it or drag and drop it to the timeline.
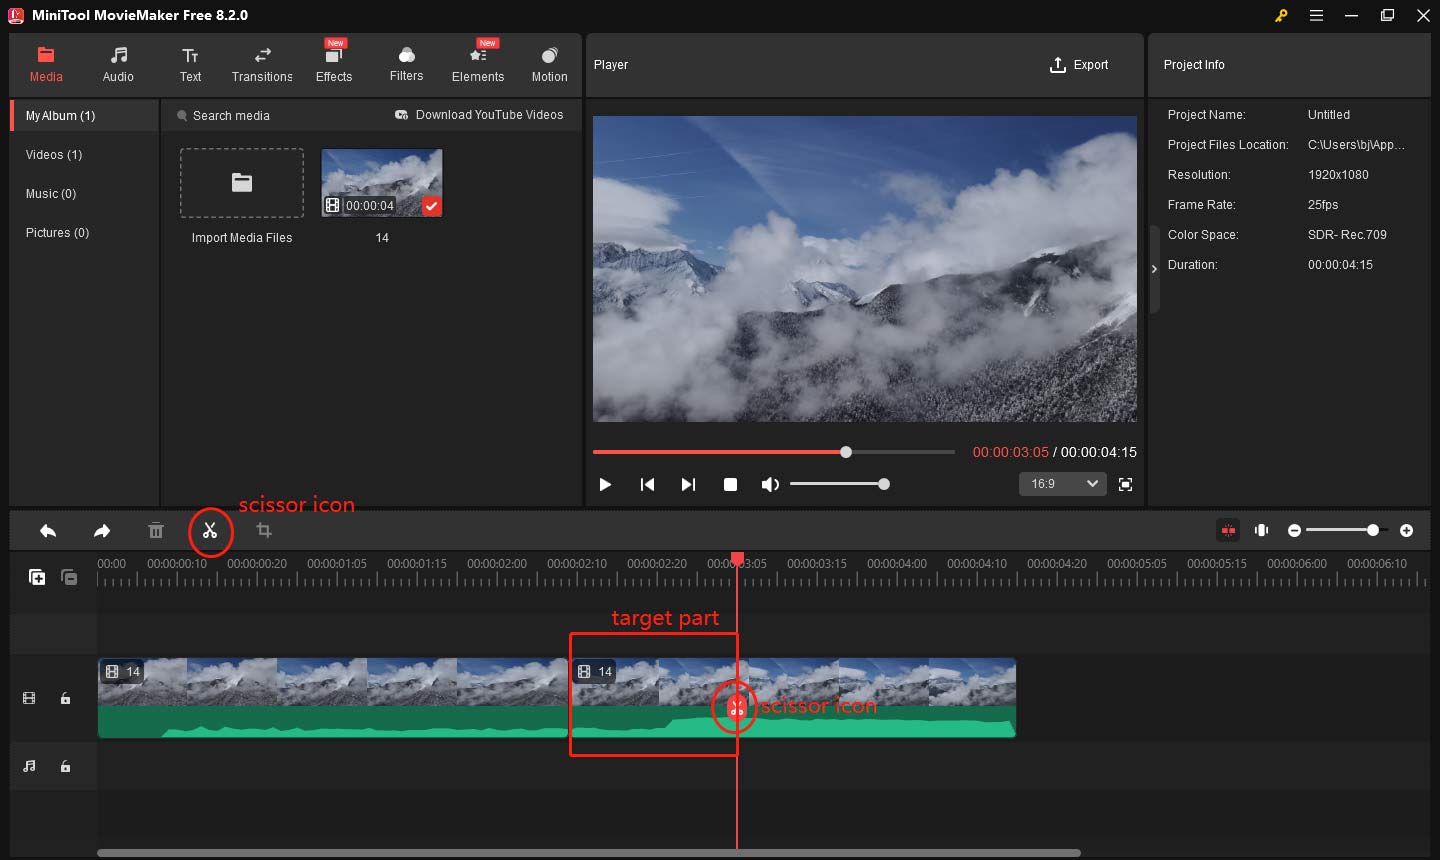
Step 3: Split Video
Click the Play (Space) icon to play through the video on the timeline and stop at the point where you want to start slowing down the video. Click the scissor icon on the playhead or on the timeline toolbar. Then continue playing the video and stop at the end of the section you want to slow down. Click the scissors icon again to separate the target part.
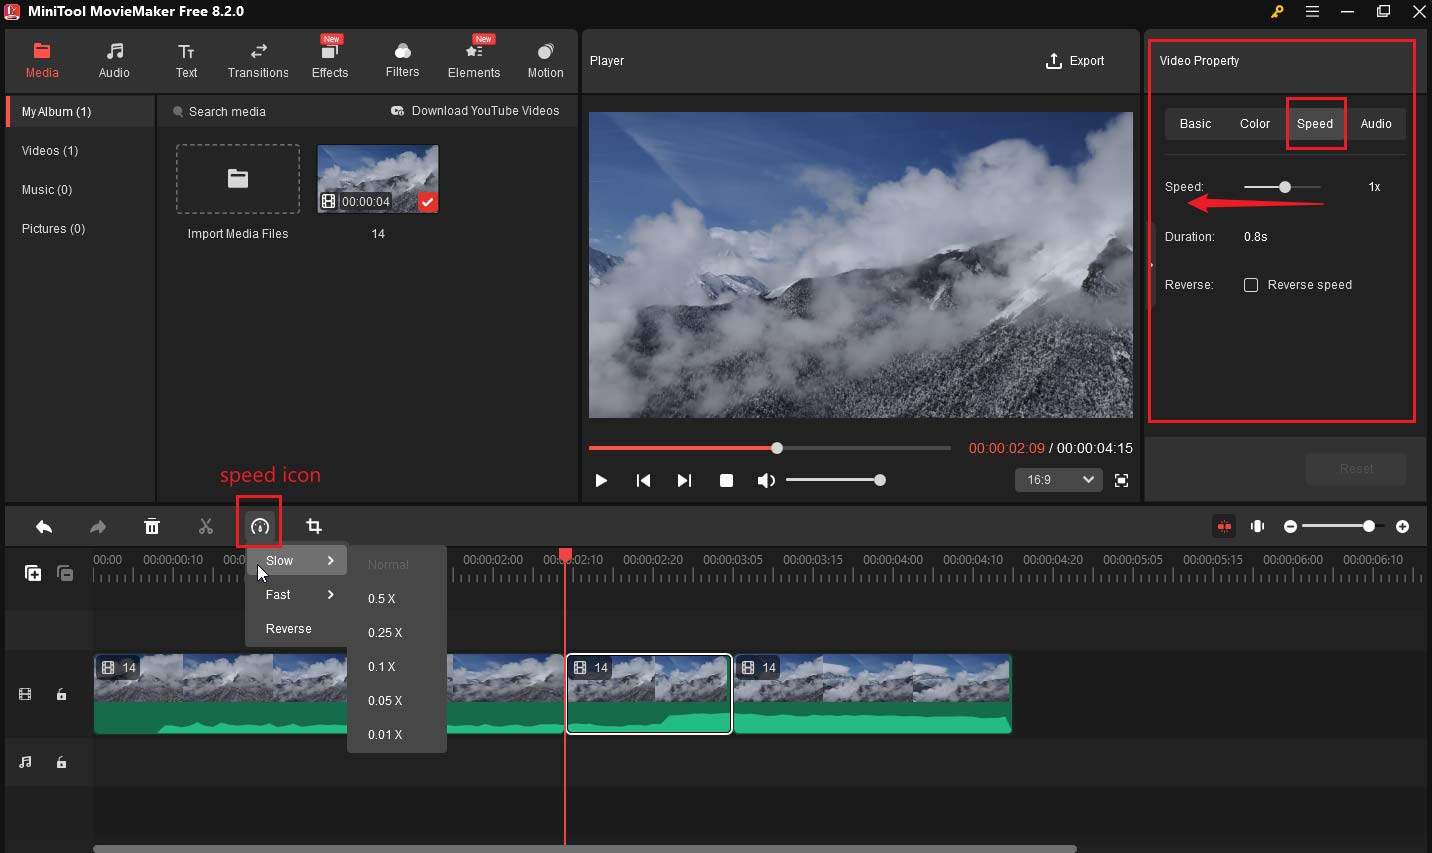
Step 4: Slow Down the Part
After you’ve isolated the part you want to slow down, click on the part on the timeline. Then, go to Video Property, click on the Speed tab, and drag the Speed slider to the left to slow down the clip. Alternatively, you can also click on the Speed icon on the timeline toolbar, choose Slow, and select a slow option according to your needs in the dropdown menu (0.5X, 0.25X, 0.1X, 0.05X, 0.01X).
Step 5: Preview and Export
Preview the video to ensure the slowed-down section looks smooth. If needed, adjust the speed further. When you are satisfied with the changes, click on Export in the top-right corner. In the Export window, choose the file location, format, resolution, etc. Finally, click Export at the bottom to save the video on your computer.
Other features of MiniTool MovieMaker:
- Text Editing: You can add titles, captions, and credits with customizable fonts, sizes, and colors.
- Music and Sound Effects: Add background music, sound effects, or voiceovers to enhance your video’s audio experience.
- Transitions: Smooth transitions between video clips can be applied to improve the flow and continuity in the video.
- Filters and Effects: A variety of filters and visual effects are available to modify the appearance and style of your video.
- Video Rotation: Rotate or flip videos to correct orientation or create dynamic perspectives.
- Picture-in-Picture: You can overlay one video on top of another, creating a picture-in-picture effect for additional visual interest.
- 360° Video Editing: Edit 360-degree videos to provide a more immersive experience for the viewer.
- Export in Multiple Formats: Save your finished video in different formats, resolutions, and aspect ratios.
- Enhanced Video Quality: Improve video quality with built-in tools for the color adjustment tool.
- Customizable Watermark: Add your own watermark to protect your video from unauthorized use.
- …
How to Slow Down Part of a Video in CapCut
CapCut is a popular and user-friendly video editing app. You can also use it to slow down part of a video with simple steps. Let’s see how to slow down a part of a video in CapCut:
Step 1: Go to the CapCut website, download and install it on your computer. After completing the installation, open the app and click on Create project to start a new project.
Step 2: In the main interface, click on Import to import the video you want to edit from your device. Then, drag and drop the video from the library to the timeline.
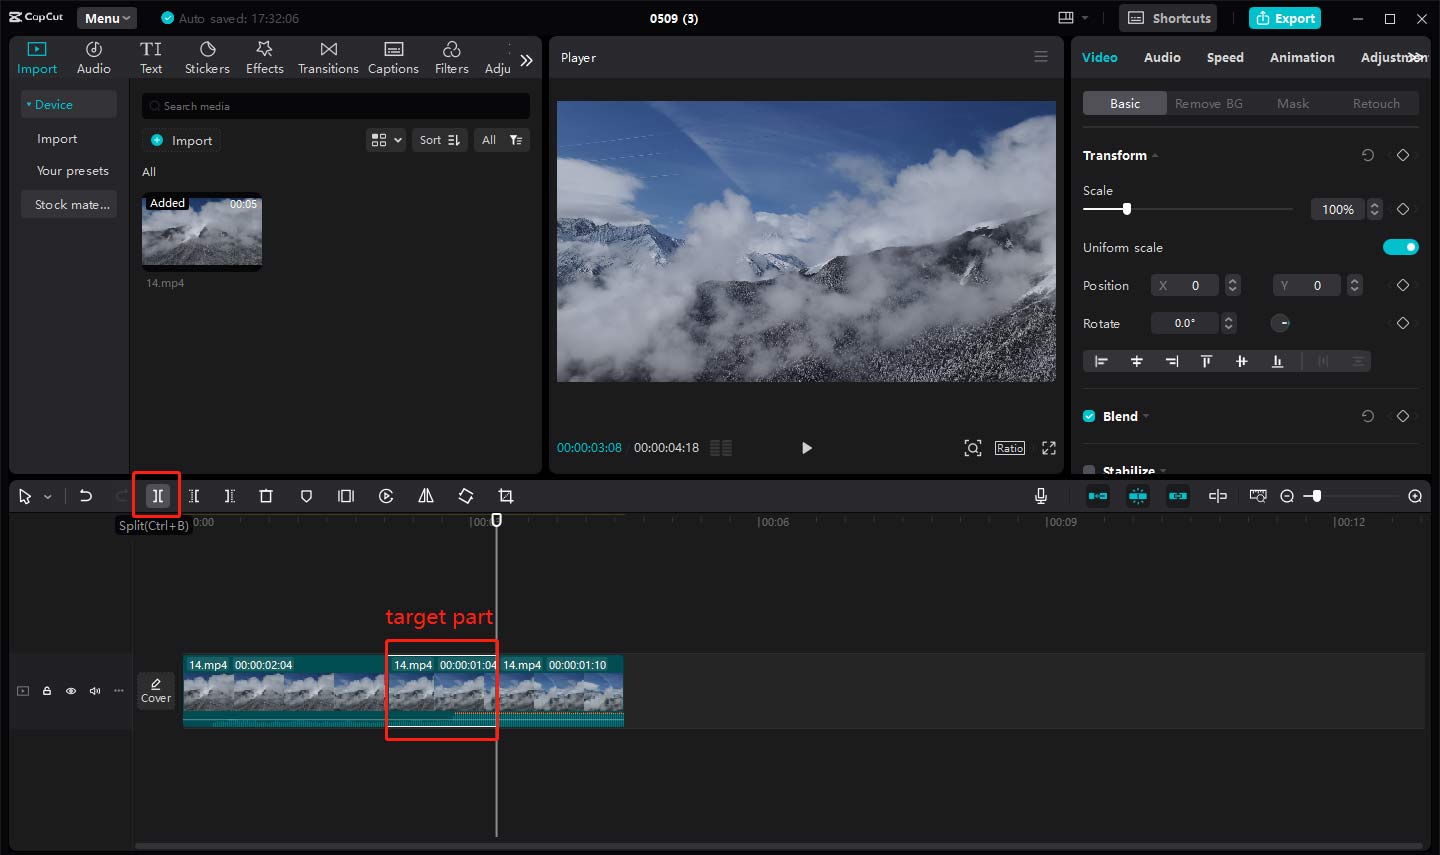
Step 3: Move the playhead to the beginning of the section that needs to be slowed down and click the Split icon on the timeline toolbar. Then move the playhead to the end of the section and click the Split icon again.
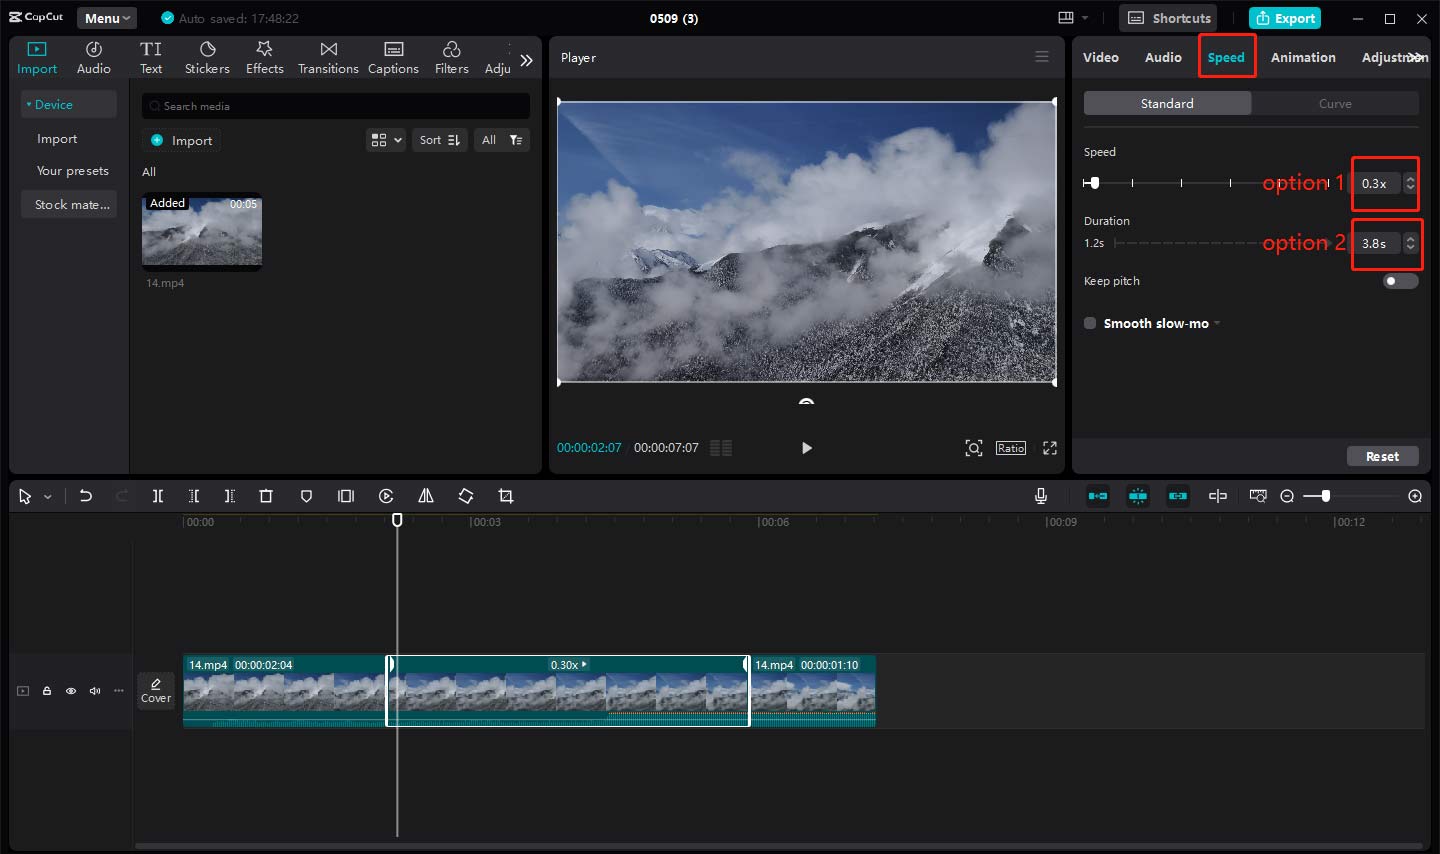
Step 4: Tap on the clip you want to slow down, then tap on the Speed option in the top-right corner. Under the Standard tab, you can enter Speed values from 0.1 to 0.9. Or you can directly enter the Duration of this clip to slow down it.
Step 5: Click the play icon to play the video to preview the changes. Once you are satisfied with the result, tap on the Export button to save the edited video to your PC.
How to Slow Down Part of a Video in Clideo
How to slow down part of a video online? If you have this question, please keep reading the following content. I will show you how to slow down part of a video online using Clideo:
Step 1: Visit the Clideo website and click Get started to begin your editing.
Step 2: Click on the Click to upload area to import the desired video. Then, your video will be added automatically to the timeline.
Step 3: Click on the video to highlight it on the timeline. To isolate the part you want to slow down, move the playhead to the beginning of the target clip, and click the Split icon on the timeline toolbar. After that, move the playhead to the end of the target clip and click the Split icon again.
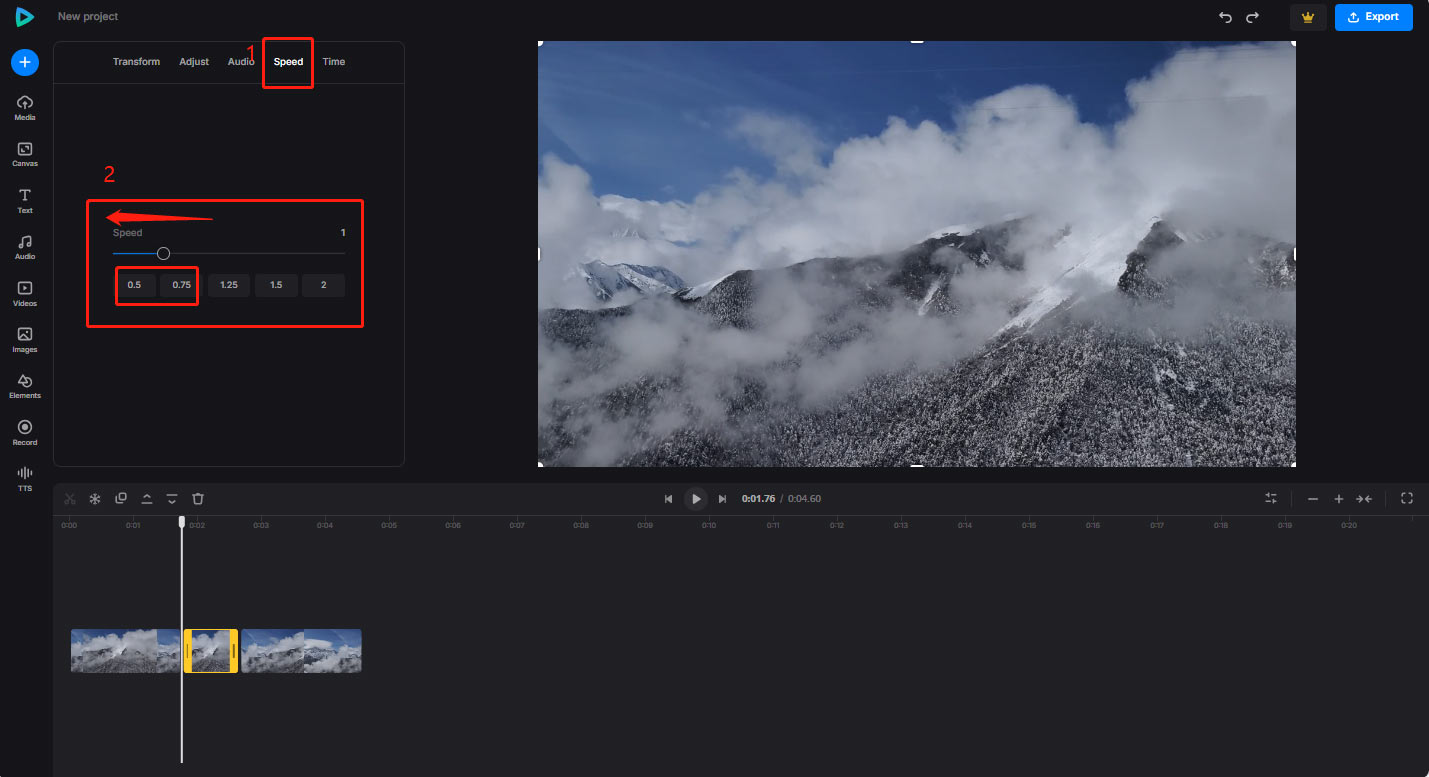
Step 4: Now you have isolated the video part that needs to be slowed down. Click on the clip on the timeline, select the Speed tab at the top left of the interface, and drag the Speed slider to the left to slow down the part, or you can click on the speed option (0.75X and 0.5X) under the Speed slider.
Step 5: Click the play icon to preview the final results. If everything looks good, click on the Export button in the top-right corner to save your video.
Tips for Making Slow Motion Work
While slowing down part of a video is an effective technique to add appeal, it’s important to keep a few things in mind to ensure that the final result is smooth and natural:
- Maintain Quality: When slowing down a video, especially by a large percentage, you may notice a loss in quality or a choppy appearance. To avoid this, try shooting your video at a higher frame rate to ensure smoother slow-motion effects.
- Use the Right Audio: Slow-motion videos can sometimes cause audio to sound distorted. Consider muting the audio in the slowed section or replacing it with a music track that fits the mood.
- Keep Transitions Smooth: When slowing down a part of a video, be sure to use smooth transitions when going back to normal speed. This prevents the video from feeling abrupt and jarring.
- Don’t Overuse Slow Motion: While slowing down video can be effective, using it too often can make it lose its impact. Use slow motion sparingly to highlight the most important moments.

Bottom Line
This is all about how to slow down part of a video. Slowing down a part of a video is an effective way to highlight moments, add dramatic flair, and improve the overall flow of your video. By following the steps outlined in this guide, you can easily slow down any part of a video to achieve the perfect effect. Finally, if you have some problems editing your videos with MiniTool MovieMaker, please feel free to contact us via [email protected] for help. Happy editing!
About The Author

Position: Columnist
Yulia has a great passion for life. She enjoys photography and travel, and is always eager to record cherished moment through her lens. This also led to her strong interest in video editing, and she kept learning multimedia-related knowledge, hoping to bring readers better advice on images, audio, video, and related topics.
User Comments :