Instagram offers different ways for users to create short discovery videos to share their lives. Reels is one of the important post types on Instagram right now. You can easily record a Reel using the Instagram camera, but how to make Reels with pictures? This post from the Windows video editor - MiniTool MovieMaker provides you with 6 Instagram Reel makers.
Reels Upload Requirements on Instagram
Before learning how to make Reels with pictures, first, let’s have a look at the Reels video upload requirements on Instagram, including format, frame rate, aspect ratio, etc.
On the Instagram app for Android and iOS, you can record a 15-, 30-, 60-, and 90-second video and edit it by adding music, effects, voiceover, and more. Also, you can upload videos from your phone gallery.
The video should be in MP4 (recommended) or MOV format, with an aspect ratio between 1.91:1 and 9:16, a minimum resolution of 720p, and a minimum frame rate of 30FPS.
Apart from that, you can create Reels on your computer by uploading videos to the Instagram website. Currently, video posts are shared as Reels on the Instagram web.
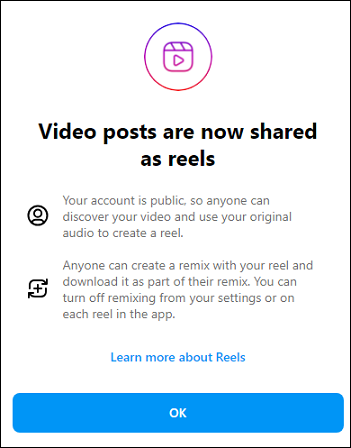
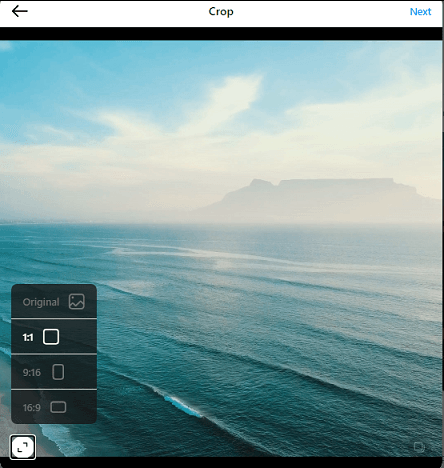
You can upload MP4, MOV, and M4V video file types to the Instagram website. It will then automatically crop the video to a 1:1 aspect ratio. Additionally, you can keep the original ratio or crop it to a 9:16 or 16:9 ratio.
When you browse Reels on Instagram, you will notice that some videos are made up of images and get viewed millions of times. How to make a Reel with photos and make it more appealing? Let’s get started.
How to Make Reels with Pictures on Instagram
The Instagram app for Android and iOS not only lets you record a Reel using the built-in camera but also allows you to make a Reel with multiple pictures from your phone gallery. First, let’s see how to make an Instagram Reel with pictures in this app. Before that, make sure that your Instagram app is up to date.
Step 1. Open your Instagram app, then you can swipe right and switch to REEL to create a Reel.
Step 2. To add pictures to your Reel, swipe up on the screen, then click Recent, find the desired album, and select a bunch of photos.
Step 3. Click Next, then you can preview your Reel, add music, and edit your photos by adding filters, emojis, text, etc.
Step 4. After that, click Next and post your Reel.
How to Make Reels with Pictures with Third-Party Apps
Alternatively, you can use other photo video makers to create outstanding Reels for Instagram. Here are 6 Instagram Reel makers for you.
#1. MiniTool MovieMaker
MiniTool MovieMaker is a great video editing software application that allows you to make video from images, video clips, and music. This app supports the most popular media file formats and comes with various editing features.
If you need a free Instagram Reel maker for PC, MiniTool MovieMaker is a nice choice. It lets you create a Reel with as many pictures as you want and it also enables you to adjust the duration, contrast, saturation, and brightness, apply filters, add a transition between two clips, add text, etc.
In addition, MiniTool MovieMaker allows you to crop, split, rotate, reverse, speed up, slow down, and trim video, change the aspect ratio, etc
With this easy-to-use and feature-rich video editor, you can quickly create a video with multiple pictures and export it in 1080p without watermarks. Here’s a step-by-step guide on how to make Reels with pictures using MiniTool MovieMaker.
Step 1. Import Pictures
Firstly, you should download and install MiniTool MovieMaker on your PC. Then, open it and close the promotion window to access the main interface.
MiniTool MovieMakerClick to Download100%Clean & Safe
To import your pictures, click Import Media Files to browse for the target folder, press the Shift key to select all images simultaneously, and click Open. Then, add these images to the timeline. Click the Zoom to Fit Timeline button to fit the image to the timeline.
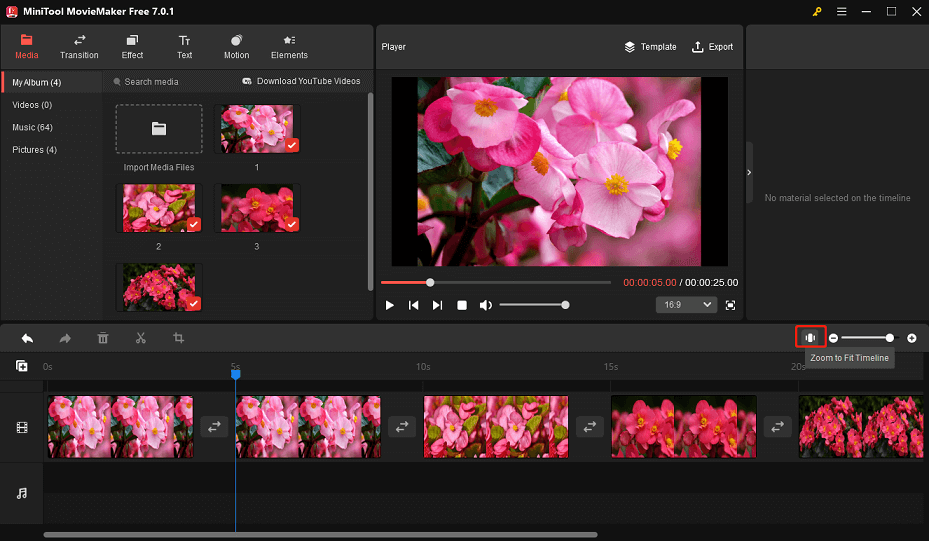
If you want to change the order of the pictures on the timeline, drag and drop one to the place where you want to put it.
Step 2. Edit Image Property
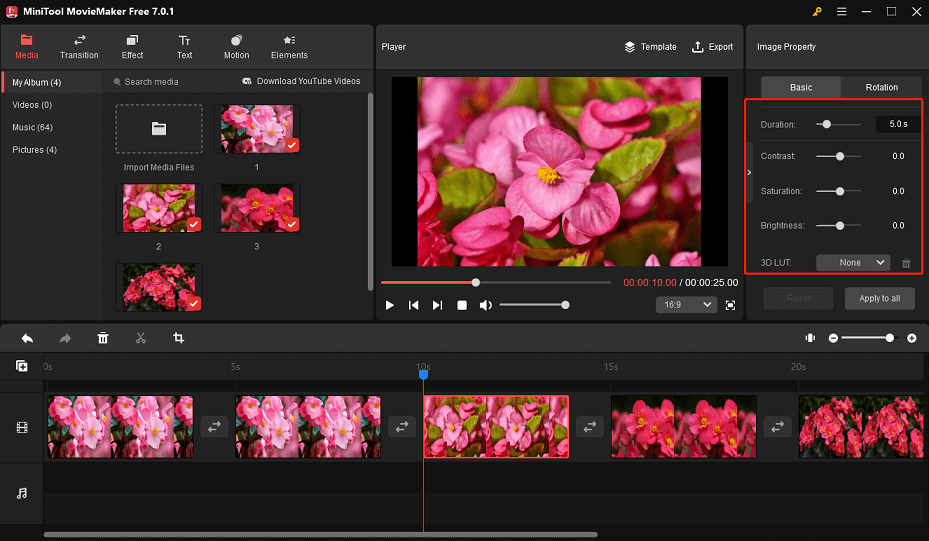
Click a picture on the timeline to enable Image Property. In the Basic tab, drag the sliders to change the duration of the photo or edit the image’s contrast, saturation, and brightness. Or, you can add a 3D LUT effect to your picture. Click Apply to All to apply these changes to all pictures on the timeline.
Step 3. Apply Filter and Transition Effects
To apply a filter, select a picture on the timeline, go to the Effect tab, preview and download a filter, and click the plus icon to apply it. Also, you can add the same effect to multiple or all clips.
To add a transition, go to the Transition tab, choose one transition effect, and drag it to the location where you want it to happen.
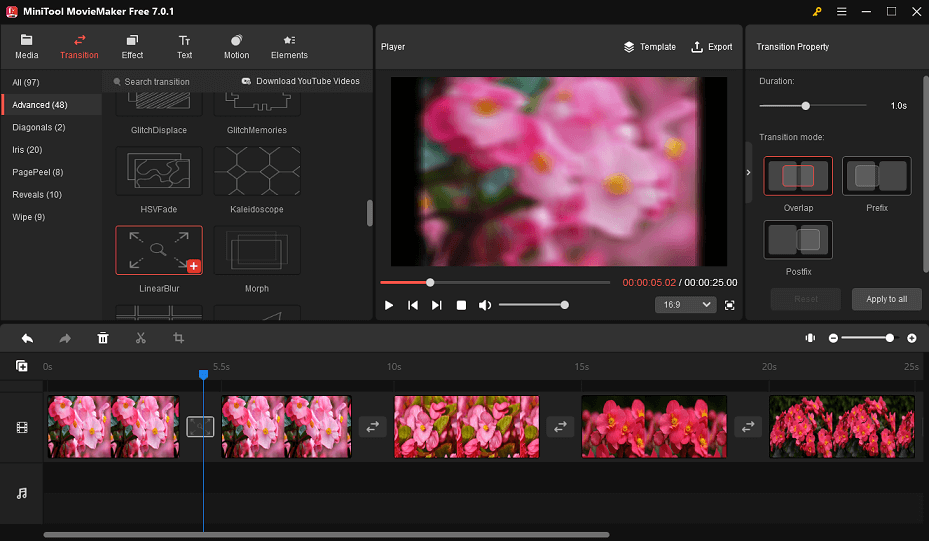
Step 4. Apply Motion Effects
MiniTool MovieMaker provides some motion (pan and zoom) effects that can make your footage more dynamic. To add a motion effect to a picture, select it on the timeline, go to the Motion tab, choose one option, and click + to add it.
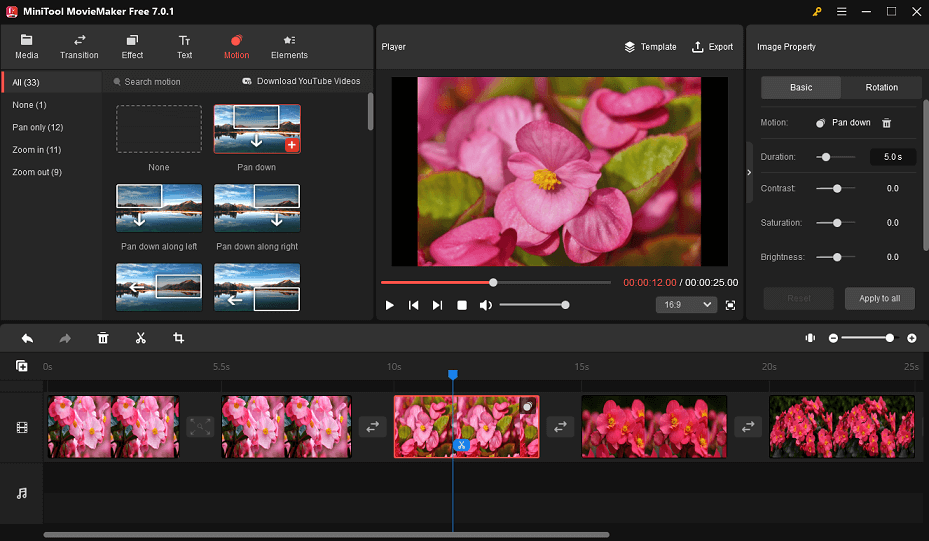
Step 5. Add Stickers to Picture
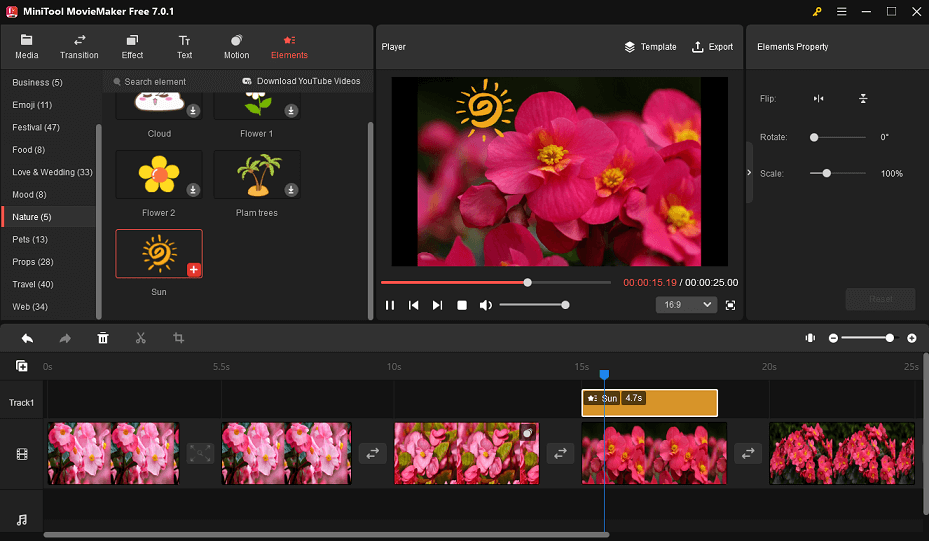
MiniTool MovieMaker also offers animated stickers to spice up your image/video. To add a sticker to a photo, click it on the timeline, go to Stickers, download the desired one, and click + to add it.
Then, you can drag either edge of the sticker on the timeline to adjust its duration and flip, rotate, and scale the sticker.
Step 6. Add Music to the Video
You can click Media and go to Music to select a song in the MiniTool MovieMaker’s music library. Also, this movie maker lets you upload music from your PC by clicking Import Media Files. Then, drag it to the timeline and you can fade in, fade out the music, and adjust the volume.
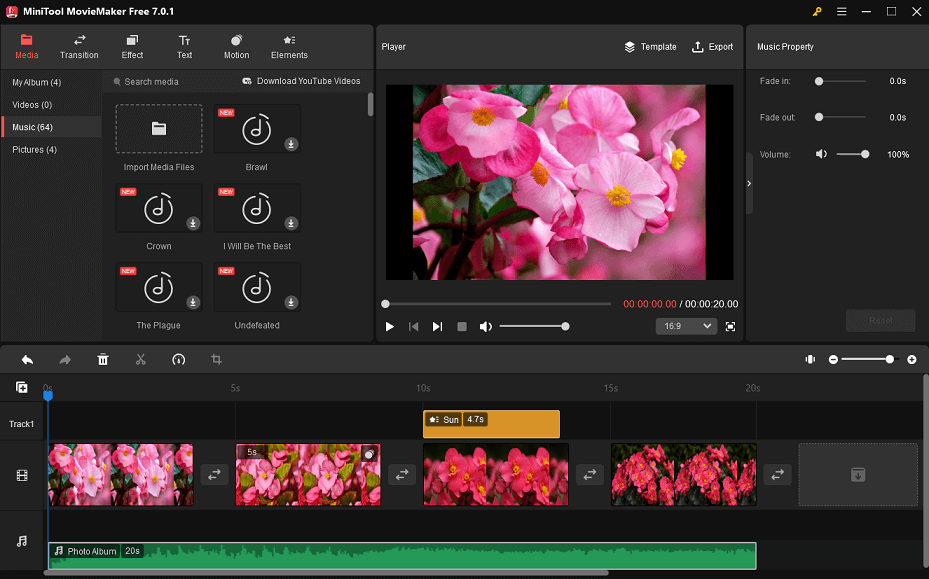
Step 7. Export Your Reel Video
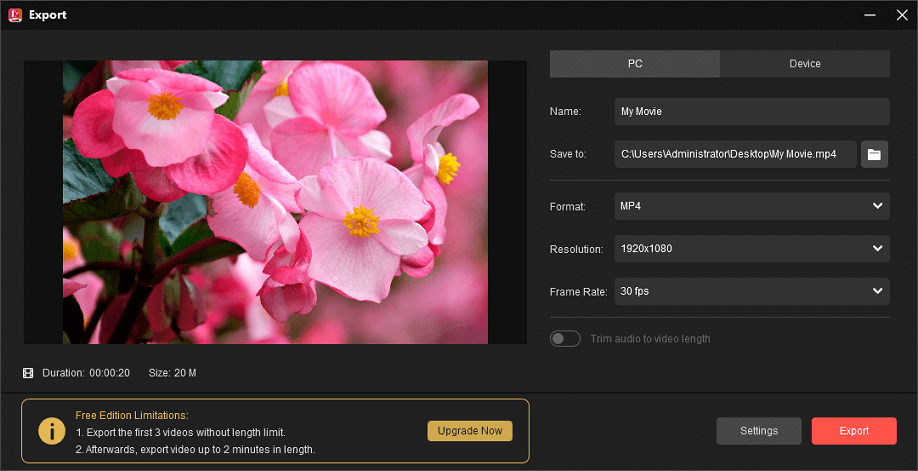
Click Export at the top right to open the Export window. Browse for a folder to save the video. Click Export to export the video to your PC. Then, upload it to the Instagram website.
#2. Canva
Canva is an online graphic design tool that allows you to create social media posts, presentations, posters, videos, logos, and more. As for social media posts, Canva helps you make Instagram Reels, Stories, ads, Facebook stories, videos, covers, and more.
Canva offers a rich variety of templates for you to choose from and you can also start from scratch. Here’s a quick guide on how to make a Reel with photos using Canva.
Step 1. Go to the Canva website and sign in with your account.
Step 2. Click Social Media > Instagram > Instagram Reel or Videos > Instagram Reel to open the Canva Instagram Reel creator.
Step 3. Click Uploads on the left and click Upload files to upload your pictures.
Step 4. Add as many pages as you need and drag the picture to the desired page. Then, customize these pictures as you want.
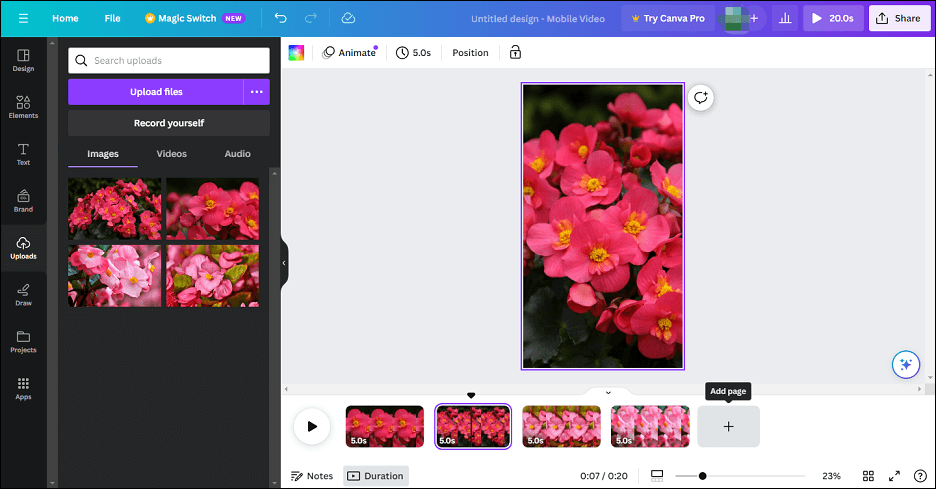
Change duration: Select the desired page, click the Timing button at the top, and change the duration of the image.
Edit photo: Click the picture on the canvas, click Edit photo, and then you can add filters and FX effects to the picture, do color adjustments, or crop it.
Draw on the picture: If you want to draw on a picture, select the target page, click Draw on the sidebar, choose the style and color, and move your mouse to start drawing.
Add transition: Click the Add transition button between two pages and select the transition effect you want.
Add text: Select a page and click Text on the left side, choose a text style and replace it with your text.
Step 5. Click the Share button in the upper right corner and choose Download to save the video as an MP4 file.
#3. CapCut
CapCut is one of the best video editing apps available on browsers, Windows, Mac, Android, and iOS. It lets you create videos for TikTok, Instagram, Facebook, YouTube, Facebook, LinkedIn, etc. With it, you can create amazing Reel videos for Instagram. Here’s a simple guide on how to make Reels with pictures on the CapCut web.
Step 1. Go to the CapCut website and sign in with your account.
Step 2. Click Create new and choose an aspect ratio in the Video section.
Step 3. Click the blue plus icon to upload your pictures and add them to the timeline. You can also find footage in the CapCut stock video and photo library.
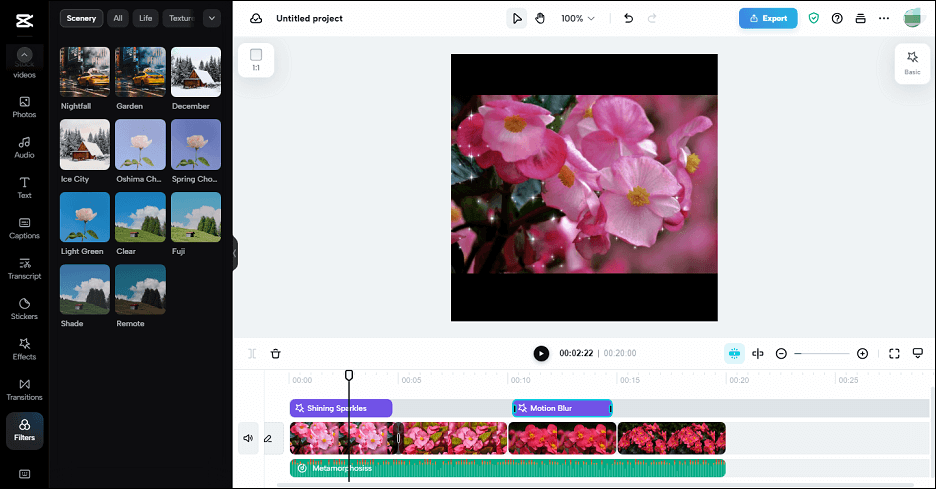
Step 4. Edit your pictures.
Add effects: CapCut provides rich effects that can bring life to your photo/video, such as motion blur, B&W film, stuck frame, and more. Click Effects, browse for the desired effect, and drag it to where you want it to happen on the timeline.
Add transitions: Click Transitions on the left, select an effect, and drag and drop it between 2 clips on the timeline.
Add filters: Click Filters in the bottom left corner, find the desired filter, and add it to your target clip.
Add audio: Click Audio on the sidebar, then find a song and add it to the timeline or apply a sound effect.
Step 5. To export the video, click Export in the upper right corner, then customize the video resolution, frame rate, quality, and format (MP4 or MOV), and click Export. Once done, download the video and upload it to Instagram.
Other Useful Instagram Reel Makers
Apart from the above 3 Instagram Reel makers, many other editing apps can help you create amazing Reels with pictures only.
Mojo
Mojo is designed to create incredible Instagram Reels, Stories, and other social media posts. This app comes with hundreds of templates, unique text styles and effects, a huge selection of royalty-free audio files, stickers, special effects, filters, and more.
Promeo
Promeo is a Story & Reels maker for Instagram, Facebook, TikTok, YouTube, Twitter, etc. This app has various pre-designed templates, a library of music tracks, millions of stock videos and photos, animated stickers, filters, and more to help you create stunning content.
Reelsy
Reelsy is also a great app for making Instagram Reels and other social media videos in seconds. This app provides many templates and trending songs for you to choose from. It won’t add watermarks to your video.
Conclusion
With these applications, you can easily and quickly make Reels with pictures only. To make a cool Instagram Reel, don’t forget to add filters, text, transitions, music, and other effects to the video.
If you have any questions while using MiniTool MovieMaker, you can contact us via [email protected] for help.


![Fix the Add Yours Sticker Not Working on Instagram [Ultimate Guide]](https://images.minitool.com/moviemaker.minitool.com/images/uploads/2023/06/add-yours-instagram-not-working-thumbnail.jpg)
User Comments :