After watching a horror movie, were you shocked at the scary effect? Maybe you would also want to try to make a scary video to frighten your friends. This article from MiniTool MovieMaker (one of the best video editing software for beginners) describes how to make a scary video from all angles.
People are increasingly fond of watching horror videos because they can experience excitement and gain novel experiences. People may be scared by the video content, but at the same time, they are still curious about what will happen next, which constantly makes them addicted to horror videos.
So, it is a good opportunity for content creators to learn how to make a scary video. This article will explain how to make a scary video from three aspects: preparation before shooting, shooting techniques, and post-production.
Preparation Before Shooting a Scary Video
Before shooting a scary video, pre-preparation is an essential stage that fundamentally determines the quality of that video. During the preparation process, you need to focus on the following three factors: a scary theme, coming up with a unique story and writing video scripts.
A Scary Theme
The theme of the video is the key to determining the video’s level of quality. If you have decided to make a scary video, the first thing you need to consider is what genre to choose. There are many types of scary videos on the internet nowadays, so you can go and see what themes are available to give yourself some ideas and direction. Here are some popular scary movie themes: psychological, monster, slasher, zombie, and vampire.
Come Up with a Unique Story
A good storyline plays an important role in making a scary video. If you want to make a high-quality scary video, you have to consider the following four points: horror plots, characters with strong personalities, a compelling beginning, and an impactful ending.
Horror plots: Conceiving horror plots is the key to making a scary video. You can search for some strange stories on the internet or ask people around you about something scary, and you can get inspiration from them.
Characters with strong personalities: Character building is also a key part. Different characters can bring the audience into different perspectives. Injecting characters with special story backgrounds and personality traits can arouse the resonance of the audience.
A compelling beginning: A compelling opening can bring a lot of attention to your scary video. You can put a highlight clip at the beginning to attract the audience or set a cliffhanger to arouse the audience’s curiosity.
An impactful ending: A good ending will enhance the content of the entire video and leave a deep impression on the audience. So, it’s important to design a good ending. You can reveal the truth at the end of the story, give an unexpected answer, or leave a blank space for the audience to think about the end of the story.
Write Video Scripts
Writing a script allows you to flesh out your story. This script contains the storyline, the characters’ dialog, the characters’ actions, and other more detailed things. This script will help you to implement the subsequent shooting.
Essential Techniques for Shooting a Scary Video
After you have determined the theme and script of the scary video, you can move on to the shooting session. The content you shoot directly determines the intuitive feeling you bring to the audience. Here are some shooting tips you need to know to enhance the fear in your videos.
Lighting: Lighting has a huge impact on the overall atmosphere of a video. Weak lighting can create a depressing and nervous feeling. You can hide some horror elements in the dark, and the sudden appearance can bring a great psychological shock to people.
Perspective: Perspective shifts are also an important part of increasing fear. For example, horror elements can be directly seen from the protagonist’s point of view. If you shoot directly from the protagonist’s point of view, the video content will appear dull. If you change the shooting perspective and don’t shoot the horror element directly, it will make the storyline more intriguing.
Erratic camera movements: A shaky camera can also change the atmosphere of a story. It gives the viewer a sense of disorientation and tension through unsteady camera movement, which also greatly heightens the sense of fear.

How to Make a Scary Video in Post-Production
After you’ve finished shooting, the last but not least step is to use video editing software to touch up your scary video. And you need to finish the last video version presented to the audience by video editing.
So, in this process, you will do various editing, such as: speeding up or slowing down the video, trimming the video, adding background music, and so on. Besides these common editing operations, you can also enhance the scary effect by adding sound effects, effects, and filters.
Here are recommendations on video editing software, post-production tricks, and specific steps on how to do this in a video editor.
Choosing the Right Video Editing Software
Video editing software is an important part of making high-quality videos, so choosing an easy-to-use and powerful editing software is necessary. Here we recommend MiniTool MovieMaker to you. It’s a free video editor without watermark and also a great horror video maker app.
MiniTool MovieMakerClick to Download100%Clean & Safe
MiniTool MovieMaker is suitable for everyone, especially beginners, because it offers a clean and simple interface that makes it easy to operate. It can import and export a range of video formats, and it can also easily make video from images.
During the video editing process, you can add horror sound effects, filters, and effects to your scary videos in MiniTool MovieMaker. You can also easily trim and split the video to make your video smoother.
Besides, the music is also a key factor that can improve the overall quality. You should choose the appropriate music for the scary video, and you can edit the music property until you are satisfied.
Post-Production Tricks for Editing Scary Videos
Creating a great scary video can’t just rely on basic editing operations, it also requires applying sound effects, visual effects, and filters to enhance the horror.
Horror Sound Effects
Sound effects can quickly change people’s moods. Sudden screams in a quiet atmosphere will make drowsy viewers wake up at once. Therefore, you can add horror sound effects to some bland plots to focus the viewer’s attention on your video.
Frightening Visual Effects
You can add some visual effects according to the content of the video to bring the audience an unusual visual experience. For example, in the segment of characters chasing, you can apply the shake effect to give the audience an immersive feeling; for shots with a TV set, you can apply the distortion effect to make the TV set malfunction, which can further deepen the tension.
Filter Making Your Videos Scarier
In the video editing software, you can choose a filter to change the atmosphere of the video. Different filters will give people different feelings. For scary video production, you can’t always apply bright filters, which will greatly diminish the horror effect. For example, if you’re shooting a story that happened a long time ago, you can apply a black-and-white filter or a low-resolution filter to emphasize the background of the story.
How to Make a Scary Video in MiniTool MovieMaker
Here’s how to make a scary video free using the horror video maker app – MiniTool MovieMaker.
Step 1: Download and install MiniTool MovieMaker
Click the button below to download free video editor, and follow the installation instructions to install it on your Windows PC.
MiniTool MovieMakerClick to Download100%Clean & Safe
Step 2: Launch MiniTool MovieMaker
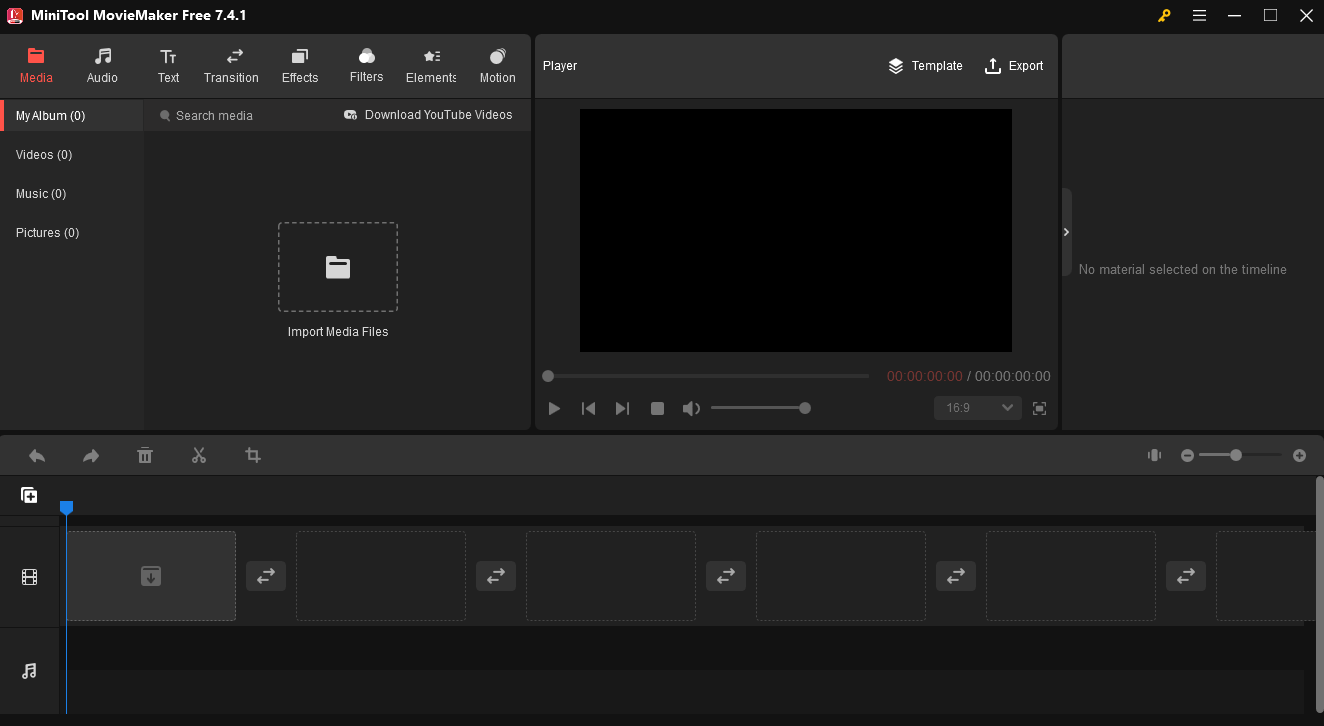
After completing the installation, launch this software and close the promotion window to get its main interface as follows.
Step 3: Import your videos
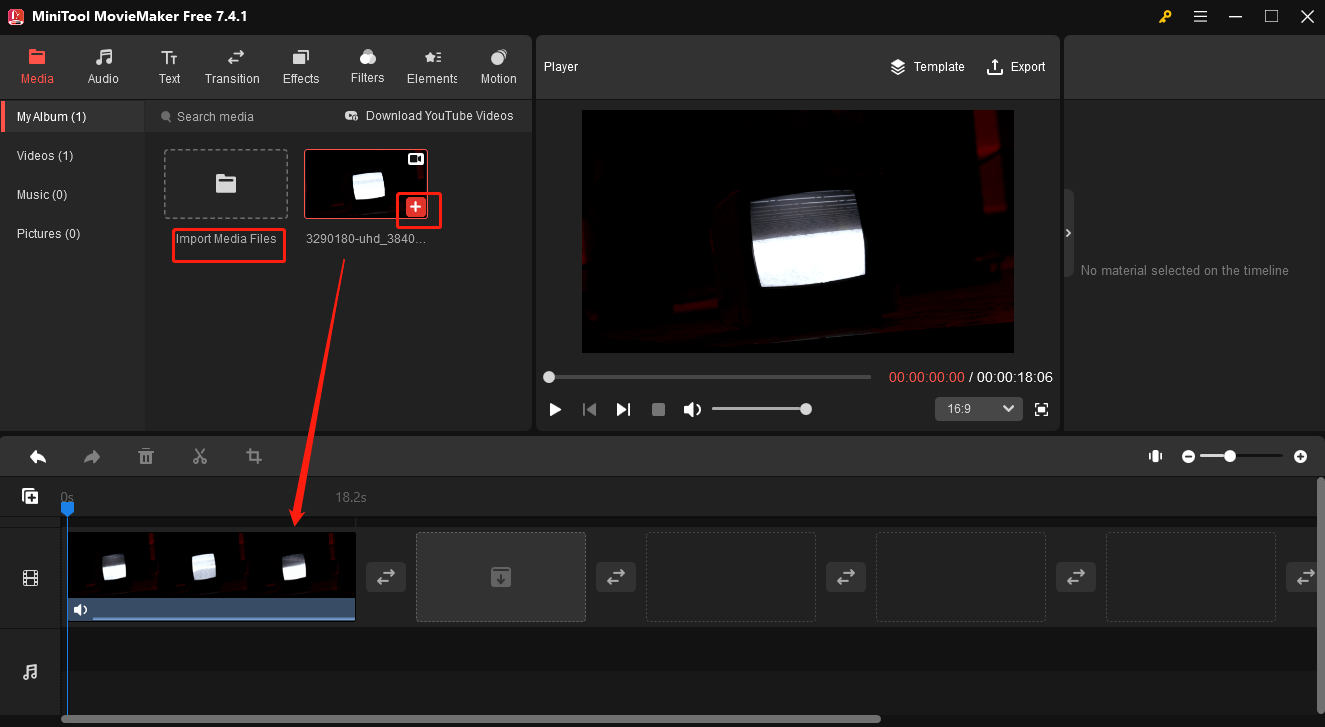
Click Import Media Files to import your videos, then click the plus icon (+) on the target file or directly drag and drop it to the timeline.
Step 4: Trim video
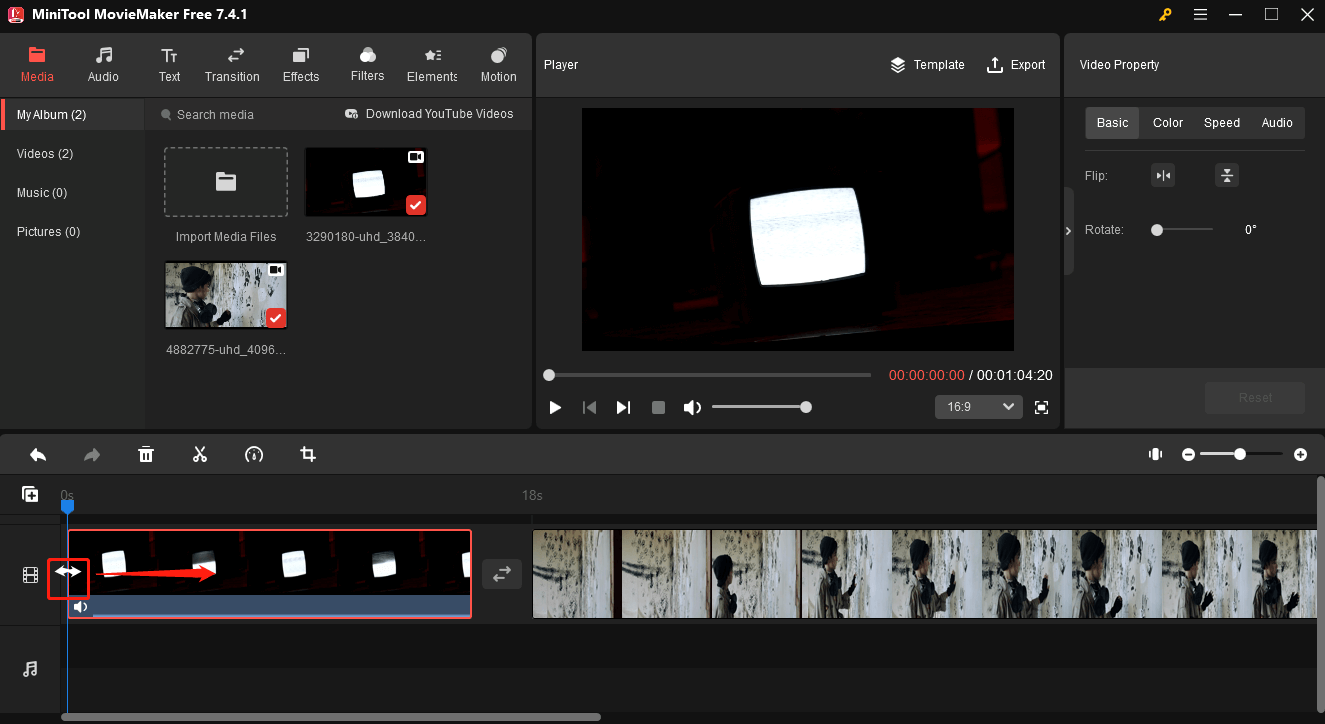
If you need to delete the beginning or end of a video clip, follow the steps below.
- Click the target clip and hover your mouse over the beginning of the video clip until you see the double-headed arrow.
- Drag this double-headed arrow to the beginning of the part you want.
- Hover your mouse at the end of the video clip until you see the double-headed arrow.
- Drag this double-headed arrow to the end of the part you want.
If you need to delete the middle part of a video clip, follow the steps below.
- Drag the playhead to the beginning of the unwanted part and click the scissors icon.
- Drag the playhead to the end of the unwanted part and click the scissors icon.
- Select the unwanted part, right-click the part, and click Delete.

Step 5: Add horror sound effect
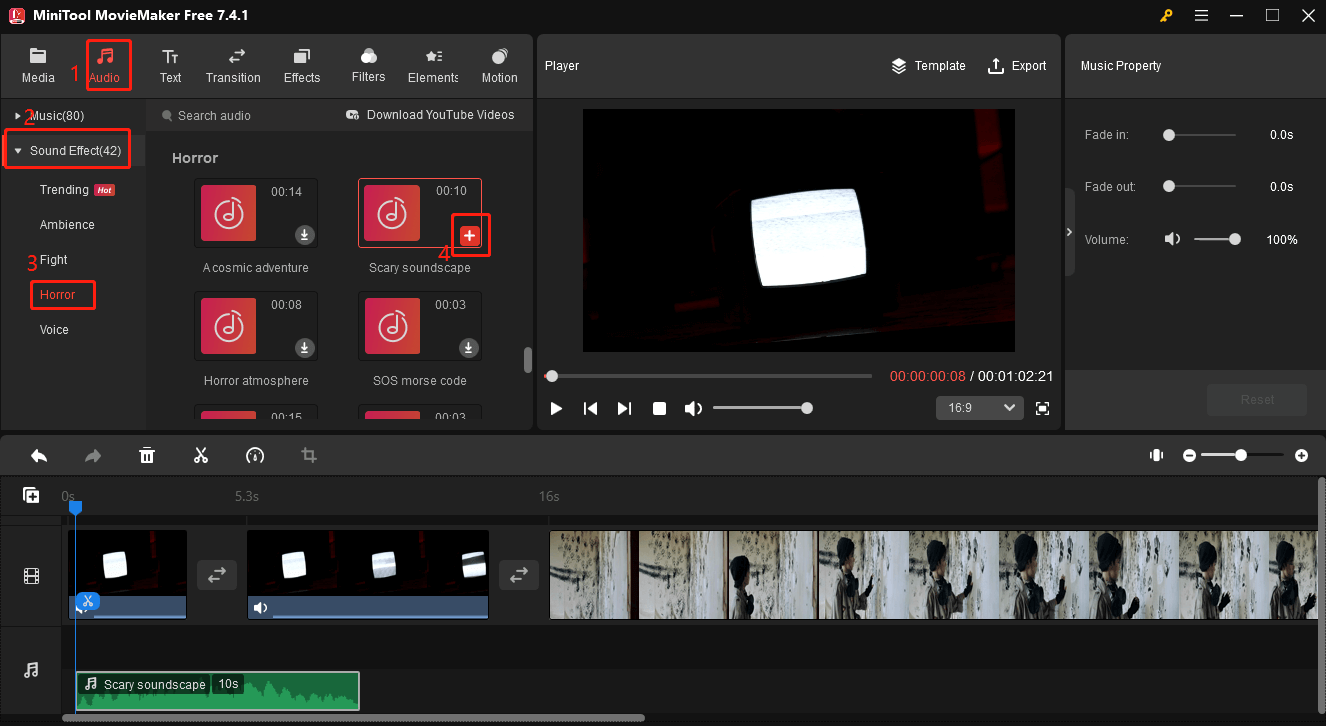
If you want to add some shivering sound effects to your scary video, you can click Audio and select Horror in Sound Effect. There are many horror sound effects for your video. After you find the right one, click the download symbol and then click the (+) icon to apply it.
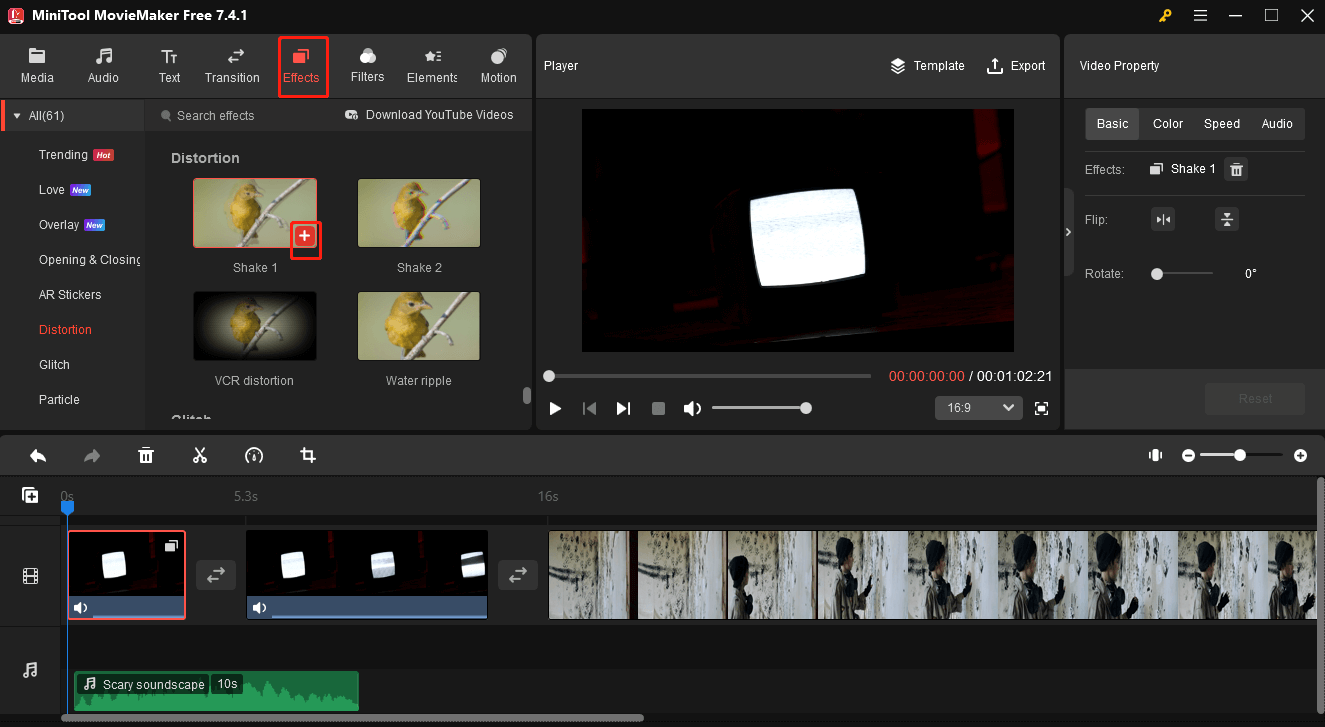
Step 6: Apply visual effects
You can also add visual effects to your video to further deepen the horror sense. Click the target clip first and then click Effect. For horror videos, you can consider Distortion, Glitch, and Particle effects. You can hover your mouse over an effect to preview it. And when you find the right one, click the download symbol and then click the (+) icon to apply it.
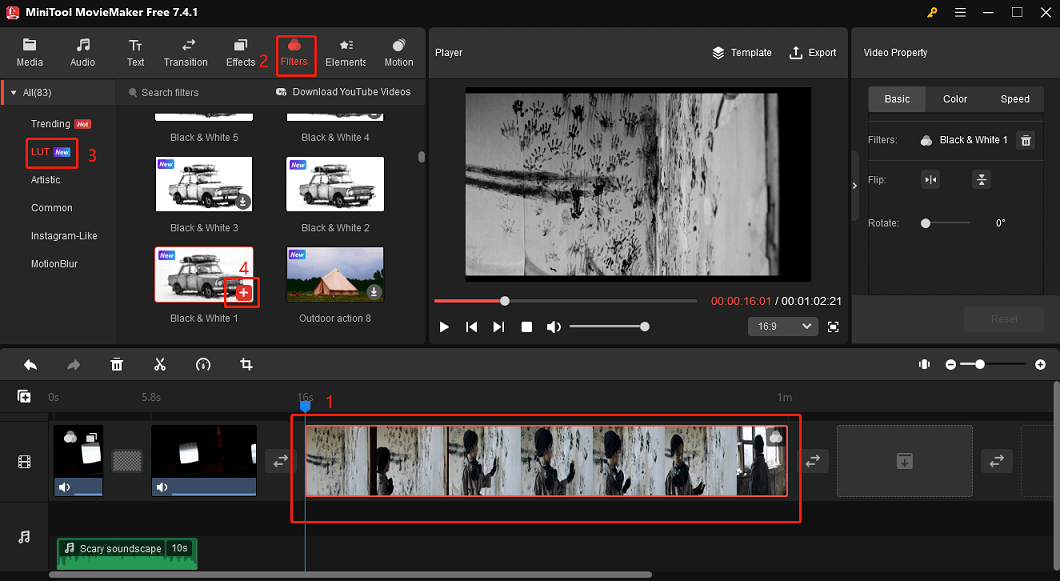
Step 7: Add frightening filters
Adding the right filters can emphasize the story atmosphere of the video. You can add a black-and-white filter to enhance the horror atmosphere. You can start by selecting the video clip you want to apply the filter. Click Filters and then select LUT. Of course, you can also select any other filter you think fit. When you find the right filter, click the download symbol, and click the (+) icon to apply it.
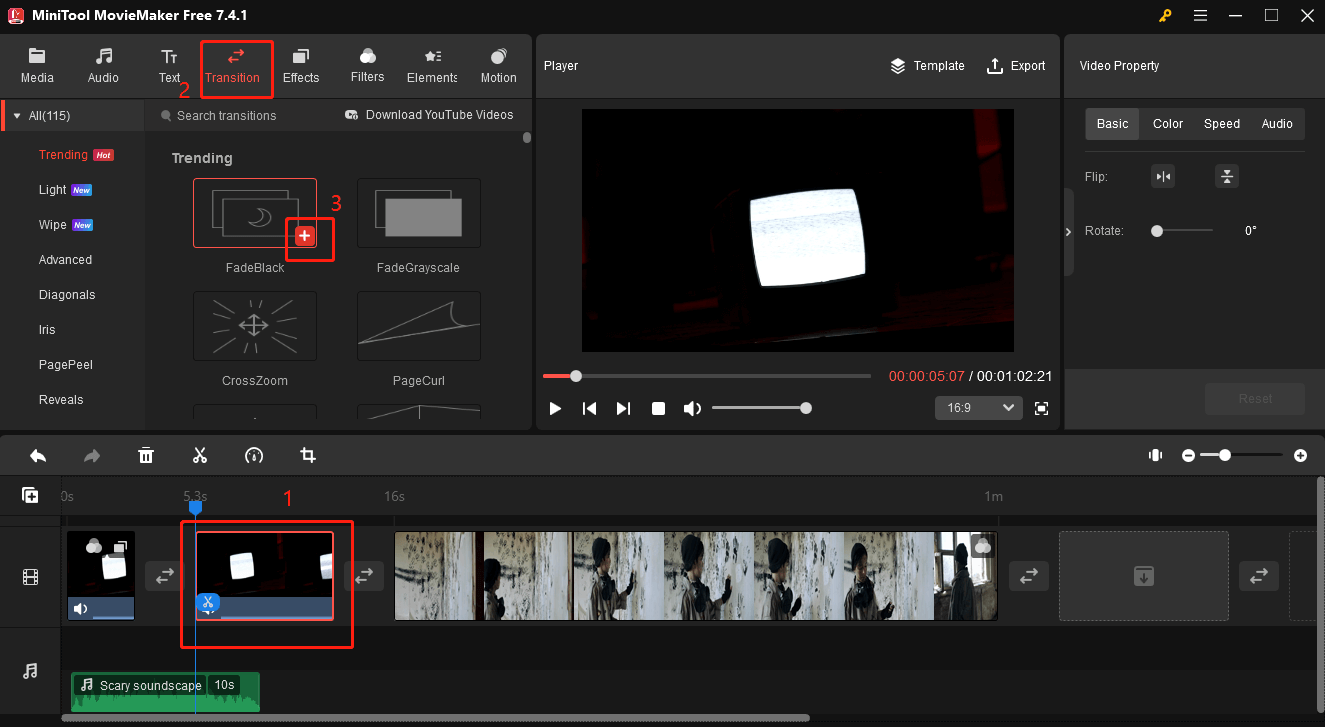
Step 8: Apply the appropriate transition
The right transitions can greatly improve the quality of your video. First click the previous video where you want to add the transition, then click Transition, when you find the right effect, click the download symbol and then click the (+) icon to apply it. In addition, you can edit the duration and mode of the transition in the Transition Property.
Step 9: Export your scary video
After you have finished all video editing and confirmed the final effect, you can click Export. The default output video format is MP4 and you can choose another format you want to save including AVI, MOV, WMV, etc.

Conclusion
Making a great horror video is not easy, from the pre-preparation, mid-shooting to post-editing, you need to consider all the points in each of these that will affect the effectiveness of the video.
This article describes in detail the techniques that can enhance the horror effect or video quality at each stage and how to make a scary video free using a horror video maker app. Overall, a good script, skillful shooting method, and natural editing effects will let you make a high-quality scary video.
I’m sure you now know how to make a scary video. Now it’s your turn to make the scary video. Go ahead and use these methods mentioned above to make your best work.
Finally, if you have some problems editing videos with MiniTool MovieMaker, please feel free to contact us via [email protected] for help.
About The Author

Position: Columnist
Yulia has a great passion for life. She enjoys photography and travel, and is always eager to record cherished moment through her lens. This also led to her strong interest in video editing, and she kept learning multimedia-related knowledge, hoping to bring readers better advice on images, audio, video, and related topics.
User Comments :