About Audio Clipping
Audio clipping happens when the amplitude of the audio waveform exceeds the maximum level that can be reproduced by the speakers or recording device. This results in distortion, harsh sound, and an overall unpleasant listening experience. Clipping can occur due to various reasons, such as recording at excessively high levels, improper microphone placement, or incorrect gain settings.
Fix Clipping Audio in Premiere Pro
How to fix audio clipping in Premiere Pro? Just follow the below solutions!
#1 Identify Clipped Audio
Start by identifying the sections in your audio track that are affected by clipping. In Adobe Premiere Pro, you can visually identify the clipped areas by observing the waveform display. Look for sections where the waveform reaches the top or bottom of the audio track, indicating clipping.
Once you have found the clipping audio section, you can adjust its waveform to make it within the normal range. Or you can directly cut off the clipping audio part.
#2 Normalize Audio Levels
One way to fix clipping is by normalizing the audio levels. Premiere Pro provides a Normalize Max Peak option that automatically adjusts the audio levels to ensure they are within an acceptable range. To use this feature, follow these steps:
- Select the audio clip that contains clipping.
- Right-click on the clip and choose Audio Gain.
- In the Audio Gain dialog box, enable the Normalize Max Peak option.
- Adjust the target peak level if needed (the default is usually -3 dB).
- Click OK to apply the changes.
Premiere Pro will analyze the selected audio clip and adjust its level accordingly, reducing the instances of clipping.
#3 Use the Multiband Compressor Effect
Premiere Pro offers the Multiband Compressor effect, which allows you to target specific frequency ranges and apply compression to control dynamics. This effect can be useful in reducing clipping while preserving the overall balance of the audio. Here’s how to use it:
- Select the audio clip with clipping.
- Go to the Effects panel and search for Multiband Compressor.
- Drag the effect onto the audio clip.
- In the Effect Controls panel, adjust the settings for each frequency band to achieve a balanced sound without clipping. Focus on reducing peaks in the affected frequency ranges.
- Preview the audio and make further adjustments as necessary.
The Multiband Compressor effect gives you precise control over the audio dynamics and can help alleviate clipping issues effectively.
#4 Manually Adjust Volume Levels
If the clipping is localized to specific sections of the audio, manually adjusting the volume levels can assist you to fix clipping audio. Premiere Pro permits you to keyframe the volume levels, allowing for precise adjustments throughout the timeline. Here’s how:
- Select the audio clip with clipping.
- Open the Effect Controls panel and locate the Volume option.
- Enable keyframing by clicking the stopwatch icon next to the volume.
- Move along the timeline to the sections where clipping occurs.
- Adjust the volume levels for those sections by dragging the keyframe handles or manually entering specific dB values.
- Smoothly transition the volume levels before and after the clipped sections to maintain a natural audio flow.
By manually adjusting the volume levels, you can reduce the impact of clipping on your audio track.
#5 Use Audio Restoration Plugins
If the above methods don’t fully resolve the clipping issue, you can utilize audio restoration plugins available in Premiere Pro or third-party plugins. These plugins are specifically designed to repair and enhance audio quality, including reducing clipping. Some popular audio restoration plugins for Premiere Pro include iZotope RX, Waves Restoration, and Accusonus ERA Bundle.
- Install the desired audio restoration plugin and open Premiere Pro.
- Select the audio clip with clipping.
- Apply the audio restoration plugin to the clip.
- Explore the available tools and settings within the plugin to reduce clipping and improve audio quality.
- Experiment with different parameters until you achieve the desired results.
- Preview the audio to ensure the clipping is effectively reduced without compromising other aspects of the audio.
Audio restoration plugins offer advanced algorithms and features to address clipping and other audio issues, providing more precise control over the restoration process.
How to Fix Peaking Audio in Adobe Audition
How to fix peaking audio in Audition? There are several methods.
#1 Identify Peaking Audio
Similar to how to fix clipping audio in Premiere Pro, identify the sections in your audio track that are affected by peaking. Observe the waveform display in Adobe Audition and look for areas where the waveform hits the top or bottom, indicating peaking.
#2 Use the Amplitude Statistics Panel
Adobe Audition provides an Amplitude Statistics panel that can help you identify peaking sections in your audio. Here’s how to use it:
- Select the audio clip.
- Go to the Window menu and choose Amplitude Statistics to open the panel.
- Click on the Scan Selection button in the Amplitude Statistics panel.
- Review the generated report, which will highlight areas of peaking in your audio.
By using the Amplitude Statistics panel, you can precisely identify the sections that require adjustment.
#3 Apply Clip Restoration Effects
Adobe Audition offers various clip restoration effects that can help fix peaking audio. These effects are designed to reduce distortion and restore the quality of your audio. Some commonly used effects include the DeClipper, DeClipper (Advanced), and Dynamics Processing effects. Here’s how to apply them:
- Select the audio clip with peaking.
- Go to the Effects Rack panel and search for the desired restoration effect.
- Drag the effect onto the audio clip.
- Adjust the settings of the effect to control the peaking and reduce distortion.
- Preview the audio and make further adjustments if necessary.
Adobe Audition’s clip restoration effects provide specialized tools to address peaking and restore the quality of your audio recordings.
Fixing Peaking Audio Audacity
Next, it comes to fixing clipping audio in Audacity.
#1 Identify Peaking Audio
In Audacity, you can also identify peaking sections in your audio by visually examining the waveform display. Look for areas where the waveform hits the top or bottom, which indicates clipping or peaking.
#2 Apply Specific Effects
Specific effects in Audacity enable you to adjust the volume of your audio track, helping to mitigate peaking.
- Select the section of audio with peaking or the entire audio track.
- Go to the Effect menu and choose Amplify, Normalize, or Hard Limiter.
- In the effect dialog box, adjust the parameter of Amplification (dB), Normalize, or Hard Limiter.
- Pre-listen the audio and make further editions to achieve the target result.
The special effects in Audacity provide a straightforward way to control peaking by adjusting the overall volume of your audio.
Fix Clipping Audio in Your Videos
Finally, let’s see how to deal with peaking audio in your videos. To put it simply, you can rely on some video editing programs like MiniTool MovieMaker, a professional and easy-to-use video editor.
MiniTool MovieMakerClick to Download100%Clean & Safe
Step 1. Download and install MiniTool MovieMaker on your computer.
Step 2. Launch this software and enter its main interface.
Step 3. Click Important Media Files in the upper left area to upload the clipping audio and some silent videos or pictures.
Step 4. Drag and drop the uploaded media files onto the below timeline on their corresponding tracks: videos and pictures on the video track; audio on the audio track.
Step 5. Listen to the audio to identify whether it exceeds the lowest level or the highest level. Or you can directly identify its level by looking at the waveform on the audio track.
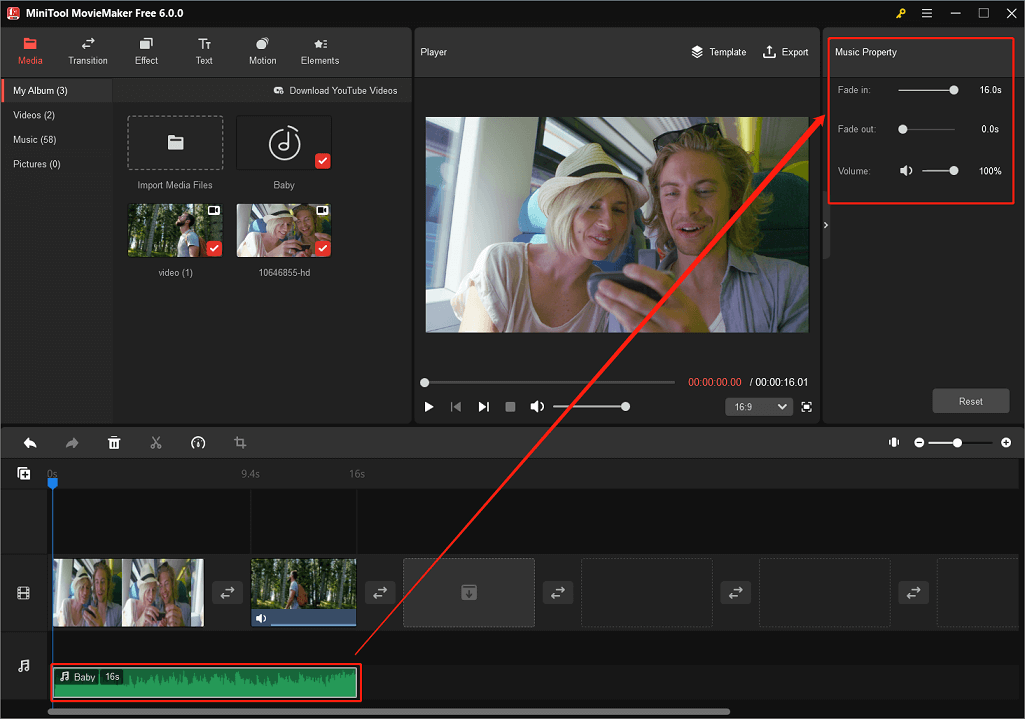
Step 6. If your video exceeds the lowest level, just adjust its fade-in effect in the Music Property section in the upper right of the main window. Music Property will appear when you click on the target audio clip. Vice versa, apply the fade-out effect to your audio. Or you can directly mitigate the clipping by adjusting the volume of the audio.
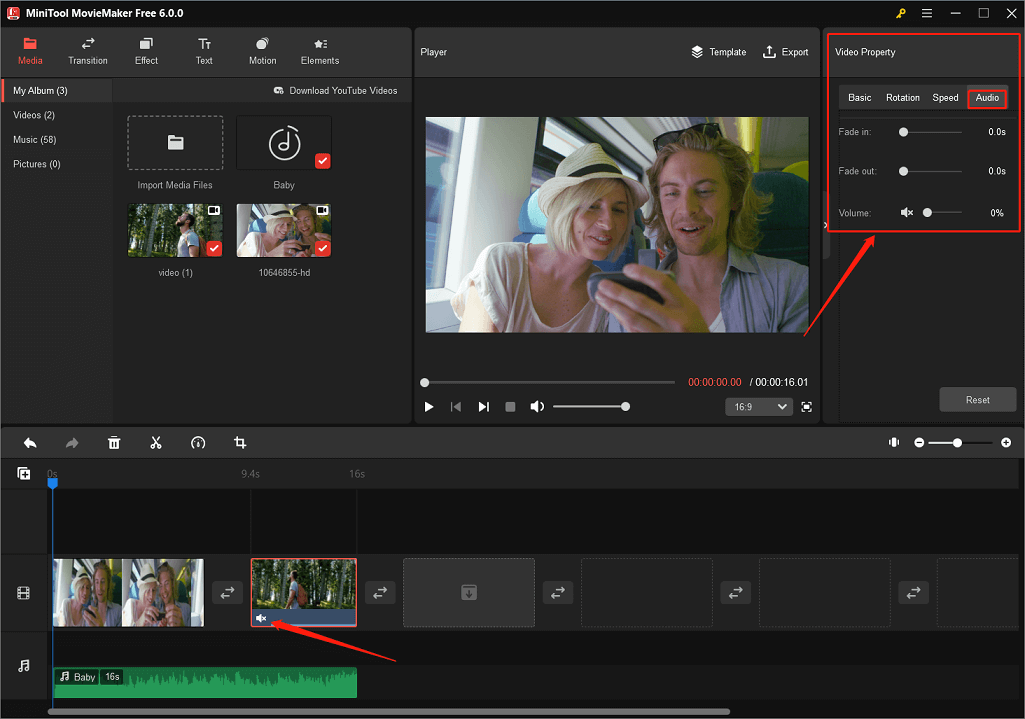
Step 7. If your video has embedded sound that has a peaking issue, you can just mute it either by clicking the speaker icon on the video on the video track or changing its volume to zero in the Video Property’s Audio tab.
If you don’t want to add extra audio to your video and simply want to fix the embedded clipping audio in your video, after identifying its waveform level, you can selectively adjust its fade-in / fade-out duration.
Step 8. You can do other changes to your video like adding transition, effect, text, motion, and animated stickers; changing its saturation, brightness, contrast, speed, and aspect ratio; cropping, flipping, rotating, or reversing it…
Step 9. Click Export in the upper right to save the changes. You can specify the file format, encoder, resolution, bit rate, and frame rate of your video.
Now, you have successfully fixed the clipping or peaking audio in your video. Congratulations!
Prevent Clipping in Future Recordings
To avoid audio clipping in the future, consider implementing the following preventive measures:
- Use a quality microphone and ensure it is positioned correctly.
- Set appropriate gain levels during recording to prevent input overload.
- Monitor audio levels during recording to ensure they stay within acceptable limits.
- Utilize a pop filter or windscreen to minimize plosive sounds and sudden peaks.
- Regularly test and adjust audio levels to maintain optimal recording conditions.
By adopting those preventive measures, you can minimize the chances of audio clipping occurring during your future recordings.
Conclusion
Audio clipping can negatively impact the quality of your videos, but with the right techniques and tools, you can effectively fix clipping audio. Adobe Premiere Pro offers various methods to repair clipping, such as normalizing audio levels, using the Multiband Compressor effect, manually adjusting volume levels, and employing audio restoration plugins. By following the steps outlined in this article, you can restore the clarity and balance of your audio tracks, ensuring an enjoyable listening experience for your audience. Additionally, implementing preventive measures during future recordings can help you avoid clipping altogether. Take the time to address audio clipping issues, as it plays a vital role in producing professional-quality videos.
You May Also Like
- Dual Audio: Exploring the World of Multilingual Entertainment
- Unravel the Wonders of Hi-Fi Audio & High-Fidelity Audio Systems
- Hi-Fi Audio Stream: Unleashing the Power of High-Fidelity Sound
- [Full Review] Exploring the World of High Res Audio
- Spotify High-Resolution Audio: Exploring Sound Quality and Future Possibilities
About The Author

Position: Columnist
Helen is a tech writer with over 10 years of experience. She specializes in creating easy-to-follow guides for video editing, media file conversion, and computer performance. Helen doesn't just write—she tests every software herself and listens to feedback from users and experts. Her goal is to make complex programs simple so that everyone can solve their tech problems with confidence.
User Comments :