What Is Audio Editing
Audio editing involves intentionally modifying recorded audio to improve its quality and clarity, while creating specific effects. It includes trimming, splitting, merging, mixing, fade in/out, adjusting volume, adding effects, removing unwanted sounds, and more. These techniques help creators improve their audio, resulting in professional-level content.
What Are Three Types of Audio Editing Techniques
Audio editing techniques can be mainly divided into three categories: permanently altering audio, preserving the integrity of the original audio, and creating new sounds. The specific methods used to accomplish these tasks can be categorized into three main types: audio cutting, audio fading, and audio mixing.
1. Audio Cutting
Audio cutting is the process of removing a part of an audio file, aiming to shorten or mute it, or delete undesired parts. It usually includes two aspects: audio trimming and splitting.
Trimming audio refers to controlling the two edges of the audio layer in an editing program to shorten the beginning or ending. Splitting audio means separating a complete audio track into two or more clips, which can be deleted, edited, moved, and so on.
Audio cutting stands as the most fundamental audio editing technique, commonly applied in video production, podcasting, and music composition to remove any annoying stops, optimizing rhythm flow and audio quality.
Audio cutting primarily emerged with the rise of audio recording technology in the 20th century. With the advent of tape recording, vinyl disc recording, and digital audio workstations, producers gained the ability to manipulate sound with greater precision, making this practice increasingly commonplace. In the latter half of the 20th century, the emergence of hip-hop and DJ culture further expanded the use of “audio cutting,” making “audio cutting” techniques central to creative remixing and sampling.
2. Audio Fading
Audio fading can be mainly categorized into three aspects, including fades in, fades out, and crossfades, which refer to the process of gradually increasing or decreasing the volume of an audio signal. Fade effects are commonly used in audio production. They can create smooth intros and a gradual fading musical ending to avoid abrupt entries and pauses.
Additionally, this technique enables seamless connections between audio segments—known as crossfades: as the current segment fades out, the subsequent segment fades in, producing a seamless transition effect.
3. Audio Mixing
Audio mixing is the process of integrating numerous audio tracks into a single cohesive track by changing volume levels, frequency characteristics, and spatial positioning.
Compared to audio cutting and audio fading, mixing is a more complex process that involves applying various effects and using tools, such as equalizers and compressors, to create a balanced, refined, and clear-sounding audio output. When mixing audio, it’s usually necessary to adjust the volume of every track, ensuring that every sound reaches the desired loudness to balance levels.
Sound Editing vs Sound Mixing
Sound editing is a post-production project, which includes audio assembling, tweaking, merging, cutting, and re-recording. Most audio editing occurs in the production stage. This includes every phase of the production process, including sound effects, post-production dubbing, and on-set shooting and recording. Editing is necessary for any procedure that produces new audio content.
Compared to sound editing, sound mixing, on the other hand, focuses more on further refining and perfecting the edited audio during the post-production stage. Mixing involves combining these edited clips to create a cohesive, complete audio composed of dialogue, sound effects, music, etc.
| Sound Editing | Sound Mixing | |
| Main Purposes | To merge, trim, create, and polish sounds. | To balance and blend multiple sounds into a harmonious mix. |
| Activities | Create sound effects, edit dialogue, fade audio clips, overlap audio, etc. | Balance volume, panning, equalization, compression, etc. |
| Time | Before sound mixing. | After sound editing. |
How to Edit Audio Files on Windows
After learning important information about audio, let’s move to how to edit audio files.
#1 Edit Audio Length
There are two main methods to edit audio length: trim audio or split/cut audio. To complete the tasks with ease, I’d like to recommend a feature-rich and free audio editing software – MiniTool MovieMaker.
MiniTool MovieMaker offers various audio editing features, such as trimming, splitting, fading, overlapping, and multi-track editing. The application has a well-organized user interface, allowing everyone to navigate quickly and easily. Also, it offers high-quality results.
1.1 Trim Audio
If you don’t want the beginning or end of the audio, trimming is a quick method to delete the undesired part. Follow the step-by-step instructions below to effortlessly trim audio using MiniTool MovieMaker.
Step 1. Download and Install MiniTool MovieMaker
Click the download button below to download this program. Then, follow the on-screen setup guide to install it on your computer.
MiniTool MovieMakerClick to Download100%Clean & Safe
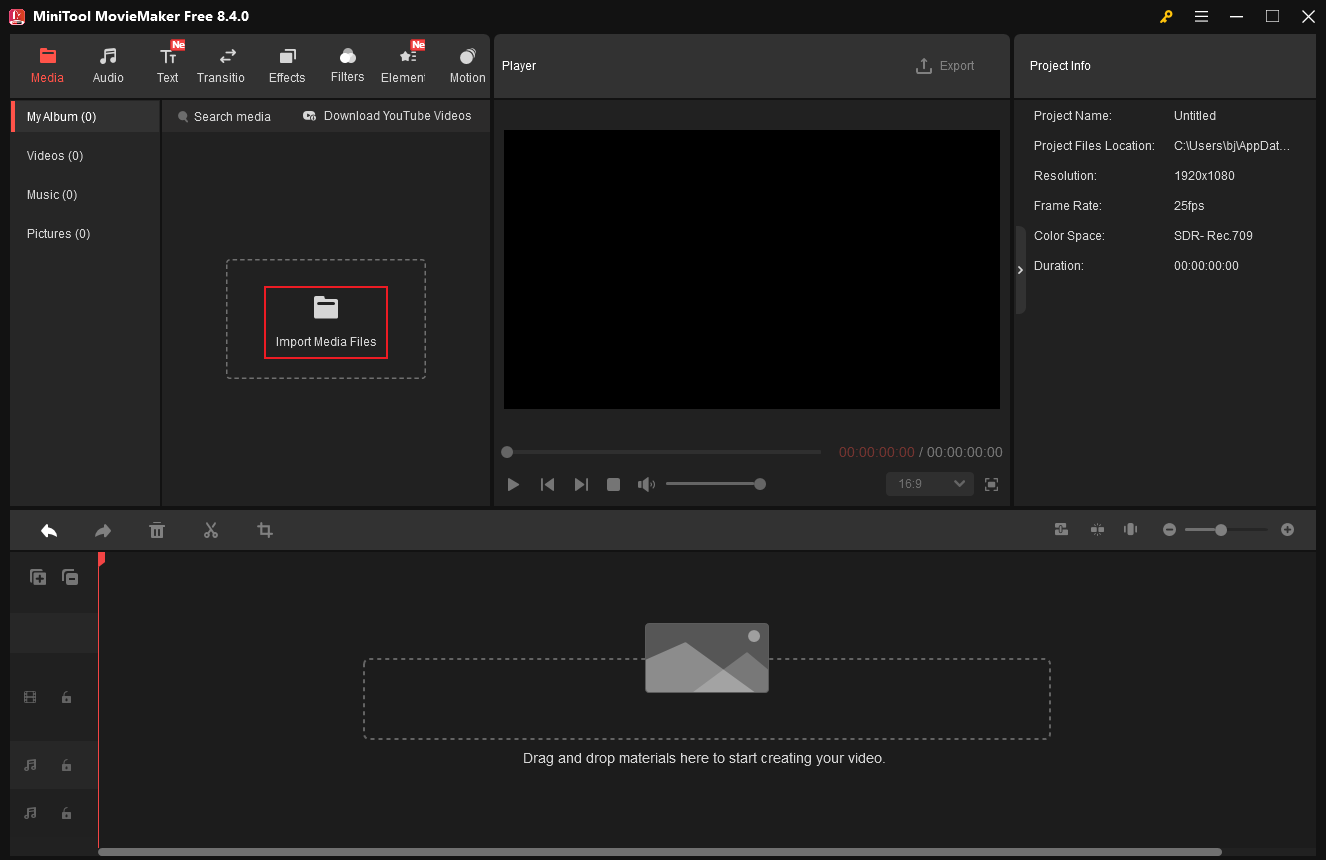
Step 2. Import Your Audio File
Launch the program and click New Project to enter the editing page. Then, click the Import Media Files option to add your audio file.
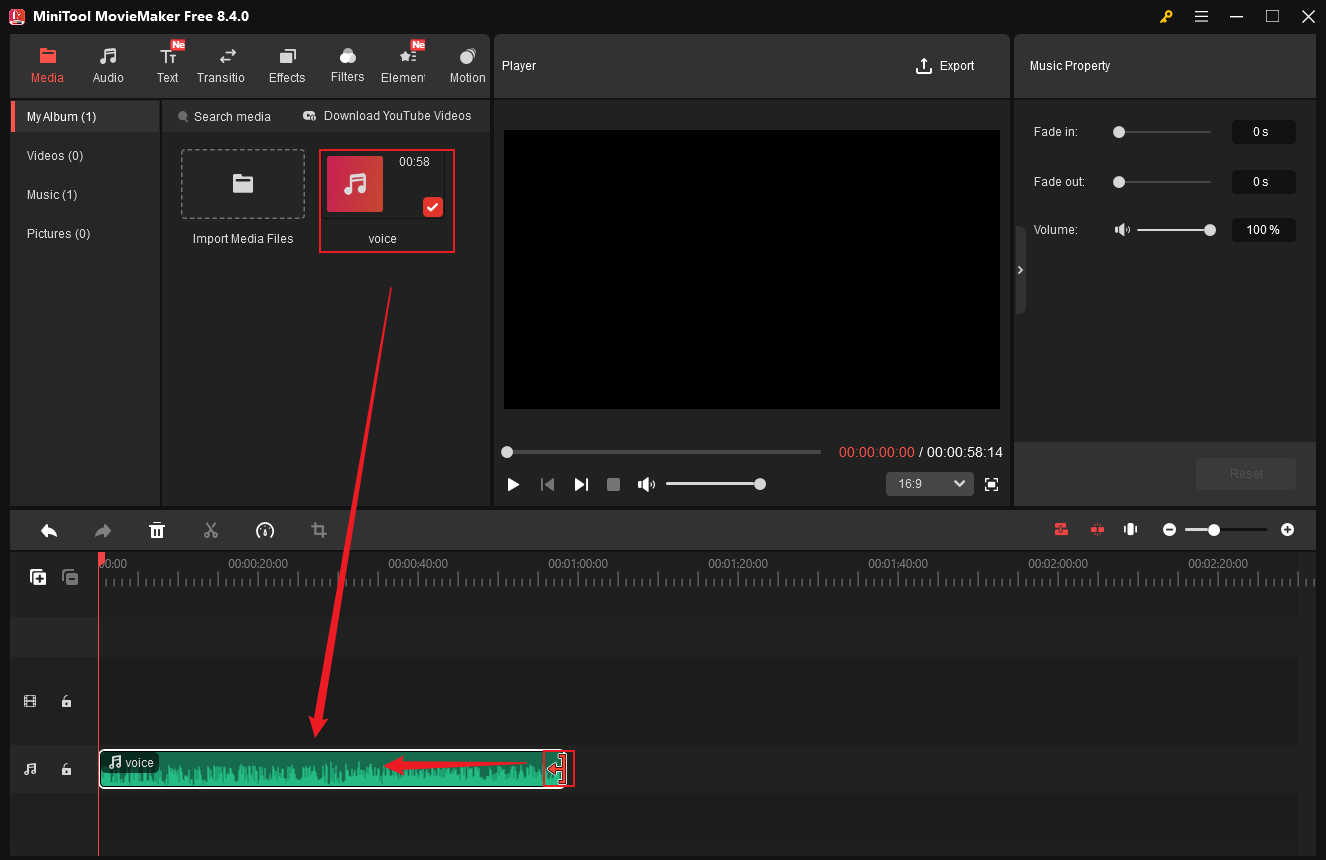
Step 3. Trim Audio
Drag the added audio file to the timeline. Hover the mouse cursor over one of the edges of the audio layer until the Trim icon appears; drag it inwards to delete the unwanted part.
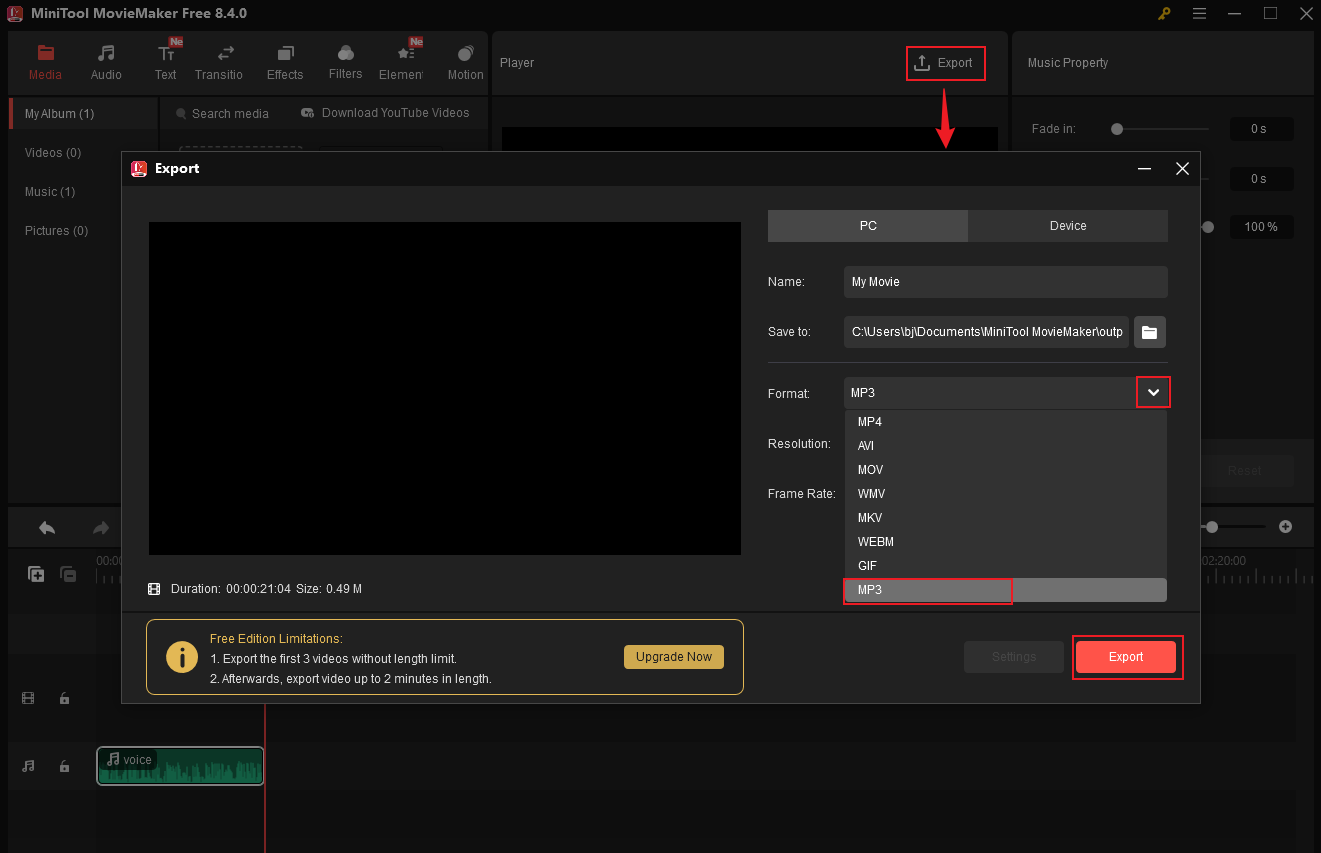
Step 4. Export the Audio
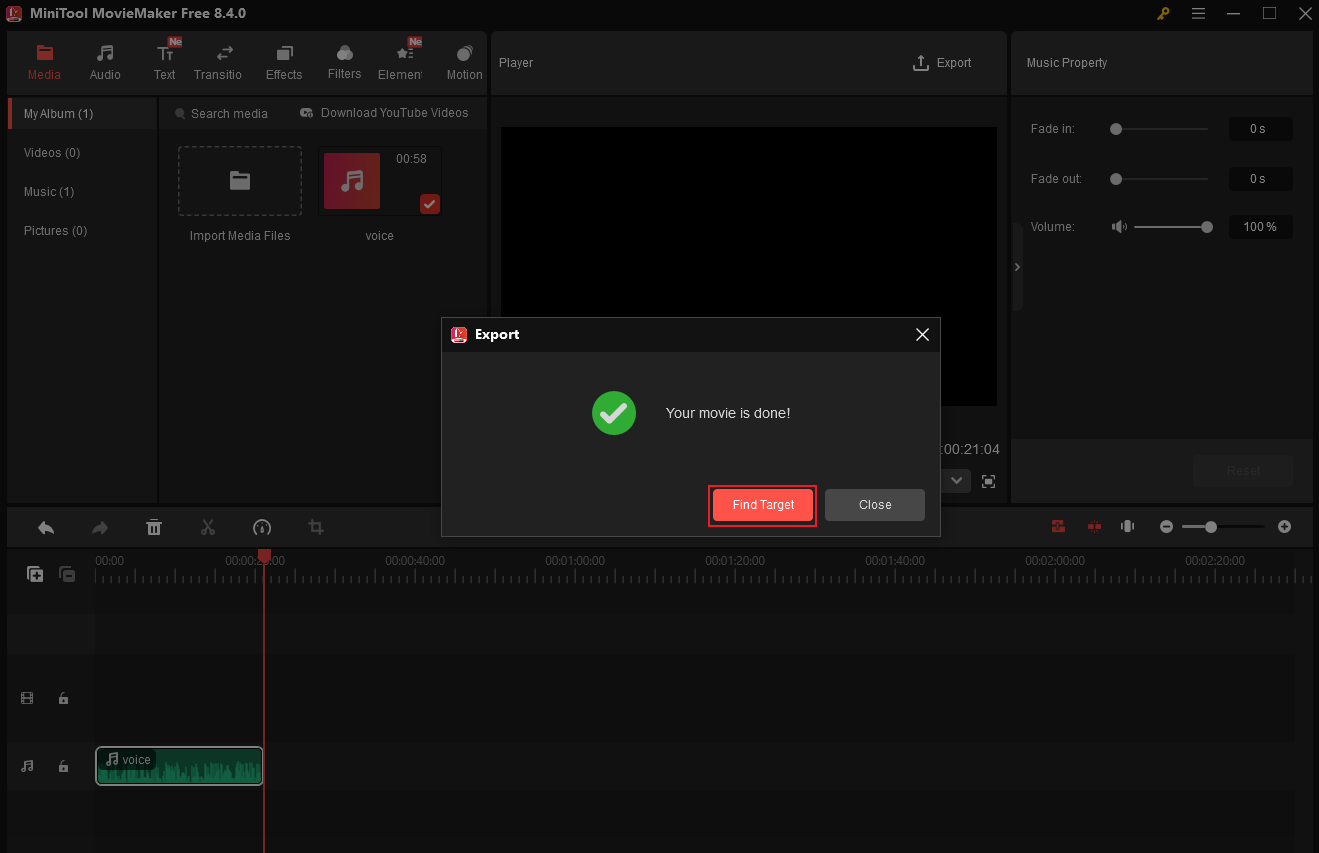
Click the Export icon at the top right of the Player window. In the Export window, expand the Format option and choose MP3 as the output format. After that, click Export to save the audio file.
Step 5. Locate the Audio
Once the exporting process completes, click the Find Target button to locate the audio file in the local folder.
That’s it!
1.2 Split Audio / Cut Audio
If you want to delete the middle part of an audio, splitting it is a go-to method. You can just extract the unwanted part from the audio. Whether to split a single audio track or multiple audio tracks, MiniTool MovieMaker allows you to do that efficiently.
Split the Audio
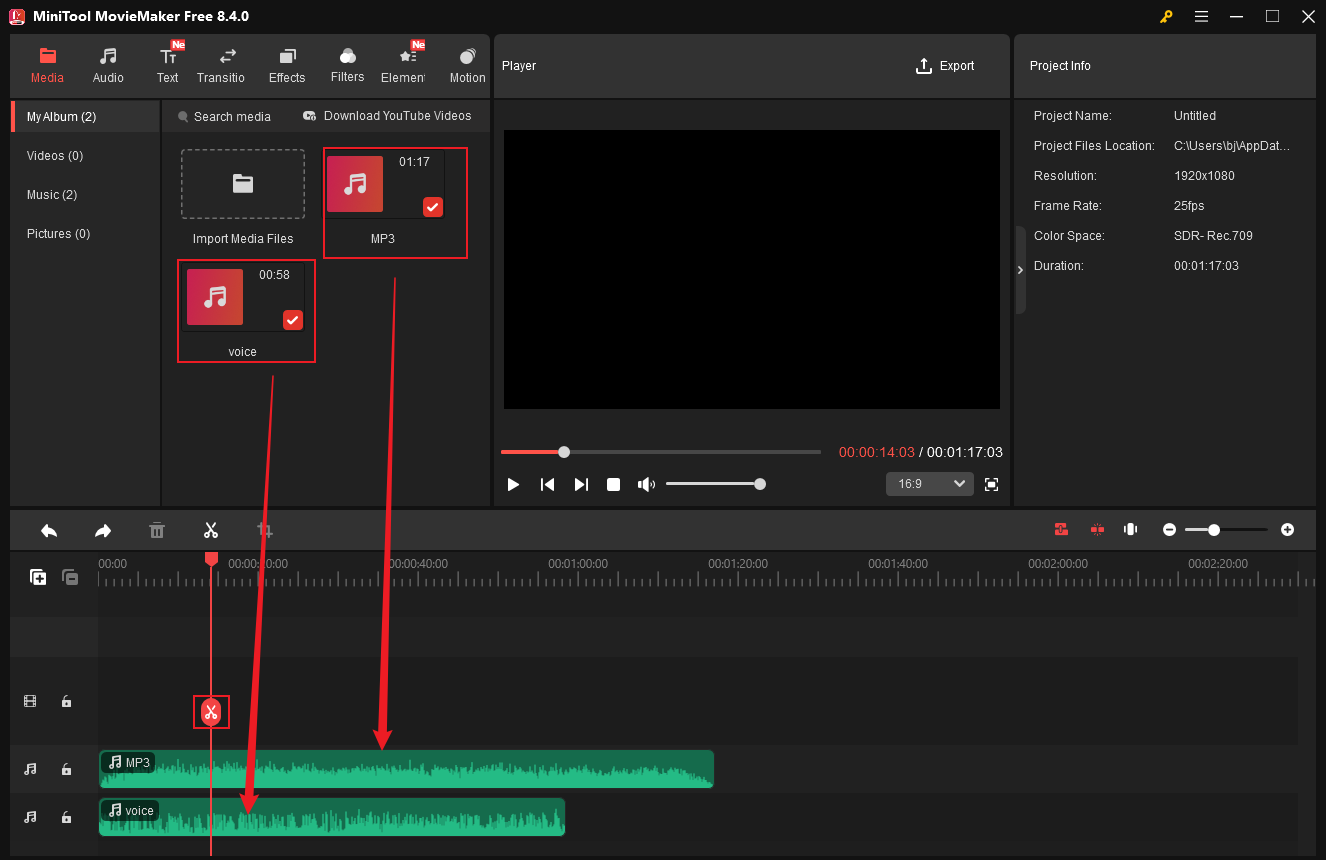
Case 1. Split Multiple Audio Tracks Simultaneously
MiniTool MovieMaker supports two audio tracks. Drag the imported audio to each audio track one by one. Move the playhead to the start of the unwanted parts and click the Scissors icon.
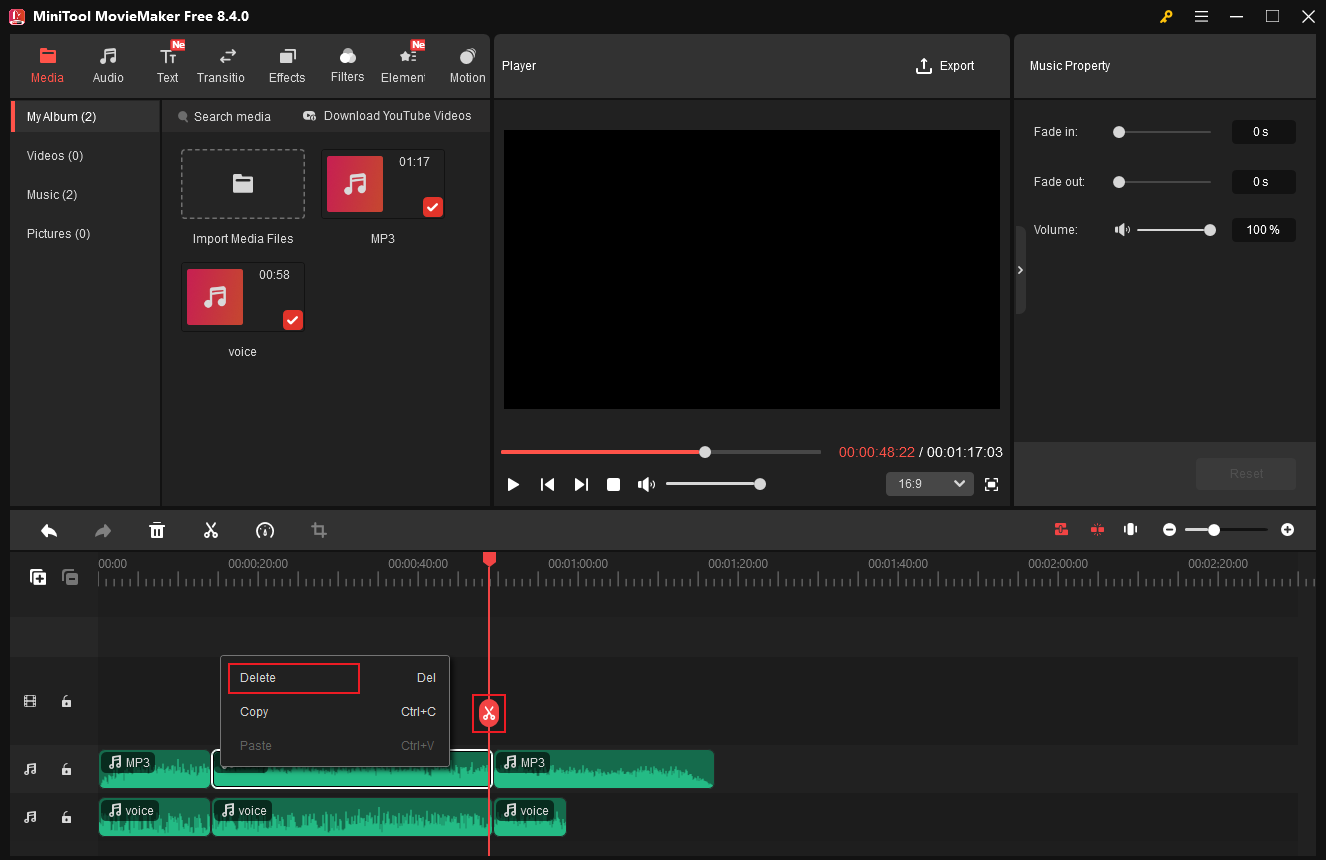
Then, move the playhead to the end of the unwanted parts and click the Scissors icon. Right-click the unwanted part and choose Delete. Repeat the operations to remove other unwanted parts.
Case 2. Split a Single Audio Track
Drag the audio you just imported to one track on the timeline. Then, repeat the same steps as splitting multiple audio tracks to cut a single audio track.
#2 Fade Audio
Audio fading is a common technique in music production or other audio design. To fade audio with ease, MiniTool MovieMaker can also be a No.1 choice. It enables precise audio fade-in/fade-out effects down to the second. Let’s see how.
2.1 Fade in Audio
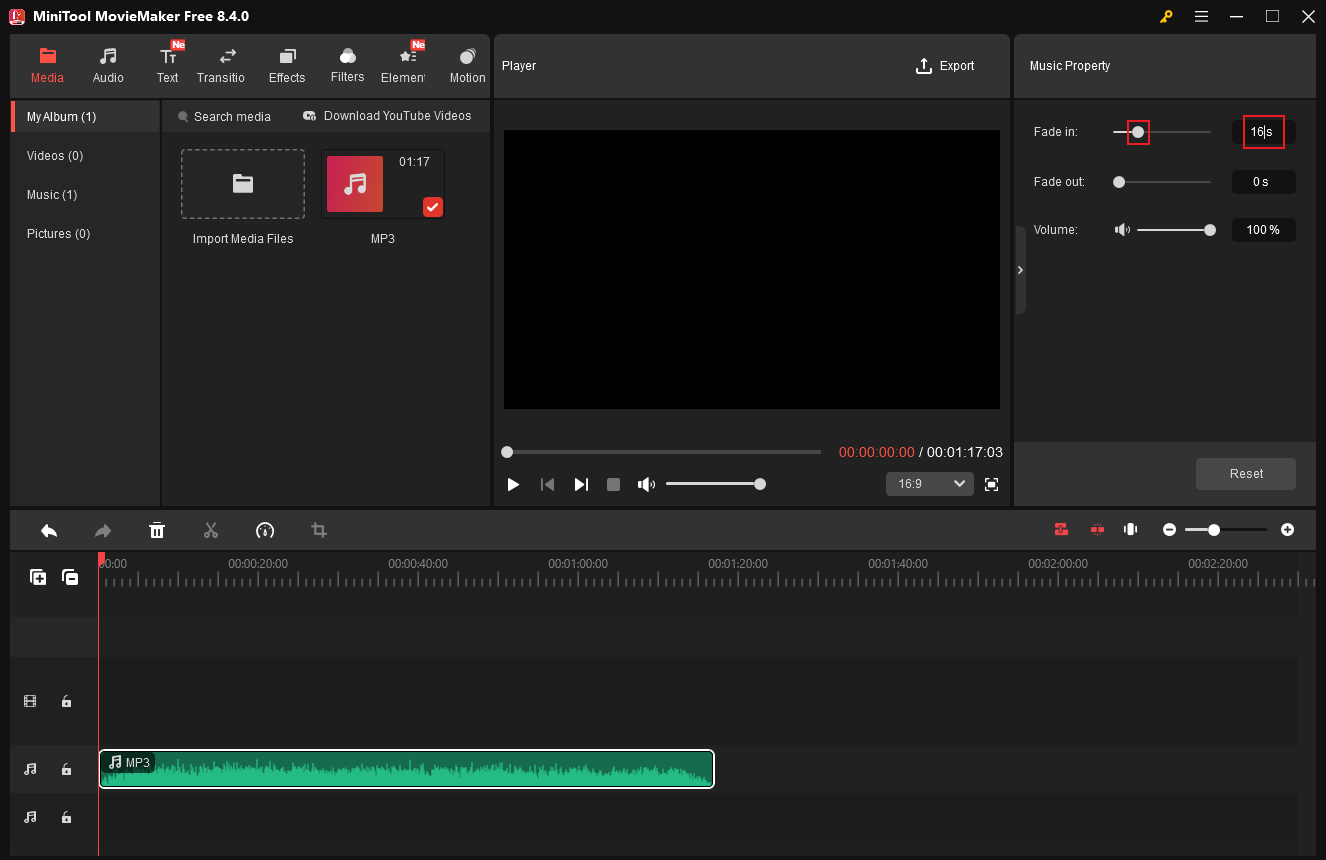
To fade in the audio, drag the added audio to the timeline. In the top right Music Property window, drag the Fade in slider to set seconds for the fade-in effect. Also, you can input a precise number into the custom box.
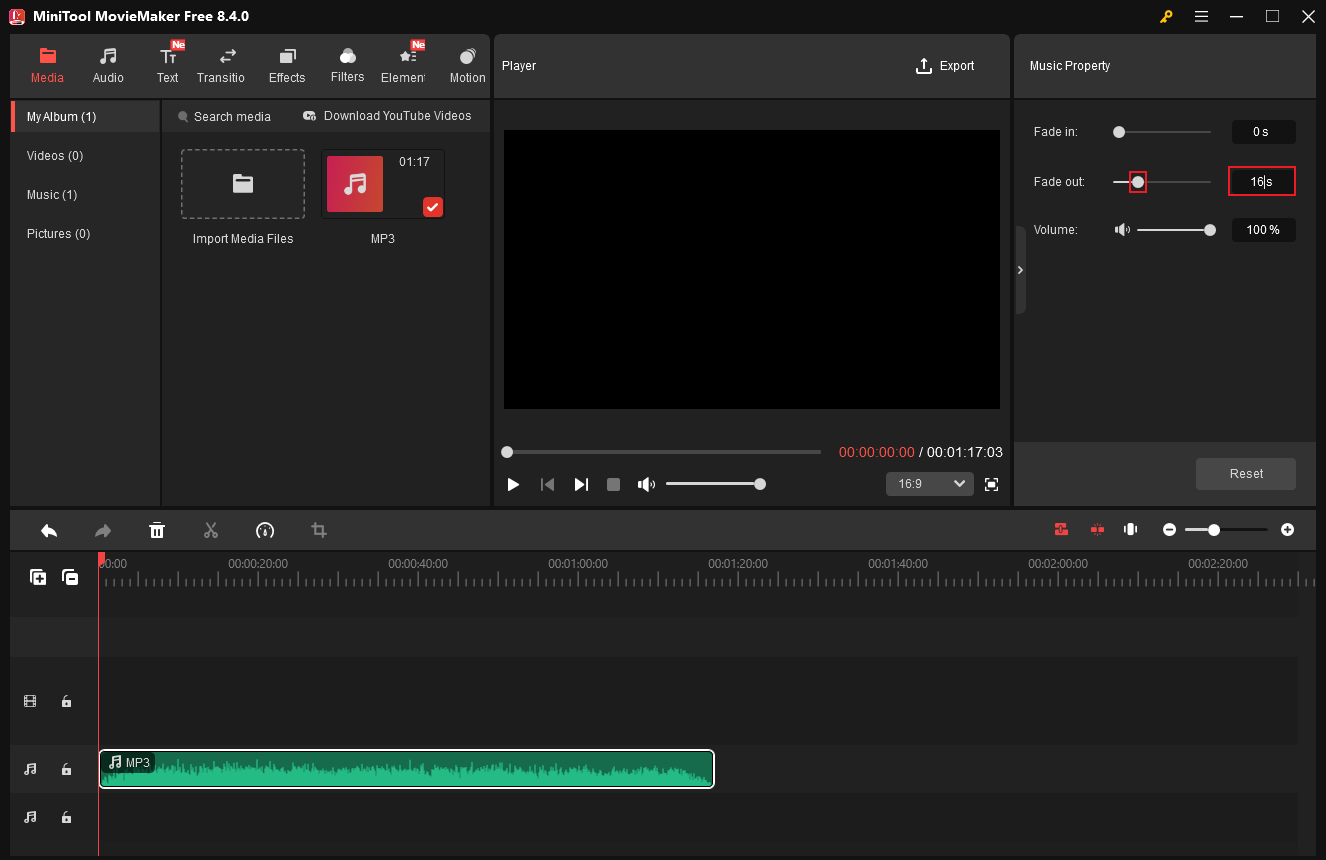
2.2 Fade out Audio
To fade out audio, choose the target audio clip on the timeline. Then, drag the Fade out slider to adjust the time in the Music Property window. Alternatively, you can simply enter a specific number of seconds into the custom box.
2.3 Crossfade Audio
Audio crossfade refers to the simultaneous gradual fade-out of one sound and fade-in of another, creating a brief period of overlap. This technique ensures audio continuity and is usually used for music mixing, podcasts, etc. How to crossfade audio on Windows? MiniTool MovieMaker is always there to lend a hand.
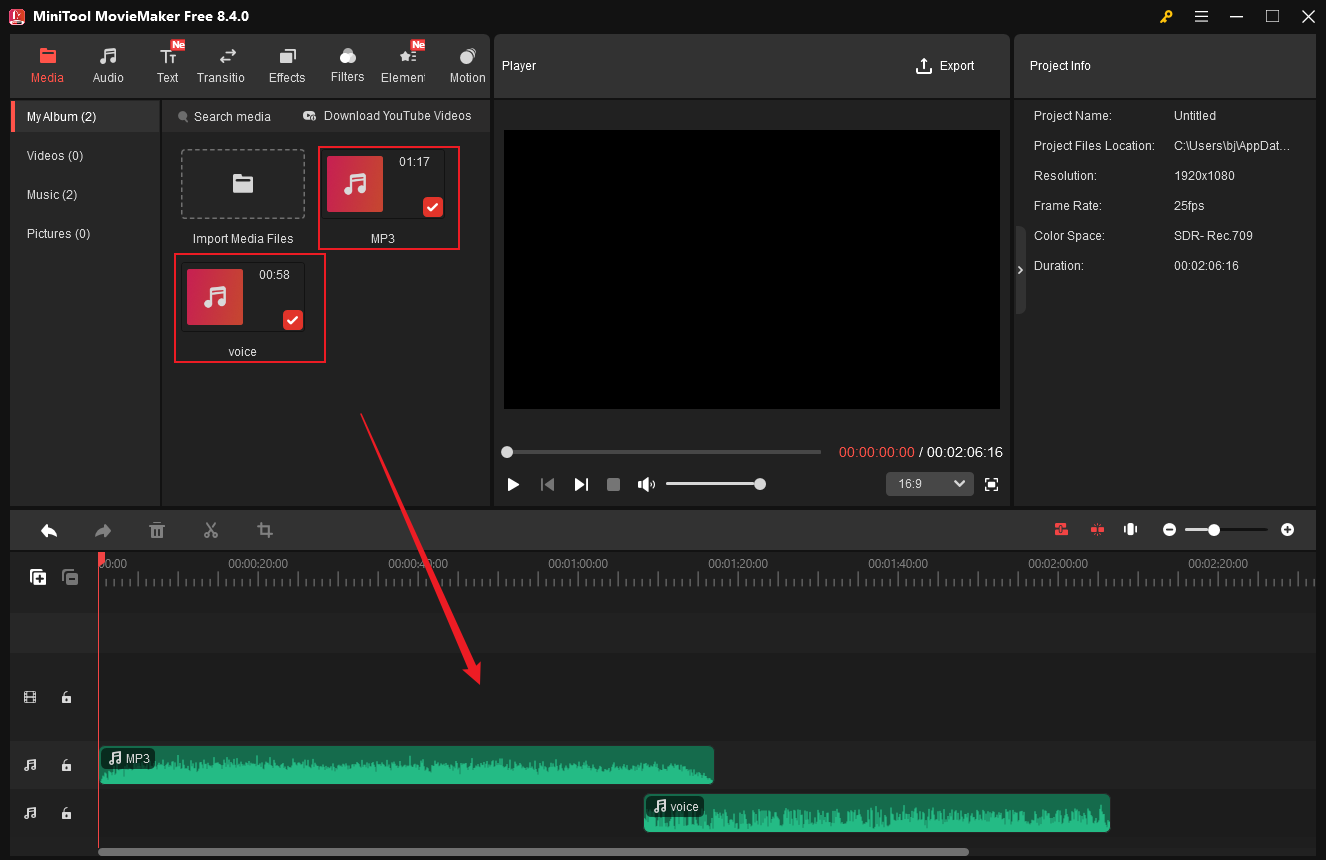
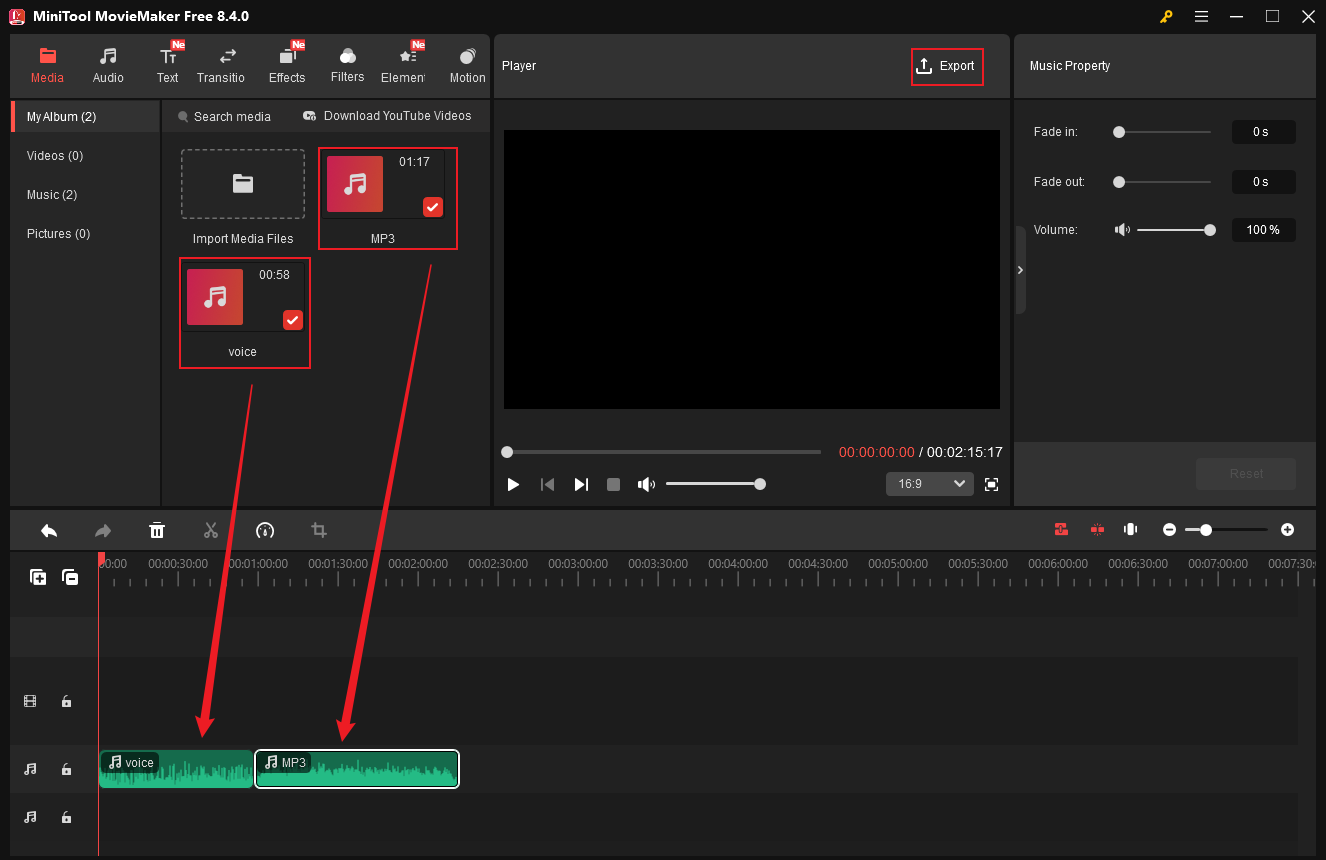
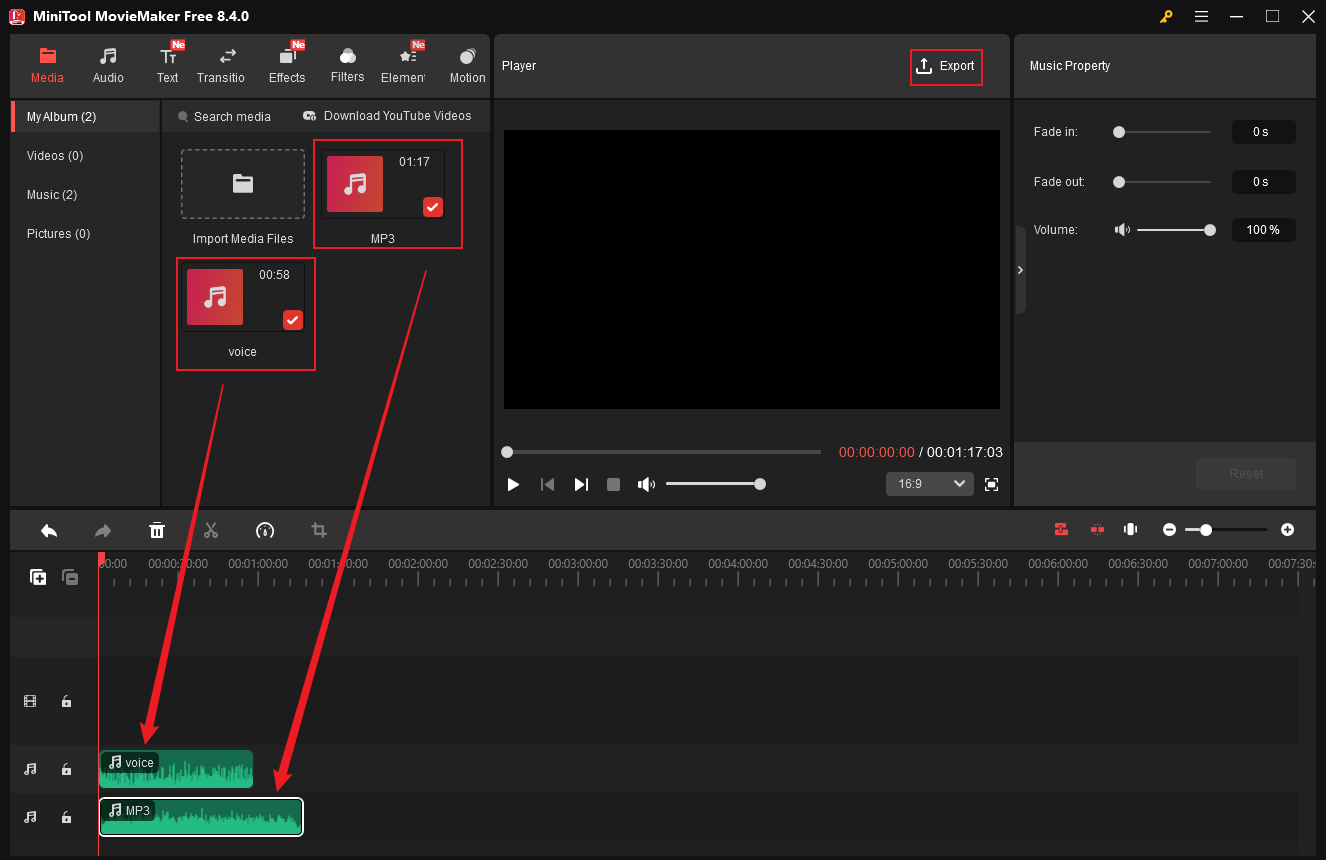
Step 1. Order the Audio Clips
In the editing interface, with audio files imported (here, I use two audio clips), drag them individually onto each audio track. Next, order the audio clips on the timeline based on your needs.
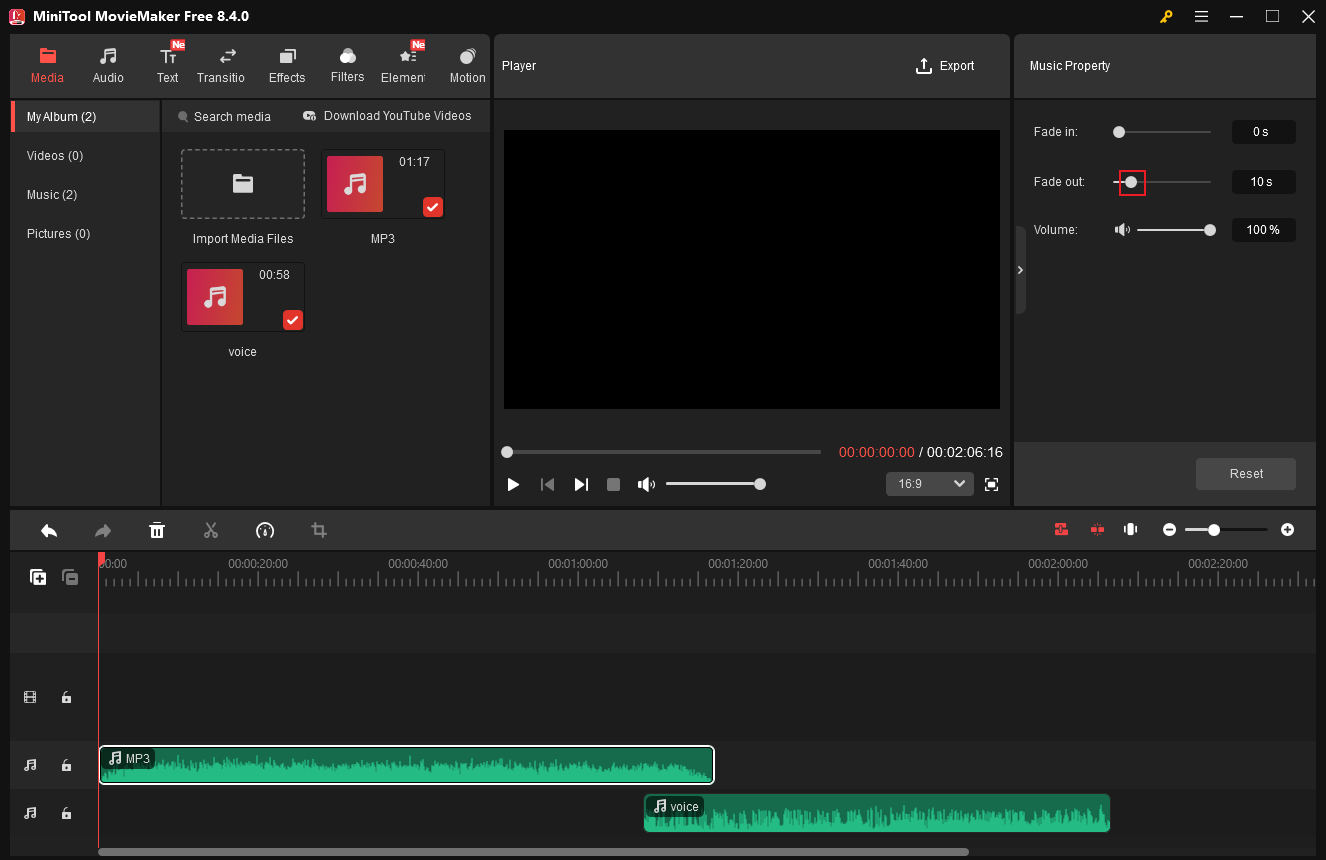
Step 2. Fade out the Former Audio Clip
Click the former audio clip and drag the Fade out slider to adjust the fade-out parameter in the Music Property window.
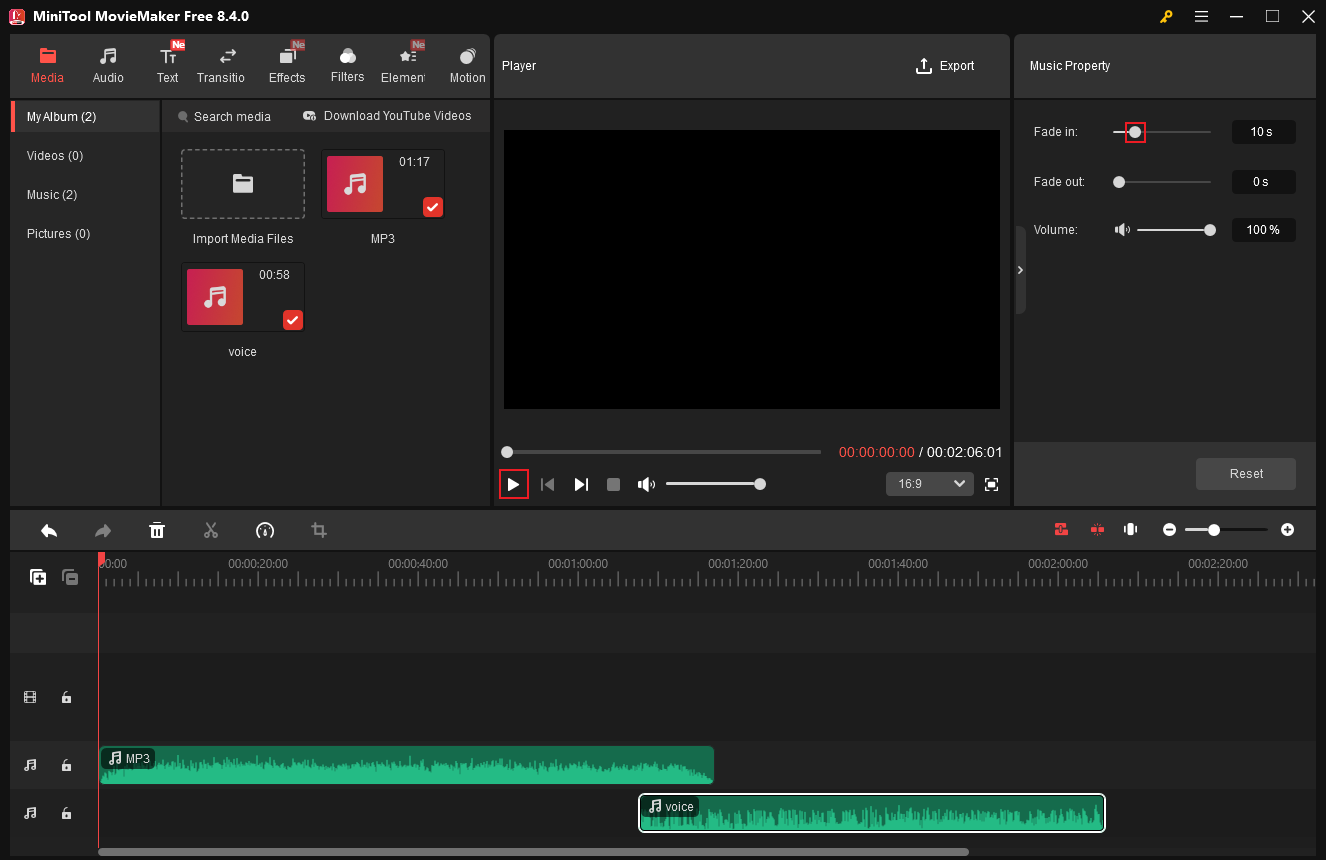
Step 3. Fade in the Latter Audio Clip
Click the latter audio clip. Then, in the Music Property window, drag the Fade in slider to set a proper parameter that seamlessly connects to the previous audio. Click the Play icon to check whether the crossfade effect is satisfactory.
With MiniTool MovieMaker, you can crossfade audio easily and quickly!
MiniTool MovieMakerClick to Download100%Clean & Safe
#3 Mix Audio
To mix audio, you need to balance the volume levels, use an equalizer to create a sense of space, adjust the panning of elements to achieve stereo width, and apply effects to add depth, all of which are done within a Digital Audio Workstation, such as Audacity, Logic Pro, Reaper, etc. Here’s a breakdown of the basic workflow for audio mixing:
- Organize and Adjust: Set up tracks in the DAW, mute all tracks except the most important one, and set appropriate starting levels for them to keep the level meters stable and free from clipping.
- Balance Audio Levels: Import other audio tracks and adjust their volume levels so that they do not exceed the volume of the main track.
- Equalization: Cut troublesome frequencies with EQ.
- Add Effects: Use reverb and delay to add depth and spatiality, making all elements sound cohesive.
- Volume Automation: Automate adjustments in volume, panning, or effects over time.
#4 Extract Text from Audio
Extracting text from audio makes content easier to search, edit, or analyze, convenient for hearing-disabled people, and more. To do this easily, I’d like to recommend an expert tool: MiniTool Video Converter.
MiniTool Video Converter is a free, professional, and AI-powered desktop program that enables you to extract text from audio efficiently. Plus, it allows you to edit the extracted text to better meet your requirements. This application supports exporting text in subtitle formats, like SRT and TXT. Follow the tutorials below to see how to extract text from audio.
Step 1. Download and Install MiniTool Video Converter
Click the download button below to download this program. Then, follow the on-screen setup instructions to install it on your computer.
MiniTool MovieMakerClick to Download100%Clean & Safe
Step 2. Import Your Audio
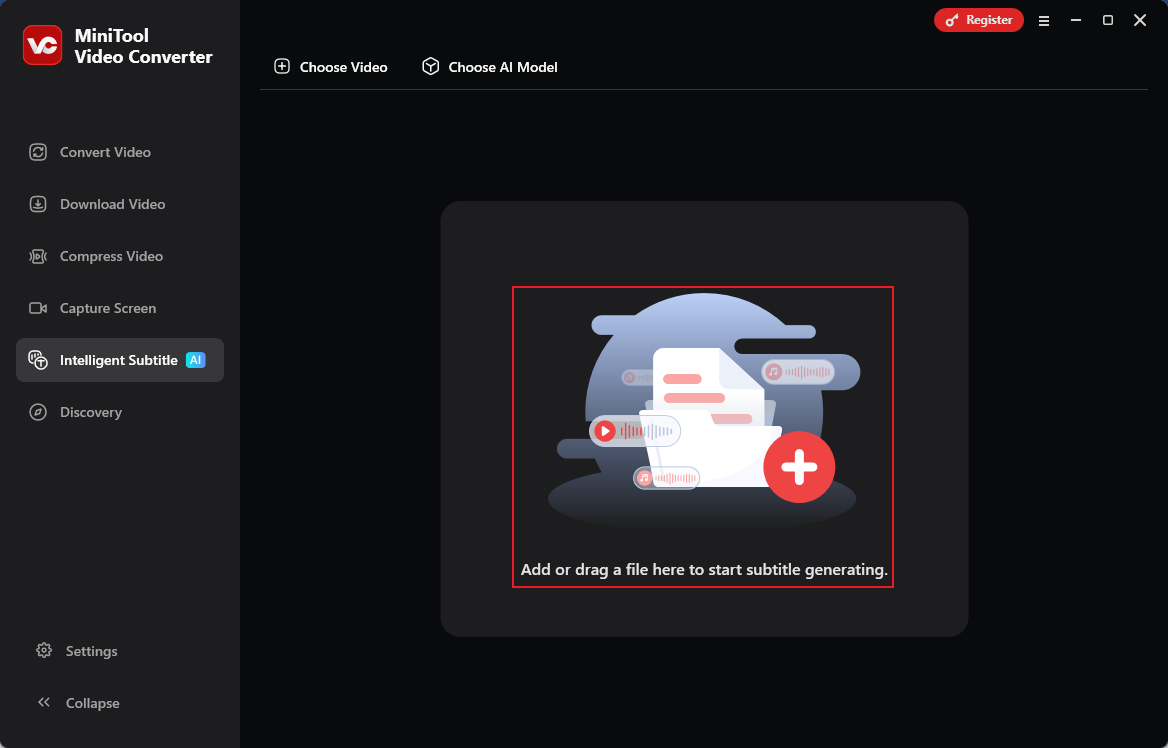
Launch this program and head to the Intelligent Subtitle section. Click the Add or drag a file here to start subtitle generating area, choose an AI model, then add your audio file.
Step 3. Edit the Text
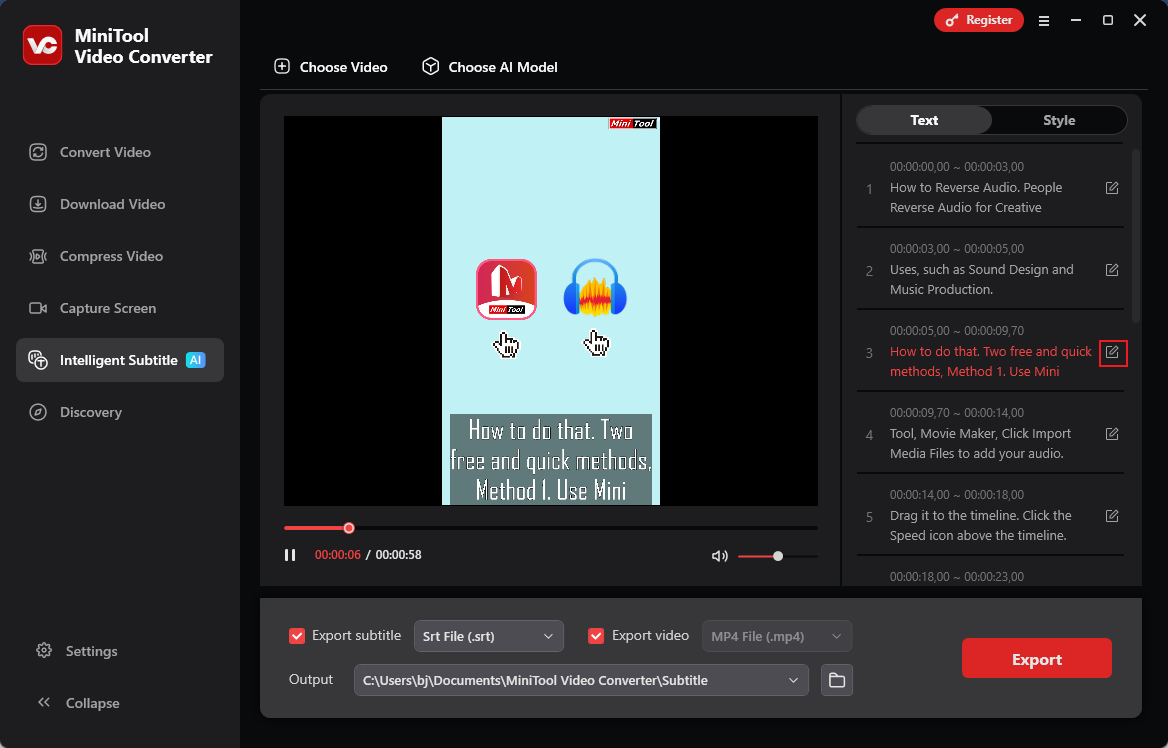
In the right Text section, click the edit icon to modify the text as needed.
Step 4. Export the Text
Expand the Export subtitle option and choose an output format (here, I recommend TXT because it’s a commonly used text format). Next, open the Output option to select a save path. After that, click Export to save the text file.

Furthermore, MiniTool Video Converter can also extract text from video, convert one video or audio format to another, reduce file size without quality loss, etc.
MiniTool Video ConverterClick to Download100%Clean & Safe
#5 Edit Audio Volume
Editing audio volume mainly covers four aspects, including changing audio volume, normalizing audio, editing audio levels, and audio ducking. This part will show you how to complete all of them step by step. Read on.
5.1 Change Audio Volume
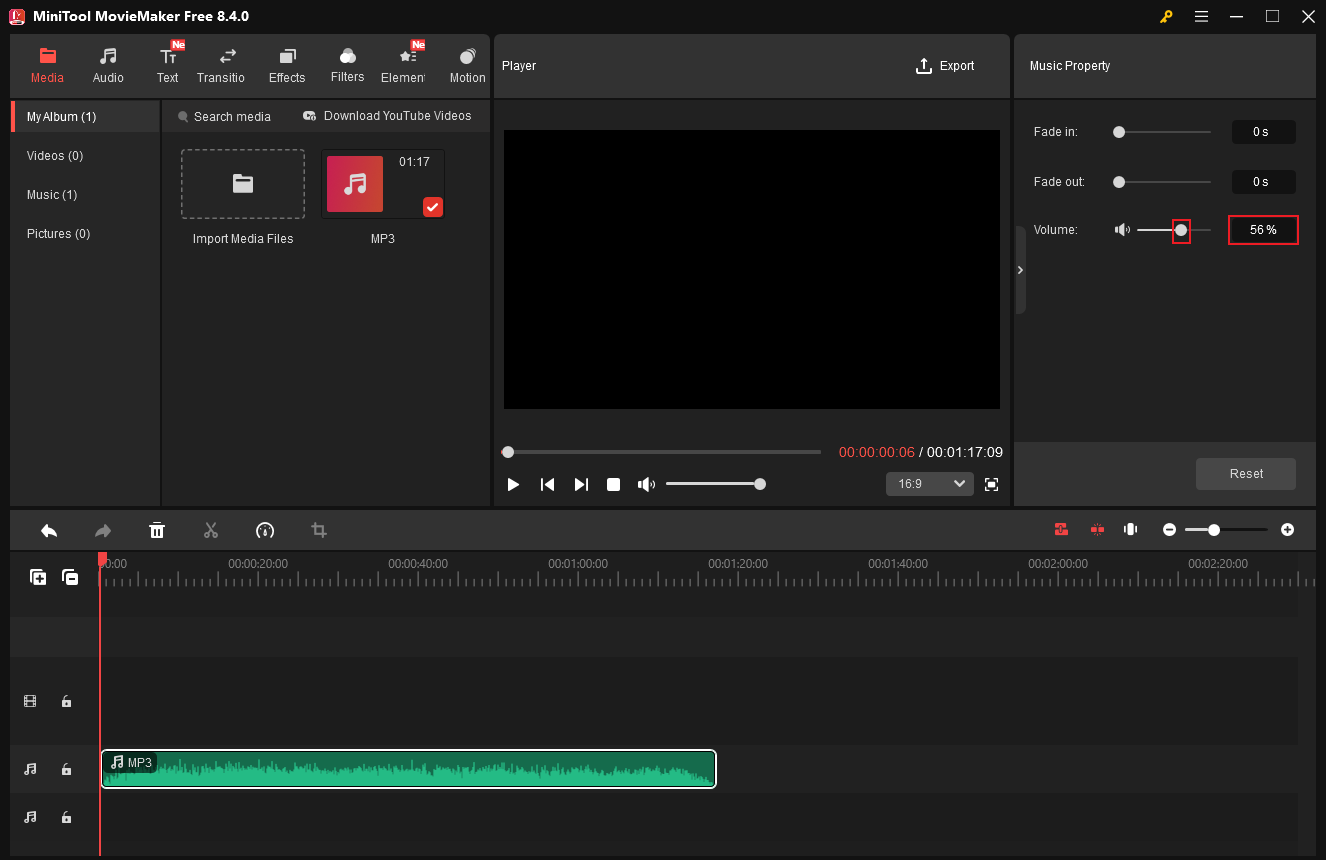
Use MiniTool MovieMaker to edit audio volume without quality loss. After importing your audio to the program, drag it to the timeline. In the right top Music Property window, change the audio volume by dragging the Volume slider. Or input the desired volume to the custom box.
Then, export the audio file.
5.2 Normalize Audio
Audio normalization refers to adjusting the overall volume of an audio file to a consistent target level without altering its tonal quality or dynamic range. This process involves lowering volumes exceeding the target level to the target value and raising those below it to the target value. Quieter parts become louder, while louder parts become quieter, ensuring all parts achieve balanced loudness and delivering a smoother listening experience.
How to normalize audio? Try Davinci Resolve. It features a built-in tool that can normalize audio effectively, achieving rapid repairs and professional-level loudness matching. Here’s a guide below.
Step 1. Get Davinci Resolve on Your PC
Visit Davinci Resolve’s official website to download and install it. Then, launch this program.
Step 2. Choose Audio Clips
Import your audio first. Then, in the edit page, highlight the audio clip you want to normalize.
Step 3. Normalize Audio Levels
Right-click the selected audio clip and choose the Normalize Audio Levels option from the menu.
Step 4. Configure Settings
- Choose a Mode: Select Sample Peak Program or True Peak based on your needs.
- Level: Choose a target decibel.
- Relative/Independent: Choose Relative, which will let all clips be adjusted as a whole based on the clip with the highest volume. Or, choose Independent to set every clip to the target decibel.
Step 5. Apply the Changes
Select the Normalize option to complete the audio normalization.
5.3 Edit Audio Levels
Audio level is the loudness or intensity of a sound signal, measured in decibels (dB). It is essential for ensuring that the audio sounds clear, balanced, and free from distortion. When audio levels reach the maximum threshold, it causes intense digital clipping or analog distortion. Typically, audio levels can be separated into three types: line level, speaker level, and microphone level.
Editing audio levels can balance music, sound effects, or dialogue, ensuring audio clarity and consistency. Editing audio levels can make audio sound more professional and enhance the listening experience by ensuring that all sounds are at an appropriate and comfortable volume level, avoiding volume peaks and dips that may cause discomfort to the audience.
How to edit audio levels? Here, I recommend Adobe Premiere Pro. It is a professional tool that can edit audio levels thoroughly, allowing you to use an advanced tool to adjust levels and enhance speech. In this way, you can fine-tune the level of each clip or track to achieve perfect sound quality. Follow the tutorial below to complete the task.
Step 1. Download and Install Adobe Premiere Pro
Head to Premiere Pro’s official website to download and install this program. Then, launch it.
Step 2. Edit Audio Levels
Import your audio into the program. There are three methods you can apply.
Use Timeline
Locate the white horizontal line representing the audio clip on the timeline. Drag upward to increase the volume or drag downward to decrease it.
Audio Gain
- Choose the target clip: Click the audio clip you want to edit in the timeline.
- Activate Gain: Right-click the target clip and choose the Audio Gain option.
- Perform Adjustment: Enter a specific dB value or use Normalize Maximum Peak to set consistent loudness while avoiding clipping distortion.
Use Effect Controls Panel
- Highlight Clip: Click the target clip.
- Access Effect Controls Panel: If you don’t see the Effect Controls panel, click the Window option in the top menu and choose Effect Controls to activate it.
- Adjust Audio Level: In the Effect Controls panel, scroll to find and expand the Volume option and adjust the blue slider to adjust the level. Or enter a value into the Level custom box.
5.4 Audio Ducking
5.4.1 What Is Audio Ducking
Audio ducking is an audio editing technique that lowers the volume of one audio track during the playback of another, more important sound, preventing the essential sound from being drowned out. Once the primary sound stops, the background music volume is restored to its normal level. Audio ducking is usually used for radio, video editing, podcasts, streaming, and music production. Making space for speech allows it to overpower music or other sounds, thereby enhancing clarity.
5.4.2 How to Do Audio Ducking
Adobe Premiere Pro supports auto audio ducking, which streamlines the workflow effectively. Let’s see how.
Step 1. Access Essential Sound Panel
Import your audio files into the program first. Then, click the Window option in the top menu, click Workspaces, and select the Audio to open the Essential Sound panel.
Step 2. Tag Audio
- Dialogue: Click the dialogue tracks on the timeline. Then, click the Dialogue button in the right Essential Sound panel.
- Music: Select the music track and click the Music button in the Essential Sound panel.
Step 3. Perform Audio Ducking
- Dialogue: Under the loudness section, choose the Auto Match option, which will raise the dialogue audio to a proper decibel level.
- Music: Click the Auto Match option to lower the music to an appropriate level, which will not overpower the dialogue.
Step 4. Configure Ducking Settings
In the Essential Sound panel, enable the Ducking option. Choose the dialogue icon in the Duck against row, then you can adjust the sensitivity, duck amount, and fades by dragging their sliders. Finally, click the Generating Keyframes option, which will add keyframes to the music track where there is no dialogue audio.
#6 Change Audio Speed
People typically speed up audio to boost efficiency, such as accelerating podcasts or audiobooks to save time. Slowing down audio is often done to better comprehend complex information or difficult-to-understand accents. Adjusting audio speed is also commonly used in video editing, music production, and other scenarios.
To change audio speed, meet our old friend – MiniTool MovieMaker. With only a few clicks, the tasks can be done.
MiniTool MovieMakerClick to Download100%Clean & Safe
6.1 Speed up Audio
Step 1. Import Your Audio
In MiniTool MovieMaker’s editing page, click the Import Media Files to add your audio. Then drag the added audio to the timeline.
Step 2. Speed up Audio
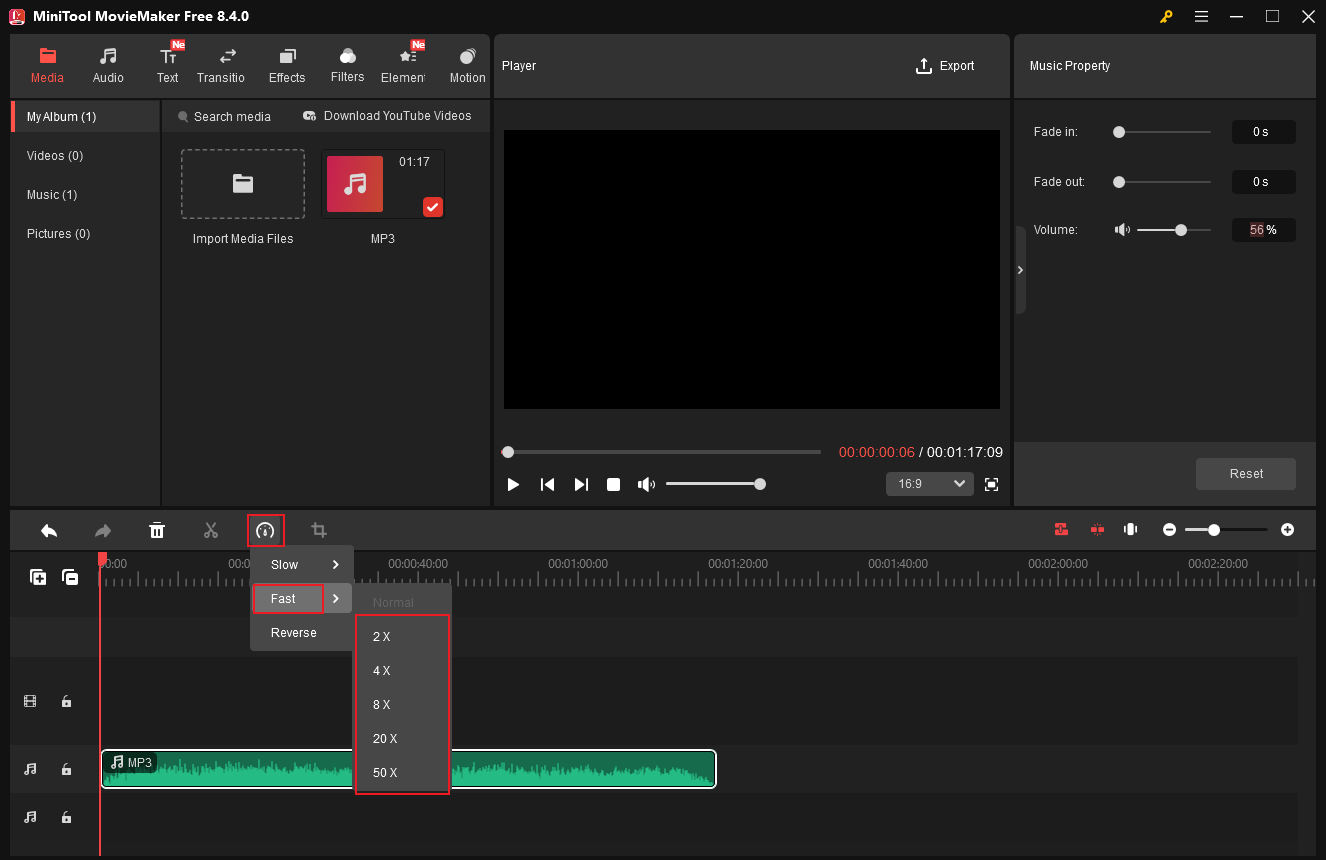
Click the Speed icon above the timeline, click Fast, and choose the desired speed.
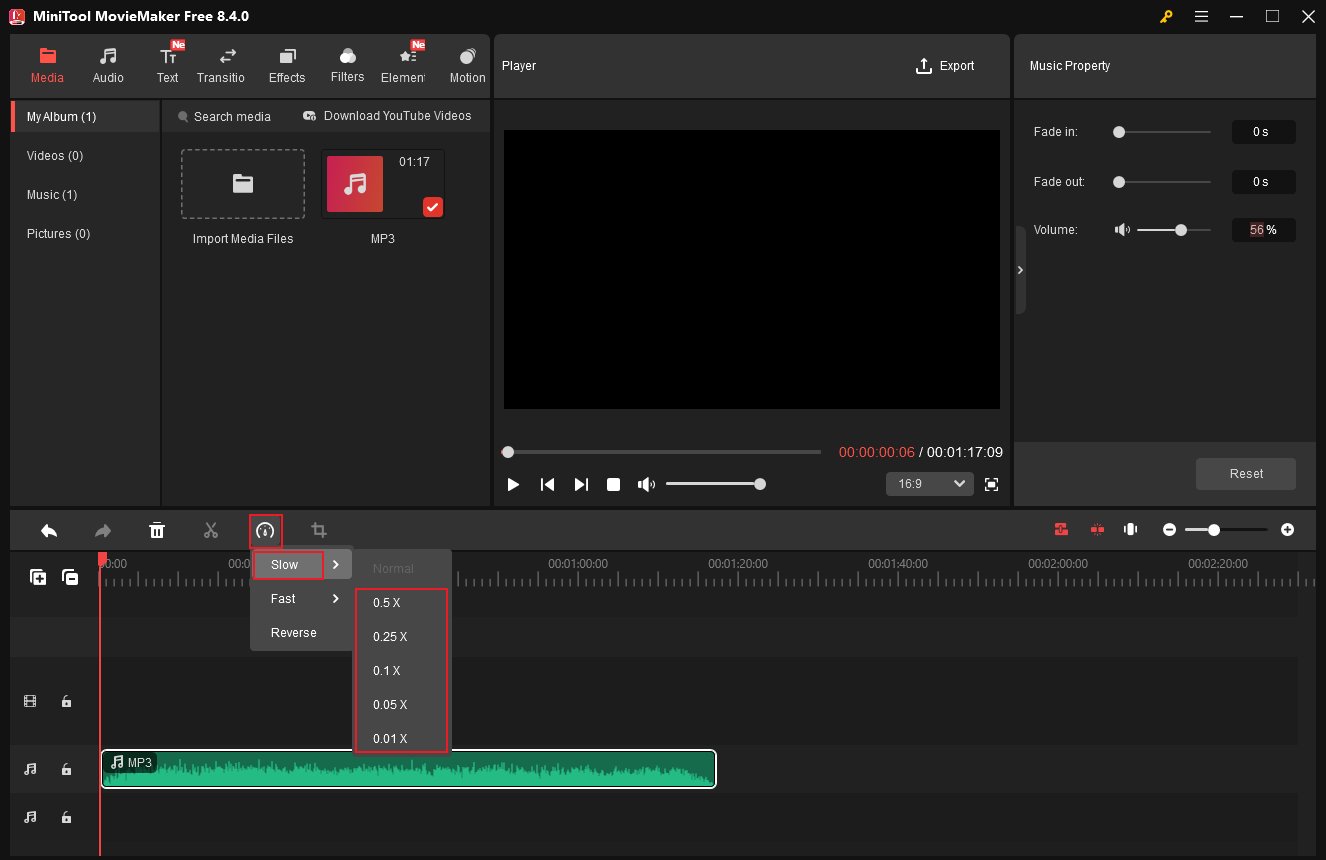
6.2 Slow down Audio
In the MiniTool MovieMaker’s editing page with the target audio imported and dragged to the timeline, click the Speed icon, choose the Slow option, and select the speed you want.
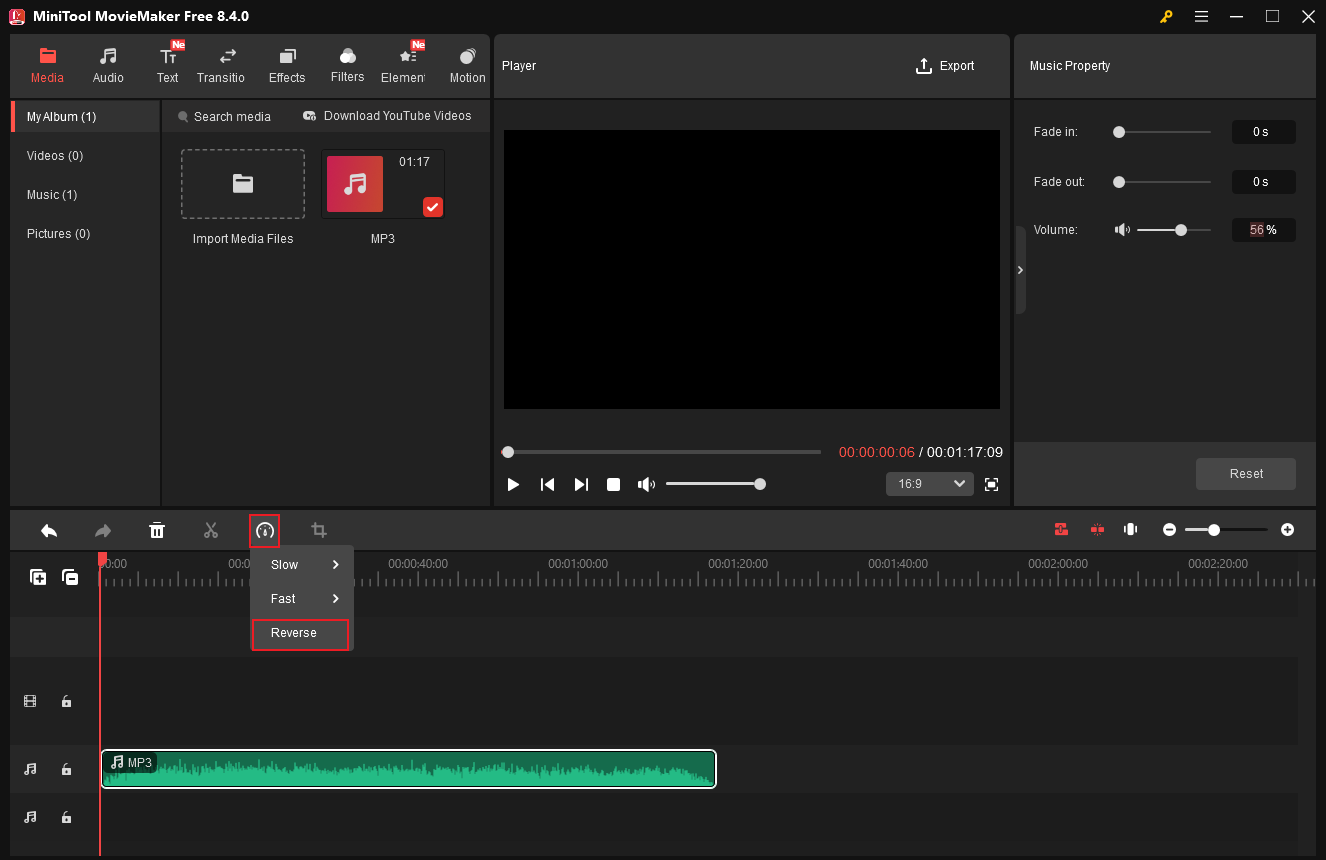
#7 Reverse Audio
Audio reversing is usually used in creative effects, music production, or other sound design. This method often produces unsettling, unpredictable sounds. How to reverse audio on Windows? MiniTool MovieMaker is a can’t-miss tool. Its simple layout allows you to reverse audio with ease.
After importing your audio into the program and dragging it onto the timeline, click the Speed icon above the timeline and select Reverse. The audio will then be reversed successfully.
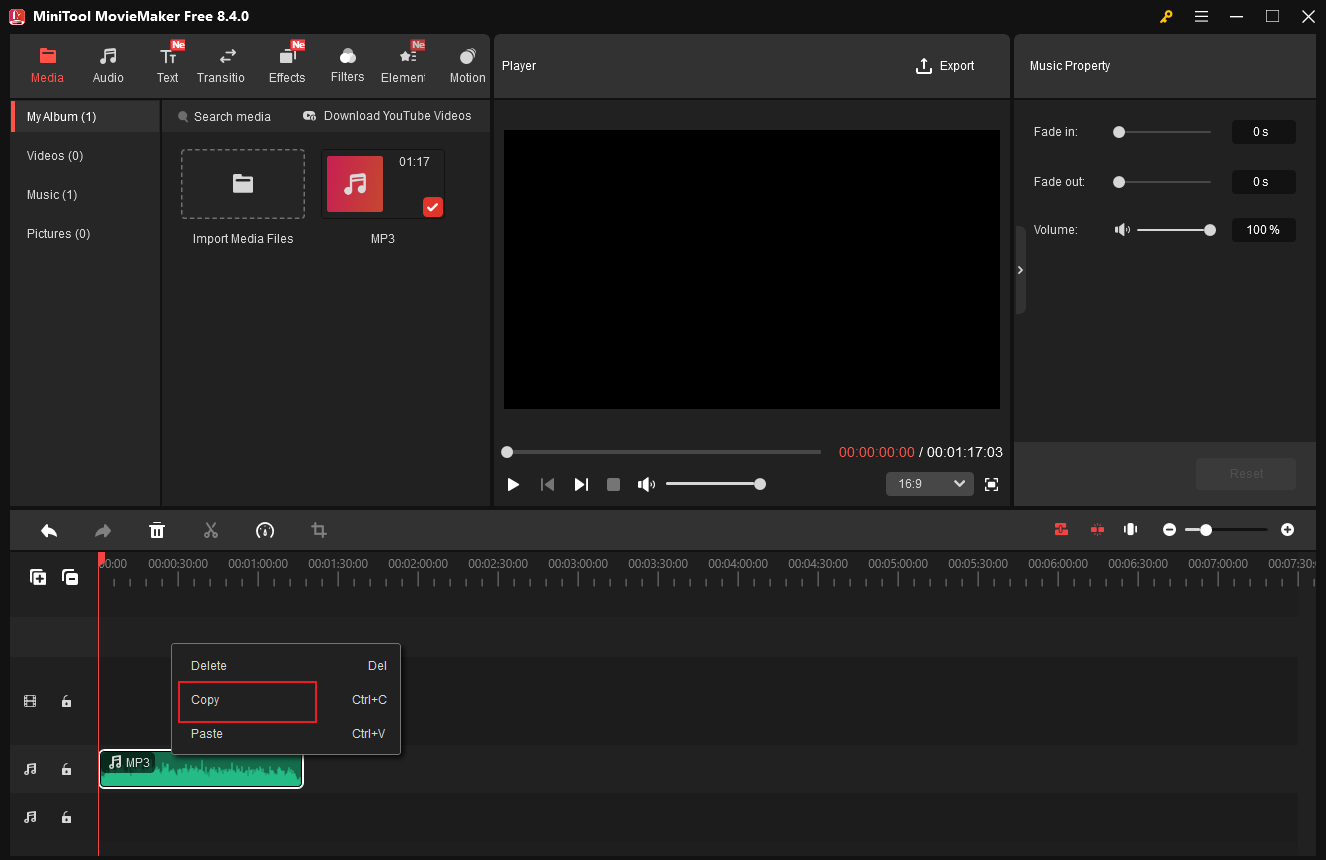
#8 Loop Audio
Audio loops are commonly used to create seamless, continuous sound for background music, song production, video editing, etc. To loop audio, MiniTool MovieMaker can do you a big favor. Here’s how:
- Drag the added audio to the audio track.
- Right-click the audio clip and choose Copy.
- Press Ctrl + V to paste the clip.
- Drag the pasted audio onto the same track as the original audio and place it at the end of the original audio.
- Repeat the operations to create more loops.
#9 Merge Audio Files
Merging audio files refers to combining multiple individual sound clips into a single and continuous audio. You can merge audio files into a single track or multiple tracks. Usually, audio merging is for content and video creation, music compilations, creative sound projects, and more.
9.1 Merge Audio Files on One Track
Merging audio files into a single track means placing multiple audio clips end-to-end to create a cohesive audio file. To do this quickly, you can rely on MiniTool MovieMaker.
- Import audio files into the program.
- Drag all the files to the timeline.
- Order the audio based on your needs.
- Click the Export icon to access the Export window.
- Set MP3 as the output format and click Export.
9.2 Merge Audio Files on Multiple Tracks
Multitrack audio merging involves combining separate audio tracks—such as vocals, music, dialogue, and sound effects—into a single, unified audio file. This can be done either sequentially (by joining clips end-to-end) or simultaneously (by blending them). The process consolidates multiple audio files into one continuous file, resulting in a complete audio piece.
In MiniTool MovieMaker’s interface, with your audio files imported, drag one of the audio files to the first audio track. Then, drag another audio to the second audio track. Also, you can adjust their playing time in the whole audio by dragging them on the timeline. After that, click Export to merge the audio.
#10 Remove Audio from Audio
Removing audio from audio means deleting specific sounds from audio, like noise, vocals, voice, wind, etc. Doing so allows you to eliminate the distractions of audio, isolate voices for voiceovers, podcasts, or accompaniment, replace audio for video/audio content creation, etc. In this section, I have broken down the audio removal process into eleven distinct aspects and show you how to complete the job step by step. Keep reading.
10.1 Remove Vocals from a Song
Removing vocals from a song refers to isolating or eliminating the vocal track to create a pure instrumental or a cappella version. Removing vocals from songs is primarily done for creative remixing, creating backing tracks for practice or performances, audio analysis, etc. Can you remove vocals from a song for free? The answer is yes. Notta can do you a big favor.
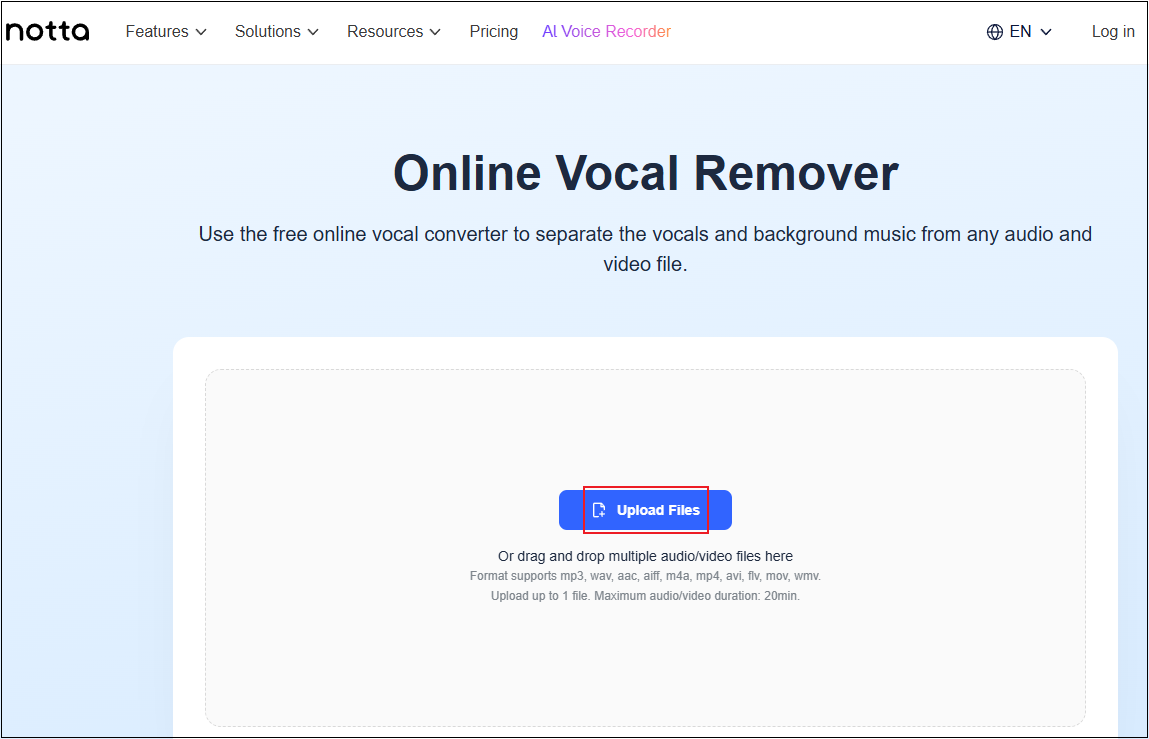
Notta is an online vocal remover that supports a wide range of audio formats, including MP3, WAV, AAC, AIFF, M4A, etc. It features an intuitive user interface, allowing you to process audio with a few clicks. In addition, Notta has AI-powered tools that are capable of extracting vocals from songs accurately. More than that, this online tool provides high-quality audio outputs.
Step 1. Access Notta’s Vocal Remover
Visit https://www.notta.ai/en/tools/online-vocal-remover.
Step 2. Upload Your Song
Click the Upload Files button to import the target audio.
Step 3. Remove Vocal from the Song
When the song is uploaded, the AI tool will extract the vocals from the music.
Step 4. Download the Music without Vocals
Once the vocal extraction process completes, download the music to the local folder.
10.2 Remove Echo from Audio
In the field of audio, an echo refers to the phenomenon where sound waves bounce off hard surfaces. The sound waves then return to the listener’s ears after the original sound. This creates a distinct, delayed repetition of the sound. An echo is an independent sound that is a clear, delayed reflection of the original.
Echoes overlap with the original sound, causing speech to become indistinct. Eliminating audio echoes enhances clarity and professionalism, making the sound more precise and polished. Plus, removing distracting or muddy reverberations can significantly captivate audiences. Moreover, if there is too much echo, the sound can sound far away, cheap, or rough. This can compromise the quality of content in streaming, podcasts, videos, and more.
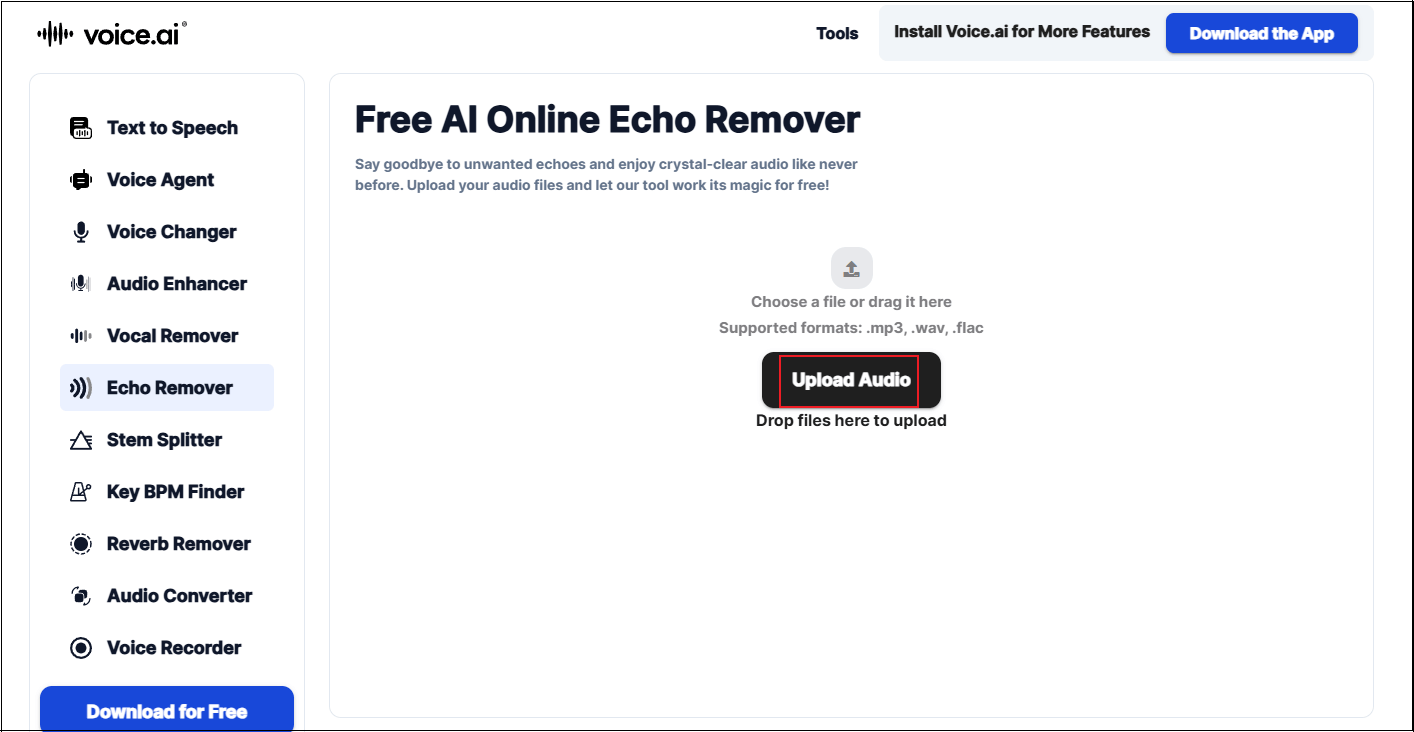
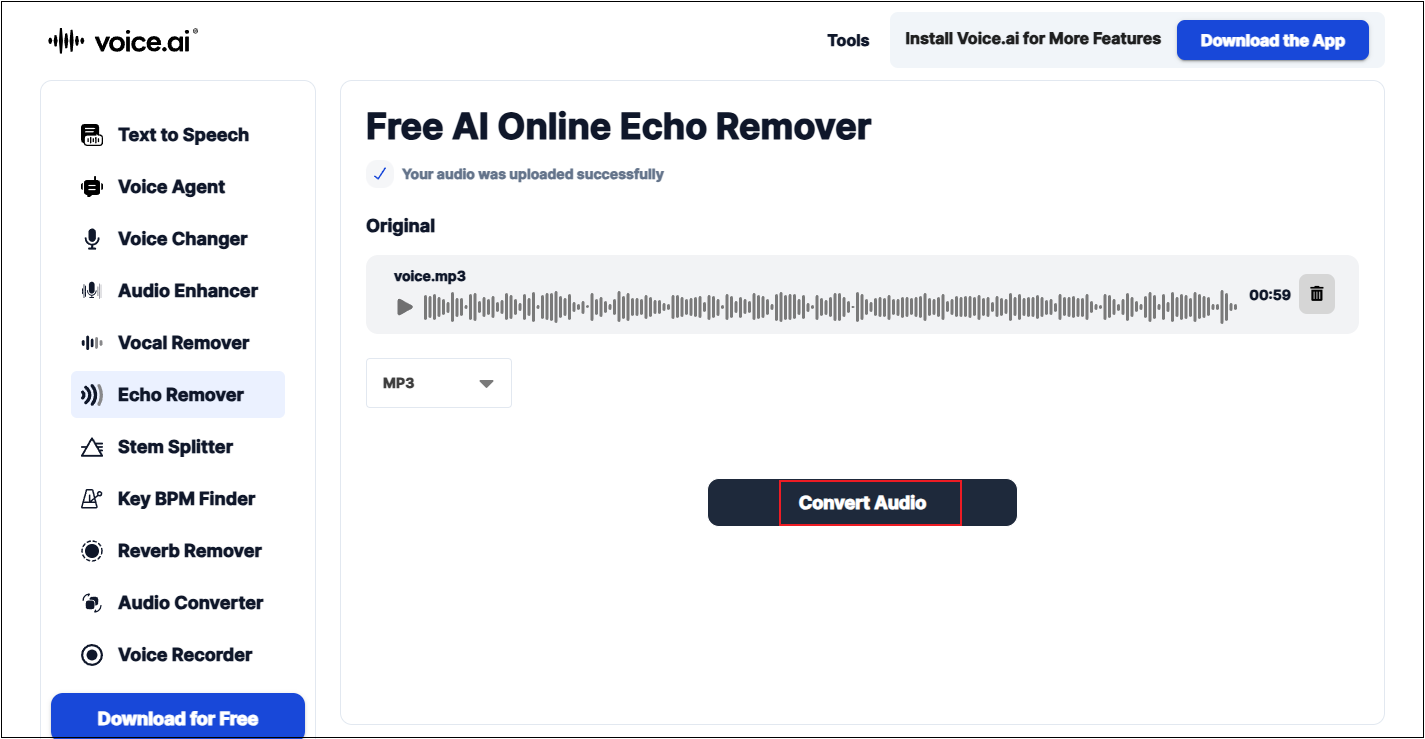
To remove echo from audio efficiently, I suggest using an online echo remover, for example, voice.ai. It is a browser-based and AI-powered tool that can eliminate echo from audio in a few seconds. Additionally, its straightforward interface offers a smooth process for both novices and professionals.
Step 1. Go to voice.ai’s Echo Remover
Visit https://voice.ai/tools/echo-remover.
Step 2. Upload Your Audio
Click the Upload Audio button to upload the target audio.
Step 3. Remove Echo from Audio
Set the desired output format. Then, click Convert Audio to start removing echo from the audio.
Step 4. Download the Audio File
Click the Download icon to download the audio file.
10.3 Remove Noise from Audio
Hissing, buzzing, and other similar sounds in audio recordings can all be considered audio noise. These noises can drown out speech and musical elements, distracting listeners and preventing them from focusing on the main message. Removing audio noise can enhance clarity, professionalism, and listener engagement. Clean, smooth recordings also enhance the overall listening experience, making them more enjoyable for listeners.
Audacity can help you remove noise from audio. Just follow the tutorials below.
Step 1. Import Audio to Audacity
In Audacity’s main interface, click the File option at the top left, click Import, and click Audio… to add the target file.
Step 2. Select the Audio
Choose the Select option in the top menu and click All.
Step 3. Remove Noise from Audio
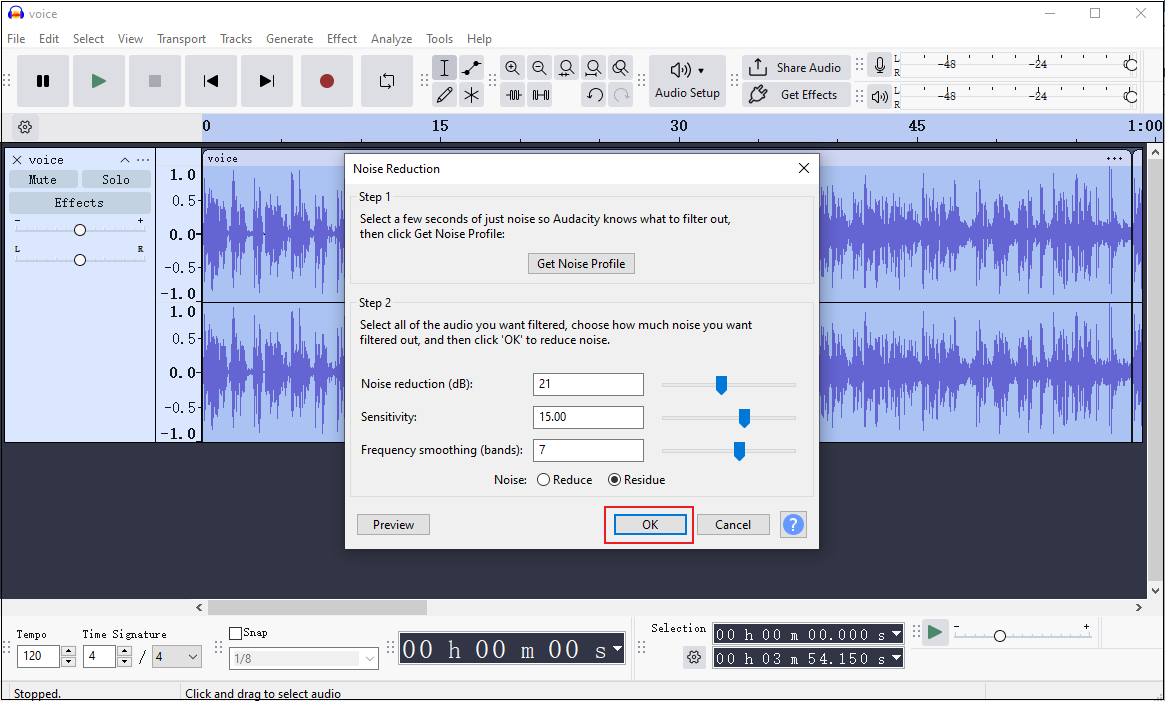
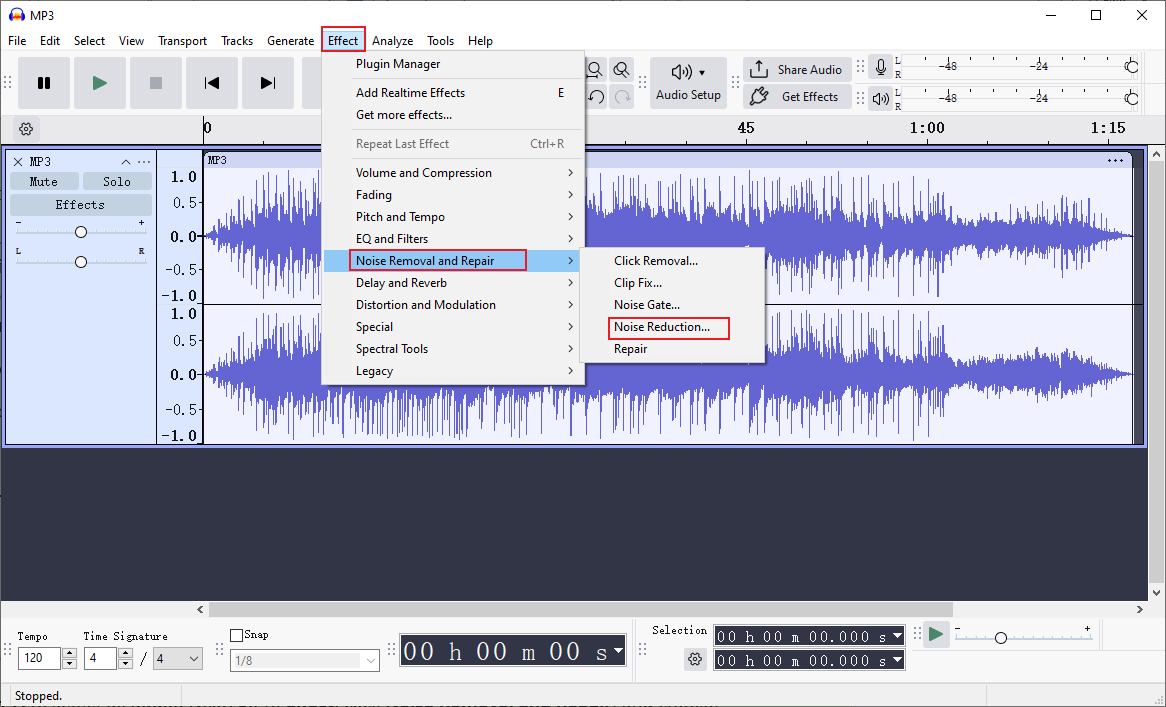
Click the Effect option in the top menu, choose Noise Removal and Repair, and click the Noise Reduction… option.
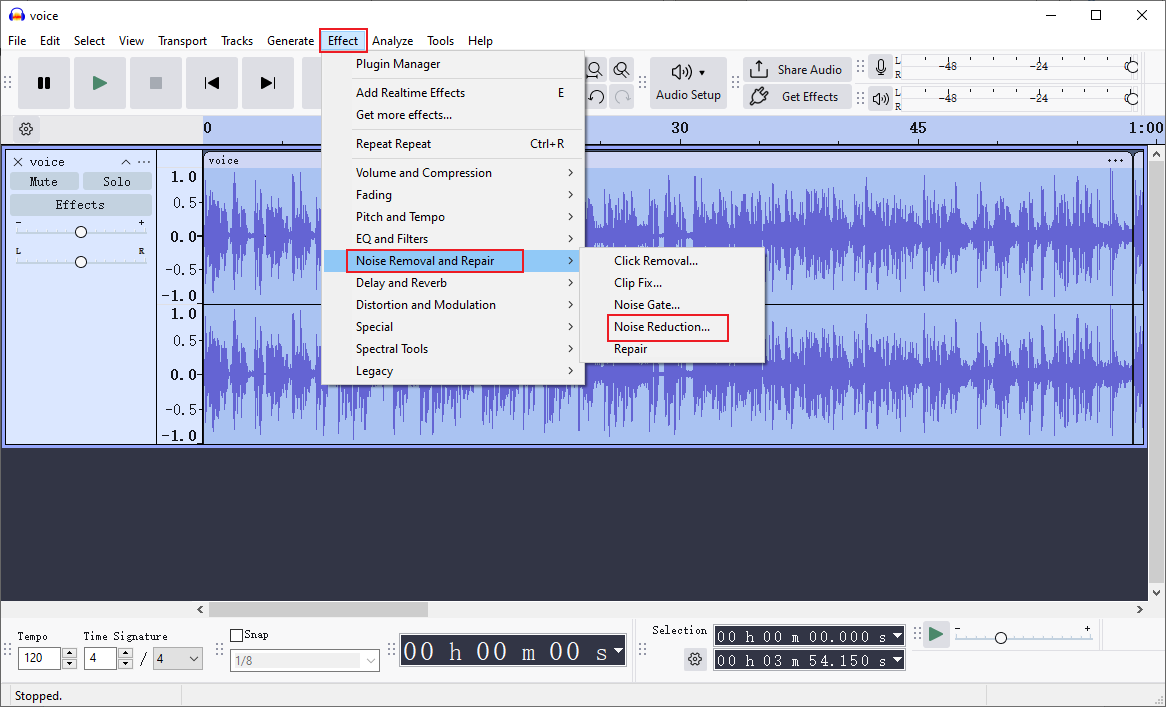
Then, adjust the settings and click OK.
Step 4. Export the Audio
Click the File option at the top left, choose the Export Audio… option, configure settings for the audio, and click Export.
10.4 Remove White Noise from Audio
White noise is a specific type of audio noise. One key difference is that white noise is more consistent, with all audible frequencies having the same intensity. It’s commonly used to mask disruptive sounds, aid concentration, and improve sleep.
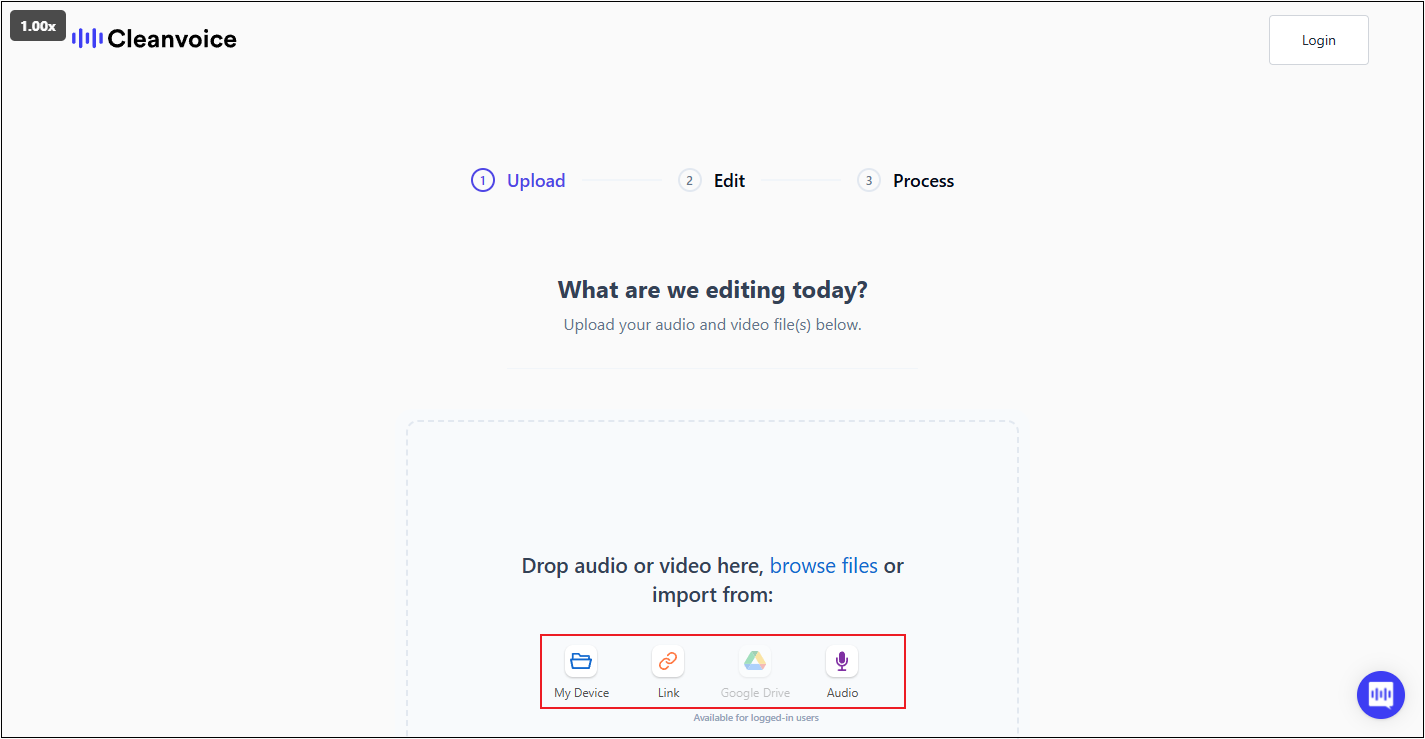
Cleanvoice AI is an online and reliable tool that can remove white noise from audio. It is AI-powered, eliminating background noise in a flash. Follow the instructions below.
Step 1. Access Cleanvoice AI’s Noise Remover
Visit https://cleanvoice.ai/remove-background-noise/. Log in or sign up. Then, click Try it for free.
Step 2. Upload Your Audio
You can upload audio from your device, a link, or record audio right now. Choose your preferred method to select and upload the audio.
Step 3. Choose a Noise Removal Preset
The default template is Clean All & Enhance (Studio Sound). It is suggested to keep the default option and click Start Processing.
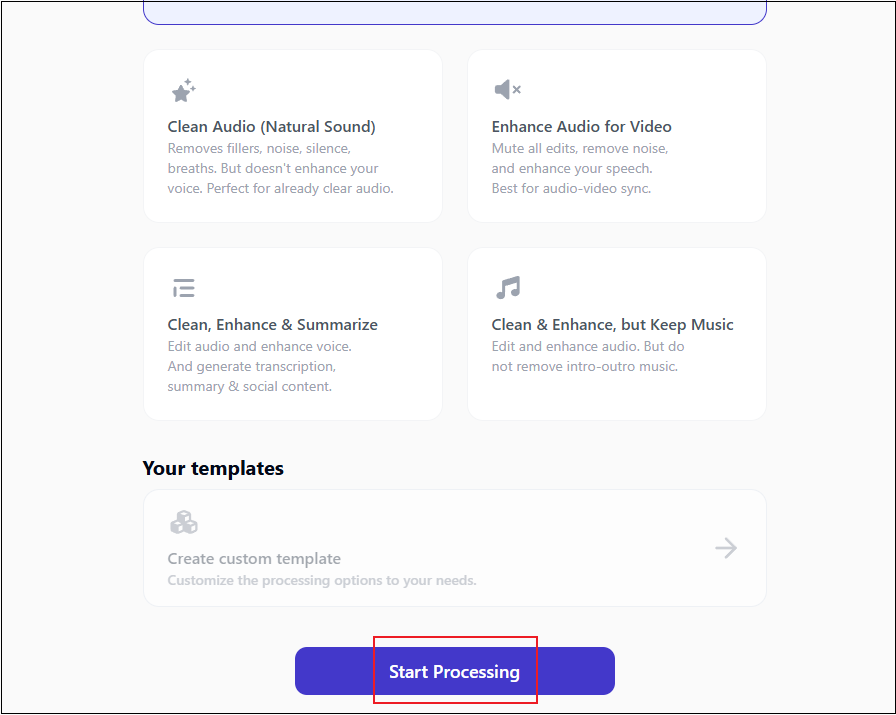
4. Download the Audio
When the noise removal process completes, click Check File, and then download the audio file.
10.5 Remove Wind from Audio
It is annoying when wind noise appears in your audio recordings. Here, I recommend an easy-to-use and convenient tool: VEED.IO. It is browser-based and compatible with multiple platforms, like Windows, Mac, Android, etc. With its AI tool, the wind noise can be removed from audio quickly.
Step 1. Access VEED’s Noise Reduction Tool
Visit https://www.veed.io/tools/remove-background-noise-from-audio/remove-wind-from-audio. Then, click Clean audio now to enter the main interface.
Step 2. Upload the Audio
Click the Upload button to upload the target audio.

Step 3. Remove Wind Noise from the Audio
Go to the AI Agent section and click Clean audio.
Step 4. Export the Audio
After the noise removal process completes, click the Done button at the top right, and click Export Video to save the audio.
10.6 Remove Music from Song
Many tools can remove music from a song, like Media.io, Gaudio Lab, Notta, etc. Here, I choose Media.io and show you how to complete the task step by step. Media.io is an online AI-powered tool that can separate all mixed vocal and instrumental parts from the song.
Step 1. Head to Media.io’s Audio Remover
Visit https://www.media.io/apps/vocal-remover/ and log in.
Step 2. Upload Your Audio
Click the Click To Upload option to enter the Vocal Remover interface. Then, click the Drag File Here or Click To Upload option to import your audio.
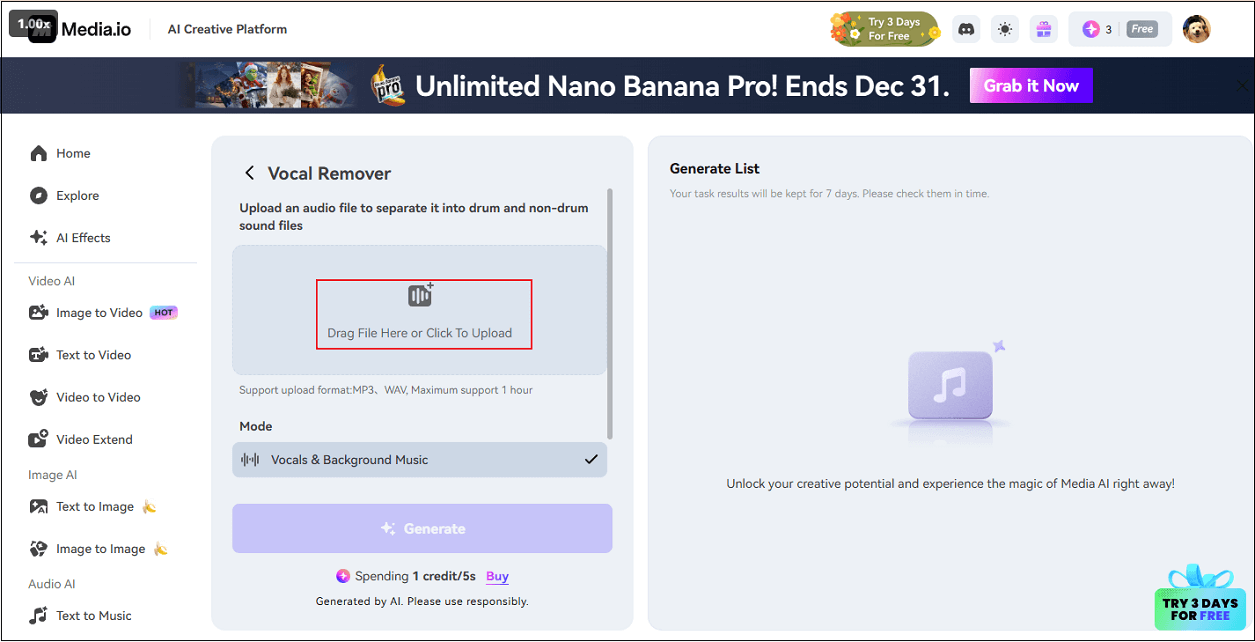
Step 3. Remove Music from Song
Click the Generate button to separate music from the song.
Step 4. Download the File
When the process completes, there will be a vocal track and an instrumental track. Click the Download button of the desired one to save it to your local folder.
10.7 Remove Silence from Audio
Removing silence from audio refers to the automatic detection and trimming of sections in audio files where the volume falls below a preset threshold. This process eliminates pauses, breathing sounds, or extended silences, resulting in a cleaner, more seamless recording. This method employs a digital threshold to detect silent parts, hence preventing silent digital output.
To remove silence from audio, Kapwing can do you a favor. It is a user-friendly online tool that provides a quick solution. Just follow the details below.
Step 1. Access Kapwing’s Silence Remover
Visit https://www.kapwing.com/tools/audio-editor/silence-remover.
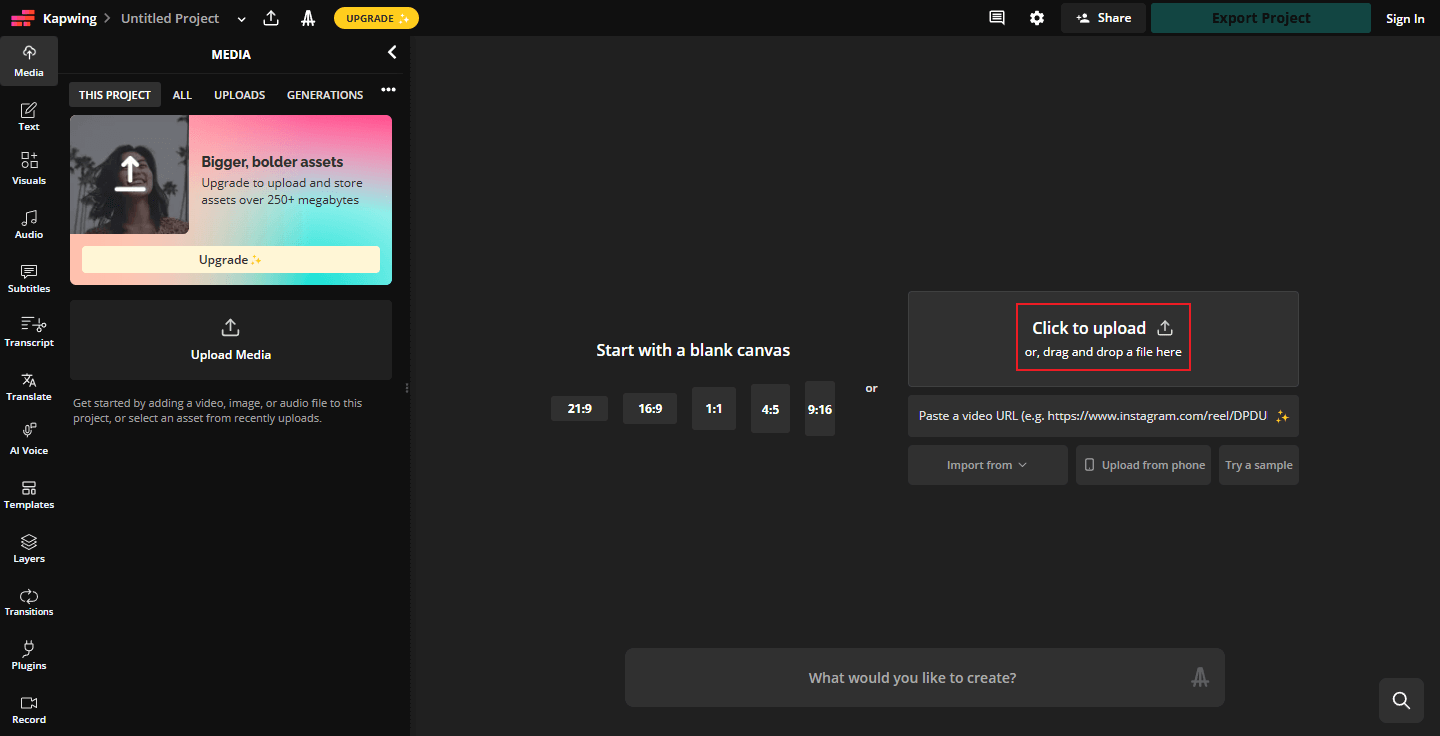
Step 2. Upload Your Audio
Click the Upload audio option to enter the main page. Then, click the Click to upload area at the right to upload your audio.
Step 3. Remove Silence from Audio
Choose the target audio clip on the timeline and use Smart Cut in the right Edit section to remove silences from the audio automatically.
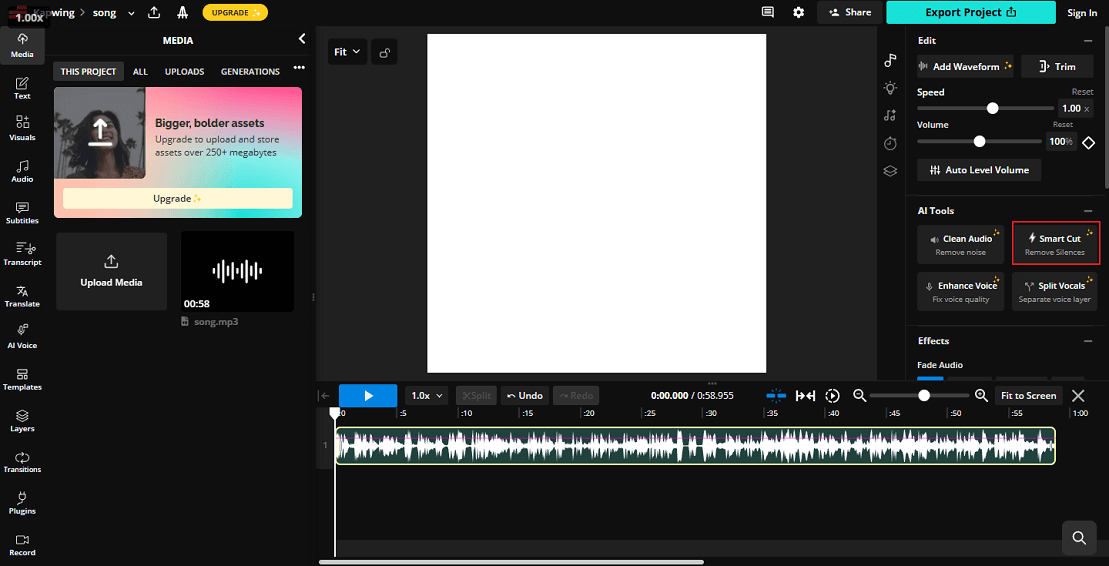
In the pop-up window, you can adjust the silence sensitivity and click Preview to apply the changes.
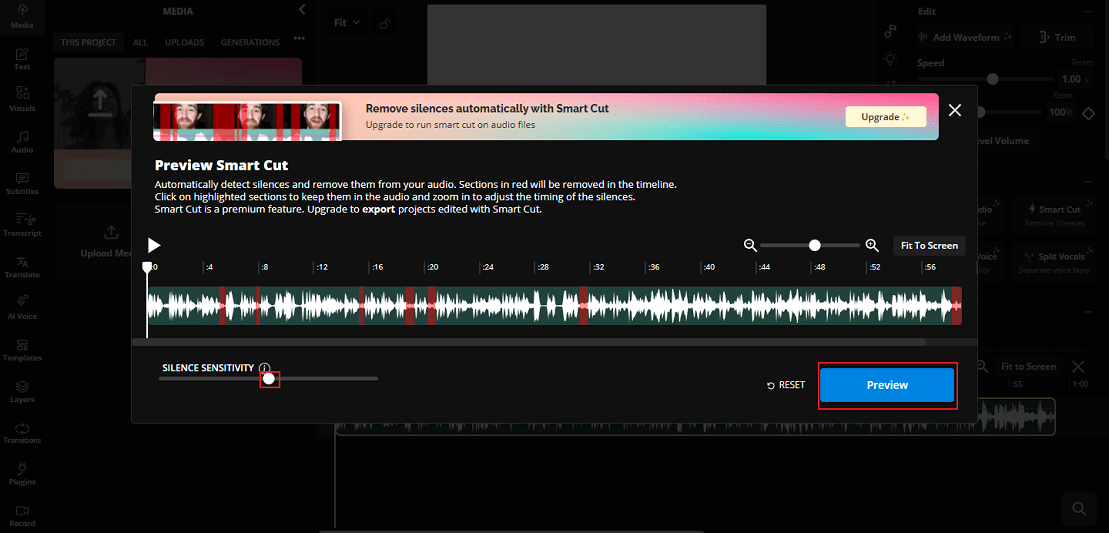
Step 4. Export the Audio
Click the Export Project button at the top right to save the audio.
10.8 Remove Watermark from Audio
Audio watermarks are hidden or audible signals put into audio files to show who owns them, or track how they are used. They allow authors to keep an eye on the circulation of their work while safeguarding it against unlawful use.
Adobe Audition is a powerful tool that can remove watermarks from audio. It features a sound remover, allowing you to delete specific frequencies visually. Let’s see how.
- Download and install Adobe Audition.
- Import your watermarked audio file.
- Choose the watermarked part of your audio.
- Head to Effects > Noise Reduction/Restoration > Learn Sound Model.
- Press Ctrl + A to select the watermarked track. Go to Effects > Noise Reduction/Restoration > Sound Remover. Click Apply.
10.9 Remove Distortion from Audio
Audio distortion is the alteration of an original sound wave, changing its timbre from clear to more textured, rougher, muddled, or harsh. This distortion is often intentionally employed in music, like rock. How to remove distortion from an audio? Use Audacity. With its equalization and filtering tools, you may adjust frequency response and eliminate particular frequencies that could lead to distortion.
Step 1. Import Your Audio File
Launch Audacity, click the File option, click Import, and choose the Audio… option to import your audio.
Step 2. Select the Audio Track
Choose the Select option in the top menu and select All.
Step 3. Remove Distortion from Audio
Click the Effect tab in the top menu, choose Noise Remove and Repair, and then select the Clip fix… option. Then, adjust the settings and click Apply.

Click Effect, choose Volume and Compression, and click Compressor. Set settings and click Apply.
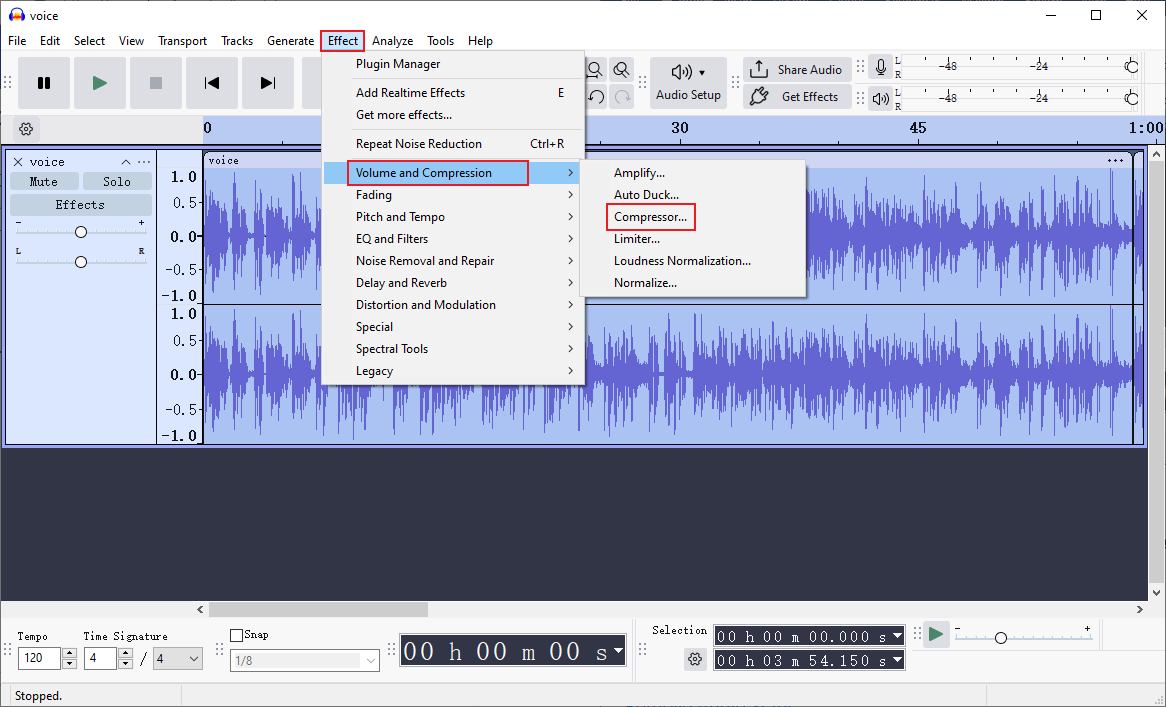
Then, export the audio file.
10.10 Remove Audio Static
Audio static refers to an unpleasant, harsh sound that appears in audio signals. It can be caused by radio frequency interference, inadequate connections, internal component problems, etc. To remove audio static, Audacity is also a go-to solution.
Step 1. Choose Noise Clip
After importing your audio to the program, find the static part of the audio and highlight it.
Step 2. Get Noise Profile
Click the Effect option in the top menu, click Noise Removal and Repair, and click Noise Reduction…. Then, click Get Noise Profile in the pop-up window.
Step 3. Apply Noise Reduction
Press Ctrl + A to select all audio. Next, go to Effect, click Noise Removal and Repair, and choose the Noise Reduction option. Set the parameters and click OK.
Then, export the audio file.
#11 Add Audio to Audio
11.1 Add Echo to Audio
You can use Audacity to add an echo to audio:
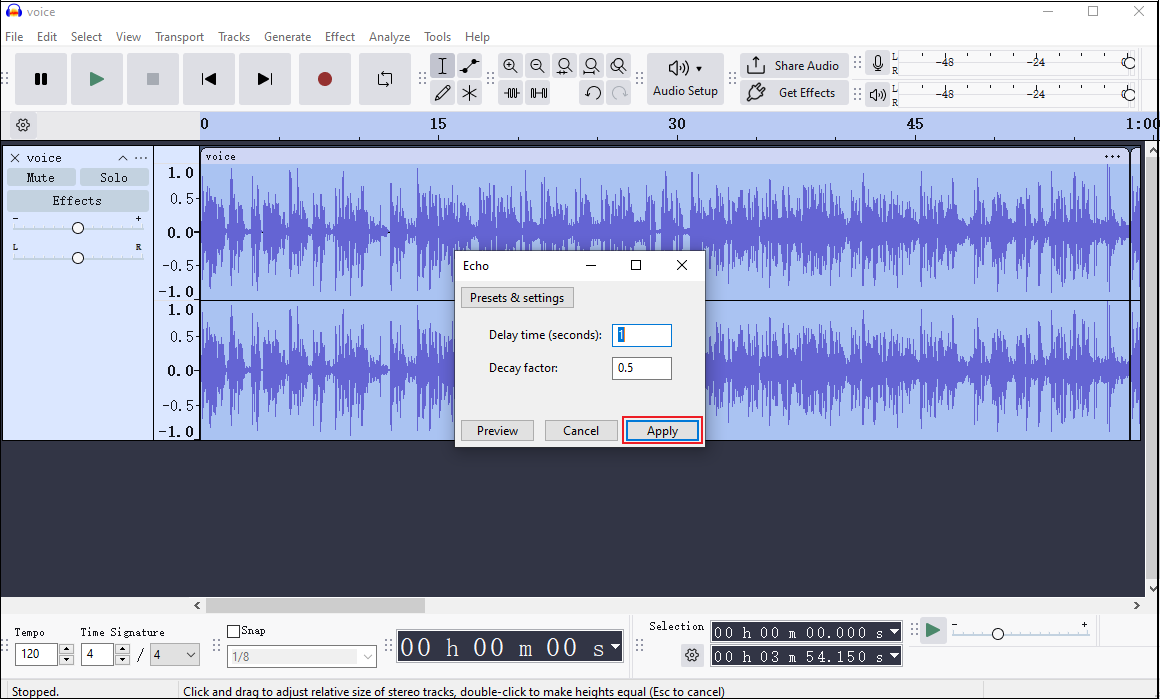
Step 1. In the main interface with audio imported, click the Effect tab in the top menu, choose Delay and Reverb, and choose the Echo… option.
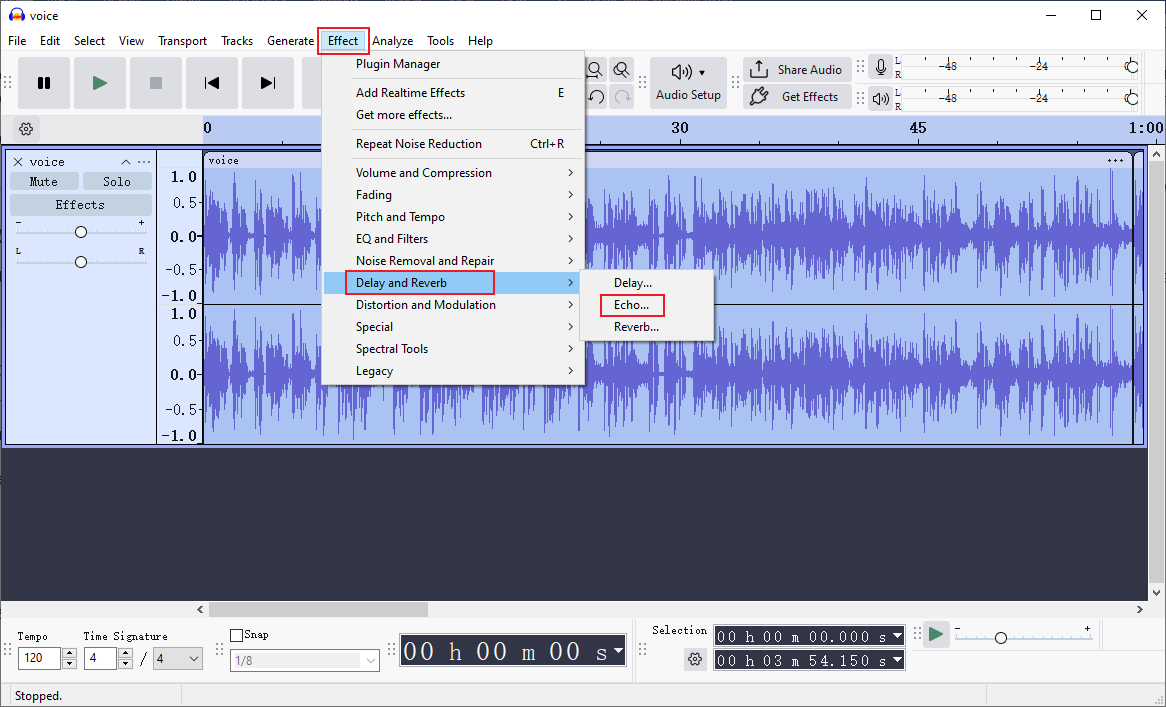
Step 2. Adjust the delay time and decay factor based on your needs. Then, click Apply.
11.2 Add Sound Effects to Audio
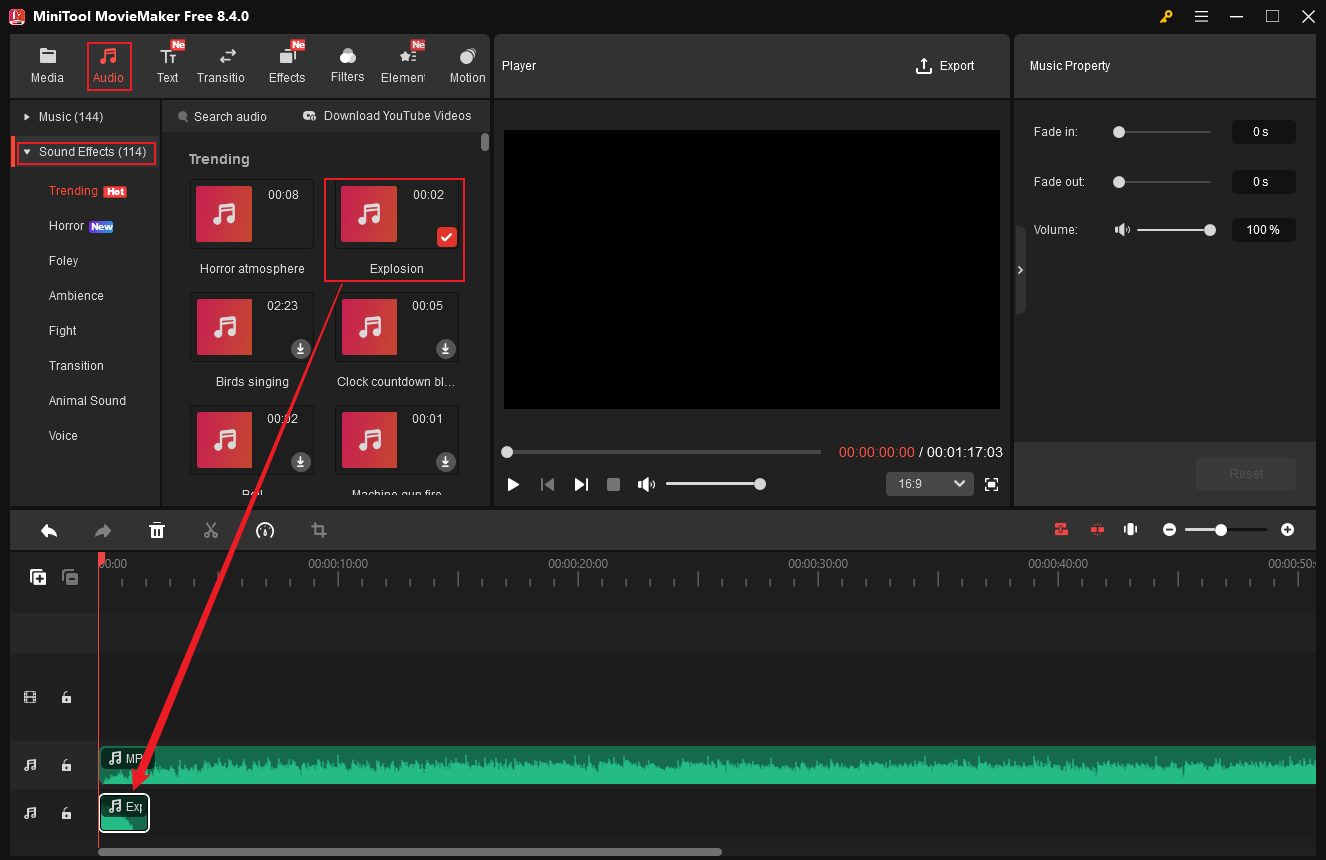
MiniTool MovieMaker is capable of adding sound effects to an audio. It features an extensive library that includes various sound effects. Here’s how:
- Go to the Audio section.
- Expand the Sound Effects list.
- Download the desired sound effect and drag it to the timeline.
- Adjust its appearance time by dragging it on the timeline.
#12 Change Audio Pitch
Pitch is a perceptual feature that allows sounds to be sorted on a frequency-related scale. Simply put, pitch is the quality that enables people to judge whether a sound is “high” or “low.” The higher the frequency of a sound wave’s vibration, the higher the pitch; the lower the frequency, the lower the pitch. Pitch is measured in hertz (Hz).
How to change audio pitch on Windows? Adobe Premiere Pro can help you. Follow the guides below.
Step 1. Download and Install Adobe Premiere Pro
Go to Premiere Pro’s official website to download and install it on your PC. Then, launch it and import your audio.
Step 2. Apply Effect
Drag the added audio to the timeline. Next, choose the Effects tab in the left panel and search for the pitch shifter in the search box. Then, drag the pitch shifter onto the audio in the timeline.
Step 3. Activate Controls
Go to the Effect Controls section in the top menu. Find and expand the Pitch Shifter tab and click the Edit… option near Custom Setup. In the pop-up window, adjust Semi-tones and Cents until you’re satisfied with the sound.
#13 Visualize Audio
13.1 What Is Audio Visualization
Audio visualization is the process of transforming audio into animated, real-time visual images. Sound intensity and pitch are conveyed through dynamic forms, colors, and motion. Visualizing audio conveys emotion, enhances audience engagement and immersion, and helps listeners establish deeper connections. Sound visualization also serves as an educational and analytical tool, aiding researchers in better understanding the physical properties of sound for more effective research.
13.2 How to Visualize Audio
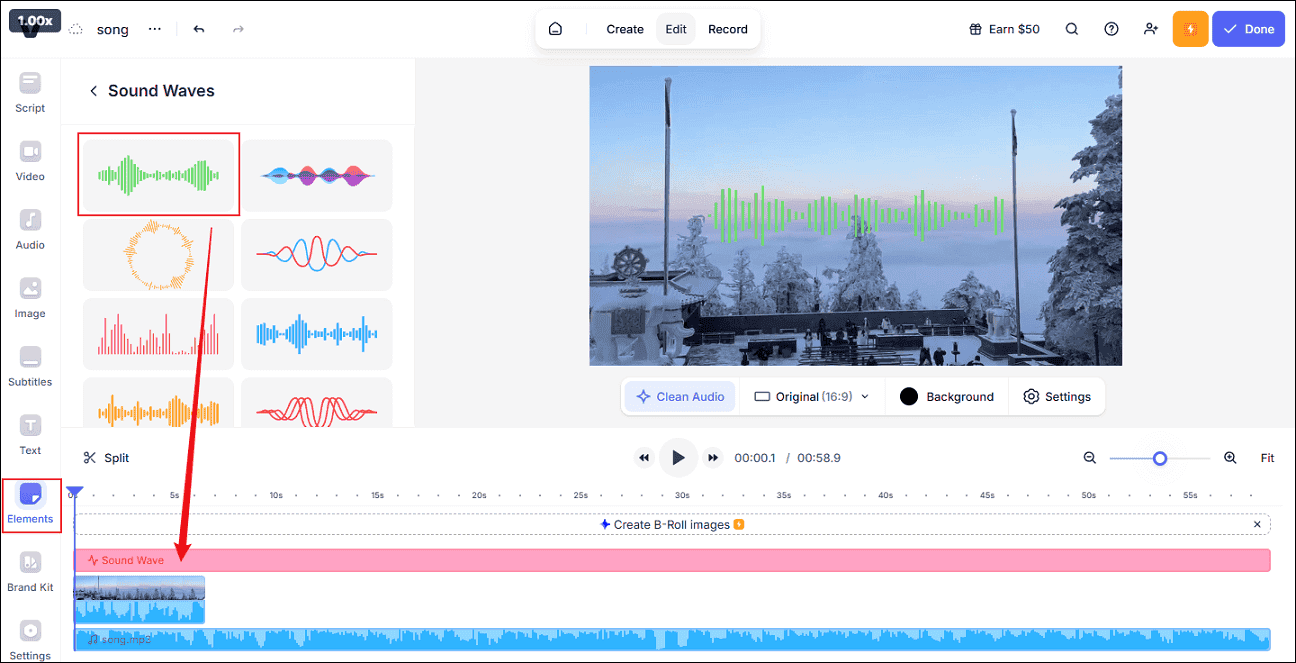
VEED.IO is capable of visualizing audio easily and quickly. It lets you effortlessly add dynamic soundwave effects to your videos, and it’s incredibly easy to use. Follow the instructions below.
Step 1. Access VEED.IO
Go to VEED.IO’s official website and start a new project.
Step 2. Upload your Media Files
- To display an audio wave on a video, add your video and audio files.
- To display an audio wave on an image, import your audio and image files.
Step 3. Visualize Audio
Head to the Elements section, find Sound Waves, and select the desired design. Then, you can adjust the visualizer’s position, scale, etc., in the preview window.
Step 4. Export the File
Click the Done button at the top right to save the file.

In Summary
Audio editing is an indispensable part of music, sound, and audio creation. This post offers a detailed explanation of what audio editing is, how to edit audio files, and other related information. Whether you edit audio length, adjust audio volume, add content to audio, etc., this article has you covered.
You can contact us via [email protected] if you have any questions about using MiniTool MovieMaker or MiniTool Video Converter. Alternatively, you can send me messages directly on X, and I’ll help you as soon as possible.
Edit Audio FAQ
1. Windows Built-in Tool: Windows File Explorer's Details tab
2. Media Players: VLC Media Player
3. Professional Tag Editors: Audacity, Mp3tag, MusicBrainz Picard, etc.
User Comments :