How to remove echo in Premiere Pro? This post from MiniTool MovieMaker will show you a step-by-step guide on how to reduce echo in Premiere Pro using the DeReverb effect. Let's get started!
Echo is one of the most challenging sound defects you might encounter, as it can turn great video sound into a disaster due to poor quality.
When it comes to avoiding echo and background noise, along with using a professional microphone, avoiding recording in a room with high reverberation should be your primary priority.
If you want great-sounding audio clips, the best thing you can do is to prevent problems before they happen, and good recording equipment is crucial.
However, sometimes this situation is unavoidable, so we need to learn how to remove echo from audio in Premiere Pro to improve audio quality. If you are interested, you can read the following to find out.
![[SOLVED] How to Fix Bad Audio Quality from Video?](https://images.minitool.com/moviemaker.minitool.com/images/uploads/2022/11/how-to-fix-bad-audio-quality-from-video-thumbnail.png)
How to Reduce Echo in Premiere Pro Using the DeReverb Effect?
For those who like to learn new skills, here’s a tutorial on how to remove echo in Premiere Pro. Before learning how you’ll need Adobe Premiere Pro installed on your PC and an audio clip with echo ready. Proceed as follows:
Step 1: Launch the Premiere Pro app on your PC.
Step 2: Import the audio with echo into the app and drag it onto the timeline.
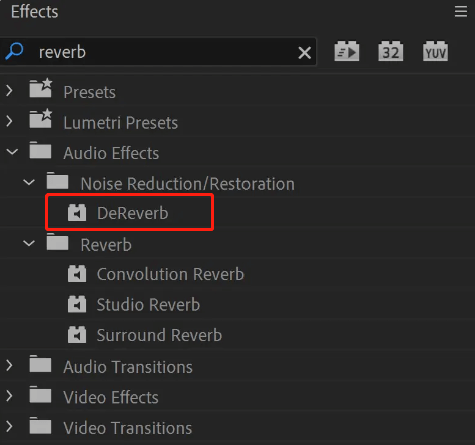
Step 3: Go to the Effects panel and type DeReverb in the search box to find it. Alternatively, you can go to Audio Effects > Noise Reduction/Restoration > DeReverb. There are several additional options in the Noise Reduction path that can help minimize background noise, but DeReverb is our focus here.
Step 4: Click on the DeReverb effect and drag it to your audio on the timeline. The new effect will appear in the Audio section of the Effect Controls panel. Click on the small arrow > on the left to show more options and click the Edit button next to Custom Setup to access the Clip Fx Editor window for more advanced settings.
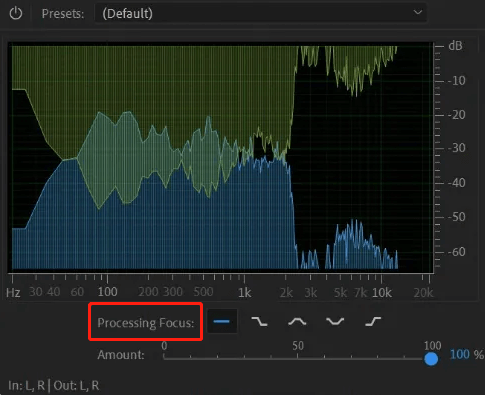
Step 5: Now, select from the presets to adjust the reverb reduction to be heavy or light. If you want to change the amount of DeReverb that you wish to apply to the audio clip, you can use the slider at the bottom. When it is set to 0%, you will not apply any effect. On the contrary, if you set it to 100%, the DeReverb effect will be applied entirely to the audio clip.
Note: If you apply too much DeReverb, your audio may lose clarity. It’s advisable to experiment with the settings until you discover a level that reduces the echo without affecting the entire audio track.
Step 6: The Processing Focus setting is located above the slider and the flat line is recommended. Additionally, if you are familiar with the frequencies, you can concentrate on specific ones.

Step 7: The slider on the left below the Auto Gain setting is for volume. The DeReverb effect is used to reduce the echo by lowering the volume. When Auto Gain is checked, it will automatically handle the volume while applying sound effects so that there is no loss of volume. The Auto Gain setting is quite effective, and you can adjust it yourself or let the software do it for you.
Step 8: Preview the audio again for any small changes you have made to avoid losing quality. When you are satisfied with the result, exit this window.
Bottom Line
Echo can be a huge problem with audio clips, which amplifies background noise and makes your recording difficult to hear. You can try the above step-by-step guide on how to remove echo in Premiere Pro to deal with your situation. Hope your audio clips sound great!
Featured Tip: Enhance Your Video Projects with a Great Video Editor
MiniTool MovieMaker
MiniTool MovieMaker is simple to use and comes with rich editing functions, allowing you to crop, trim, split, flip, rotate, speed up, and slow down videos. Moreover, it provides you with a variety of transitions, filters, text templates, and animated stickers to spice up your videos. After editing, users can use it to quickly export high-definition videos without watermarks.
MiniTool MovieMakerClick to Download100%Clean & Safe
Further reading:
User Comments :