What Is a Before and After Video
Are you working on improving the look of things? If so, you could make a before and after video. However, what is a before and after video? A before and after video is to make a comparison to show what something looks like before and what it looks like after making some changes.
Just like before and after images, it is also possible to make before and after videos. Some before and after videos are created for personal use, but they can also be very valuable if you use them for commercial purposes. Whether you’re a makeup artist, interior designer, weight loss coach, stylist, or home decorator, a before and after video can be one of the best ways to promote yourself or show potential customers how your work can lead to this change.
For example, makeup artist Lilly Rivera told us, “Before and after videos is a great marketing tool that converts video views into contracts.” By sharing the before and after makeup videos, she gains more exposure and positive reviews, which led to huge cosmetics sales.
Before and After Video Ideas
Coming up with creative before and after video ideas isn’t always easy for some people. The first step is to choose a theme that can suit you best and can gain more views. Next, we’ll talk about some great before and after video ideas to make it easier for you to choose which style is best for your videos.
Before and after makeup videos
You may find that there are many makeup channels on YouTube, and many makeup videos are incredibly popular with viewers. If you are proficient in makeup techniques, there’s no better choice than make before and after makeup videos.
Many viewers would like to improve their makeup skills on YouTube videos. At the beginning of the video, show the state of the skin without makeup, then the makeup process and makeup effect. If this before and after video wows viewers, they are more likely to buy the same make-up cosmetics as you.
Also read: Google AdSense for YouTube: Everything You Should Know.
Before and after room transformation video
Some house owners want to refurbish their houses, especially when it’s getting old and less attractive. However, for those new to decorating, they may not be quite sure where to start. That’s why before and after room transformation videos are so popular, from which they will gain creative room transformation ideas.
Therefore, beginning with making before and after room transformation videos is also a good choice. Make sure to capture multiple angles to give the viewer the best view of the transformation. For example, if you’re showing the backyard before and after the furniture was installed, try to show a few angles to paint the whole picture.
Before and after weight loss video
Losing weight is a difficult process that requires constant persistence. A before and after weight loss video mainly talks about how a person has overcome the difficulties on the weight loss journey and some effective ways to lose weight. Many YouTubers are seeking before and after weight loss videos to inspire themselves to never give up and accomplish their goals. So, making such a video can help a lot in the popularity of your YouTube channel.
Before and after styling video
A before and after styling video should share how to style your hair and dress up starting from the very beginning. You might as well share some great shampoos and conditioners or clothing products that are the same as yours to give viewers a new look.
You can refer to one of these before and after video ideas above to start your journey. Once you decide on a style, you need to choose a before and after video maker to finish it off.
As for selecting a before and after video maker, you need to take the video transition effects into consideration. It’s essential to choose a video maker with nice video transition effects. Then, we will share with you great before and after video makers for Windows, online users, and mobile users.
![11 Best Blender Alternatives [Windows/Online/iOS]](https://images.minitool.com/moviemaker.minitool.com/images/uploads/2023/02/blender-alternative-thumbnail.jpg)
Best Before and After Video Maker on Windows
There are many nice before and after video makers, and today we truly recommend the best one for me, it’s MiniTool MovieMaker.
#MiniTool MovieMaker
The best before and after video maker on Windows is MiniTool MovieMaker, a free video editing software that performs well in video transition effects for Windows 11/10/8/7, with no ads, no bundles, and no watermarks.
As for transition effects, MiniTool MovieMaker has had 97 transition effects until now. Each of them will make your video incredibly smooth. You can preview it before you choose one and add it between two video clips or images. Of course, it will try to provide you with more transition effects in the future.
Apart from transition effects, you can also add filter effects, motion effects, text, background music, and animated elements to the before and after video. In addition, MiniTool MovieMaker comes with many other features, like splitting, trimming, cropping, flipping, and more. More than these rich features are waiting for you to explore.
Here’s how to make a before and after video with MiniTool MovieMaker:
Step 1. Download and install MiniTool MovieMaker.
Click the Free Download button below to download and install it. After that, open it and close the pop-up window.
MiniTool MovieMakerClick to Download100%Clean & Safe
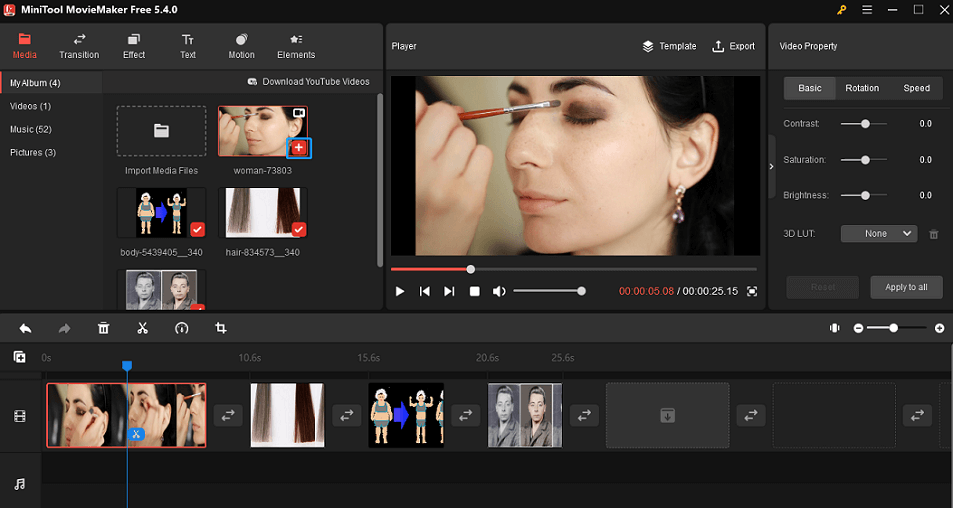
Step 2. Import the media file.
Tap on Import Media Files to import your before and after images and video clips to MiniTool MovieMaker. Then, drag and drop files to add them to the timeline under the Media tab or click + on the bottom right corner of the files.
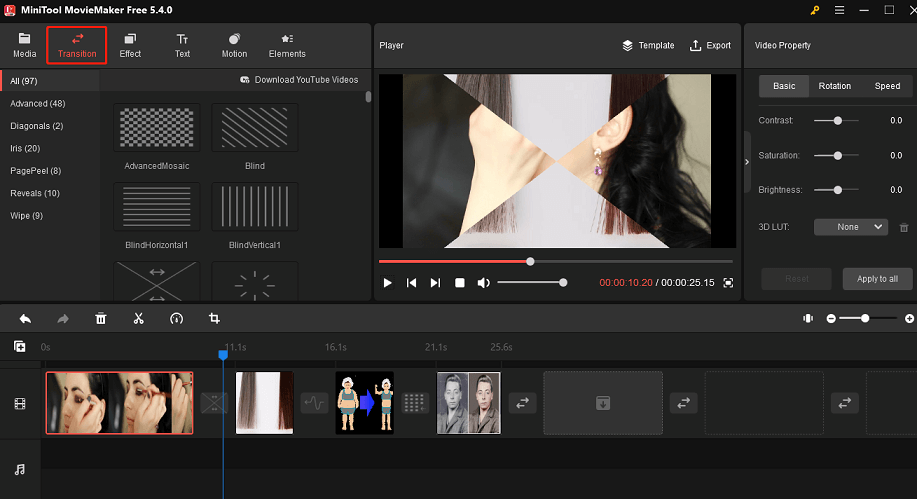
Step 3. Edit the before and after files.
Add transitions: To switch video clips more smoothly, just click on Transition, select one transition effect you prefer, and drag and drop it between two video clips, or click + on the bottom right corner of the transition.
Then, you can take advantage of its other video editing features to edit the before and after video according to your needs.
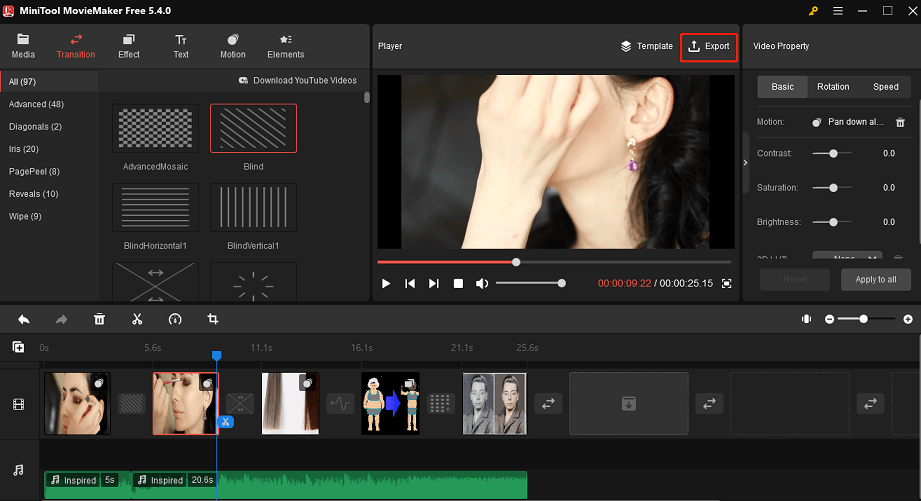
Step 4. Export the before and after video:
Once finishing editing, click Export on the toolbar to export this video to your Windows. You can selectively rename the video, choose the output format and storage location, and change video quality, encoder, resolution, bit rate, and frame rate.
Online Before and After Video Maker
Here are several online before and after video makers, including FlexClip, Animoto, and Clideo.
#FlexClip
The first online before and after video maker we recommended is FlexClip. It is a great free tool for creating before and after videos in minutes of any aspect ratio suitable for your Instagram profile or YouTube channel. It comes with various video templates, a huge high-resolution photo media library, and animated elements.
FlixClip is friendly to novice users because it has an intuitive interface. Besides that, FlexClip also has powerful video editing tools that can help you do video editing in a few clicks, such as adding filters, changing video speed, adding text, etc.
Follow these steps to make a before and after video with FlixClip:
Step 1. Go to FlexClip in a web browser, tap Start from Scratch, and choose Timeline Mode.
Step 2. Go to the Media tab and add your before and after videos, photos, and audio to FlixClip.
Step 3. Drag these files and drop them into its editing tracks.
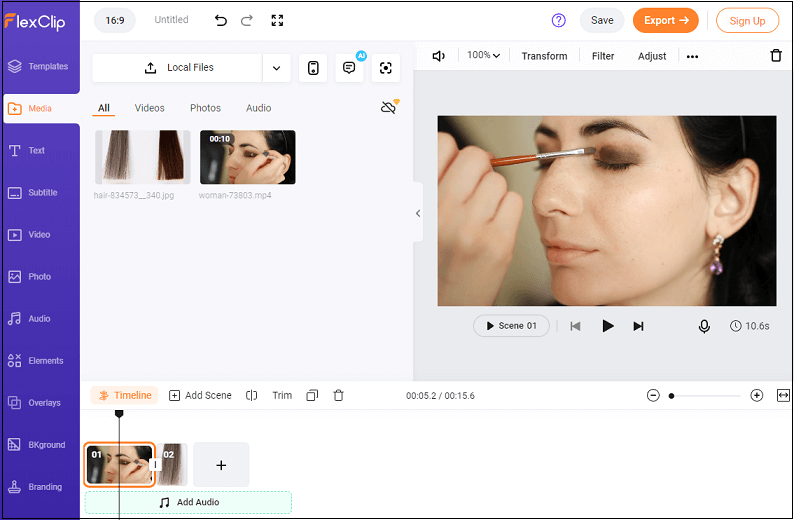
Step 4. Add background music, text, voiceover, filter effects, and more to customize this video.
Step 5. Click on Export to export and download the before and after videos.
#Animoto
Animoto is a cloud-based and easy-to-use before and after video maker with which you can create a video in minutes. It’s seen as a reliable choice among students, photographers, teachers, business professionals, and video marketers.
It offers a wide range of video templates, such as holidays, celebrations, education, tutorials, real estate, and more. Animoto allows you to apply its growing library of licensed music. Whereas, there will be a watermark if you don’t use the paid version.
Here’s how to make a before and after video with Animoto:
Step 1. Visit Animoto’s official website.
Step 2. Choose a video template or start from scratch.
Step 3. Upload your before and after photos and videos under the Media Library.
Step 4. Customize the before and after video, you can edit text, audio, layout, themes, design settings, record a voiceover, and more.
Step 5. Save and export this video.
#Clideo
Clideo is another great online before and after video maker that makes it easy to create and edit video files, GIFs, and images in one place. You can easily make a before and after video with this tool. It supports various video formats like MP4, AVI, MPG, VOB, WMV, MOV, etc.
Clideo also allows the uploading of files up to 500 MB for free. Moreover, this tool comes with a variety of video editing features, such as merging, compressing, resizing, slideshow, cropping, rotating, reversing, and many more. To make this video more attractive, you’re able to add music or text.
Here’s a guide on how to make a before and after video with Clideo:
Step 1. Go to Clideo and click on Get Started to begin creating.
Step 2. Tap the Upload button and then choose files to import the before and after video files.
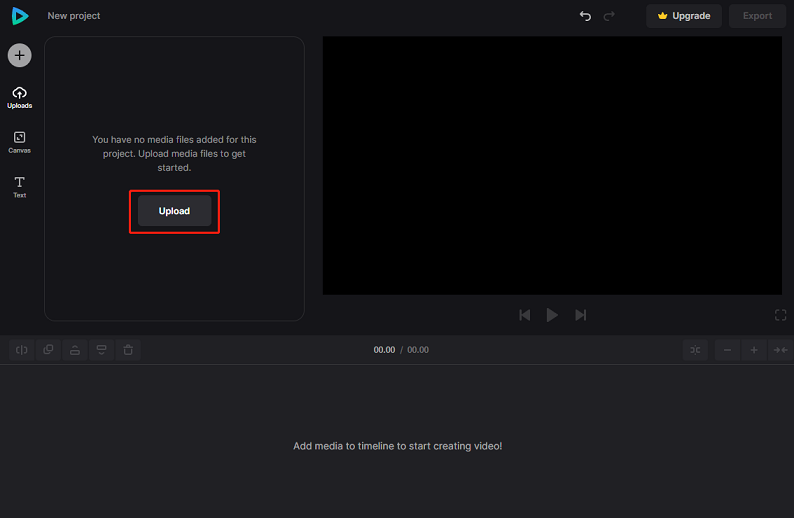
Step 3. Drag and drop these imported files to the timeline or just click + at the bottom right corner of videos or images to add to the timeline.
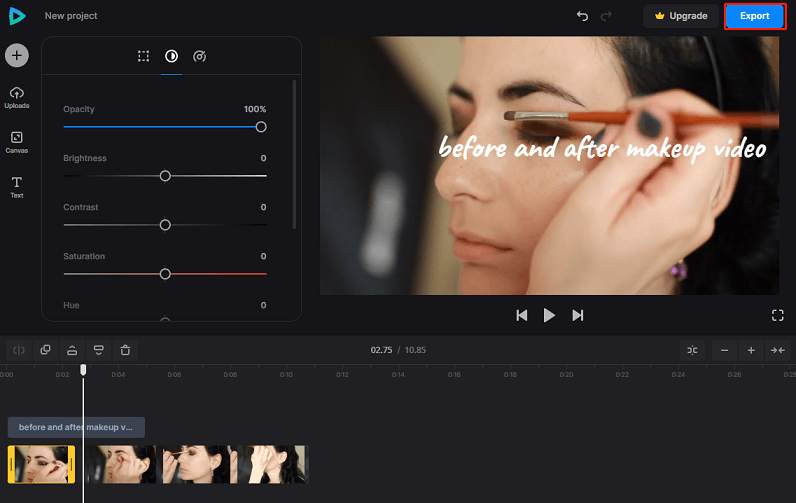
Step 4. Edit the videos as you need. You can split, rotate, flip the video, change video speed, add text, and change video properties, like opacity, brightness, contrast, hue, and saturation.
Step 5. Click on Export and choose a video resolution to export this video.
Best Before and After Video App for Mobile – InShot
InShot is one of the best before and after video makers for both iOS and Android users. It’s an ideal video editing tool in video transition effects for social media content creators. It offers many built-in video templates for various social media platforms, such as YouTube, TikTok, Facebook, and Instagram.
InShot is an all-in-one video editor that has all the features you are looking for when creating a before and after video. You can trim, cut, and split videos, merge video clips, and add music, filters, effects, text, and stickers.
Follow these steps below to make a before and after video with InShot:
Step 1. Download and install InShot on your phone and then open this app.
Step 2. Tap on the Video tab, click on New to create a new video, and choose the video you want to edit.
Step 3. Click the little icon between two video clips to enter the transition screen, then select a desired transition effect. Besides that, choose whether to add filters, stickers, text, and background music to the video.
Step 4. Click on Save to export this before and after video.
Bottom Line
Before and after videos are a great way to compare the changes of the same thing. Choosing a before and after video maker is an important step to make a before and after video. Whether you intend to do it on Windows or mobile, this post can meet all your needs.
If you have any questions or suggestions while using MiniTool MovieMaker, please leave a comment to us or contact us via [email protected].
User Comments :