How does CyberLink PowerDirector combine clips in steps? In this post, we are going to show you exactly how to do just that. Or, you can have a try with another Windows video editor, MiniTool MovieMaker, to merge several clips into one video.
With the growing need for video merging, a variety of video merging software has emerged one after the other. PowerDirector, developed by CyberLink in 2001, is one of the most popular and most professional video joining software available.
Many video enthusiasts like to do many things with it. However, some people who are not very familiar with it might not know how to use it in a precise way to merge video clips.
To help, the following describes how to combine videos in PowerDirector. Additionally, the guide introduces a PowerDirector alternative for combining clips.
PowerDirector Combine Clips (Step-by-Step Guide)
PowerDirector is one of the top video editing software, offering numerous comprehensive and high-end capabilities. With its help, you can merge a series of video segments into a single video file and apply creative effects such as Hollywood-style green screen, frame-by-frame motion tracking, stunning transition effects, and so on to make your video footage stand out. Furthermore, it supports many formats for importing and exporting. Some common formats like MP4, WMV, VOB, AVI, and others.
How does PowerDirector merge clips? Follow these steps:
Step 1. Launch CyberLink PowerDirector
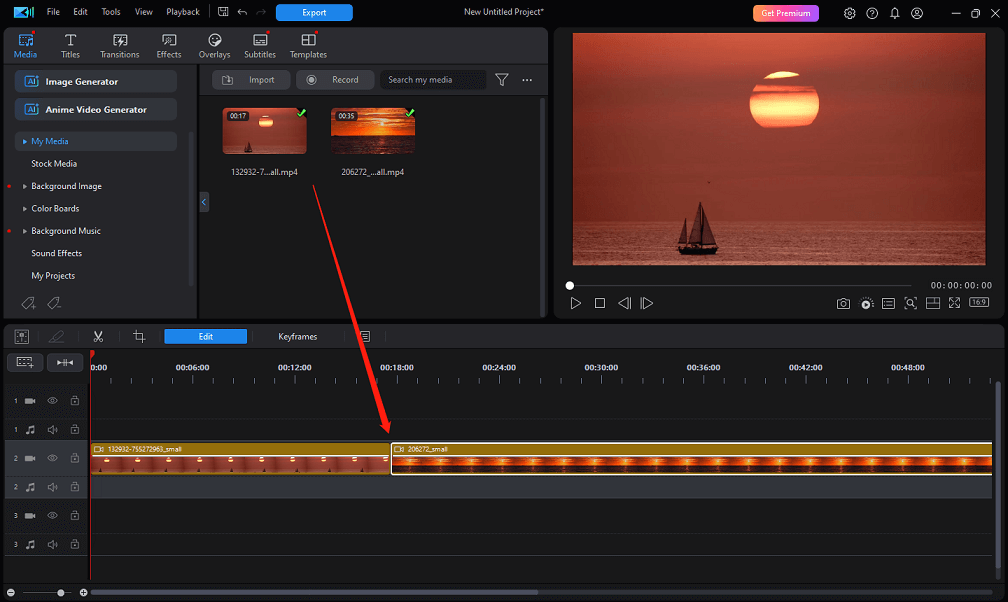
The first thing you need to do is to download and install CyberLink PowerDirector on your PC. Then, launch this video merging program. To enter the editing interface, click on New Project.
Step 2. Import Video Clips
Navigate to File > Import > Media Files to import the video clips you want to combine. After that, drag and drop the imported video clips onto the video track in the timeline area.

Step 3. Make Edits to the Video Clips
Depending on your needs, make the necessary edits to the video clips. To trim them, you can move the mark in and mark out position sliders to the appropriate places and then hit OK. In addition, make your video clips more creative by applying different special effects.
Step 4. Export the Edited Video
Once done, click the Export button at the top to complete the export process.
How to Combine Video Clips in PowerDirector Alternative – MiniTool MovieMaker
There is no doubt that the use of PowerDirector is a great option to combine many video clips into one video file for viewing in sequence. In order to create more possibilities for combining clips, here is an excellent PowerDirector alternative – MiniTool MovieMaker. It is an easy-to-use and reliable video combiner perfect for both beginners and professionals.
Besides, it supports importing and exporting a wide range of video file formats (like MP4, MOV, AVI, WEBM, etc.) and merges video clips in high quality. Moreover, MiniTool MovieMaker allows you to trim, split, crop videos, add text and background music, rotate or flip videos, apply filters and effects, reverse video footage, and more.
Here’s how to combine video clips with MiniTool MovieMaker.
MiniTool MovieMakerClick to Download100%Clean & Safe
Step 1: First of all, download and install MiniTool MovieMaker on your computer. Next, open this video combiner and close the promotion window to get access to its editing interface.
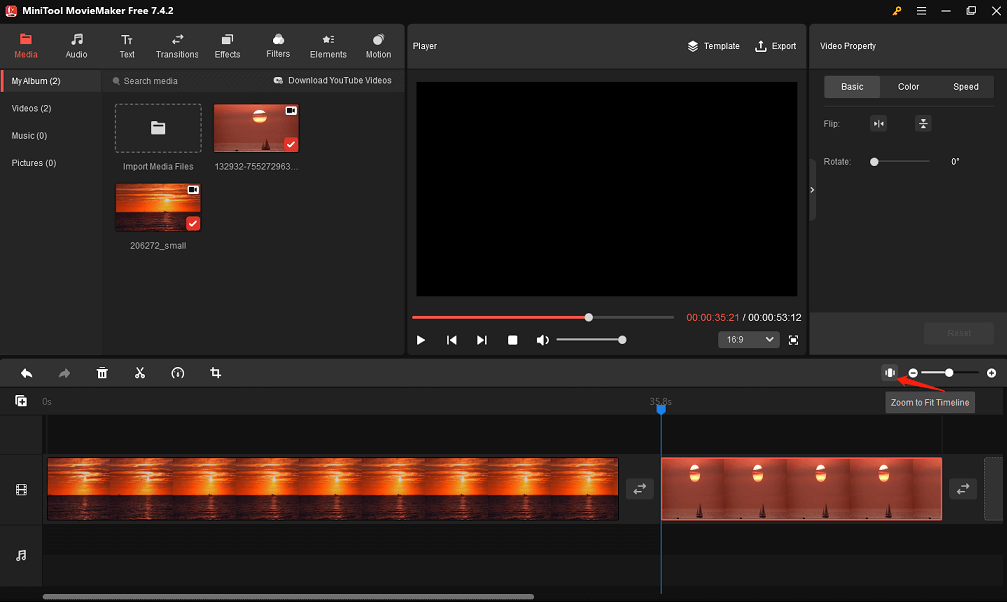
Step 2: Click on the Import Media Files option to import the video clips you would like to combine into MiniTool MovieMaker.
Step 3: Now, click on the + icon on the imported video clips to add them to the video track in the timeline area. After that, click on the Zoom to Fit Timeline icon in the top right corner of the timeline area to fit all the added video clips to the timeline.

Step 4: Based on your needs, you can perform some operations on the video clips, such as adjusting the aspect ratio, applying transitions and sound effects, changing their playback speed, and so on.
Step 5: Click on the Export option at the top right to configure export settings for the edited video and then save it to your computer.
Conclusion
How does CyberLink PowerDirector combine clips step-by-step? Refer to the instructions above to complete the process. You can even join clips together using this video editor alternative, like MiniTool MovieMaker.


User Comments :