In this post by the free movie maker from MiniTool, we’ll show you how to add fonts to DaVinci Resolve and give you a list of the best fonts for video captions.
DaVinci Resolve is a comprehensive video editor for Windows and Mac computers. The free version offers a variety of tools and effects, making it powerful enough whether you are a beginner or an advanced user. Text is just one of its ordinary tools to spice up videos.
DaVinci Resolve offers various text templates and gives you the flexibility to edit the text property, such as font, color, size, line spacing, font style, and more. If you’re not satisfied with the fonts in DaVinci Resolve, just import and use your custom fonts. Here’s how to add fonts to DaVinci Resolve.
How to Add Fonts to DaVinci Resolve
Here’s a step-by-step guide on how to add custom fonts to DaVinci Resolve.
Step 1. Download a Font
You can search and download fonts from many websites.
Google Fonts: It’s one of the most popular font resources in the world and offers hundreds of fonts available for different languages. You can download all of its fonts for free.
Font Squirrel: This website allows you to download thousands of high-quality and free fonts for commercial purposes.
DaFont: It’s also a great place to find and download your desired fonts.
Generally speaking, the download font will be saved on a ZIP file. Unzip the file to access the font file, typically .ttf or .otf files.
Step 2. Install the Font on Your Computer
After downloading your desired font, double-click to open it, then click the Install button on the top to install the font onto your system.
Step 3. Restart DaVinci Resolve
After installing the new fonts, save and close the project, then exit the DaVinci Resolve application. After a few seconds, restart the program. Restarting the software is critical as this will cause DaVinci Resolve to recognize and load the fonts you just installed.
Step 4. Use Your Desired Font
Now, it’s time to add text in DaVinci Resolve and use your desired font.
1. Open your project and select where you want the text overlay to start on the timeline.
2. Go to the Effects tab on the top, and select Titles under Toolbox.
3. Browse these font templates and drag and drop the desired one to the timeline.
4. Select the text track and click Inspector to open all properties of the text.
5. Enter your text and then expand the Font Family menu to find the font you installed.
6. After your editing is completed, export the video from DaVinci Resolve.
Best Font for Video Captions/Subtitles
What is the best font for video captions or subtitles? Which font can make your video stand out on social media platforms? Here’s the list of best fonts for subtitles.
- Arial
- Roboto
- Helvetica
- Lato
- Open Sans
- Verdana
- Times
- Poppins
- Rubik
- Georgia
- Quicksand
- Cabin
DaVinci Resolve Alternative for Adding Text to Videos
MiniTool MovieMaker is one of the best alternatives to DaVinci Resolve for creating amazing videos. It’s a simple video editor without watermark, offering a set of tools and effects to edit and enhance your footage.
Here’s a quick guide on adding text to videos in MiniTool MovieMaker.
MiniTool MovieMakerClick to Download100%Clean & Safe
Step 1. Launch MiniTool MovieMaker after the installation is done, and close the promotion window
Step 2. Click Import Media Files to open your video and add it to the timeline.
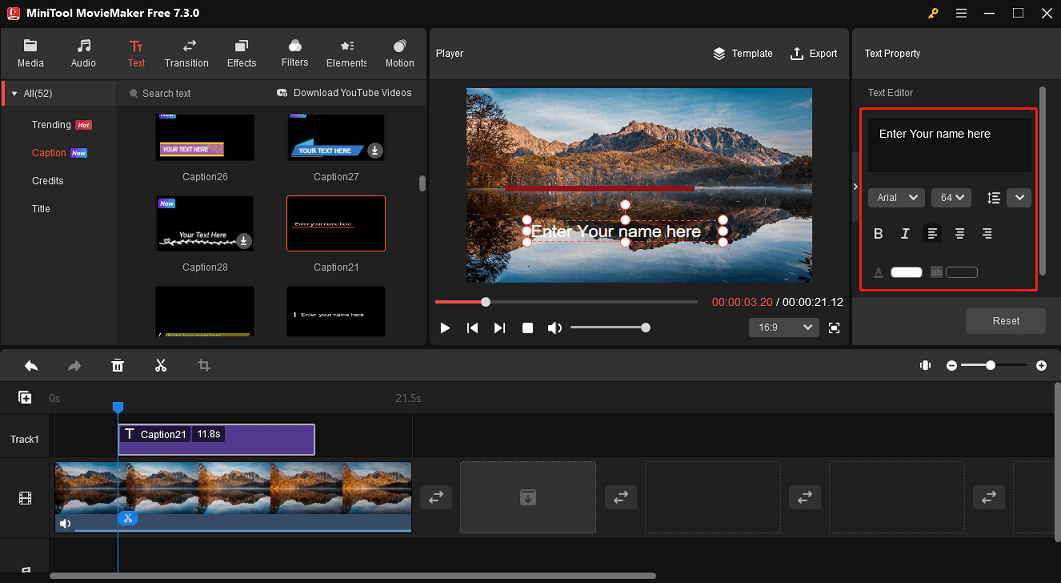
Step 3. Select the clip on the timeline and go to the Text tab. MiniTool MovieMaker allows you to add a title card, caption overlays, and end credits to the video.
Choose the text category, browse for a text template, and drag it to the timeline. Then, you can edit the text property and change its duration and position.

Step 4. Click Export to export your video.
Conclusion
Adding new fonts to DaVinci Resolve is very simple. Just download the fonts, install them on your computer, and restart the software.
You may also like:


![How to Fix the DaVinci Resolve Media Offline Issue [Full Guide]](https://images.minitool.com/moviemaker.minitool.com/images/uploads/2023/03/davinci-resolve-media-offline-thumbnail.jpg)

User Comments :