This tutorial shows you how to merge subtitles with MP4 video or other types of video files with MKVToolNix, VLC Media Player, and HandBrake. Let’s get started! And make sure that the subtitle file is in the same folder and has the same file name as the video file.
If you want to add a title card, end credits, and captions to a video, you can try MiniTool MovieMaker, a free video text editor.
#1. Merge Subtitles with Video with MKVToolNix
MKVToolNix is a free, open-source, and cross-platform program for Matroska media files. With it, you can merge SRT/ASS/SSA/SUP subtitles with MP4, AVI, MOV, and other video files. Finally, you’ll get an MKV video file. And it’s also an MKV joiner.
Here’s how to merge subtitles with MP4 video using MKVToolNix.
Step 1. Download and install MKVToolNix on your computer, and then launch it.
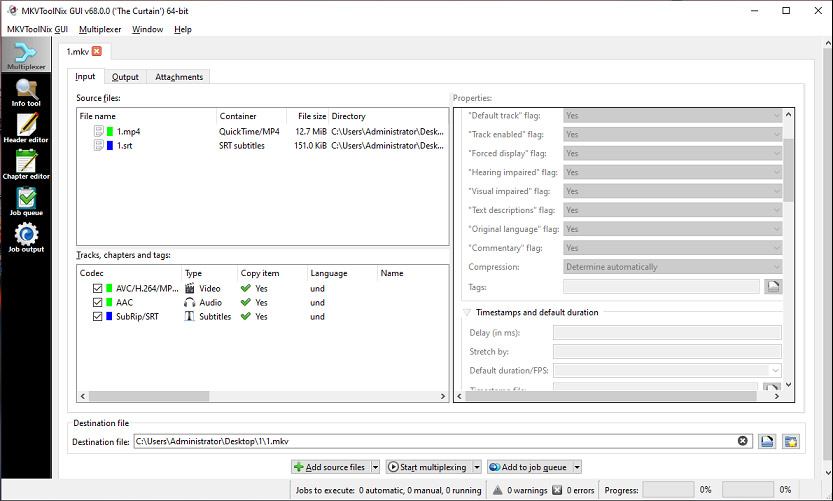
Step 2. Click the + Add source files at the bottom to open the Add media files window.
Step 3. Browse for the folder that stores your subtitles and video file, then select them, and click Open.
Step 4. You can click the icon next to the Destination file box to change the location to save your video and rename it.
Step 5. Click Start multiplexing to merge videos and subtitles.
#2. Merge Subtitles with Video with VLC Media Player
VLC is a free, open-source, and cross-platform multimedia player. It can play most video and audio files. VLC also has other features. It can cut, rotate videos, convert videos, and merge subtitles and subtitles.
VLC supports various video formats and multiple subtitle formats. Here’s how to merge subtitles with video permanently with VLC.
Step 1. Open VLC Media Player on your computer, click Media and select Convert/Save from the drop-down menu.
Step 2. Click the +Add to browse for your video, and click the Convert/Save button.
Don’t check the Use a subtitle file option and browse for a subtitle file. And make sure the subtitle file is in the same folder and has the same file name as the video file.
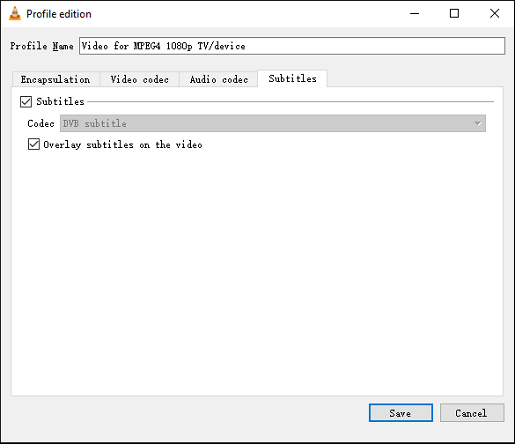
Step 3. Click the drop-down menu of Profile, and choose Video for MPEG4 720p TV/Device or Video for MPEG4 1080p TV/Device.
Step 4. Click the Edit selected profile icon next to the Profile drop-down menu, and go to Subtitles.
Step 5. Check the following 3 options, Subtitles, DVB subtitle, and Overlay subtitles on the video. Then click Save.
Step 6. In the Convert window, click the Browse to choose a location to save the new video. Then click Start to merge subtitles and videos.
#3. Merge Subtitles with Video with HandBrake
HandBrake is a free, open-source, and cross-platform video converter. It allows you to convert any video format to MP4, MKV, and WebM. Also, it can convert videos for many devices. And it can also merge subtitles with the video.
Step 1. Open HandBrake after the installation, and click the File to upload your video.
Step 2. Under the Summary tab, choose a format.
Step 3. Go to the Subtitles tab, click the Import Subtitle to add SRT/ASS/SSA subtitle file, and check the box of Burn In at the end of the subtitle source.
Step 4. Click the Browse to choose an output folder and give the file a name.
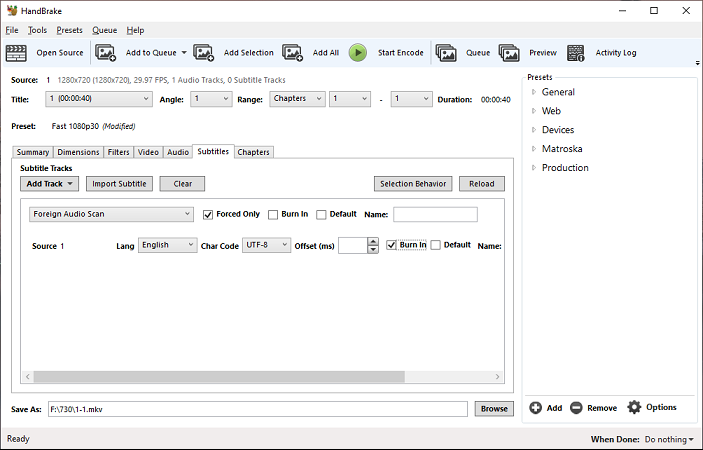
Step 5. Click the Start Encode button at the top.

Conclusion
The 3 applications in this post support most popular video file types and common subtitle files. With them, you can easily merge subtitles with video permanently.
About The Author

Position: Columnist
Cora is a tech writer specializing in digital media workflows, with over six years of hands-on experience in video post-production, media transcoding, and screen capture. Her writing is always clear and practical. Cora also produces in-depth software reviews for users across skill levels to help them find the right tool and enjoy video editing.
User Comments :