When it comes to video editing tips, it takes more than professional equipment, good lighting, and a microphone setup. The post-processing of the collected footage is also crucial for making movies, clips, or videos.
Now, let’s take a look at the 10 easy tips for becoming a better video creator.
1. Get the Video Editing Software
With our list of video editing tips for beginners, you can start by getting proper video editing software. It might be difficult to determine which one to use because there are so many video editors available on the market.
Now, we would like to recommend this free video editing software for you. Check out the guide below to see how to use it.
MiniTool MovieMaker
MiniTool MovieMaker provides users with a free and comprehensive edition to enhance their video footage. It includes embedded templates that simplify the entire editing process and are especially user-friendly for beginners. Users can use some of its sounds to attract more people to watch their videos. You can also use transitions to change the visuals at regular intervals, as well as split or trim videos to make them shorter. This movie maker also allows you to export watermark-free videos in resolutions up to 1080P.
Download and Install MiniTool MovieMaker
MiniTool MovieMakerClick to Download100%Clean & Safe
Here is the guide to getting the video editing software:
Step 1: Click the Free Download button above to download MiniTool MovieMaker for free.
Step 2: Open the installation package and click Yes from the pop-up window.
Step 3: Click the Install Now button from the next pop-up window. If you want to change the default installation, click Custom Installation.
Step 4: Click on Start Now to launch it.
2. Learn to Create a Project
After launching the video editing software, you will see the Project library window. In the left panel, there are three options: New Project, Open Project, and Movie Templates.
When you select New Project, you will go to the interface of MiniTool MovieMaker where you can create a project.
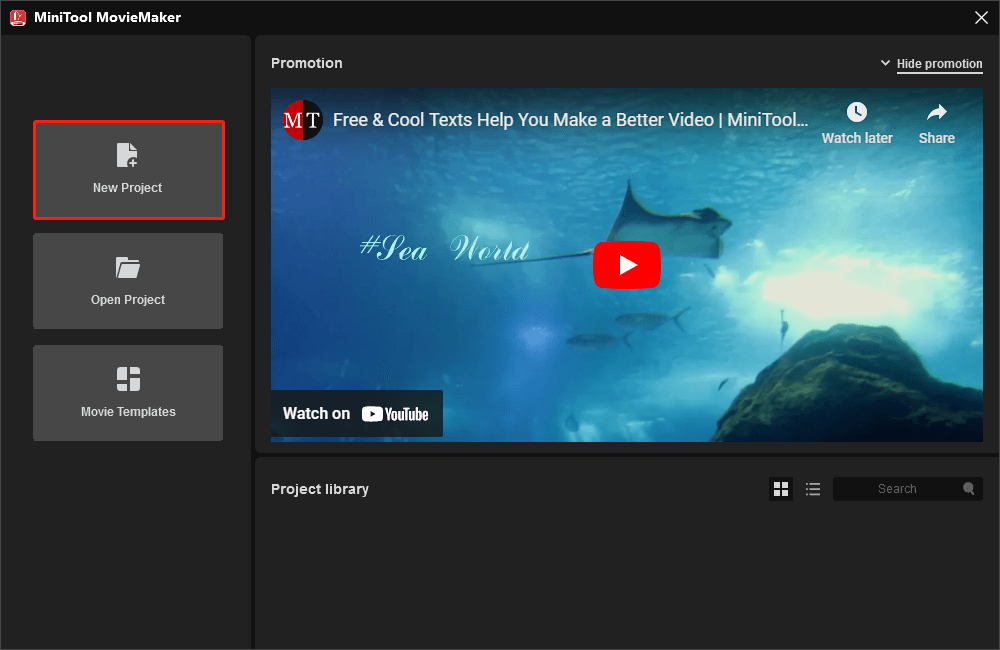
Or, you can exit the Project library window, click the 3-bar Menu in the upper right corner of the interface, then hover over File and select New Project.
If you are a new user, you can try out the free edition right now. If you already have a license code, you can click the Register icon on the left side of the 3-bar Menu. The Register window will appear. You can enter the license code in the blank box to register MiniTool MovieMaker now. If you do not yet have a license code, you can get one from the MiniTool website by signing up for a Monthly Subscription, Annual Subscription, or Ultimate Plan.
3. Use a Movie Template
For the video editing tips in this article, we’re going to show you the third tip on how to use a movie template. The video editor here can provide you with various movie templates to make a movie quickly, such as love, travel, family, friends, festivals, and so on. Let’s see how it works.
Step 1: Select Movie Templates from the Project library window or tap on the Template in the upper right corner of the Player window.
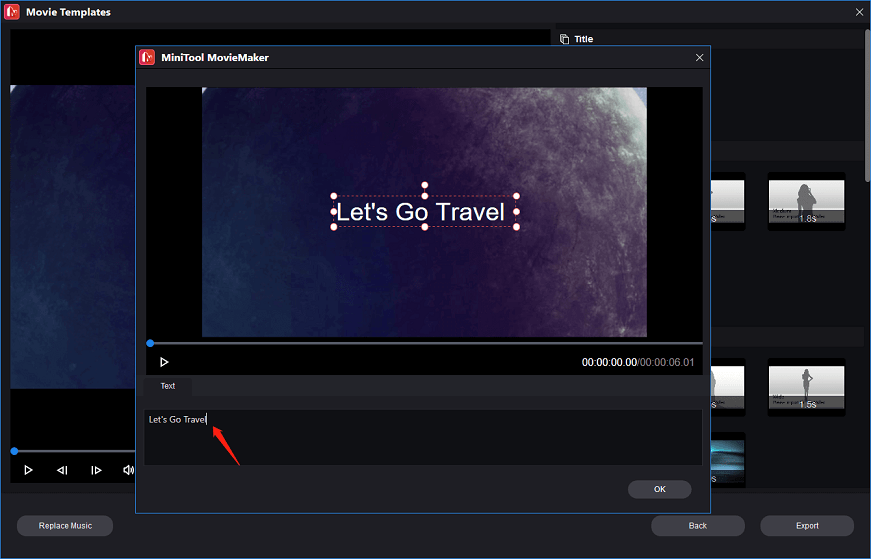
Step 2: Select a favorite movie template from the Movie Templates window.
Step 3: Click the Next button to import the same number of videos and pictures as the number of videos or pictures in the template you pick and they will be automatically embedded in the movie template.
Step 4: Hover over the video or picture below the Title, hit T to write a title from the popup window, and click OK to save the change.
Step 5: Drag the videos or pictures with the mouse to change the order as you like.
Step 6: Click the Replace Music button to select your preferred tunes and click OK to save your selection.
Step 7: Click the Export button to go to the Export window, then click the red Export button.
Note: In the Export window, you can rename the movie, choose the output format, select the save path, and adjust the resolution settings. When the export process is over, you can click the Find Target button to view the exported movie.
4. View Video Editing Tutorials
Video editing tutorials also play a key role in tips for video editing and photo editing. Good tutorials can help you do some specific tasks.
If you are using this MiniTool software, you can learn how to edit videos and photos by following these steps: Click on the 3-bar Menu > hover over Help > Select the Manual option. Next, you will see many clear and easy-to-follow tutorials on the site. Therefore, you can read the guides to help you create and edit videos as needed.
5. Make a Video with Music
We mainly focused on the editing video tips in this article and let’s keep an eye on the fifth tip. The music in a video can be a subtle or crucial element. It is absolutely a good idea to choose a song and make sure it matches the rhythm of the video while editing it. To make a video with music, try the following steps:
1. Launch the MiniTool MovieMaker app.
2. Shut down the Project library window to access its main interface.
3. Click on Import Media Files under the Media tab at the top left corner of the interface.
4. Locate the video you want to import and then click on Open.
5. Check the video in the Media library.
6. Click + on the video thumbnail to add it or drag and drop it to the below timeline.
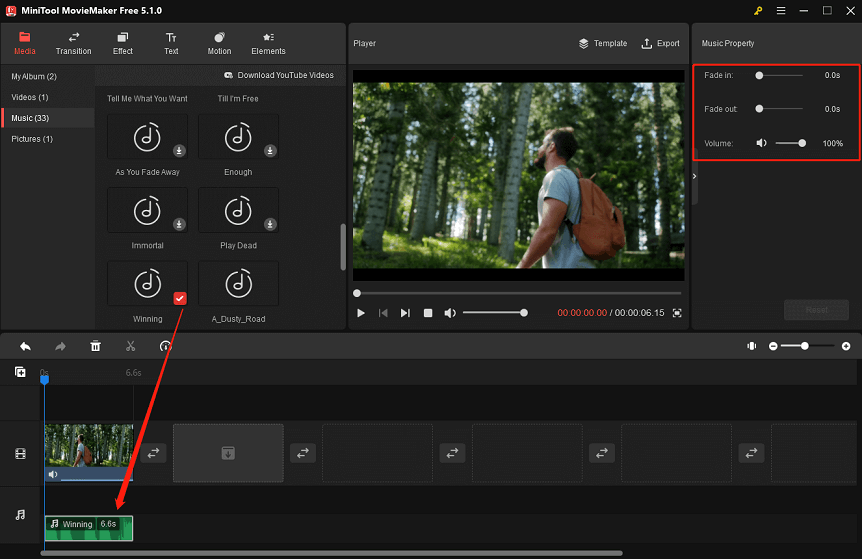
7. Click on Music in the left menu, then click the Download icon at the bottom right of the music you like.
8. Click + on the music thumbnail to add it or drag and drop it to the below timeline.
9. Select the music in the audio track to highlight it. The Music Property will appear on the top right of the interface.
10. Move the Fade in and Fade out sliders to change the duration of the fade-in and fade-out effects.
11. Move the Volume slider left or right to make the music sound quieter or louder.
6. Improve Your Video with Transitions
It is common in video editing to connect one shot to the next by using a post-production technique called video transitions. When it comes to transitions, you can use them to make the video clips look like a slideshow or a promotion to attract a large audience. MiniTool MovieMaker comes with a variety of free video transitions, including Advance, Diagonals, Iris, PagePeel, Reveals, and Wipe.
Here’s how to add transitions to your video in minutes with MiniTool MovieMaker:
1. Launch the MiniTool MovieMaker and close the Project library window to enter the main interface.
2. Click on Import Media Files under the Media tab in the upper left corner of the interface.
3. Choose some videos and photos you want to import and then click on Open.
4. Hold the Ctrl key and select the imported videos and photos one by one. Then, click on the + icon at the bottom right corner of one of the videos or photos to add them to the timeline.
5. Go to Transition and select the clip on the timeline to which you want to add a transition.
6. Select the desired transition and click the + icon or drag and drop it next to the clip.
7. Select the transition you added to highlight it. The Transition Property will appear on the top right of the interface.
8. Move the Duration slider to change the duration of the transition.
9. Select the Overlap, Prefix, or Postfix from the Transition Mode.
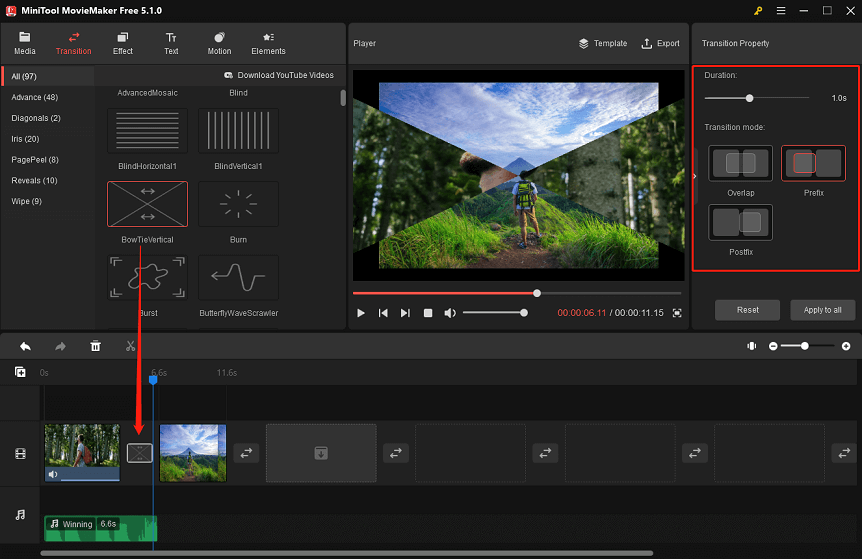
Note: If you want to remove the transition adjustment, you can press the Reset button to return to the default settings.
7. Keep the Video Short
As a free video editor, MiniTool MovieMaker also allows you to trim, split, slow down, or speed up videos. In this section, the recommendation from the list of video editing tips is to quickly keep the video short. Do the following steps:
1. Launch the video editor and close the pop-up window to enter the main interface.
2. Click on Import Media Files to add a video and drag it to the timeline.
3. Click the video clip on the timeline to highlight it.
4. Move the playhead to the place you want to split.
5. Click the Split icon (a scissor button) on the playhead or click the Split icon on the toolbar and choose Quick Split.
6. Select and delete the unwanted part or add a new video to the split video clips.
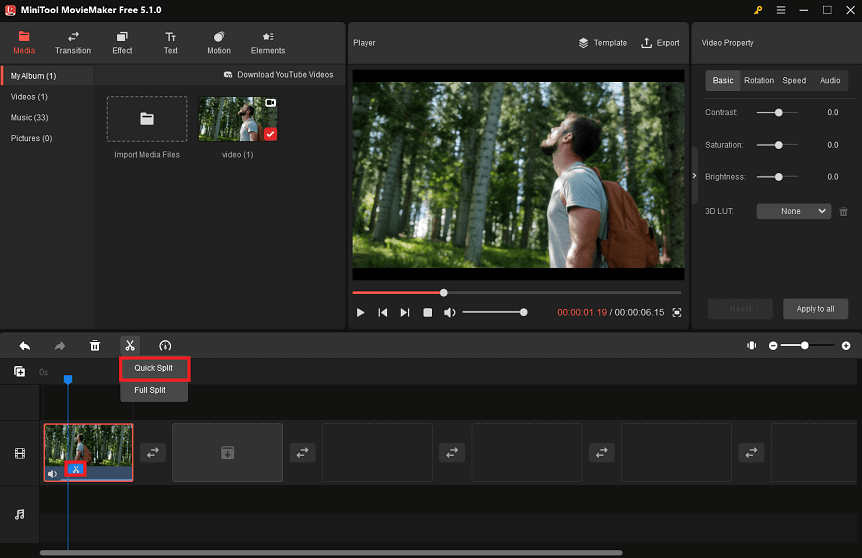
Now, you will discover the video is shorter than before.
8. Back up the Edited Video
If you accidentally lose your edited video, all your time and effort will be wasted. Many editing apps perform regular backups, which is important if you need to find a previous version. The backup option is especially useful at this time.
In MiniTool MovieMaker, you can use the backup tips to alleviate your concerns: Click the Menu at the top-right corner of the interface, hover the mouse over the File option, and select Save Project or Save Project As to save the edited video. That is to say, you can choose to not store the video in the same location by using the video editing tips.
9. Make Use of Keyboard Shortcuts
Keyboard shortcuts are a fast way to combine one or more keyboard hotkeys to access and perform a series of operations that will typically take more time to complete. You can edit videos using keyboard shortcuts in most editing programs for various in-app editing operations.
With the help of these keyboard shortcuts, you can navigate more quickly through your whole desktop application, including the Start menu, panel, menus, etc.
Also Read: New Keyboard Shortcuts in Windows 11: How to Use Them?
10. Learn about Key Terms
For those unfamiliar with video editing, some of the terminologies can be intimidating. This is why you are interested in learning more about them. The following are examples of basic concepts:
- Jump Cuts: Remove segments to skip monotonous scenes and increase visual interest.
- J Cut: The audio comes before the video.
- L Cut: The video comes before the audio.
- Montage: A sequence of clips depicting the passage of time, commonly used for transitions.
- Cutting on Action: Cut when the subject moves rather than after each movement to make a scene smooth and dynamic.
- Match Action: Crop two visually similar shots or scenes.
- Cutaways: Add transition clips to reveal the scene, set the tone, or add context to a scenario.
Conclusion
With the ten video editing tips mentioned above, you can take advantage of them to produce films, vlogs, music videos, explainer videos, and creative shorts. In addition, they allow you to improve the quality of the video content.
Please send an email to [email protected] if you have any questions or concerns about the MiniTool MovieMaker.
Also read:
User Comments :