People love traveling and always take photos or videos to capture amazing and wonderful moments. And sometimes, you may desire to create your travel videos and share them with friends? How to make a travel video quickly and easily? To help you out, this post will give you 4 travel video makers (including MiniTool MovieMaker ).
If you’re still wondering how to make a travel video by yourself, you’ve come to the right place. This post provides 4 travel video makers (MiniTool MovieMkaer, LightMV, BeeCut, FlexClip) and it will give you step-by-step guides on how to make travel videos with them.
Top 4 Travel Video Makers
- MiniTool MovieMkaer
- LightMV
- BeeCut
- FlexClip
Where to watch travel videos? First, let’s look at the following sites.
Top 5 Sites to Watch Travel Videos
1. Pexels
Pexels, a good place for free stock videos and images, provides more than 1,000+ beautiful travel videos. It allows you to organize the video list by orientation and size (4K, HD, Full HD). Ans you’re allowed to download the video free and without registration, and it lets you choose a size for the video you download.
2. Vimeo

Vimeo is a video hosting and sharing platform equipped with 26 categories of videos, including animations, comedy, trailers, weddings, and more. It also offers a variety of travel videos for you to watch and the content is about Africa, Antarctica, Asia, Europe, North and South America, etc.
Also read: Top 7 Vimeo Video Downloaders to Help Download Vimeo Videos
3. YouTube
YouTube is another place to find the best travel videos and offers many vlogging channels to follow, such as Expert Vagabond, Fun for Louis, Fearless & Far, Hey Nadine, Sam & Audrey TV, Migrationology, and more. These channels provide different and wonderful travel videos.
4. Lonely Planet Video
Lonely Planet Video is also a great source of travel videos. This site provides a lot of videos about food, adventure, journey, art, culture, etc. And it also gives you some advice, guides, and destination information of your travel.
5. CNN Travel

With CNN Travel, you can watch travel videos of breathtaking journey experiences, and the content includes destinations, hotels, local food, and more. Besides, CNN Travel gives you some travel tips.
How to Make a Travel Video with MiniTool MovieMaker?
MiniTool MovieMaker is the best free simple video editor for Windows. It offers a free download and has no in-app purchases. And it’s clean, no bundle, no watermark, and no ads. This travel video maker supports the most popular formats of videos, images, and audio tracks, such as MP4, MKV, AVI, GIF, PNG, JPG, MP3, WAV, and more. And this software is simple and quick to operate. Thus, everyone can make travel videos without effort.
To help you make amazing videos, MiniTool MovieMaker provides many editing features. It allows you to rotate, flip, split, trim, reverse videos, combine multiple clips into a video, slow down or speed up videos, add music to the video, apply transitions between two clips, add text to the video, and more.
But how to make travel videos with MiniTool MovieMaker? Here’s the tutorial.
Step 1. Launch MiniTool MovieMaker on your Windows computer.
Click the below button to download this software, then install it according to the on-screen instructions, next open this program, and shut down the pop-up window to access the user interface.
MiniTool MovieMakerClick to Download100%Clean & Safe
Step 2. Upload your media files.
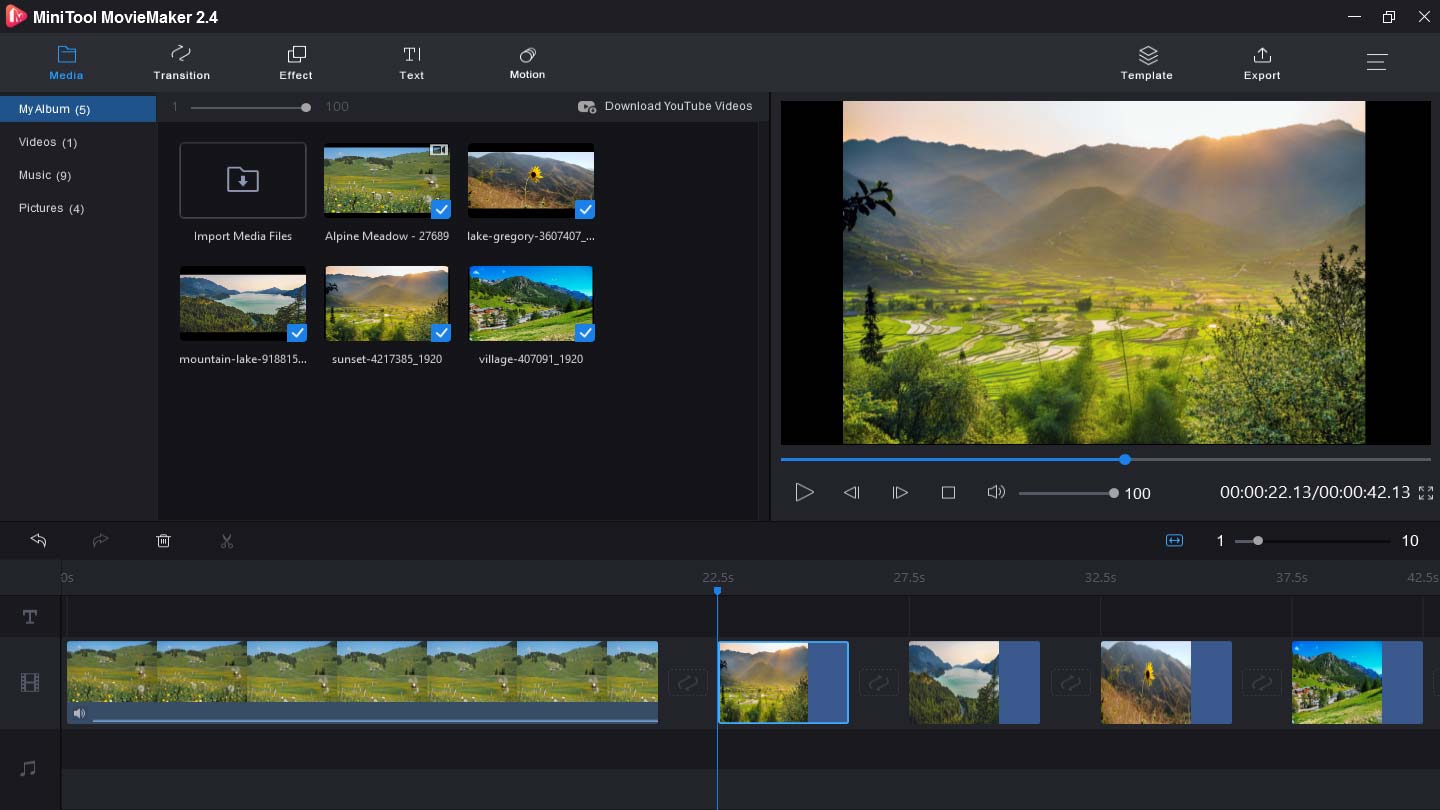
First, tap on Import Media Files to browse your folder, then locate the one that contains the images, video clips, and music you need, next choose all files you need and click the Open to import them to the MiniTool MovieMakker’s media library.
Step 3. Create your travel video.
Drag and drop the clips or click the + icon to add these clips to the timeline. Then click the Zoom to Fit Timeline to adjust all clips to fit the timeline. And tap on the Play button to preview the travel video.

Step 4. Customize your travel video.
Rotate and flip the video: Select and click a clip on the timeline, and choose the Edit, then choose from Rotate 90° clockwise or Rotate 90° anticlockwise, Flip Horizontal or Flip Vertical.
Split and trim the video: Select a clip and click the scissor icon, then choose the Full Split. Choose the Split to split the video into two parts. Choose the Trim to trim parts of the video.
Change the video speed: In the timeline, choose a clip and click the Speed icon. To accelerate the video, select the Fast and pick a speed form Normal, 2X, 4X, 8X, 20X, 50X. To slow down the video, click the Slow and pick one from Normal, 5X, 0.25X, 0.1X, 0.05X, 0.01X.
Step 5. Export and save the travel video.
After your editing, click the Export to get the output window. Then give the video a name and choose the output destination. The default format is MP4, and if you want another format, click the format box and select one. And tap on Export to start the video process.
How to Make a Travel Video with LightMV?
LightMV is one of the best travel video makers. It offers online services, and you can have this software on your Windows computer, Android, and iPhone.
Here’s how to make travel videos in LightMV.
Step 1. Open LightMV.
Go to the LightMV website to download this app on your device. Or you can directly create your travel video online. And the following steps are based on the desktop version of LightMV.
Step 2. Choose a Template.
Enter travel to search for all video templates and photos about travel. To discover a template you like, you can filter the content by type, ratio, style, color, and more. Hover the cursor over a template and click Select, then you can preview the video, and tap on Create now to access the editing window.
Step 3. Upload files.
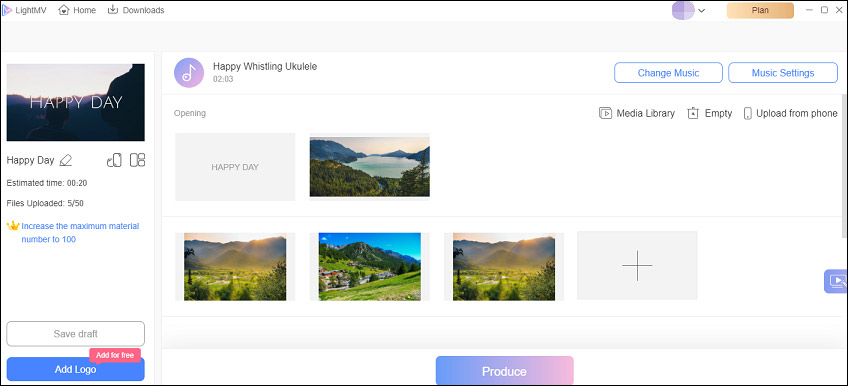
Click the big + icon and then choose Add Files, and browse your computer and choose all images and video clips you need and click the Open to import these files. And you can also select the Media Library to upload existing files or click the Upload from phone to import other files.

Step 4. Edit each clip.
For the opening and ending scenes of the video, just click it and then you can change the text on it. For videos, you can rotate it or replace it with another one. And you can replace, crop, and rotate images, and add text. If you want to remove any clips, just hover your mouse over it and choose the Delete.
If you want to insert media, just choose a clip and right-click it, then choose one from Insert Media Before, Insert Image After, Insert Text Before, Insert Text After to upload your media.
Step 5. Change and edit the Music.
Click the Change Music > Add Music to upload your music, and select the Music Library to choose another track, and click the OK. Tap on Music Settings, you can adjust the music volume, trim the audio, and fade in and fade out it, and click the OK.
Step 6. Produce the video.
Choose a video template ratio and click the Produce to make your travel video.
How to Make a Travel Video with BeeCut?
BeeCut is another travel video maker available on Windows, Mac, and Android. This video editor is simple to use and it’s equipped with many editing functions. It allows you to crop, split, and zoom videos, apply transitions, filters, and backgrounds to the video, and more.
Here’s how to make travel videos with BeeCut.
Step 1. Import files.
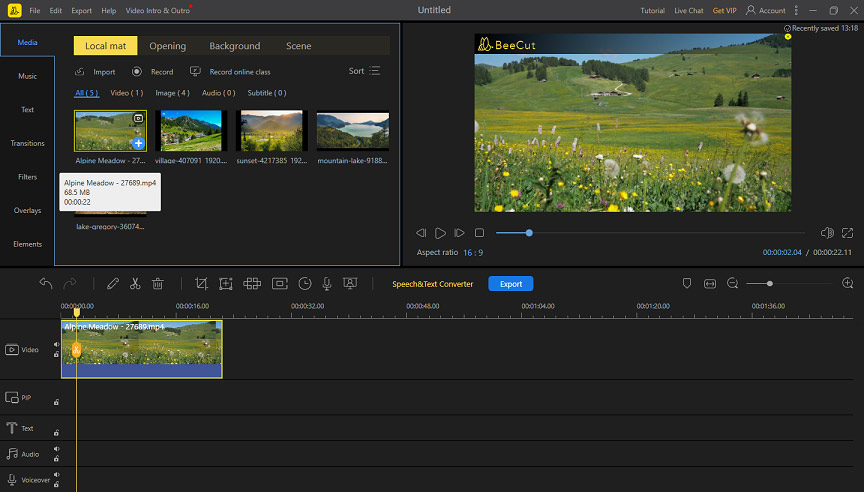
Download, install, and open BeeCut on your computer, and choose a video aspect ratio. Click the Import to upload files, folders, and subtitles. And add them to the timeline.

Step 2. Edit the video.
Right-click the clip on the timeline, click the Edit to adjust the video speed, reverse video, rotate and flip video, and change the background color.
Click the Music to choose a track from the library or upload your music to add it to the video.
Select the Text, choose a text style, delete the sample text, and enter your text.
Step 3. Export and save the travel video.
Tap on Export, then name the video, choose an output folder, a video format, the video quality, and click the Export.
How to Make a Travel Video with FlexClip?
How to make a travel video online? FlexClip is a good choice. It’s an online professional video editor. To enable you to make a video with ease, this platform provides a variety of video templates and features. But how to use it to create a travel video? Here’s the tutorial.
Step 1. Upload media files.
Visit the FlexClip website and log in, and select the Create by Template or Start from Scratch. And the following steps are based on the latter. Then choose storyboard mode or timeline mode.
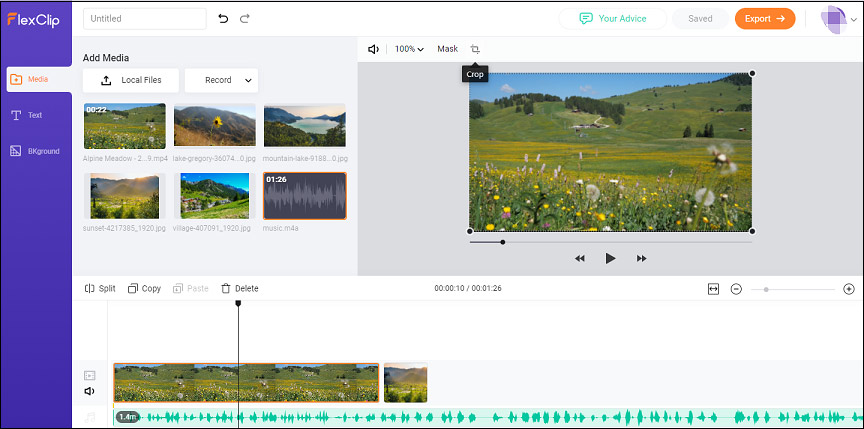
Click the Local Files to upload your images, videos, and music tracks. Drag and drop them to the timeline.
Step 2. Edit the video.
Add the music to the timeline, and move the slider on the timeline to a point and click the Split to split the video into two parts.
Click the Text to add text to the video, select the Background to choose one and apply it to your travel video.
Select ta clip, and click the Crop icon to crop the video as you like.

Step 3. Export the video.
Click the Export to complete the output option. Give a name to the video and choose video quality. Tap on Export to export the video.
Conclusion
This post shares 5 websites with you to enjoy travel videos and show you how to make a travel video with 4 methods. Just select a method and try to create your fantastic travel videos. And if you have any suggestions or questions, you can leave them in the below comments area or contact us via [email protected].
Trave Videos FAQ
- Install InShot on your Android or iOS device.
- Launch the app and enter the interface.
- Click the New to import your clips.
- Customize the travel video. Add filters, text, stickers, and music, etc.
- Click Save to export the video.
- Go to the Biteable website and sign in.
- Click the Start with an empty video.
- Give the project a name, choose a video aspect ratio, and click the Continue.
- Tap on Upload to import your images and then click the Edit Video.
- Tap on the music icon to choose a music track from its library or upload your music.
- After the editing, click the Export to start the video output.
- Navigate to the Lumen5 website and log in.
- Click the + New Video button, choose a template or create from scratch.
- Click the Media > Uploads > Upload images and videos to import your media files.
- Add new scenes for your clips, then edit the video, and finally publish the video


User Comments :