Are you attempting to figure out how to put a square in a photo or video on Windows 11/10? In this article, I recommend simple and practical video editing software to everyone, MiniTool MovieMaker and Microsoft Clipchamp, which give you the option to apply a square overlay for edits to make your creations more appealing.
MiniTool MovieMaker and Microsoft Clipchamp are both excellent Windows video editors that can help you with a variety of video editing tasks, including the placement of square overlays. Let’s go a bit deeper!
How to Use the Square Overlay for Edits in MiniTool MovieMaker?
Before you master how to add square stickers to videos or pictures in MiniTool MovieMaker, you need to have a basic understanding of the software first.
Basic Understanding About MiniTool MovieMaker
MiniTool MovieMaker is an indispensable video editor without watermark if you need to apply a square overlay for edits efficiently and free of charge.
It is worth noting that the application also contains other amazing shape stickers, like the double line frame, full screen, and rectangle.
This best video editing app supports importing multiple video, picture, and audio formats, such as MP4, 3GP, MKV, WEBM, GIF, PNG, MP3, WAV, FLAC, etc. You can then use it to make video from images, audio, and video clips.
It currently features 4 popular aspect ratios, including 1:1, 4:3, 16:9, and 9:16. It aims to help both novices and experts complete their projects by providing a number of editing options.
In addition, you can work with MiniTool MovieMaker to export video files up to 4K or 1080P without taking too long.
MiniTool MovieMakerClick to Download100%Clean & Safe
The primary features of MiniTool MovieMaker are explained as follows:
- The program comes with an intuitive user interface (UI).
- The application allows for one-click and drag-and-drop actions.
- MiniTool MovieMaker covers great built-in music and sound effects.
- It lets you add captions, titles, and end credits to photo or video segments.
- It delivers plenty of smooth transitions, like the fold, morph, slide, wind, and more.
- It allows you to overlay effects (e.g. hearts, frames, or sparkles) on videos and pictures.
- It enables you to overlay filters (e.g. cools or warms) on top of videos and pictures.
- It gives you the ability to overlay more stickers (e.g. arrows or loadings) on photos and videos.
- It offers different motions, like the zoom out center, zoom in top, pan up, and so on.
- You can use it to split or trim video footage in a fraction of the time.
- You can crop an image or video clip proportionally or manually with it.
- You can take advantage of it to scale, flip, or rotate video files.
- You can make use of it to change the brightness, contrast, and saturation of a video or add a 3D LUT to the video.
- You will be able to speed up, slow down, or reverse a video using it.
- MiniTool MovieMaker gives you the power to generate picture-in-picture (PIP) and split-screen effects.
- The software assists you in undoing or redoing your most recent activity.
- The video editor provides some custom settings for exporting media files.
Steps to Apply the Square Overlay for Edits with MiniTool MovieMaker
The following instructions will show you how to add square stickers to videos or photos using MiniTool MovieMaker.
MiniTool MovieMakerClick to Download100%Clean & Safe
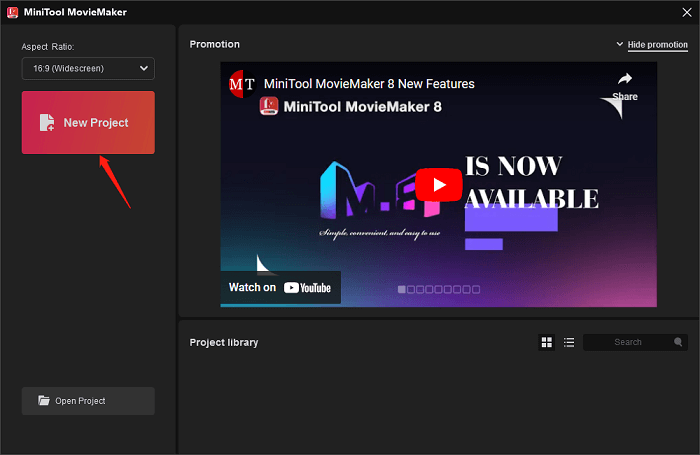
Step 1: Click the download button above to get the MiniTool MovieMaker application and install it on Windows 11/10.
Step 2: Start the application and click on the New Project button from the project library window to create a blank project.
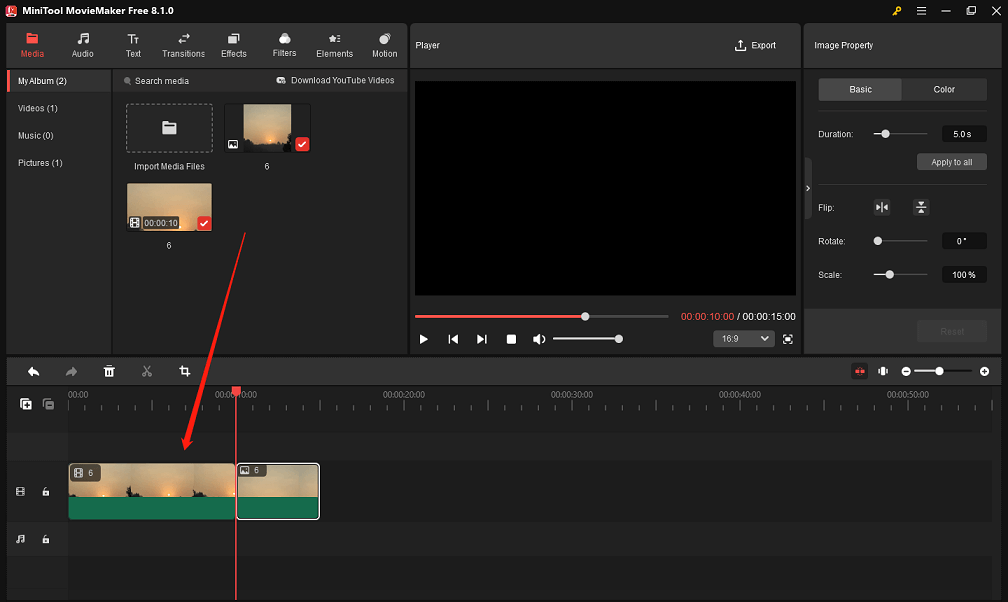
Step 3: As soon as you enter the main interface, click on the Import Media Files button under the Media tab to import the video and photo files to which you would like to put the square overlay.
Step 4: Click on the + icon on the imported video or photo or drag and drop the media files to the video track in the timeline.
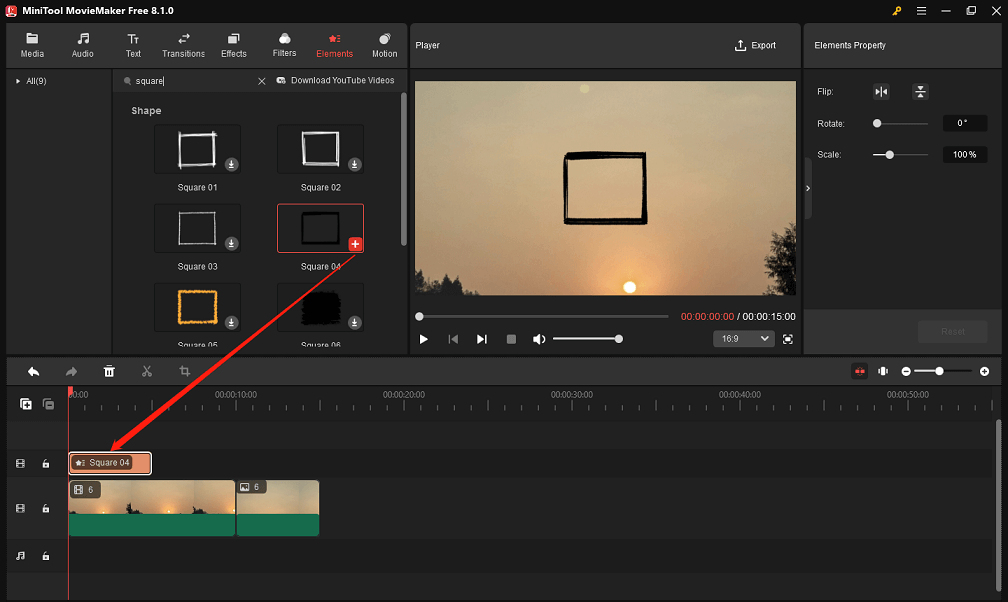
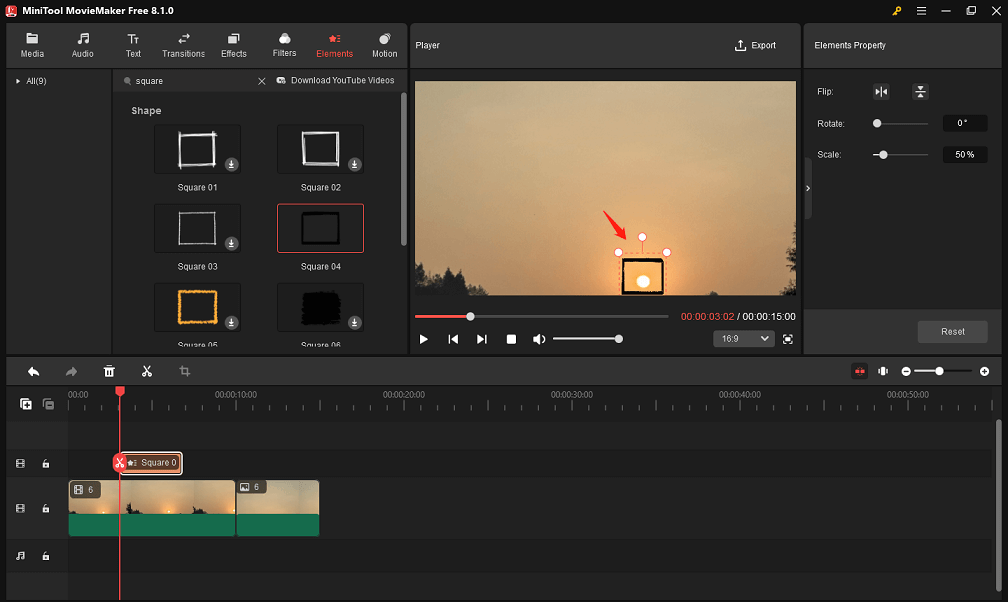
Step 5: Go to the Elements tab located at the top of the main interface. At this point, you can utilize the search tool to quickly find all of the options for the square overlay. To do this, type “square” into the search bar in the upper left corner and press Enter on your keyboard.
Alternatively, you can go right to the Elements tab and select the Shape sub-tab to find square overlays.

Step 6: To obtain the free square sticker you want, simply click on the Download icon on it. Wait for a couple of seconds to complete the download. Next, double-click the target video or photo in the timeline and click on the + icon to put the obtained square overlay on top of the highlighted video or photo.
Or, you can directly drag and drop the downloaded square sticker over the target video or picture in the timeline.
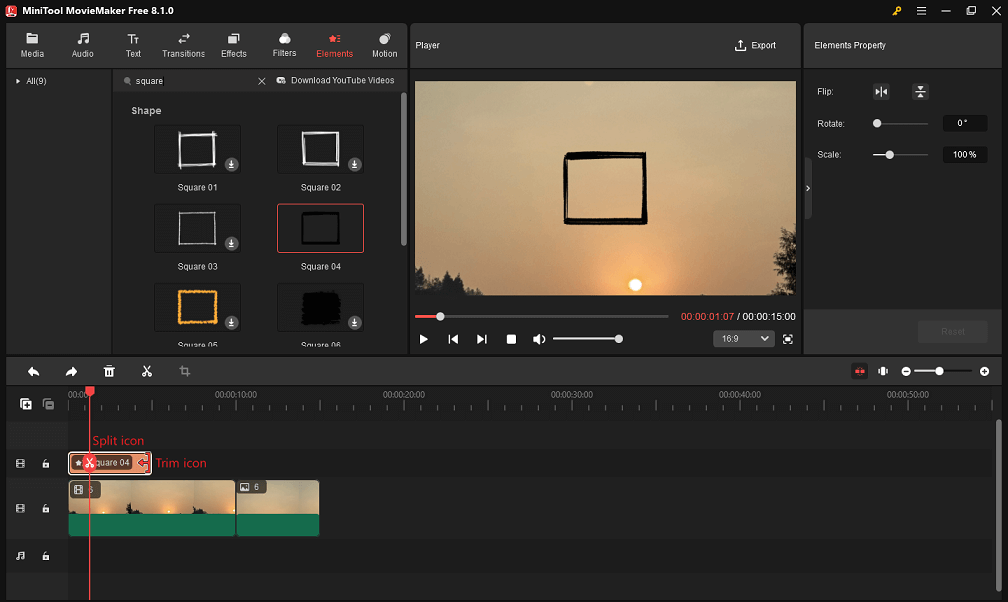
Step 7: Edit the applied square overlay to suit your needs, for example:
1. Split or trim the square overlay.
Remove the middle part of the square overlay. First, keep it on the video track selected. Then, position the playhead to the start and end points of the square overlay that you want to delete. At this moment, click the Split icon on the playhead separately. Further, right-click on the middle part and select Delete.
Remove unwanted portions at both ends of the square overlay. The Trim icon appears when you hover the mouse pointer over the beginning or end of it. Drag the edges inward to complete this operation.
2. Adjust the time when the square overlay appears.
This is easy to do. Just move the square overlay on the video track to where you want it to appear in the video or photo.
3. Flip or rotate the square element.
In the Elements Property panel, click on the Flip Horizontal or Flip Vertical icon to flip the square element. Rotate it between 0° and 360° by sliding the Rotate slider. Optionally, enter the required rotation degree in the small box on the right.
4. Scale the square element.
This operation is also very easy to perform. Slide the Scale slider to the left or right to make the square element smaller or bigger. Or, input the required display size percentage in the small box on the right.

5. Modify the position of the square sticker on the screen.
In the preview window, move the square sticker to another location where you want it to be placed.
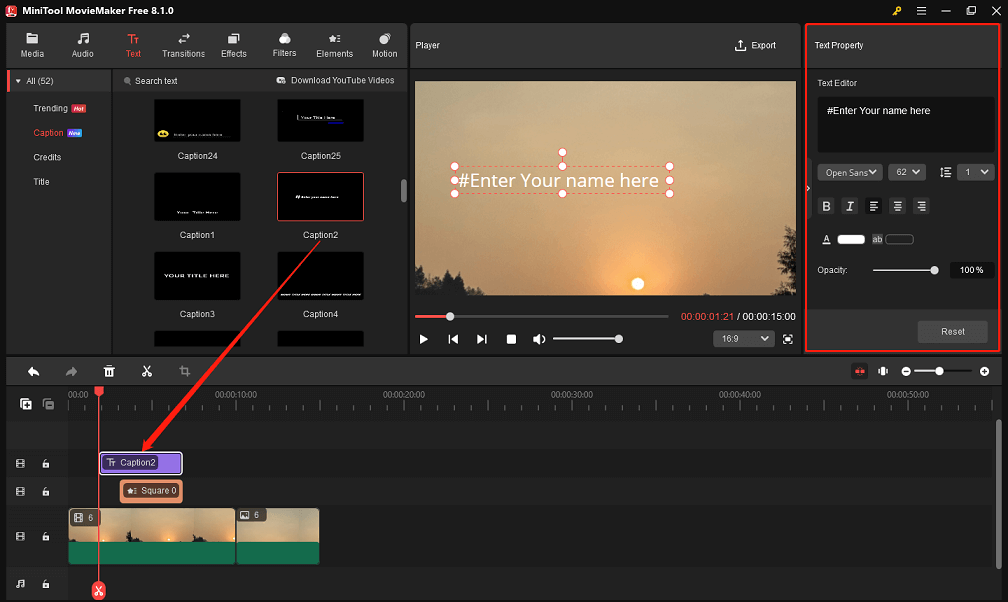
Step 8: Add text to describe what you created. You can find and download a text style you like by going to Text > Caption, then drag and drop the downloaded one to the target location in the timeline.
Keep the text in the timeline selected. In the Text Property panel, enter text description under Text Editor and customize the font, size, line spacing, alignment, color, opacity, etc.
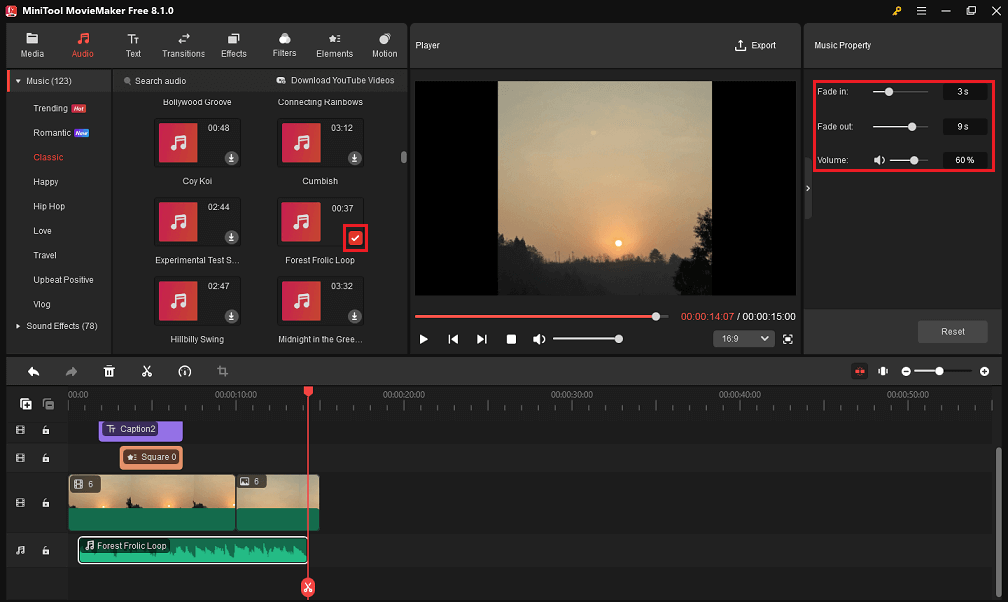
Step 9: Make your piece more engaging by adding a tune. Navigate to Audio > Music or Sound Effects to find and download the melody you prefer. Drag and drop the downloaded one to the target position on the audio track in the timeline. Plus, you can use the Trim tool to remove unwanted parts of the tune you added.
Keep the tune in the timeline selected. In the Music Property panel, fade the tune in and out and control the volume by sliding the sliders or entering values.
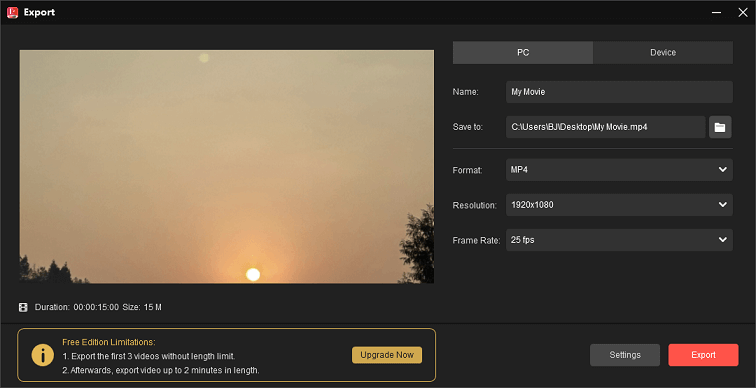
Step 10: After completing all edits, click on the Export button at the top right corner. This will open a new window with the output settings. Here, you can name the project, choose where to save it and configure the file format, resolution, or frame rate.
Moreover, you can click on the Settings button to select the appropriate quality or bitrate for the created file.
Finally, click on the Export button at the bottom to save the created project to your computer.
How to Use the Square Overlay for Edits in Microsoft Clipchamp?
Before learning how to put a square in a photo or video in Microsoft Clipchamp, you need to get familiar with the software first.
Learn About Microsoft Clipchamp
Microsoft Clipchamp is a useful video editor that allows you to apply shapes & annotations, stickers, frames & borders, overlays, etc. to videos and images. It is available as a Windows application for use with personal Microsoft accounts. You can also get access to the online version.
Additionally, there are fantastic transitions, filters, and effects to choose from. Other features worth exploring in this app include adding text, inserting music or sound effects, correcting the colors of videos or images, trimming or merging video footage, and so on.
Steps to Apply the Square Overlay for Edits with Microsoft Clipchamp
Let’s see how to put a square in a photo or video using Microsoft Clipchamp.
Step 1: Download the Microsoft Clipchamp software from Microsoft Store and install it on Windows devices.
Step 2: Launch the software and click on Create a new video to bring up the primary interface.
Step 3: Click on the Import media button to import the media files. After that, click on the + icon on the imported video and image files to add them to the timeline.
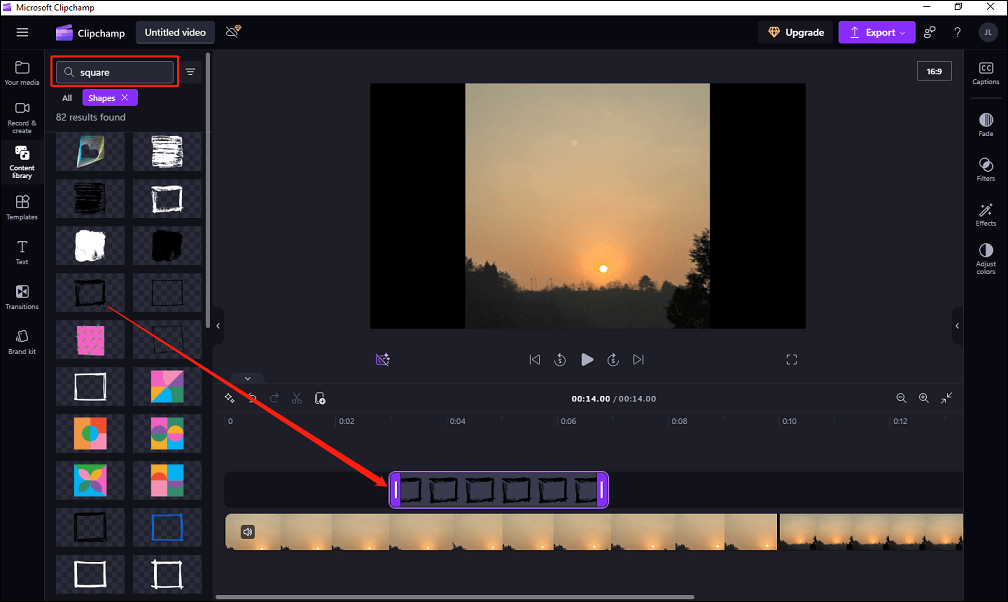
Step 4: Select the Content library tab on the left side of the interface. Find your favorite square overlay easily by using its search feature. Drag and drop the square overlay of your choice on top of the video or photo in the timeline.
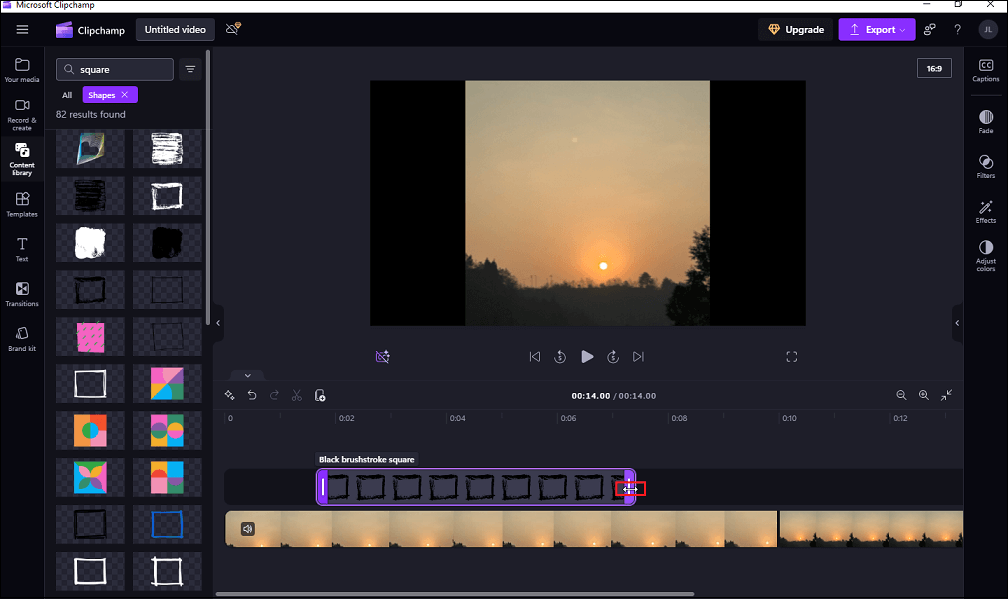
Step 5: Hover the mouse cursor over either end of the square overlay in the timeline. Drag the edge to the left or right to adjust its duration when the double-headed arrow appears.
Step 6: Once you’re happy with your edits, click on the Export button in the top right corner to choose the output resolution and save the final project to your computer.

Closing Remarks
To summarize, I present two effective methods to put a square overlay for edits to enhance the visual attractiveness of your work. You don’t need advanced editing skills to use any of the video editors. Get started on your creative journey today!
If you have any problems when using MiniTool MovieMaker, please email us at [email protected] for assistance.
User Comments :