When your iPhone storage is running out of space, you can transfer some files like photos and videos to the cloud or computer to regain storage.
How to Import Photos from iPhone to Windows 11?
The following guides will teach you how to transfer photos and videos from an iPhone to PC Windows 11. The instructions for moving photos/videos from iPad or iPod touch to Win11 are similar.
#1 Sync Photos from iPhone to Windows 11 by Windows Photos
First of all, let’s see how to use the Windows Photos app to get photos from iPhone.
1. Connect your iPhone to the target computer via a USB cable.
2. Turn on the smartphone and unlock it. Also, power on the PC. Otherwise, your computer won’t detect the connected device. You may be asked to trust the computer on the mobile phone, just tap Trust or Allow to continue.
3. On your desktop, click on the Start menu and select Photos to open the app.
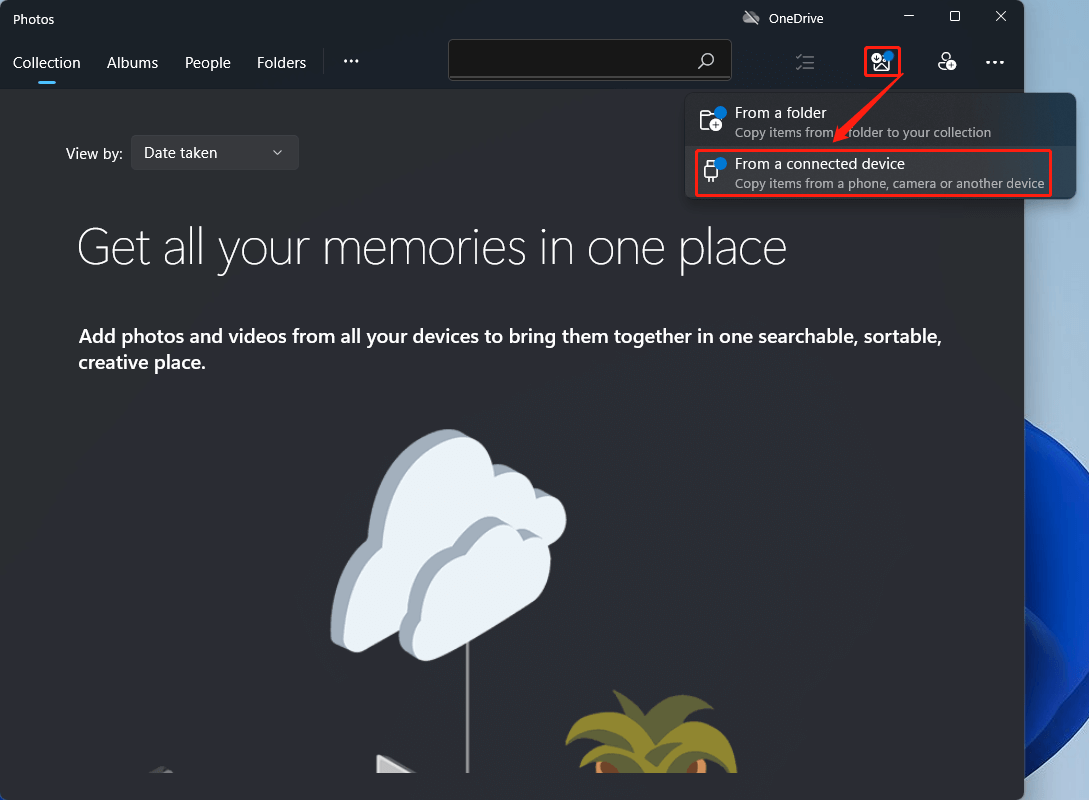
4. In the Photos app, click on the Import icon on the upper right and choose From a connected device.
5. Then, a new window will pop up. There, specify which photos or videos you’d like to upload to your computer and where to save those items. You may need to wait for a few seconds to allow the media to load all your photos.
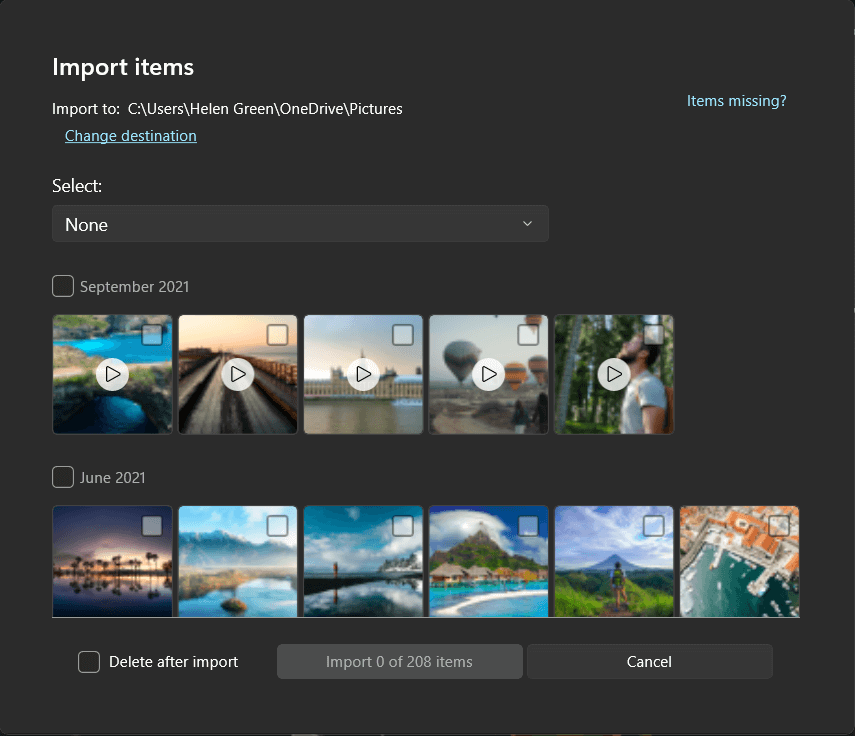
6. Finally, click the Import button to start the process. It will take a certain time to finish depending on the size you migrate.
The above steps apply to the situation where the photos/videos are stored on the Apple device instead of the cloud storage. If your photos are located on iCloud or you have iCloud Photos turned on, you need to download the original, full resolution versions of your photos to your iPhone, iPad, iPod, etc. idevices.
#2 How to Import Photos from iPhone to PC Windows 11 in File Explorer?
Another way to transfer iPhone photos and videos to Windows eleven is to take advantage of the right-click context menu in Windows Explorer.
1. Similarly, connect the Apple phone to Windows PC and “Allow this device to access photos and videos” on your phone.
2. In This PC, right-click on Apple iPhone and select Import pictures and videos.
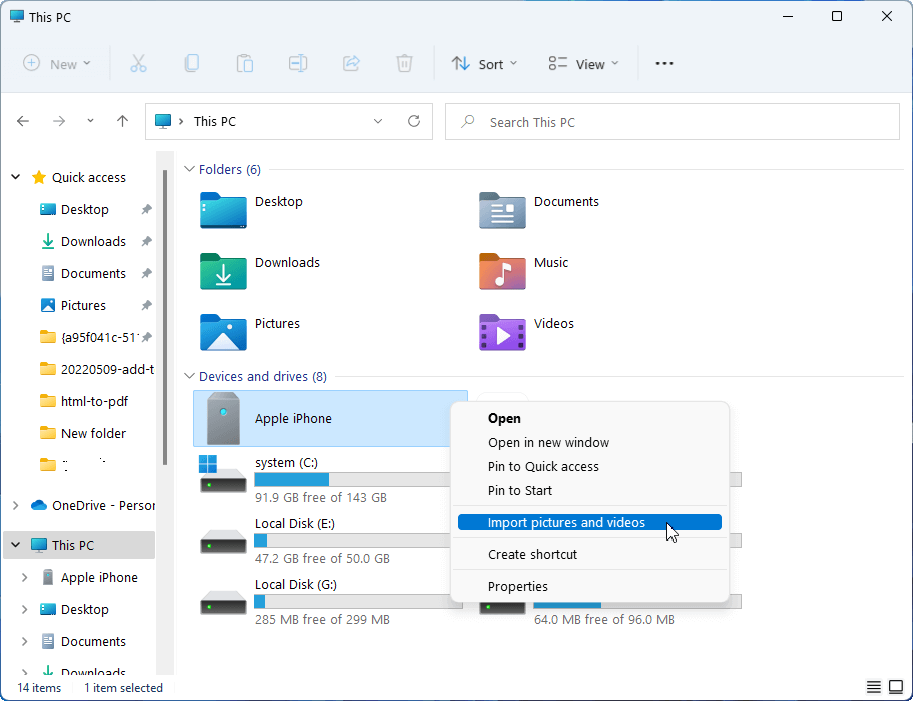
3. Wait until it detects all your iPhone photos/videos.
4. Then, in the new popup, choose Import all new items now. You can further input the name of the image or image folder to be imported.
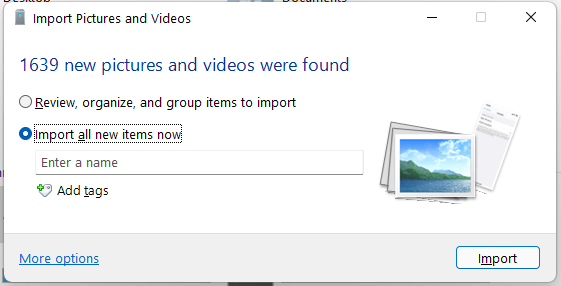
5. Eventually, click the Import button to begin the process.
Take your patience and wait until it finishes.
Or, you can directly open Apple iPhone Internal Storage in Windows File Explorer, navigate to find your target photos and videos, copy and paste them to the destination on your computer.
#3 Import iPhone Photos to Windows 11 with Other Programs Like iTunes
Besides, you are able to indirectly take photos/videos or other files from your iPhone to your Windows device relying on other applications like iTunes, email apps, chat apps, cloud apps, and so on. Just install the tool you pick up on both iPhone and PC, sign in to your account, send the target items to your account on the phone, and receive the items on your desktop. That’s it!
However, this method has disadvantages. For example, usually, there is a file size limitation for transferring within a single task on those apps except for iTunes. If you have many photos to submit, you have to repeat the operations a lot of times. It’s annoying and time-consuming.
How to Make iPhone Photos Compatible with Windows 11?
When you import videos/photos from iPhone to Windows 11 or from other iOS/iPadOS devices to your PC, some media might be rotated incorrectly in the Windows Photos app. You can add those media to iTunes to play them in the correct orientation.
You can also do something to ensure those photos and videos have the best compatibility with Win 11.
- On your iPhone, iPad, iPod, etc. devices, open the Settings app.
- Tap Camera > Formats.
- Tap the Most Compatible option.
Then, your iPhone camera will capture photos and videos in JPEG and H.264 formats.
How to Fix Can’t Import Photos from iPhone to Windows 11?
You may fail to migrate photos or videos to Win11 via iPhone. The reasons are various. For instance, there may be no photos found in iPhone internal storage media folder – DICM or something just goes wrong. You can try the following solutions.
- Click “Allow your computer to access photos and videos” on your iPhone when you plug it into your PC.
- Restart iPhone or PC.
- Check the iPhone connection or try a different USB wire or computer.
- Turn off the iCloud Photos Library or download all target photos from iCloud to your phone.
- Restart Apple Mobile Device Service (AMDS).
- Install Apple Mobile Device Support.
- Reset iPhone’s Location & Privacy in Settings.
- Change the permission of the DICM folder.
- Update related software like Photos, iTunes, Apple mobile device USB driver, etc.
- Transfer a small number of photos at one time.
After importing photos and videos from iPhone to Windows 11, you may make use of those media to create beautiful movies or convert them to other file formats to play them with media players on PC. If so, you may need the below tools.
Also read:


User Comments :