These days, people enjoy watching educational videos on YouTube and other platforms, and this style of video is becoming increasingly popular. Khan Academy videos are ideal if you intend to spread knowledge by creating videos. What kinds of tools are required to make Khan Academy videos? How to make Khan Academy videos easily? If you would like to know the answers to these questions, you can check out this article on MiniTool MovieMaker (always treated as a video editor).
Khan Academy provides free video tutorials on science, math, economics, finance, history, grammar, and many other subjects. It is an excellent method for people who are interested in particular subjects to pursue self-learning, and it is also great for classroom and distance learning.
Originally created by Salman Khan to assist his cousin in learning math, Khan Academy has grown into a major non-profit educational organization, with over 8 million subscribers on its YouTube channel and over 8,000 videos on a variety of topics.
The electronic blackboard talks are the most striking feature of Khan Academy videos, and they even define the style of Khan Academy videos to a certain extent.
Whether you would like to recreate Khan Academy videos for the community, like uploading new lessons or offering a version of another language, or you just like the blackboard-style videos and would like to make one, you can find the free tools and detailed steps here.
Part 1. What Kinds of Applications Are Required to Make Khan Academy Videos?
The entire workflow of how to make a Khan Academy video involves different kinds of applications, including some apps to serve as blackboards, screen recorders, and video editors.
#1. Some Apps to Act as the Blackboard
As mentioned above, the chalkboard drawing is the most obvious feature of the Khan Academy videos. At the same time, it happens alongside the teaching. It provides the viewer with an immersive experience as if they’re sitting in the classroom as well as watching the instructor explain something and write on the blackboard or whiteboard.
In this way, the teacher can immediately add notations, circle out regions that need close attention, and visually explain something.
This real-time canvas writing style requires drawing apps, note apps, online whiteboards, image editors, and presentation software. For example, you can use any of the following drawing tools:
a) Paint

Paint, a Windows favorite, is an easy and powerful graphics editor with multiple uses. You can quickly edit images or make masterpieces using tools within this app. When you are finished, you can save and share your files in just about any format.
b) Sketchbook
Sketchbook is an award-winning drawing, sketching, and painting application perfect for any drawing enthusiast. Both artists and illustrators love Sketchbook due to its highly customizable tools and professional-level feature set. Plus, people love this app because of its elegant user interface and natural drawing experience, allowing them to concentrate on capturing and expressing their ideas.
c) Procreate
Procreate, a leading drawing app loved by aspiring artists and creative professionals, provides hundreds of handcrafted brushes, an innovative set of artistic tools, and an advanced layer system. With it, you can also create rich paintings, expressive sketches, wonderful animations, and stunning illustrations.
Moreover, it is likely that you already have other apps available to you, and you can reuse them as a drawing canvas. For making Khan Academy style videos, the app should have the following capabilities:
- Brush/Pen/Color palette. Quickly switch between the textures, colors, and pen sizes. Drawing tools often include a dazzling range of brushes and color schemes.
- Enable multiple layers. You can set charts and pictures as the background, along with writing on a new layer. If you wish to delete annotations, the background remains intact.
- Canvas size. 1920×1080 minimum; if you wish to zoom and scroll while lecturing, it would be better to have support for higher resolutions (the Khan Academy website recommends 6400×6400 pixels).
#2. A Screen Recorder to Capture Tutorial Content
For the screen recording app, MiniTool Video Converter can be the most appropriate one as it can meet almost all of the user’s recording needs. This all-around screen recording tool also provides users with a ton of necessary features.
It allows its users to record any region on the PC screen with/without audio. Besides, MiniTool Video Converter lets them capture tutorial content in MP4, MKV, WMV, FLV, AVI, MOV, and TS formats as well as choose the desired recording frame rate (15fps, 20fps, 25fps, and 30fps).
In addition to its screen recording function, the software has the ability to convert video to audio, video to video, or audio to audio. For instance, you can make use of it to convert MP4 to MP3, MOV to MP4, MKV to MP4, OGG to MP3, and so on.
Whether you want to capture screen activity or convert video and audio files, MiniTool Video Converter has you covered. Try it out now for free!
MiniTool Video ConverterClick to Download100%Clean & Safe
#3. A Video Editor to Enhance Your Khan Academy Videos
When you are finished recording your Khan Academy videos, the next step is the post-production process. You need a user-friendly and powerful download free video editor to help you merge video clips, use zoom-in or zoom-out motions, cut off unwanted parts, add transitions to video clips, synchronize voice-overs and videos, and more.
For instructors with little or no video editing skills, professional and paid software like Final Cut Pro or Premiere Pro may seem overkill. MiniTool MovieMaker comes highly recommended for making Khan Academy style videos, as it is not only free of charge with a clear user interface but also comes with a rich set of features and advanced editing tools.
MiniTool MovieMakerClick to Download100%Clean & Safe
To learn how to make Khan Academy type videos, it is essential to get to know the following functions of MiniTool MovieMaker:
- Split or trim video. Crop and combine video footage easily.
- Switch naturally from one video clip to another.
- Provides dozens of pan & zoom effects.
- Liven up your videos with eye-catching texts and animated elements.
- Use a filter to decorate the video – for example, to make it black and white.
- Fade in or out the audio in a video.
- Import video, audio, and image files in a variety of formats (e.g. MP4, AVI, MOV, FLV, PNG, JPG, GIF, MP3, WAV, and FLAC).
- Popular aspect ratios are available, including 16:9 (Widescreen), 9:16 (Portrait), 4:3 (Standard), and 1:1 (Instagram).
- Slow down the video from 0.01 X to 0.5 X, speed up the video from 2 X to 50 X, or make the video play in reverse.
- Flip the video vertically/horizontally or rotate it from 0° to 360°.
- Modify the video’s quality, resolution, bitrate, frame rate, etc.
- Export videos up to 1080P with no watermark at all, even on a low-end computer.
Part 2. How to Make Khan Academy Videos for Free and Easily?
Once you are familiar with the free screen recording application (MiniTool Video Converter) and free video editing software (MiniTool MovieMaker) introduced above, you can now start creating Khan Academy videos by following the specific steps in this part.
Steps to Record Khan Academy Videos
The following describes how to capture screen activities (related to drawing and writing Khan Academy tutorial content) by using MiniTool Video Converter:
Step 1: Click on the download button below to get MiniTool Video Converter and install it on your PC.
MiniTool Video ConverterClick to Download100%Clean & Safe
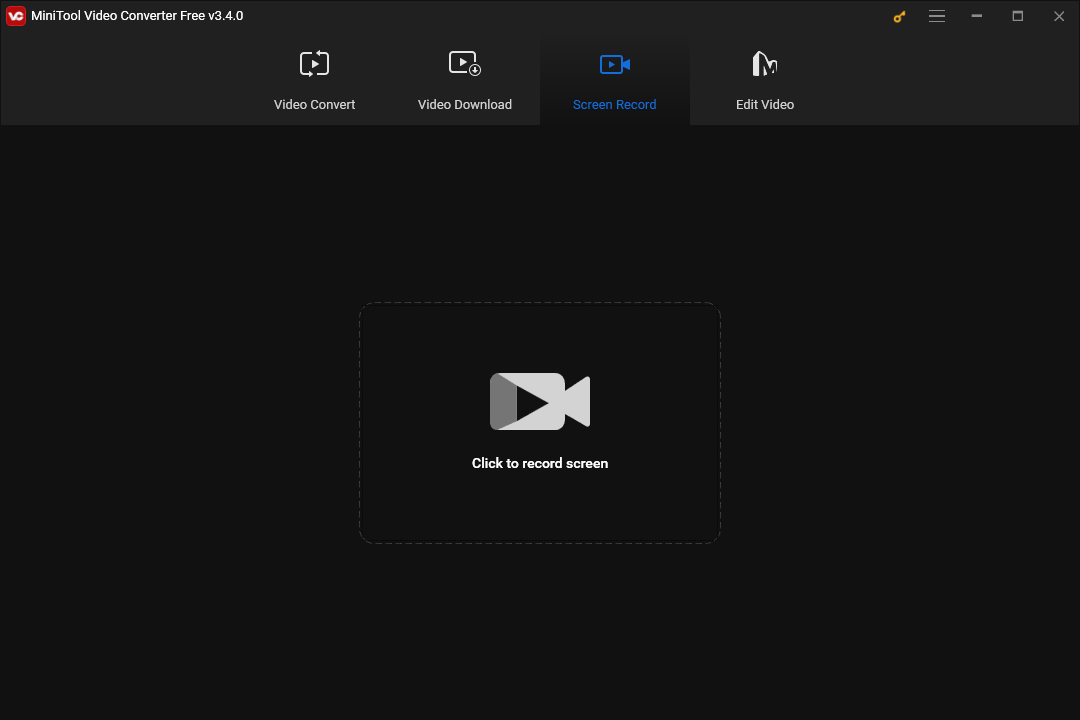
Step 2: Launch MiniTool Video Converter. Go to the Screen Record tab and hit the Click to record screen dotted box area to enter the MiniTool Screen Recorder window.
Step 3: It is recommended that you leave the default Full screen option for a better experience.
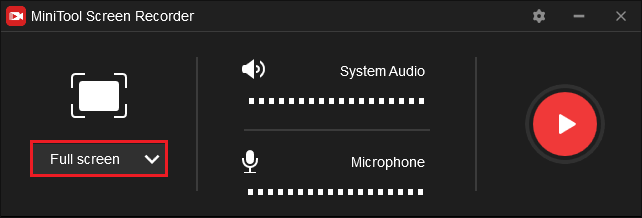
Step 4: In some cases, you’ll need to record the system audio when you record a video. Simply click on the Speaker icon (if it’s muted) to enable it; otherwise, no action is required. The same goes for whether the microphone audio is enabled or not.
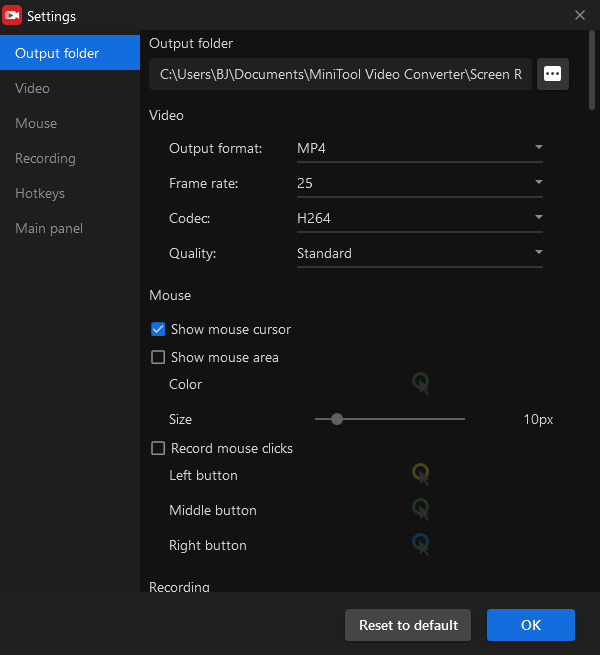
Step 5: Click the Settings icon in the top right corner (it looks like a gear with six teeth.). From the pop-up window, you can choose an output folder to save your recorded Khan Academy videos, as well as change the output format, frame rate, and quality of the videos.
From there, you can also do mouse settings, such as showing or not showing the mouse cursor/area by checking or unchecking the small box next to it. Customize other settings as needed, then click OK to save changes.
Step 6: Click on the red Record button or press the F6 hotkey to start recording your Khan Academy tutorial videos. Press the F9 hotkey to pause or resume the recordings if necessary. Finally, press the F6 hotkey to stop recordings.
After completing all recordings, you will see a list of the recorded videos here. Continue reading to refine them.
Steps to Edit Khan Academy Videos
In the following, you will learn how to create Khan Academy style videos and make them even better by using MiniTool MovieMaker:
Step 1: Click on the download button provided below to get MiniTool MovieMaker and install it on your computer.
MiniTool MovieMakerClick to Download100%Clean & Safe
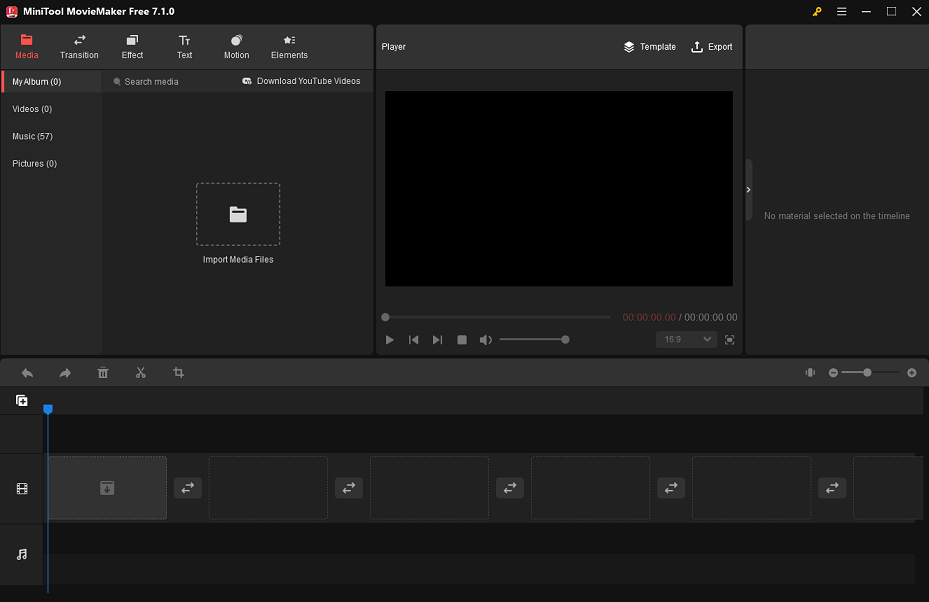
Step 2: Launch MiniTool MovieMaker. Close the pop-up Register and Promotion windows to enter its main interface.
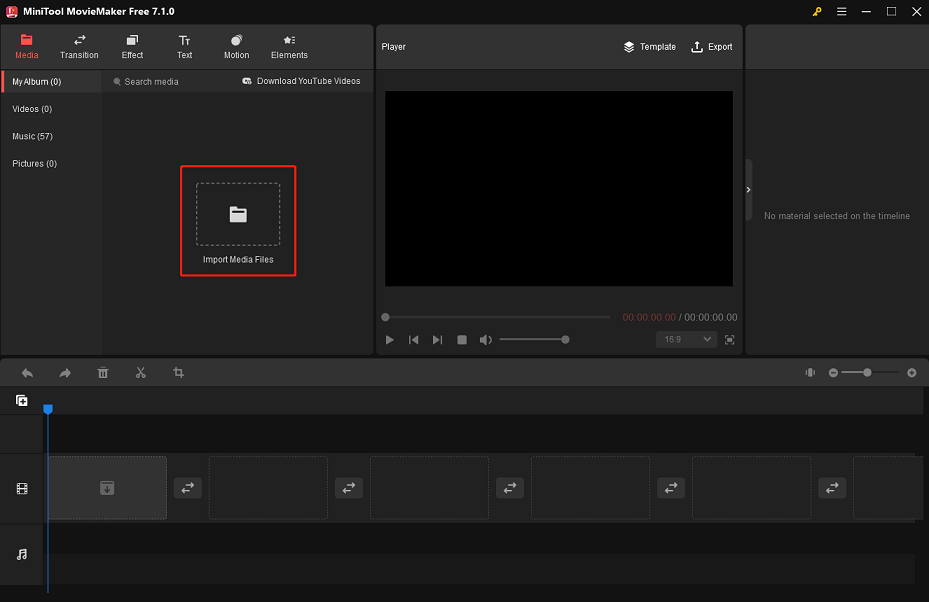
Step 3: Click on the Import Media Files dotted box area to import your recorded Khan Academy video footage into the software. Drag and drop the imported video footage into the below timeline.
Step 4: Perform the following editing tasks to make your Khan Academy videos even better:
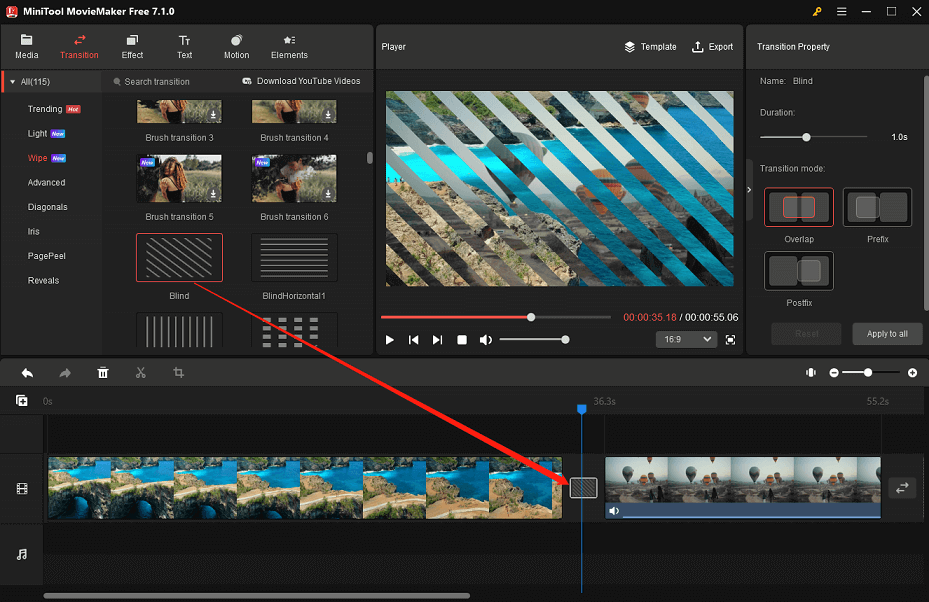
Add a transition between two video clips. Go to the Transition tab, keep the All drop-down list expanded, and select the sub-tab you want to access, such as “Wipe”. Click the Download icon in the lower right corner of the desired transition to get it, then drag and drop it between the two target video clips.
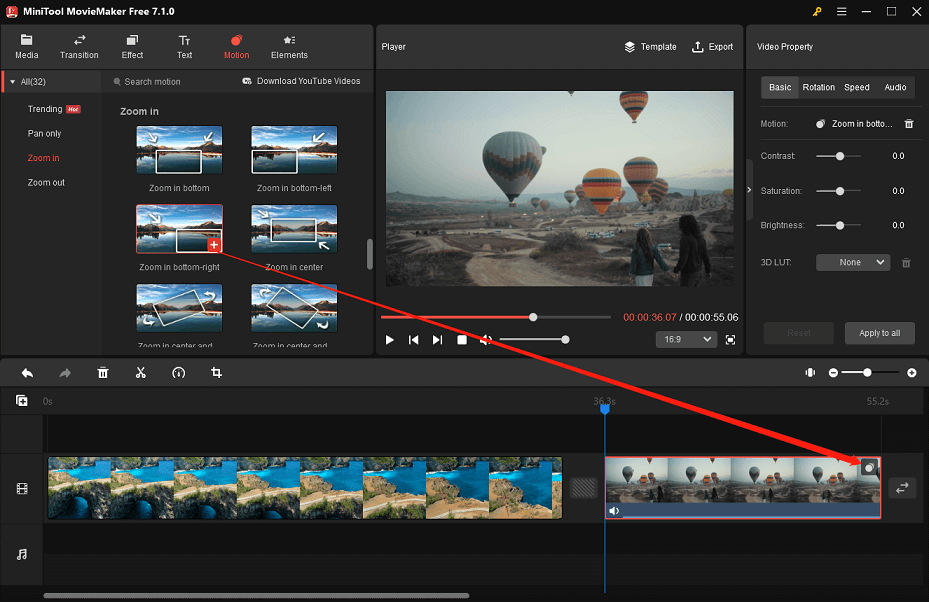
Apply a zoom-in or zoom-out motion. Switch to the Motion tab, keep the All pull-down list expanded, and select the Zoom in or Zoom out sub-tab. Make the target video clip highlighted in the timeline, choose a suitable zoom-in or zoom-out motion effect, and click on the + icon to apply it.
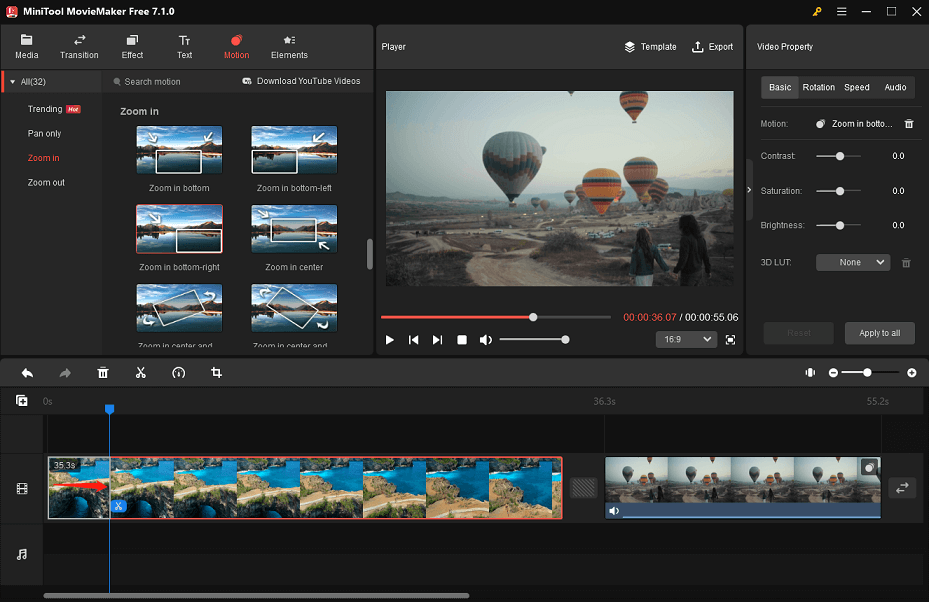
Trim a video clip. Hover your mouse cursor over the start of the target video clip in the timeline. As soon as it turns into a double-headed arrow, move it rightwards to the beginning of the wanted video clip. Similarly, trim the unwanted ending portion of the target video clip.
Step 5: Click the Play icon in the lower-left corner of the Player section or press the Space hotkey to preview the edits you’ve made.
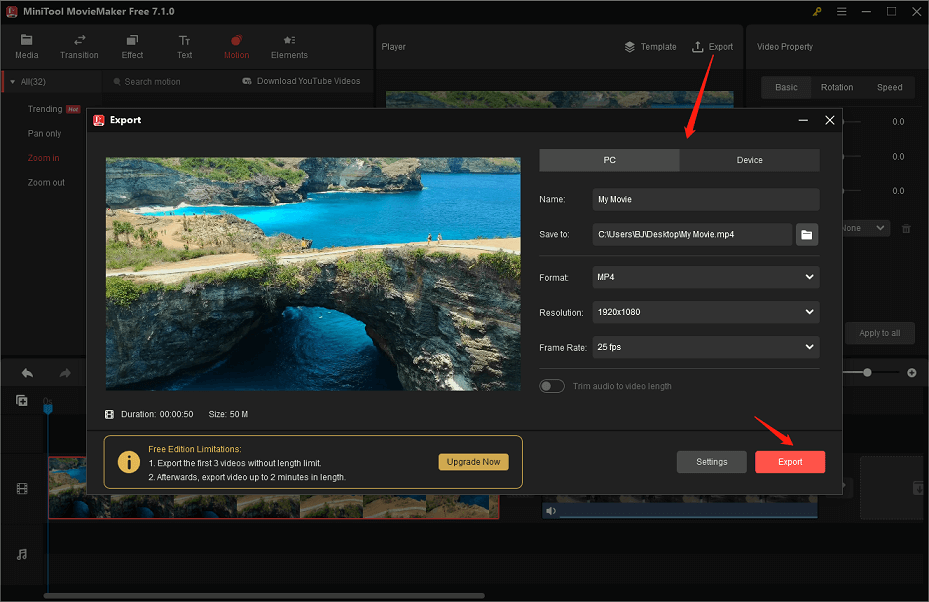
Step 6: When you are happy with your edits, click the Export option to adjust some output settings, such as choosing the target folder and changing the video format, resolution, and frame rate. At last, click the Export button at the bottom to save your final Khan Academy video.
Closing Words
We hope this article has given you a decent grasp of how to make Khan Academy videos for free and with ease. When you’re prepared to create your own Khan Academy tutorial videos, just give MiniTool Video Converter or MovieMaker a shot!
If you have any questions while using MiniTool products, you can contact us at [email protected] for help.



User Comments :