This comprehensive guide will help you learn how to make a vertical video horizontal. Discover the best video editing software to reformat your vertical video to enhance your content and attract more viewers.
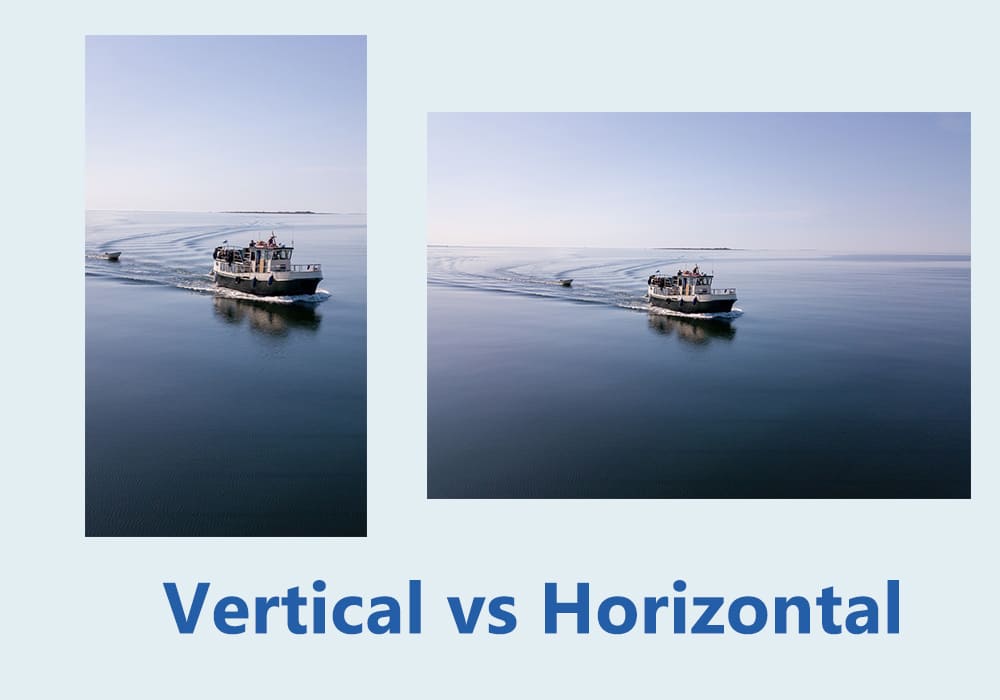
Vertical Video vs Horizontal Video
Before learning how to make a vertical video horizontal, let’s first understand the different video formats.
Vertical videos are in the portrait orientation, meaning the video’s height is greater than its width. 9:16 is its standard aspect ratio (1080×1920 or 720×1280 resolution), and is commonly used in mobile-focused platforms, including TikTok, Instagram Reels/Stories, Snapchat, and YouTube Shorts. In addition, videos with an aspect ratio of 2:3 (older vertical videos) are also in a portrait layout.
On the contrary, horizontal videos are in the landscape orientation, meaning their width is greater than their height. The most common aspect ratios for this traditional form include 16:9, 4:3, and 21:9. This kind of video is good for viewing on TVs, monitors, and laptops.
- 16:9 is the standard aspect ratio of landscape videos and is commonly used on most TVs, YouTube, and streaming platforms.
- 4:3 is used for older TVs and some classic (35mm) films.
- 21:9 is also known as Ultra-widescreen, wider than the standard 16:9 format, and used in cinemas.
In a word, vertical videos are optimized for mobile viewing when users naturally keep their phones upright. Horizontal videos are perfect for desktop viewing, traditional YouTube videos, and movies and TV shows.
Why Convert a Vertical Video to Horizontal
Vertical and horizontal videos dominate today’s digital world. So, why do you need to convert a vertical video to a horizontal one? The answer is obvious: repurpose content for different platforms. When you want to share mobile-first content on a desktop or laptop, turning it into a horizontal format provides a better viewing experience. Besides, landscape videos look better on widescreen displays when you want to create professional-looking content, such as short movies, video tutorials, documentaries, and vlogs.
How can you achieve this? This guide will walk you through the best methods to convert a vertical video to a horizontal one.
![How to Convert Slow Motion Video to Normal Speed [Ultimate Guide]](https://images.minitool.com/moviemaker.minitool.com/images/uploads/2026/04/convert-slow-motion-video-to-normal-speed-thumbnail.jpg)
How to Make a Vertical Video Horizontal: 4 Ways
Now, let’s explore the best ways to adjust your vertical video to fit a horizontal layout.
#Way 1: Crop the Video and Adjust the Aspect Ratio
If the video was recorded in vertical orientation, the easiest way is to crop it to horizontal orientation. This method works for any vertical video and will give the video a clean horizontal look, but it can cause to lose some video detail.
In this section, I’ll show you how to make a vertical video horizontal using MiniTool MovieMaker, an easy-to-use and feature-rich video editor without watermark.
MiniTool MovieMaker has an intuitive and straightforward interface, making it easy to use and navigate. The software includes various tools and effects to make video from images, such as trimming, cropping, filters, transitions, and text.
Follow the steps below to convert a vertical video to horizontal.
Step 1. Click the button below to download the portrait to landscape video converter and install it on your PC.
MiniTool MovieMakerClick to Download100%Clean & Safe
Step 2. Launch the software and click the New Project button to access the main UI. Under the Media tab, click the Import Media Files area to open the File Explorer, locate your vertical video, and open it in the application.
Step 3. Drag and drop the video to the timeline to begin editing.
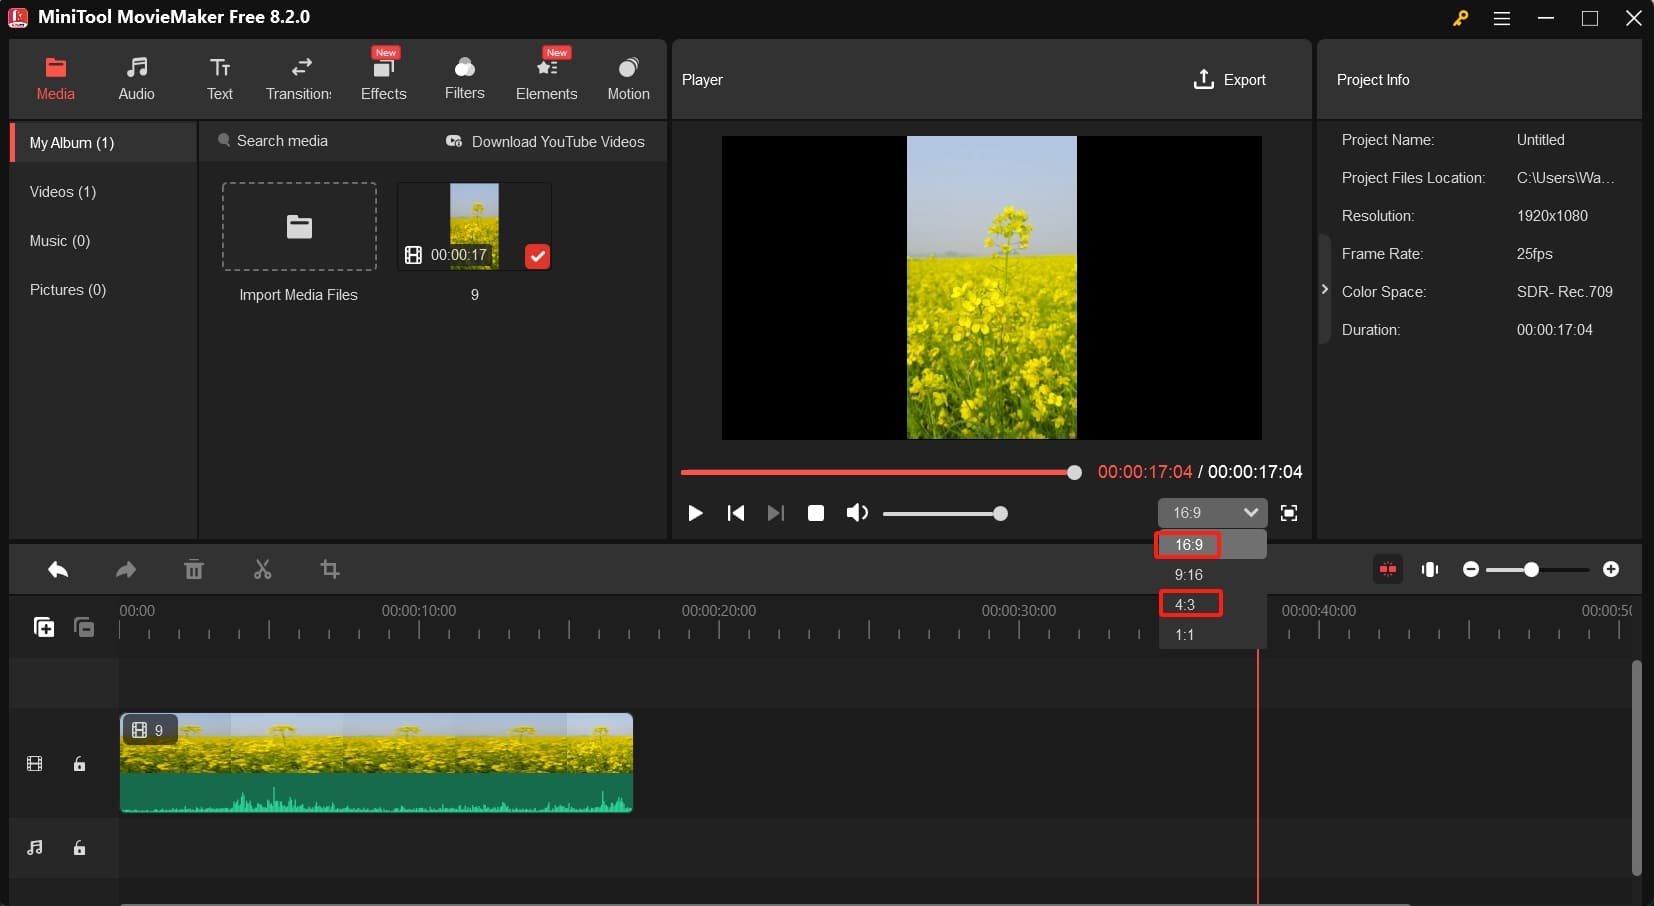
Step 4. To convert a vertical video to horizontal, first set the project’s aspect ratio to 16:9 or 4:3, then crop the video to the ratio of your choice.
16:9 is the default aspect ratio in MiniTool MovieMaker. If you need to change it, open the Ratio drop-down list and select 4:3.
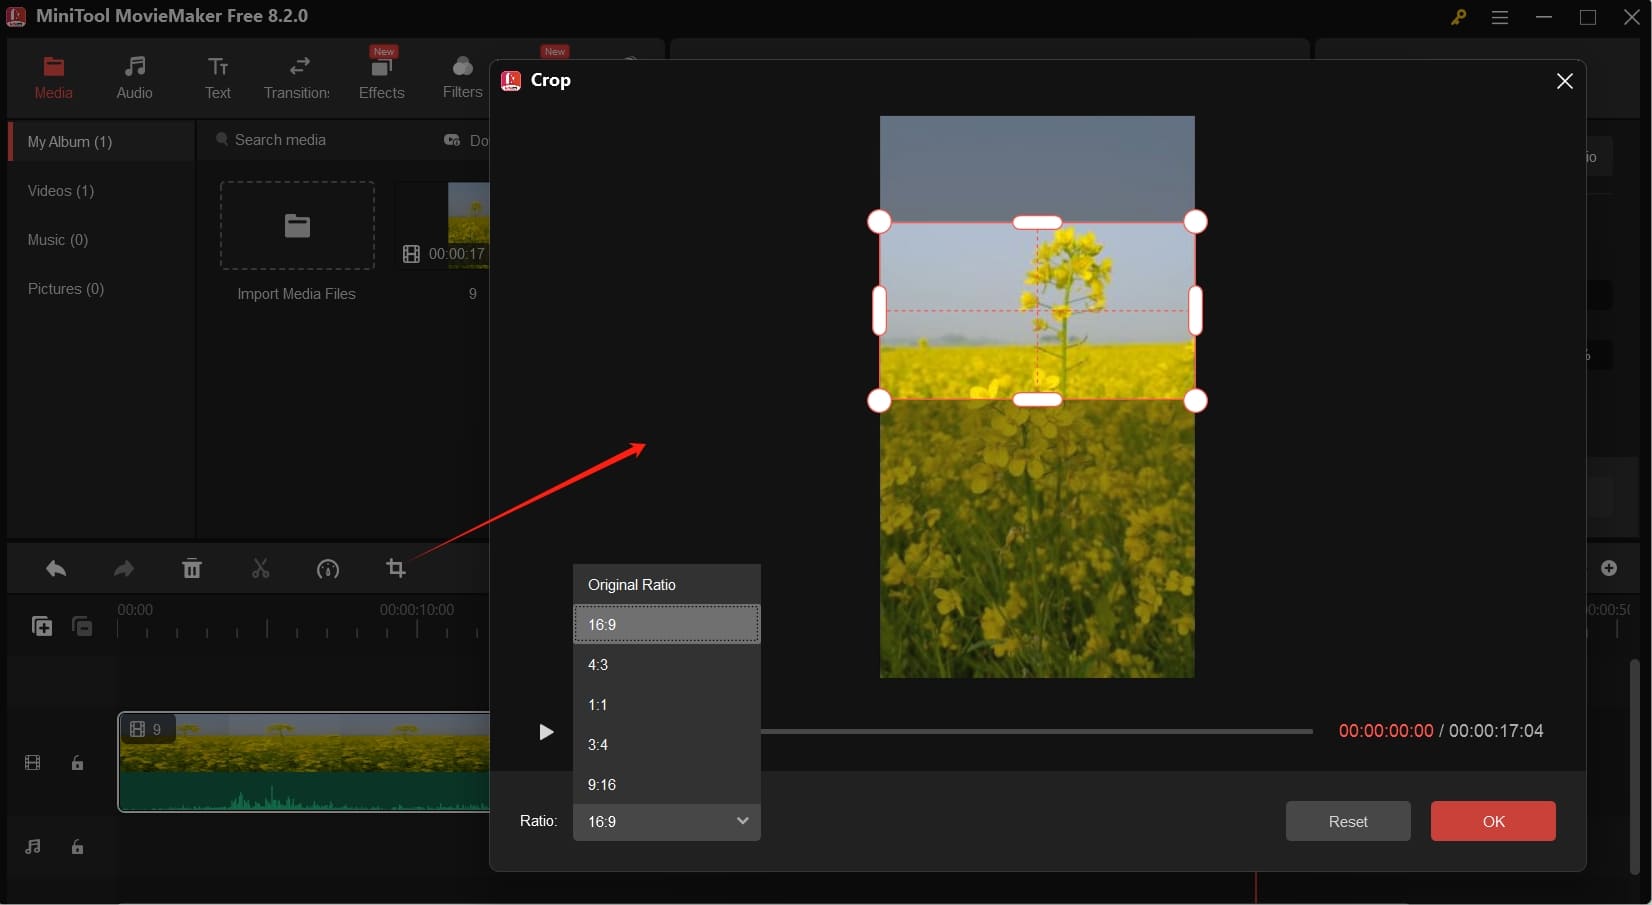
Select the video on the timeline and click the Crop icon on the timeline toolbar. On the Crop window, click the Original Ratio button and choose 16:9 or 4:3. Then, move the red rectangle on the video preview to select the area you want to save, and click OK to save changes. Then, the video will be in the landscape layout.
Step 5. Continue editing the video:
- Add a filter: Go to Filters at the top, select the desired one, and click the + icon to apply. Then, drag the edge of the filter layer on the timeline to adjust the duration.
- Add captions: Go to Text > Caption, click the + icon on the target text template to add it, then go to Text Editor to enter and edit your text.
- Edit audio in the video: Go to the Audio tab in the Video Property, where you can apply fade-in/out effects and lower the volume.
- …

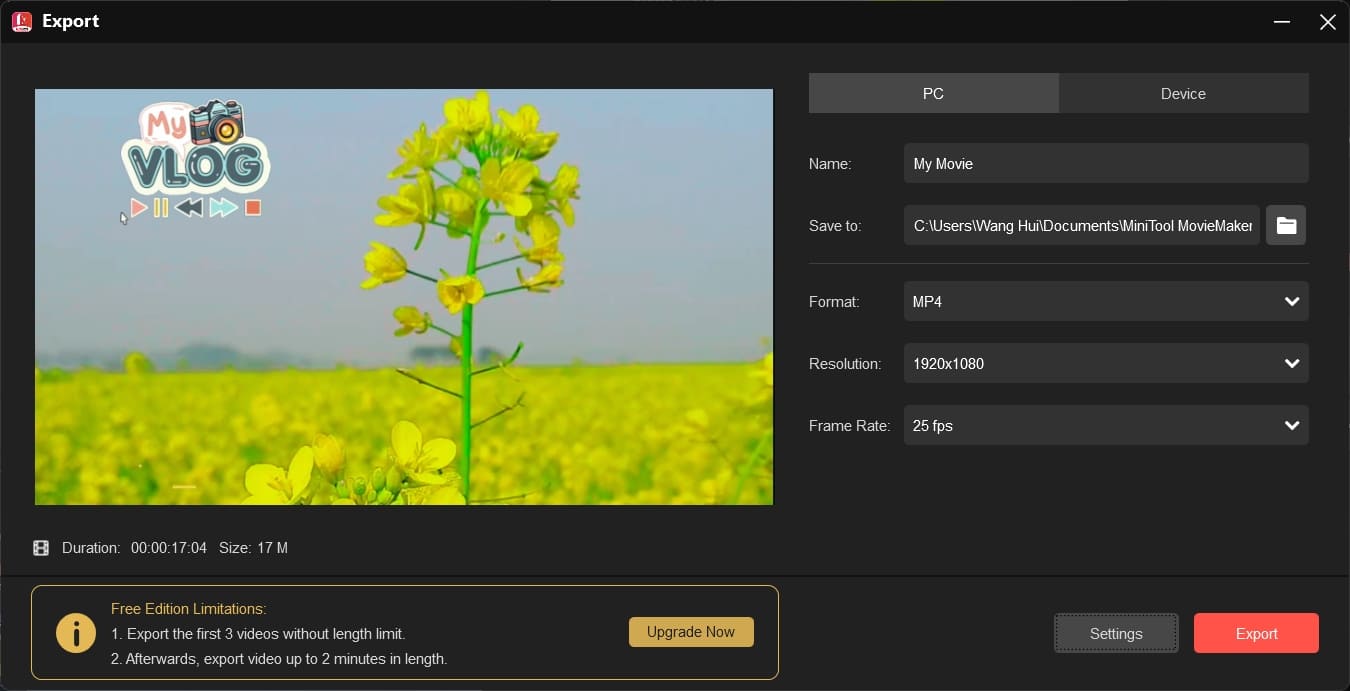
Step 6. If you’re happy with the result, click the Export button in the upper right corner. Next, you can select the destination folder to save the video, set the video format, change the resolution, frame rate, etc. Finally, click the Export button to start rendering the video.
Way 2: Add Background Fill
The second way to expand your video into a horizontal frame is to add a background without losing detail.
Option 1: Add an Image Background
You can put the portrait video in a landscape canvas and add an image as the background to hide the black areas. To do this, you can also use MiniTool MovieMaker, an excellent video editor with a multi-track timeline.
Follow the steps to convert video from portrait to landscape by adding a background in MiniTool MovieMaker.
MiniTool MovieMakerClick to Download100%Clean & Safe
Step 1. Open the software and import your portrait video and image by clicking the Import Media Files button.
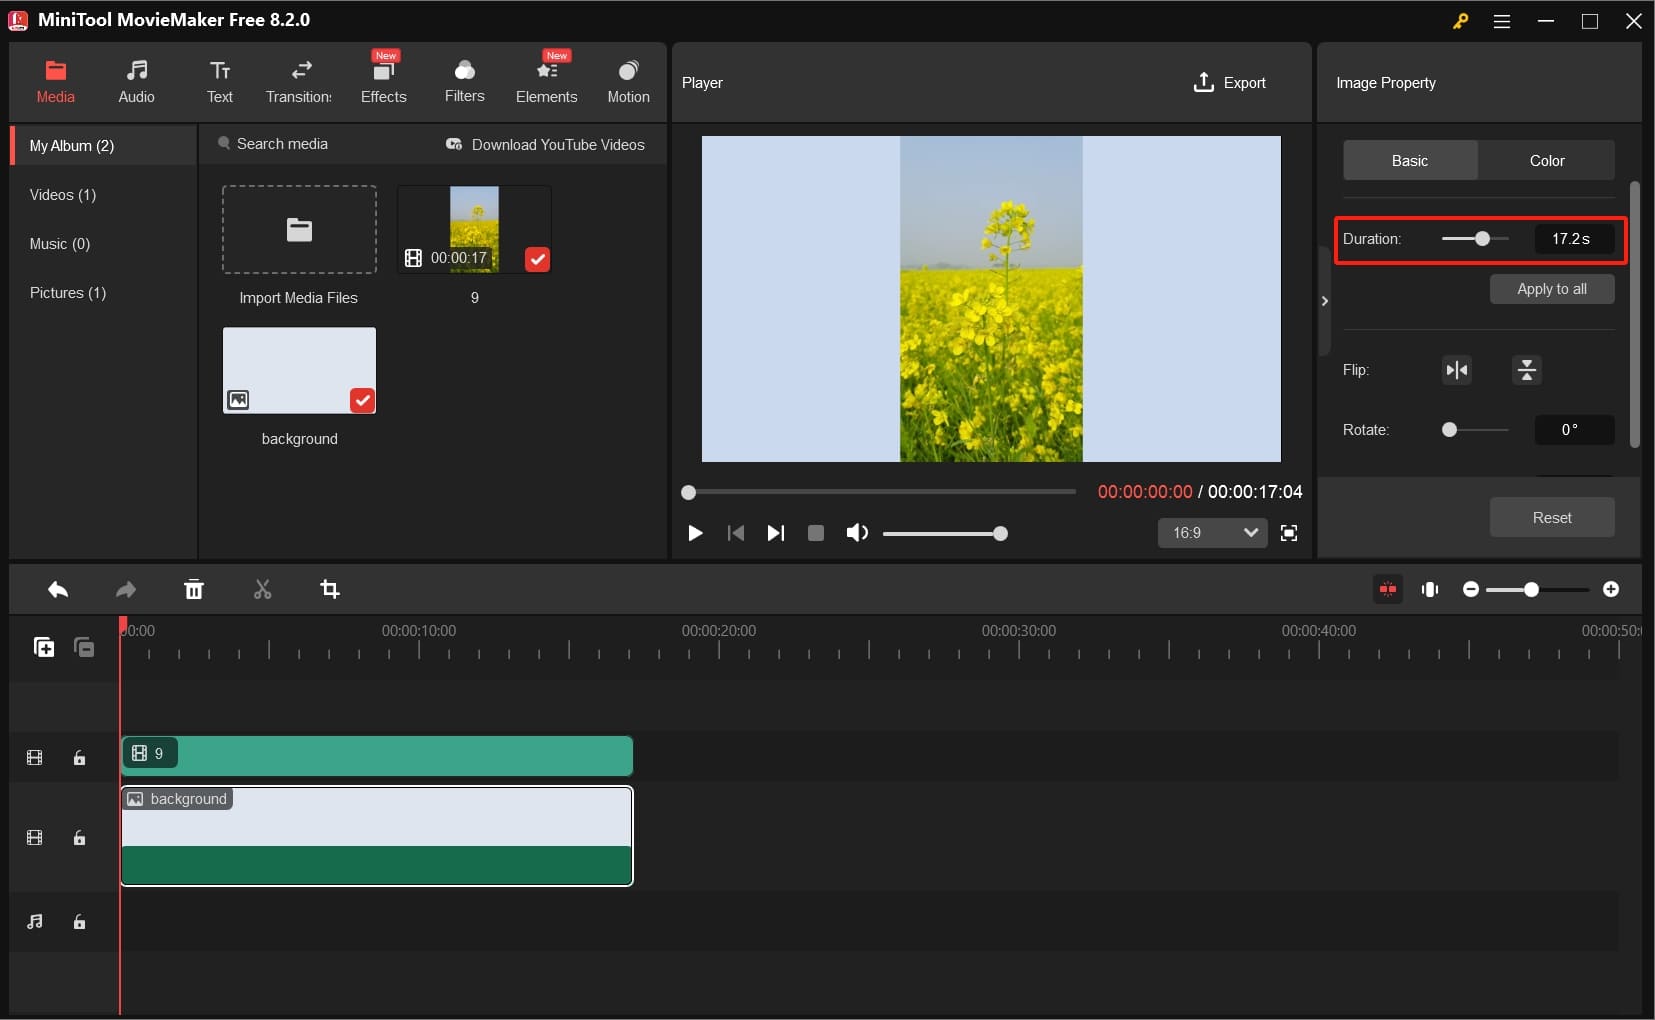
Step 2. First, click the + icon on the image to add it to the main video track as a background, then drag the video onto the track above the image. Don’t forget to set the video aspect ratio as 16:9 or 4:3.
Step 3. Click the image on the timeline and drag the Duration slider to adjust its duration. You can directly type the number of the video length to quickly set the image duration (up to 30 seconds). If your video is longer than 30 seconds, copy and paste it to the timeline to adjust the duration.
Also, you can go to the Color tab to adjust Contrast, Brightness, and Saturation to give your image background a different look.
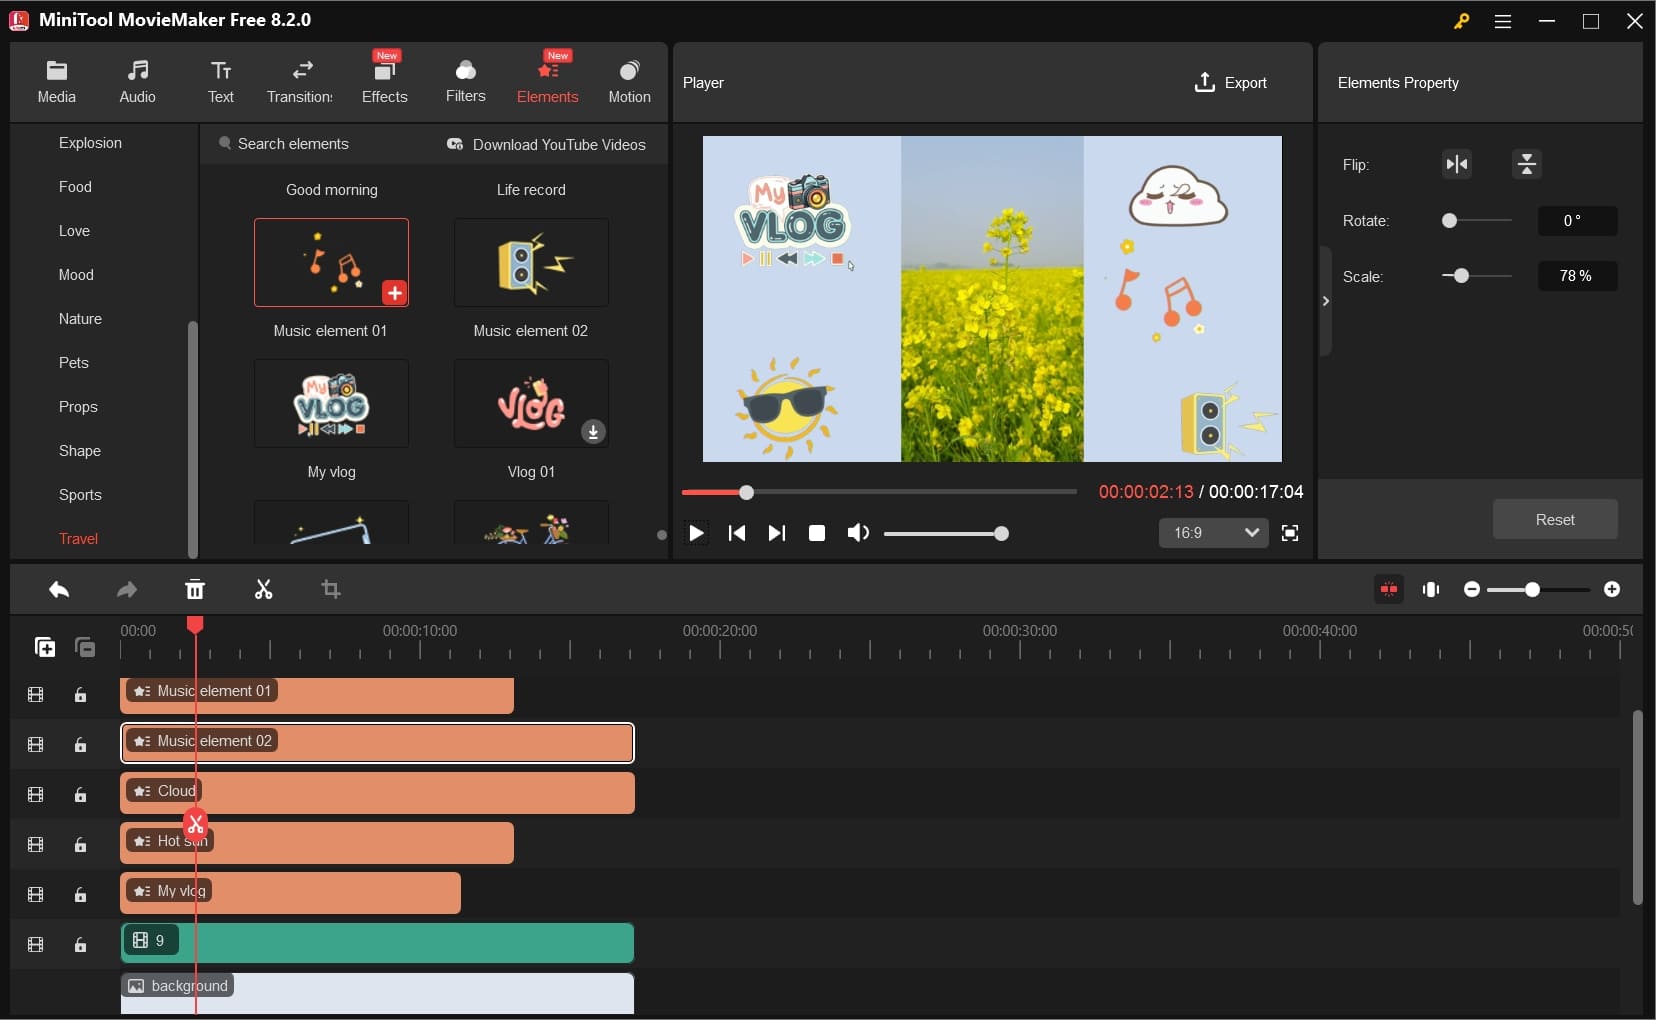
Step 4. Next, you can decorate the empty space with animated stickers to make the video look less boring. MiniTool MovieMaker provides a huge library of animated stickers to add fun to your footage.
Go to Elements, browse the content library, download the stickers you like, and click the + icon on the target one to add it to the timeline. Then, you can go to the video player window to change its position, rotate, flip, and scale it, or adjust the duration on the timeline.
Step 5. Preview your video. If you’re satisfied with the result, click the Export button to save your video to your computer.
Option 2: Add a Color Background
You can also add a solid color or gradient background to make the vertical video horizontal. In this section, let’s take Canva as an example and show you how to convert portrait video to landscape using a color background.
Step 1. Navigate to the Canva website and log in with your account.
Step 2. Click the Video button at the top menu bar and select the Video (Landscape) option.
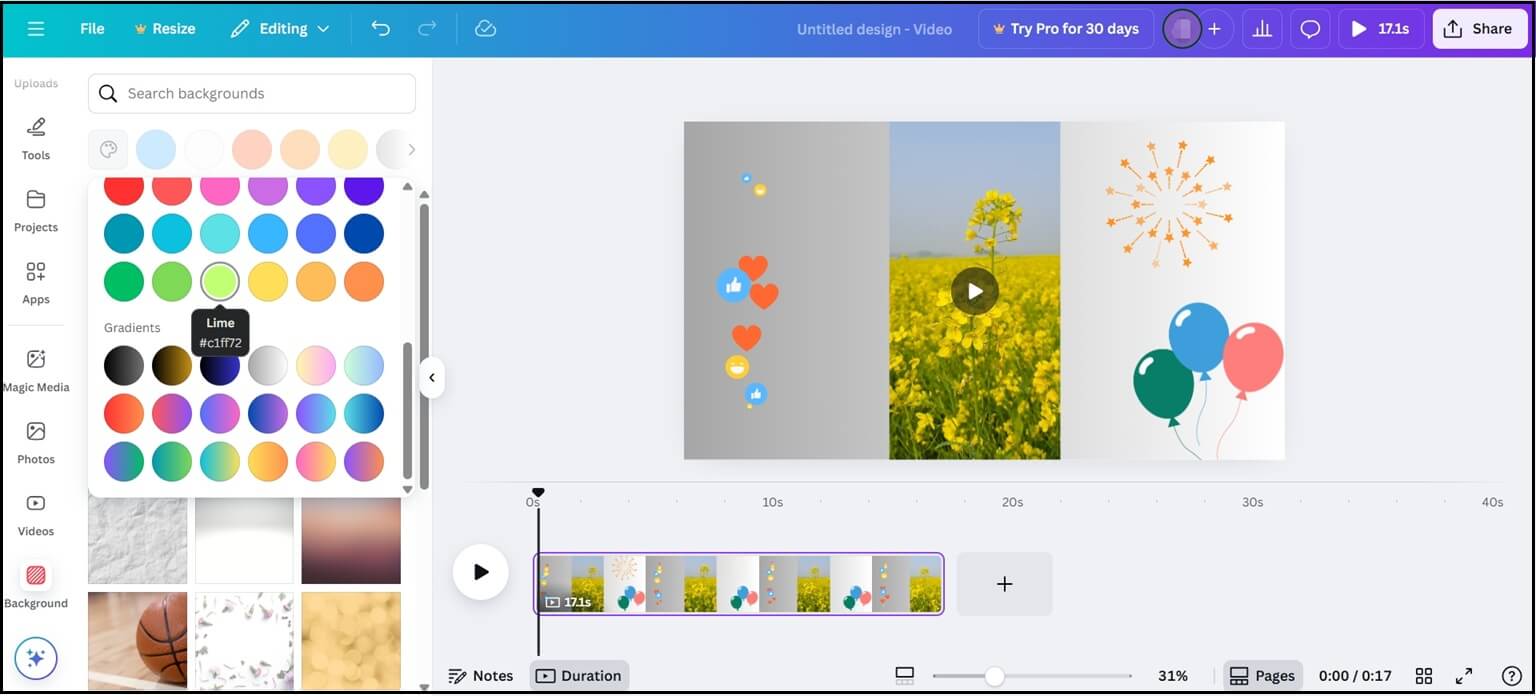
Step 3. Click Uploads > Upload files to open your portrait video and put the video in the 16:9 canvas. Scale and reposition the video to make it the center of the canvas.
Step 4. Click the Apps button on the left sidebar and select Background. Next, choose from the default color backgrounds (solid color or gradients) or add a new color.
Step 5. Go to Elements to find graphics, stickers, photos, and more to spice up the empty space.
Step 6. Click the Share button, select Download, and choose a resolution to export the video.
Way 3: Split-Screen or Side-by-Side Layout
Another way to convert portrait video to landscape is to duplicate the clip and create a side-by-side layout. You can also try MiniTool MovieMaker to achieve this effect.
MiniTool MovieMakerClick to Download100%Clean & Safe
Step 1. Launch the video editor and close the promotion window to enter the main interface. Click the Import Media Files button to import your video and add it to the timeline.
Step 2. Ensure the project aspect ratio is set to 16:9 or 4:3.
Step 3. Right-click the video on the main video track and select Copy, then paste the video three or two times, and layer them above the main video track.
Next, go to the video player window, and arrange the duplicated clips side by side. Sometimes, you need to scale the video slightly to fill the canvas without black bars.

Step 4. Export the landscape video to your PC.

Way 4: Auto Reframe the Vertical Video to Horizontal
Auto reframe is an advanced AI-powered tool that intelligently detects key elements in your video and adjusts the framing to fit multiple aspect ratios, perfect for optimizing content across different social media platforms. Likewise, it’s possible to auto-reframe your vertical video to horizontal.
Option 1: CapCut
CapCut is a simple yet powerful video editing application that provides various editing tools and effects to create high-quality videos and adapt them to different social media formats, such as transitions, filters, aspect ratio changes, cropping, curve speeding, blending modes, and more. In addition, this software has an auto-reframe feature for easy video resizing.
Here’s how to convert portrait video to landscape with CapCut desktop video editor’s Auto Reframe tool.
Step 1. Open the video editor after your installation and click the Create project button at the top to enter the main editing page.
Step 2. Click the Import button to open your portrait video.
Step 3. Add the video to the timeline and select it. Click the Ratio button and choose 16:9 or other landscape layouts.
Step 4. Under the Video’s Basic tab, go to Auto reframe, and check the option. Open the Aspect ratio drop-down list and select 16:9 or other options to turn the video into landscape, and the app will automatically start recognizing key elements or subjects in each frame and keep them centered and in focus as it adjusts the video’s dimensions. Click the Apply button to start resizing the video.

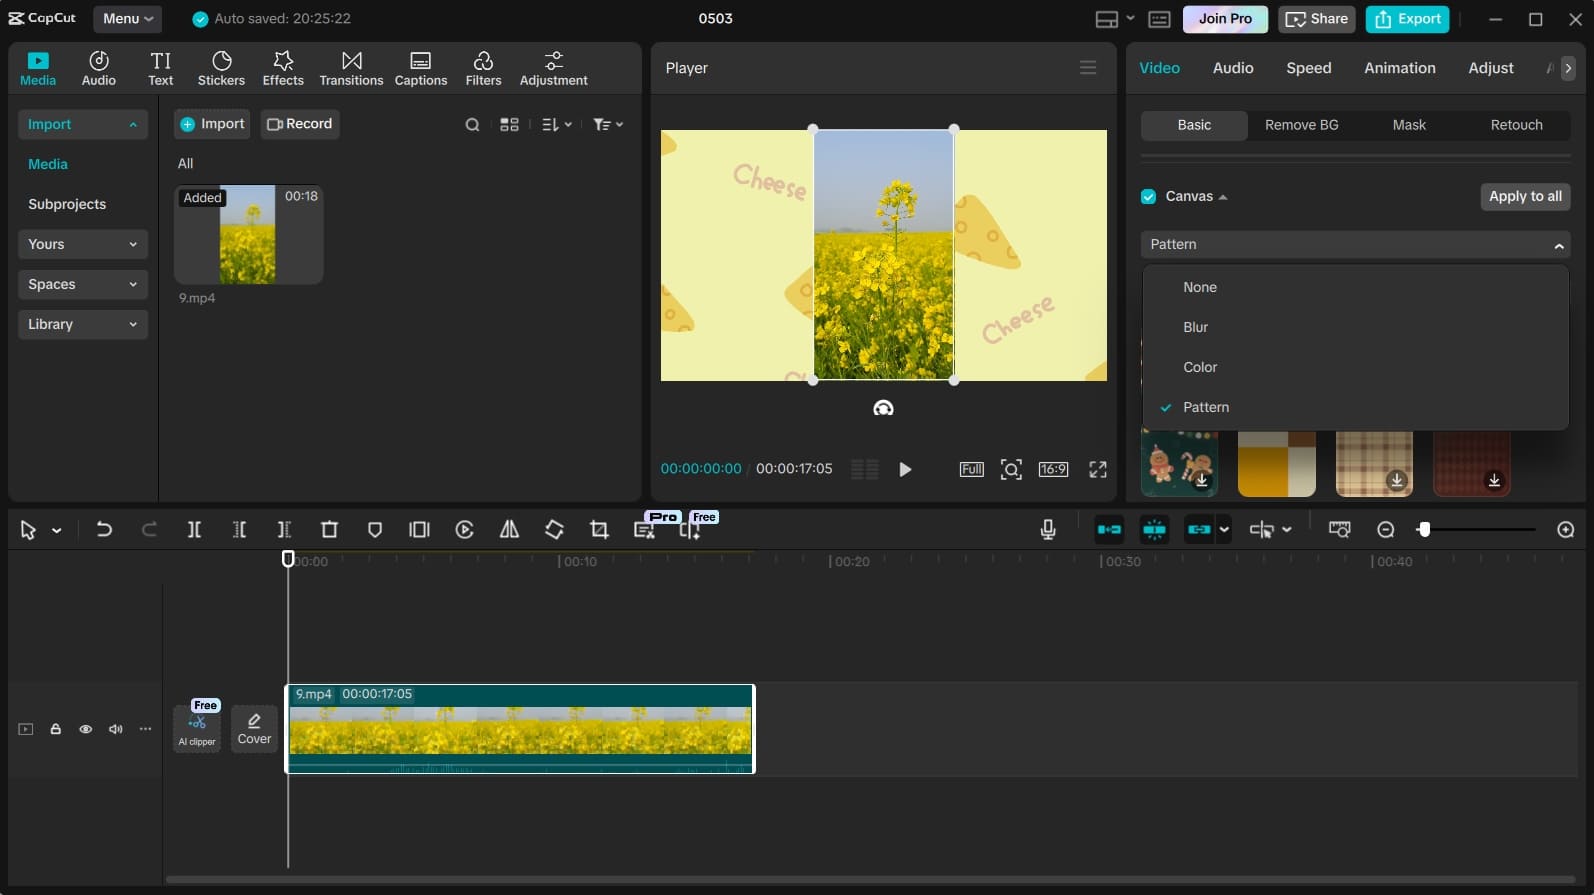
In addition to reframing the video, you can also add a color or blurred background to the 16:9 canvas to convert video from portrait to landscape.
Scroll down to the bottom of the Basic tab and check the Canvas option. Click the None button, select Blur and choose a blurred background, or click Color to choose a color background, or click Pattern and pick an image background.
Step 5. Click the Export button to export your video.
Option 2: Adobe Premiere Pro
Premiere Pro is a professional video editor with comprehensive and powerful editing functions, including the auto reframe feature. Here’s how to make a vertical video horizontal in Premiere Pro.
Step 1. Run Adobe Premiere Pro on your computer and start a new project.
Step 2. Import your vertical video and add it to the timeline.
Step 3. Right-click on the clip on the timeline, choose Scene Edit Detection from the list, and click the Analyze button. Then, Premiere Pro will go through the whole video and make cuts as scenes change.
Step 4. Click the sequence in the project window to select Auto Reframe Sequence. On the next window, expand the Target Aspect Ratio menu, choose Horizontal 16:9, and click the Create button. Then, Premiere Pro automatically analyzes for auto reframing. Wait until the process is finished.
Step 5. Preview the video. To export the video, go to File > Export > Media, customize the output settings, and click the Export button.
Conclusion
Converting a vertical video to horizontal is easier than you think. Whether you crop, add a background, create a side-by-side layout, or use AI-powered tools, there’s a solution for every need. Now you can reformat your vertical videos for YouTube, presentations, and more, and maximize your video’s reach on desktop/laptop users.
Finally, if you have problems while using MiniTool MovieMaker to create videos, please contact us via [email protected] for assistance.
About The Author

Position: Columnist
Cora is a tech writer specializing in digital media workflows, with over six years of hands-on experience in video post-production, media transcoding, and screen capture. Her writing is always clear and practical. Cora also produces in-depth software reviews for users across skill levels to help them find the right tool and enjoy video editing.
User Comments :