This post from MiniTool MovieMaker (a Windows video editor) will show you how to convert FLAC to MP4 with image effortlessly. Follow the steps to enjoy high-quality sound and visuals in one seamless format.
Why Convert FLAC to MP4 with an Image?
In today’s digital world, audio formats like FLAC (Free Lossless Audio Codec) are popular for their high-quality sound. However, sometimes you may need to convert a FLAC file to a more universal format like MP4, especially if you need to pair the audio with images for platforms like YouTube or social media, because these platforms don’t support audio-only files.
What’s more, MP4 provides better compatibility than FLAC, which is a lossless audio format, but not all devices and platforms support it. MP4, on the other hand, is universally compatible with smartphones, tablets, and media players.
How to Convert FLAC to MP4 with Image on Windows
In this part, we’ll walk you through the easiest yet effective method to convert FLAC to MP4 with image with an excellent photo to video maker – MiniTool MovieMaker.
Key Features of MiniTool MovieMaker
MiniTool MovieMaker is a user-friendly video editing application designed for both beginners and intermediate users who want to create high-quality videos without a steep learning curve. Whether you’re editing home videos, vlogs, tutorials, or social media clips, this tool provides a simple yet powerful solution to enhance your footage.
First, MiniTool MovieMaker has an intuitive and straightforward layout, making it easy for entry-level or first-time users to navigate and edit videos. With the drag-and-drop functionality, you can seamlessly import media files and arrange clips.
Second, the software provides essential editing tools such as trimming, splitting, merging, and cropping, allowing users to optimize videos accurately. In addition, it allows you to rotate video, adjust playback speed, flip clips, and reverse videos to enhance visual effects.
To make videos more engaging, MiniTool MovieMaker includes a variety of transitions, artistic filters, stickers, overlays, frames, captions, titles, and credits. It also offers built-in sound effects and music to make your video more expressive.
Finally, when exporting videos, MiniTool MovieMaker lets you choose from many video formats and offers multiple output settings, such as resolution (up to 4K), frame rate, quality, and bitrate.
Whether you’re a hobbyist or a budding content creator, MiniTool MovieMaker provides all the tools to easily produce stunning videos. Here’s how to convert FLAC to MP4 with image using MiniTool MovieMaker. By the way, this tool also supports FLAC to MP3 conversions.
Steps to Convert FLAC to MP4 with Image
Step 1. Launch MiniTool MovieMaker
Click the button below to download free video editor on your computer. Open the installation package and follow the prompts to install the software. After that, open the application and close the promotion window to access the main interface.
MiniTool MovieMakerClick to Download100%Clean & Safe
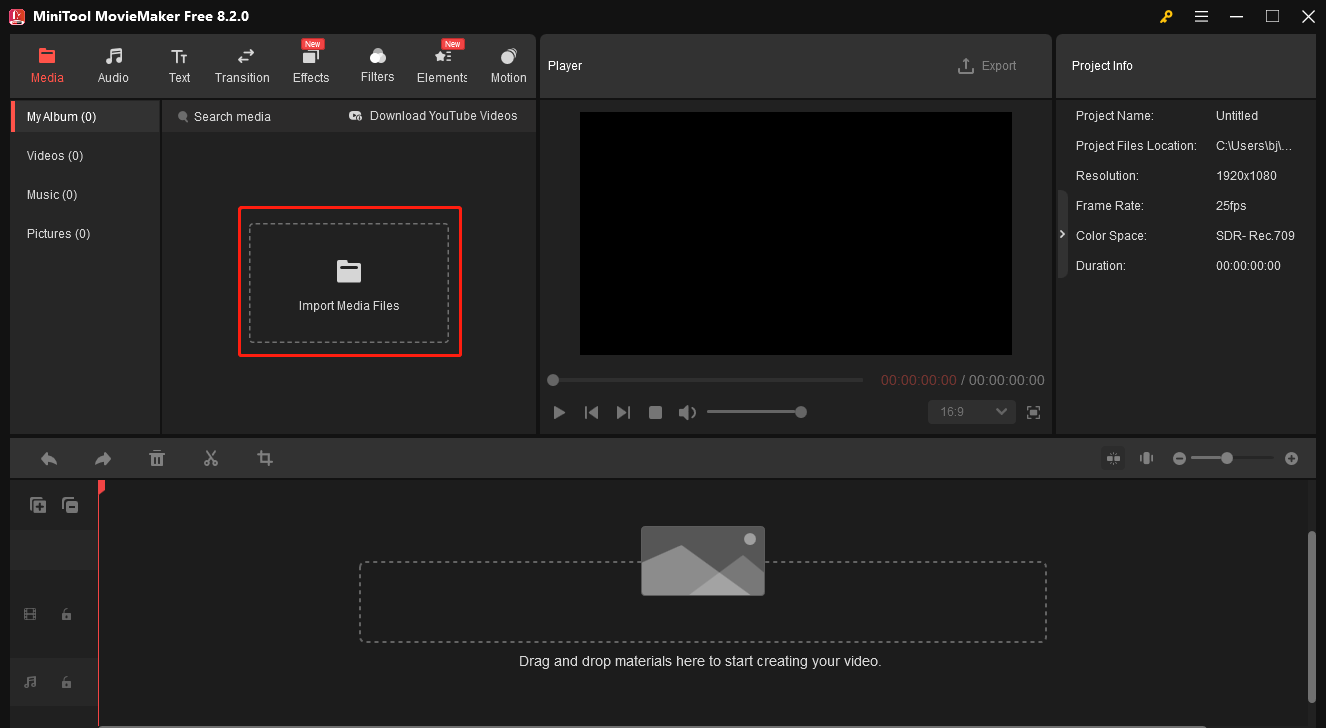
Step 2. Import Your FLAC File(s) and Image(s)
Under the Media tab, click the Import Media Files button to open the File Explorer, locate and select your target files, and click Open to open them in the program. Next, click the + icon on the media file or drag and drop it to the timeline.
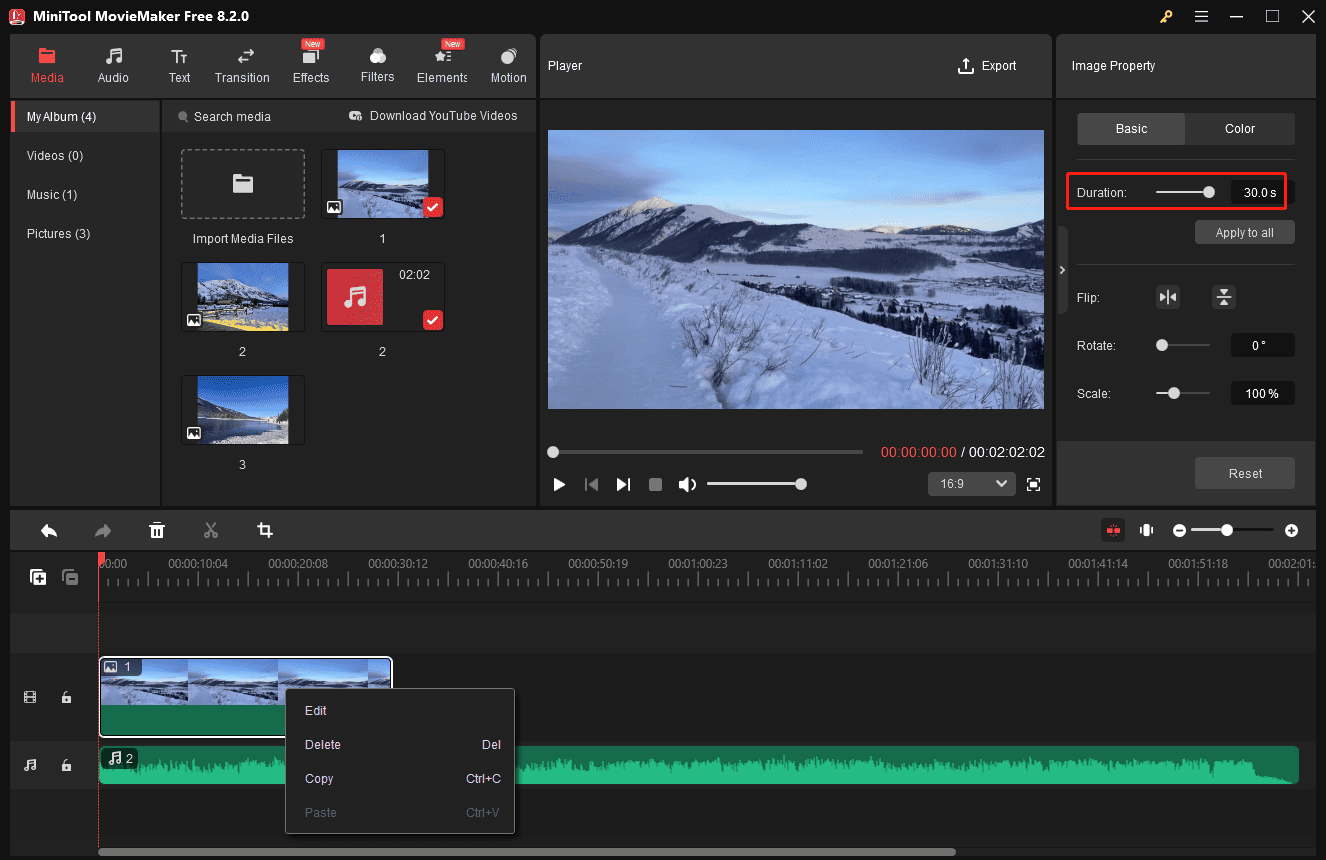
Step 3. Edit Your Image
If you only have one image, adjust its duration to match the length of the audio file. MiniTool MovieMaker lets you set the image duration up to 30 seconds. You can drag the right edge of the clip to the right or drag the Duration slider to make the image appear longer. Then, you can copy the image and paste it as many times as you need to extend the duration.
Also, you can import different images to the timeline, edit the duration, and make other edits.
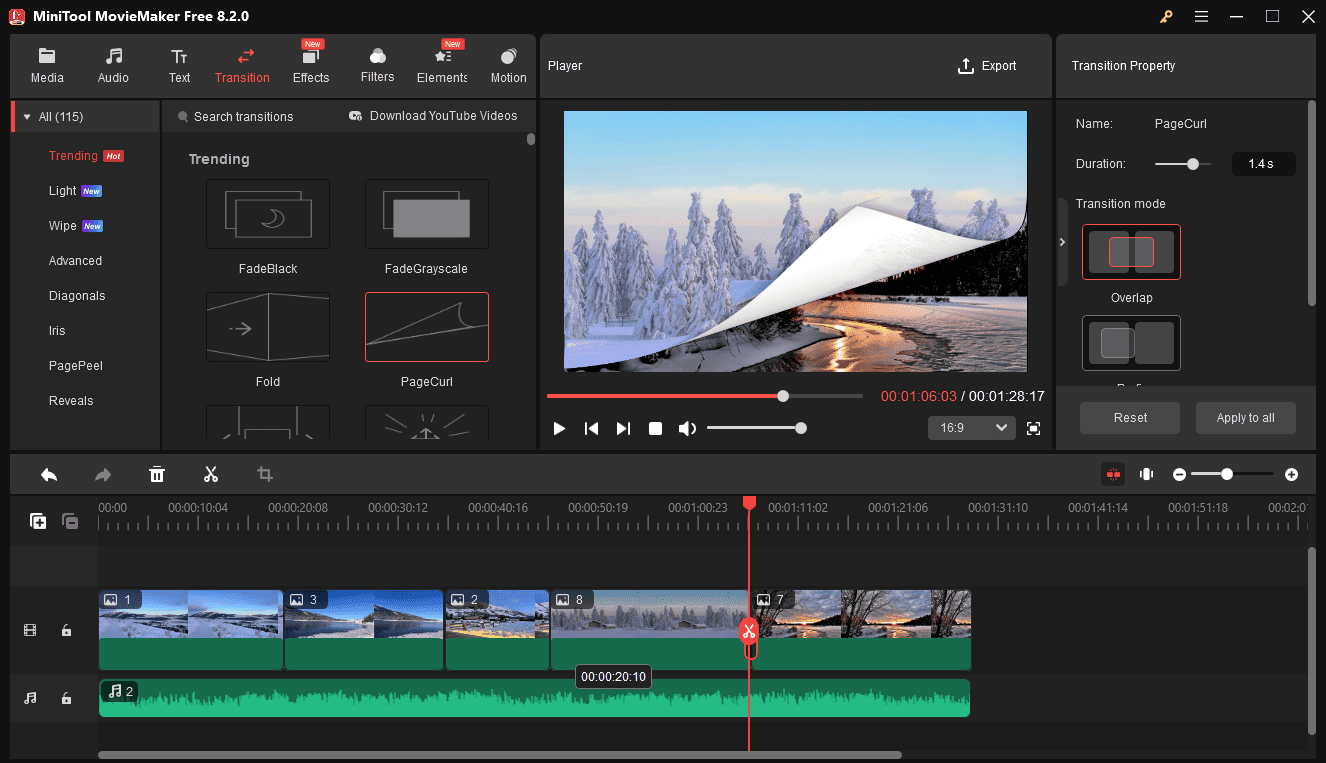
Add transitions: you can add transitions between images on the timeline to smoothly move from one scene to the next and add creative effects. Go to Transitions at the top menu bar, browse these options, and download the desired one. You can hover your mouse over the thumbnails to preview the effect. Then, drag the transition to the gap between any two images on the timeline. Next, edit the duration and mode of the transition on the right property panel.
Edit the image’s color: click the target image on the timeline, go to the Color tab on the Image Property, and move the Contrast, Saturation, and Brightness sliders.
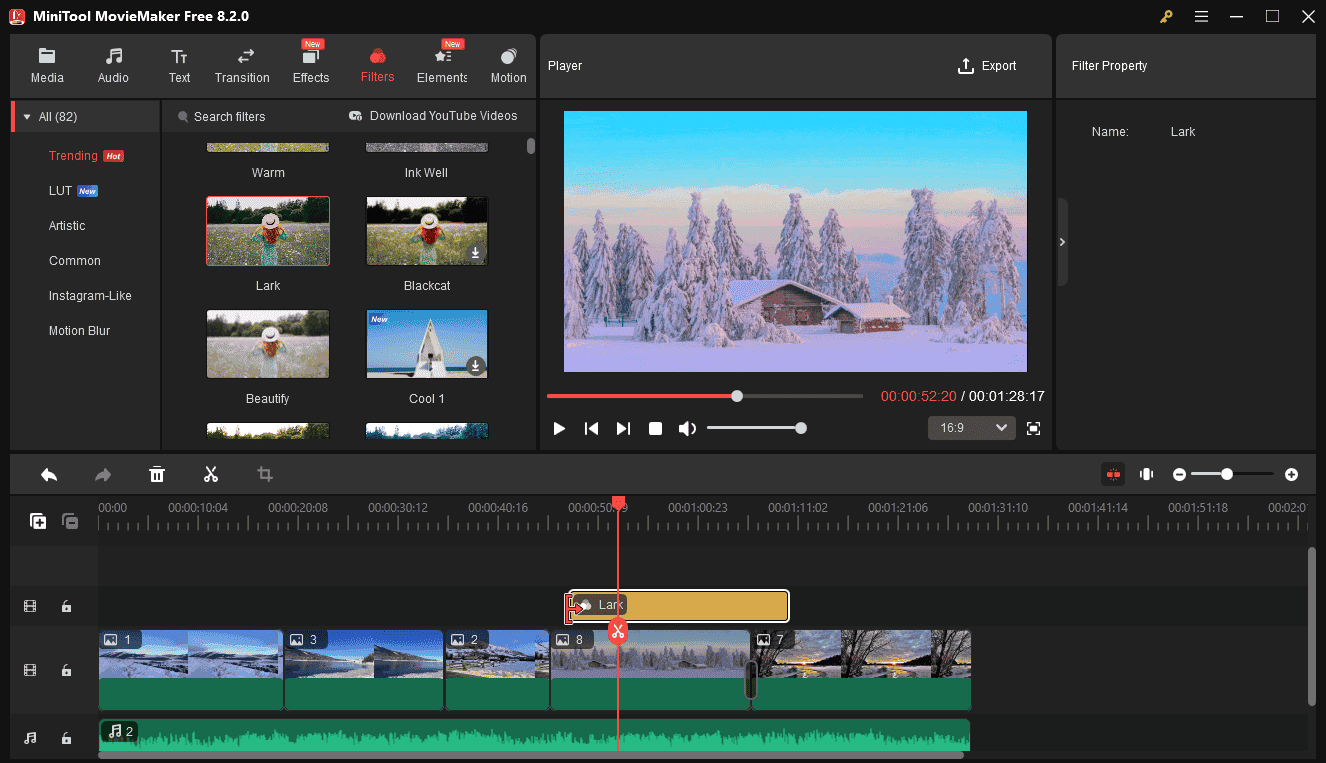
Apply filters: add a filter to adjust the color tone of your image. Go to Filters, download a filter, and click the + icon to add it to the timeline. Then, you can drag either edge of the filter on the timeline to adjust its duration.
Add text: MiniTool MovieMaker comes with multiple text templates to help you quickly add titles, captions, and credits to the video. Go to Text, choose the type of text template, download your favorite one, and add it to the timeline. Then, go to the Text Editor to enter and customize your text.
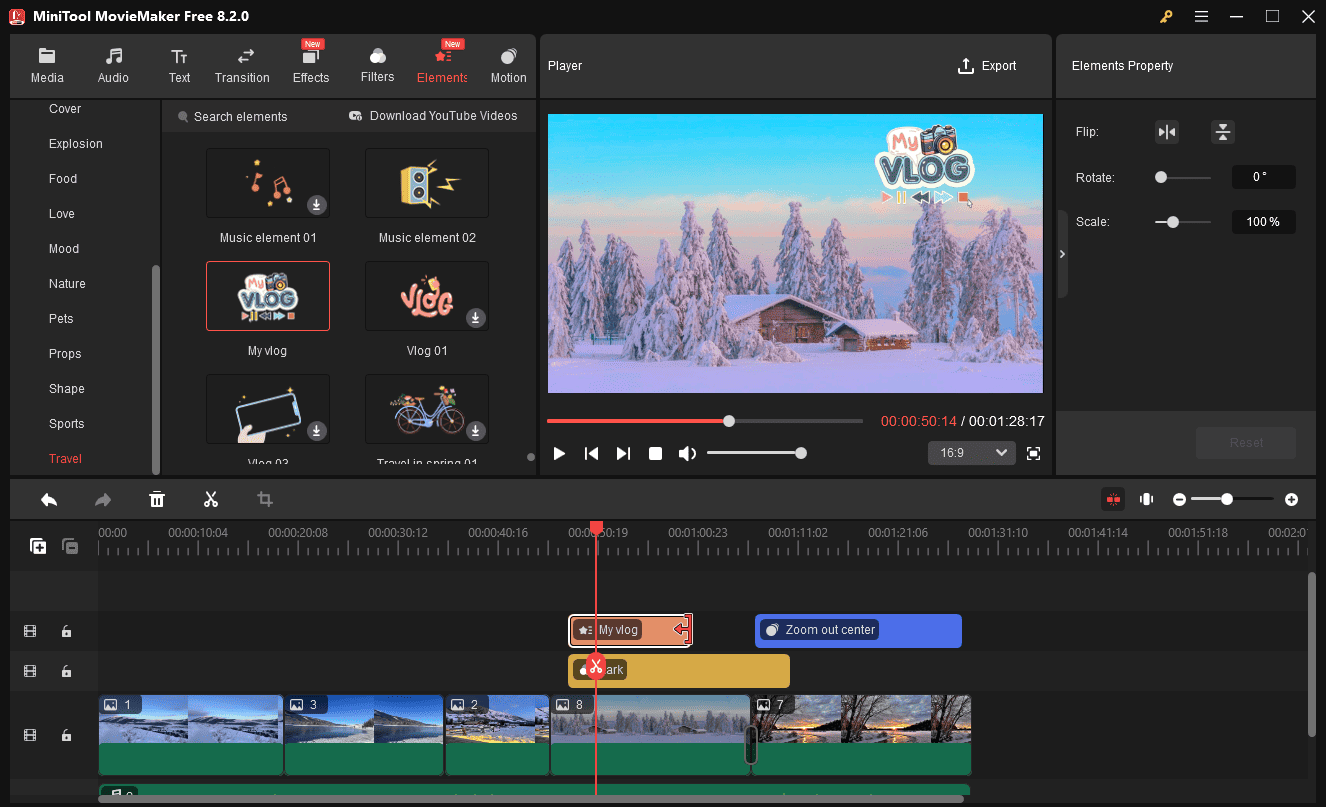
Add motion effects: add motion effects to make your still images dynamic. Go to Motion, select a panning, zooming in, or zooming out effect, and add it to your image.
Use elements to decorate your image: Go to Elements, scroll down the left sidebar to select a category, download the sticker you like, and click the + icon to apply it. Then, edit the element by rotating, flipping, scaling, and repositioning.
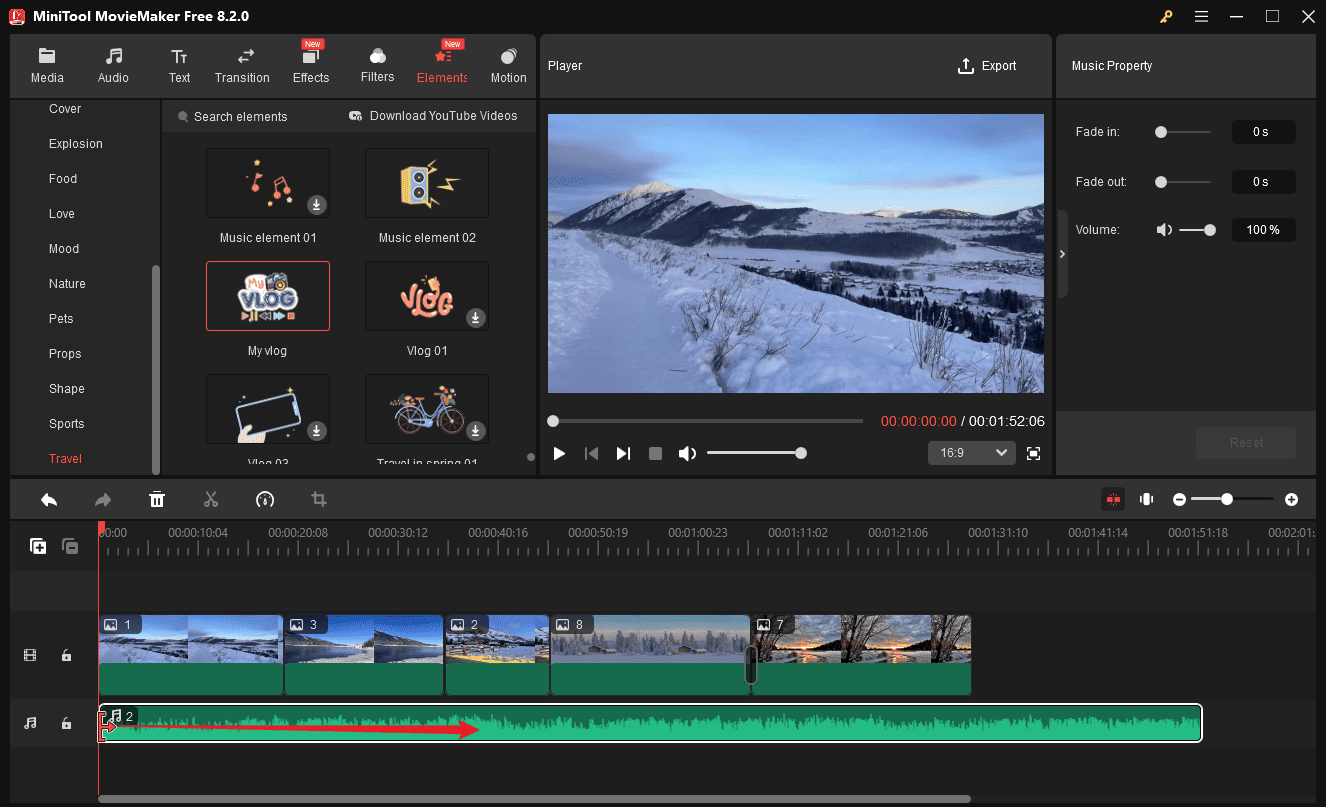
Step 4. Edit Your FLAC File
Remove unwanted parts: if you want to delete the beginning or end parts of the audio to keep the song’s climax, trim it. To do so, select the clip on the timeline, hover your mouse over the start or endpoint of the clip until the Trim icon appears, and drag the icon inwards.
However, if you want to cut out the middle part of the audio, use the Split tool to separate it from the original clip and delete it.
Edit music property: click the audio clip on the timeline to open Image Property, then you can apply the fade-in and fade-out effects or turn down the volume.
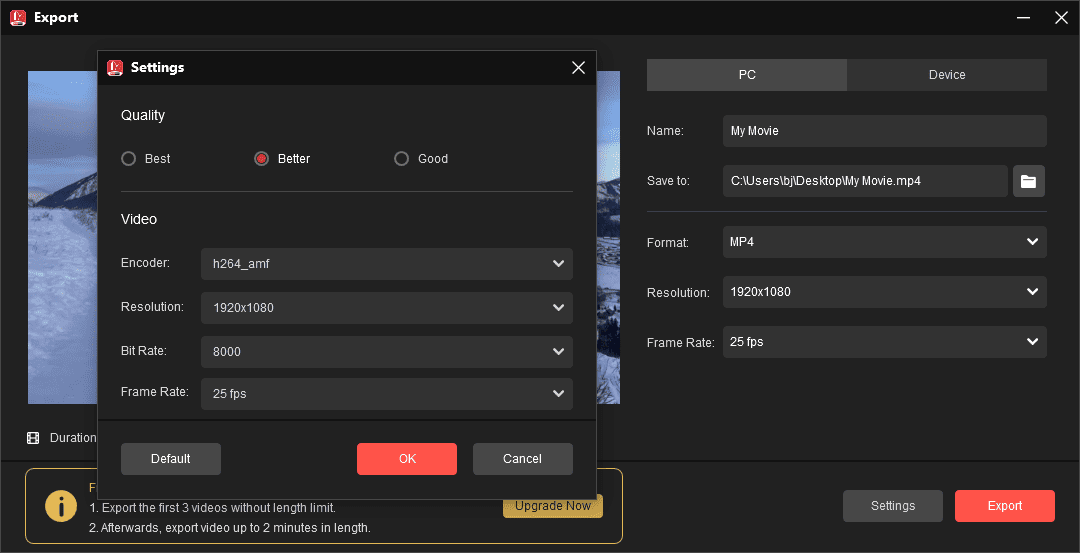
Step 5. Export Your Project as MP4
Click the Export button in the upper right corner to enable the Export window. Then, make sure the output format is set to MP4. You can also select the resolution, frame rate, quality, and video bitrate. Finally, choose the location to save the exported MP4 file and click the Export button to begin.
Pros:
- A simple interface makes it easy for beginners to navigate.
- Multiple options to edit and enhance images.
- Plenty of transitions, filters, and effects.
- Export 4K MP4 videos without watermarks.
Cons:
- Only compatible with Windows.
How to Convert FLAC to MP4 with Image Online
If you’re looking for ways to convert FLAC to video with image online, here are two options.
Option 1: Online Video Cutter by 123Apps
Online Video Cutter by 123Apps provides various tools to edit videos, such as trimming, cropping, resizing, stabilization, adding text, and more. It also includes a video editor that allows you to make video from images, video clips, and music.
Here’s how to convert FLAC to MP4 with image online with Online Video Cutter by 123Apps.
Step 1. Navigate to the 123Apps website, click Video Editor, and click the Create project button to enter the main UI of Online Video Cutter.
Step 2. Click on the area saying Add files to open your images, and they will be automatically added to the timeline. Then, click Files > Add files to import your FLAC file. Similarly, it will be layered on the timeline.
Step 3. Edit your images. Click the image you want to edit, and you’ll find some image options on the left panel. Crop the image to 16:9, 9:16, 1:1, 4:3, or 3:2, adjust the opacity, rotate, and flip images. You can drag the right edge of the image outward to extend its duration.
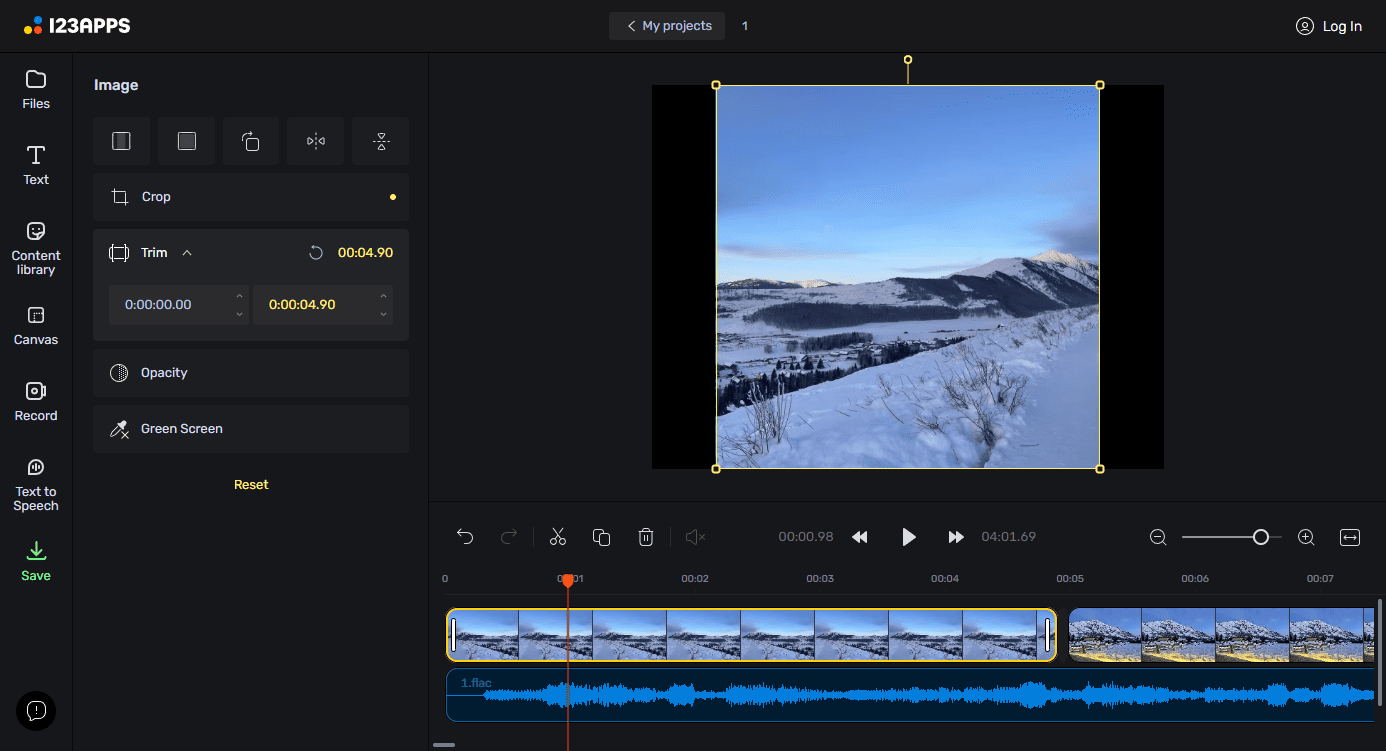
In addition, you can add text, emojis, and stickers to the image. Go to Text, select a text style, and click to add it. Next, enter your words and edit their properties. To add stickers or emojis, go to Content library, select Stickers or Emoji to open the library supported by GIPHY, and click your favorite one to add it to the image.
To choose an aspect ratio for the final video, go to Canvas, open the Size drop-down list, and click the ratio based on your needs.
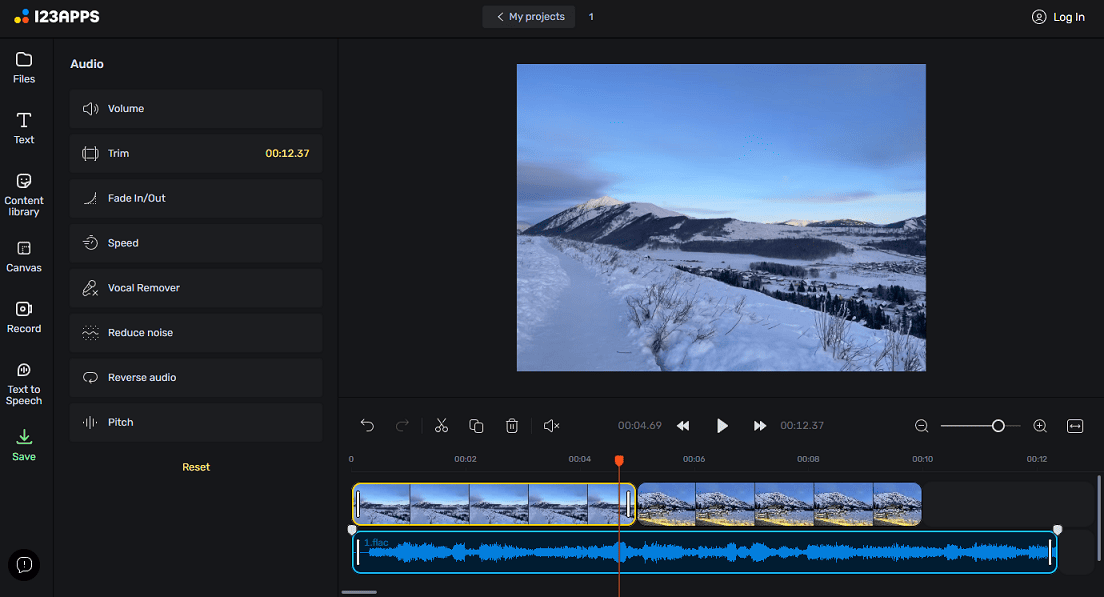
Step 4. Edit the FLAC file. Click the clip to select it on the timeline, and you’ll see all the available audio editing tools on the left panel.
- Click Volume and drag the slider to increase or decrease the volume level.
- Click Trim and set the time range to cut off unwanted parts at the beginning or end.
- Click Fade In/Out to set the fade-in and fade-out effects for your FLAC audio.
- Expand the Speed menu to adjust the audio speed.
- Select Vocal Remover to keep music or vocals only from your audio.
- Click Reduce noise and turn the toggle on to remove background noise in the audio.
- Click Reverse audio and turn the toggle on to play the FLAC file in reverse.
- Click Pitch and move the slider to increase or decrease the pitch of the audio.
Step 5. After that, click the Save button on the left sidebar, set Format to MP4, select a resolution, 480p, 720p, or 1080p (1080p requires a Premium plan), and click the Export button.
Pros:
- Online access: without installing software.
- Easy to use and doesn’t require experience.
- A huge content library of videos, images, music, stickers, emojis, animated text, and GIFs.
- Basic image editing tools.
Cons:
- No transition effects and filters.
Option 2: Clideo
Clideo is a great online video platform providing various options for content creators to edit and enhance their footage. In addition to standalone tools, such as filters, cropping, and subtitles, this service offers a video editor to combine images, videos, music, and text into a single clip. Therefore, Clideo is also a good solution for converting FLAC to MP4 with image online.
Step 1. Visit the Clideo website and select Video editor. Then, click the Get started button to open the Clideo video editor.
Step 2. Click the area saying Click to upload to open your image and FLAC file.
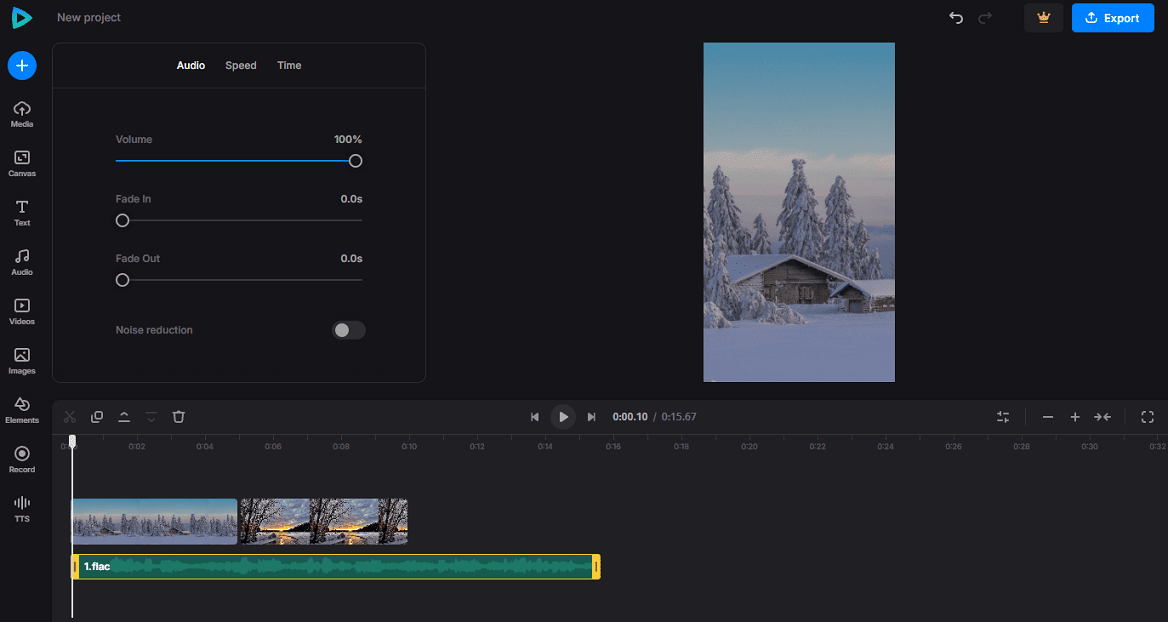
Step 3. Edit your image. Under the Transform tab, you can crop the image to multiple aspect ratios, rotate, flip, fit, and fill the image. Switch to the Adjust tab to adjust opacity, brightness, contrast, saturation, hue, and blur to correct the clip’s color. Additionally, you can add text, shapes, stickers, emojis, and GIFs.

Step 4. Edit the FLAC file. Select the clip on the timeline to open the Audio editing options. Then, you can turn the volume down, apply fade-in and fade-out effects, or enable noise reduction to reduce the noise from the audio. Besides, you’re able to trim the FLAC file or split it into segments and delete some parts.
Step 5. Click the Export button and select a resolution to render the video. Then, you’ll get an MP4 file. Click the Download button to save the video on your PC.
Pros:
- User-friendly interface.
- Fast rendering and exporting for small/medium-sized projects.
Cons:
- Limited editing features.
- Watermark in the free version.
![Video Volume Booster: How to Make a Video Louder [Complete Guide]](https://images.minitool.com/moviemaker.minitool.com/images/uploads/2025/02/video-volume-booster-thumbnail.jpg)
Tip: How to Convert FLAC to MP3, WAV, AIFF
Sometimes, you may need to convert FLAC to another audio format, such as MP3, to fix compatibility issues, reduce the file size, and share it over email or messaging apps, or WAV or AIFF for better processing in some DAWs.
How do you convert your FLAC files? You can try the following online FLAC converters without installing software on your computer:
- CloudConvert
- FreeConvert
- Online Audio Converter
- Convertio
- Aconvert
- Zamzar

Conclusion
Converting FLAC to MP4 with image couldn’t be easier if you select the appropriate tool. This post explains 3 detailed ways to help you transform your FLAC audio and images into videos. Finally, if you have problems while using MiniTool MovieMaker to create videos, please contact us via [email protected] for assistance.
About The Author

Position: Columnist
Cora is a tech writer specializing in digital media workflows, with over six years of hands-on experience in video post-production, media transcoding, and screen capture. Her writing is always clear and practical. Cora also produces in-depth software reviews for users across skill levels to help them find the right tool and enjoy video editing.
User Comments :