In this comprehensive guide offered by the best free video editor – MiniTool MovieMaker, we'll walk you through the process of editing Palworld videos to create captivating content that captures the essence of your in-game adventures.
Palworld has emerged as a captivating and innovative video game, allowing players to immerse themselves in a unique blend of creature collection, resource management, and strategic gameplay. As avid Palworld enthusiasts, you may find yourself wanting to share your epic moments and achievements or simply showcase the beauty of your virtual world with others. To do so effectively, mastering the art of editing Palworld videos becomes essential.
Step 1: Capture High-Quality Footage
Before diving into the editing process, ensure that you have high-quality footage to work with. Use reliable screen recording software to capture your Palworld gameplay at the best resolution and frame rate your system can handle. This will serve as the foundation for your edited masterpiece.
Step 2: Choose the Right Editing Software
Selecting the right video editor without watermark is crucial for a seamless editing experience. Popular options like Adobe Premiere Pro, Final Cut Pro, or even free alternatives like MiniTool MovieMaker, Shotcut, and DaVinci Resolve offer a wide range of features suitable for Palworld video editing. Familiarize yourself with the chosen software’s interface and capabilities to make the editing process more efficient.
Here in this article, we will take MiniTool MovieMaker for example to show you how to edit Palworld video recordings to make them more attractive. Why choose MiniTool MovieMaker? Because it has the following advantages compared with most other competitors.
- Free and easy to use.
- No watermarks, no bundles, no ads at all.
- Support various video templates for quickly making a video.
- Fascinating music, effects, filters, and stickers are available for free use.
- Turn video fragments, pictures, or sounds into a 1080p masterpiece in a few clicks.
All you need to do is to download and install MiniTool MovieMaker on your Windows computer.
MiniTool MovieMakerClick to Download100%Clean & Safe
Step 3: Organize Your Footage
Start by importing your captured Palworld footage into the editing software. Organize your clips into a logical sequence based on the narrative or theme you want to convey. This step is essential for maintaining a smooth workflow throughout the editing process.
MiniTool MovieMaker supports importing the most common source media file formats including:
- Videos (.mp4, .wmv, .mov, .mkv, .flv, .avi, .webm, .vob, .mpg, .3gp, .rmvb)
- Photos (.png, .jpg, .jpeg, .gif, .ico, .bmp, .tif)
- Audio files (.mp3, .aac, .flac, .wav, .m4a, .m4r, .amr, .ape)
Launch MiniTool MovieMaker and enter into its main user interface (UI). There, under the Media tab, click the Import Media Files option to upload your Palworld recording clips.
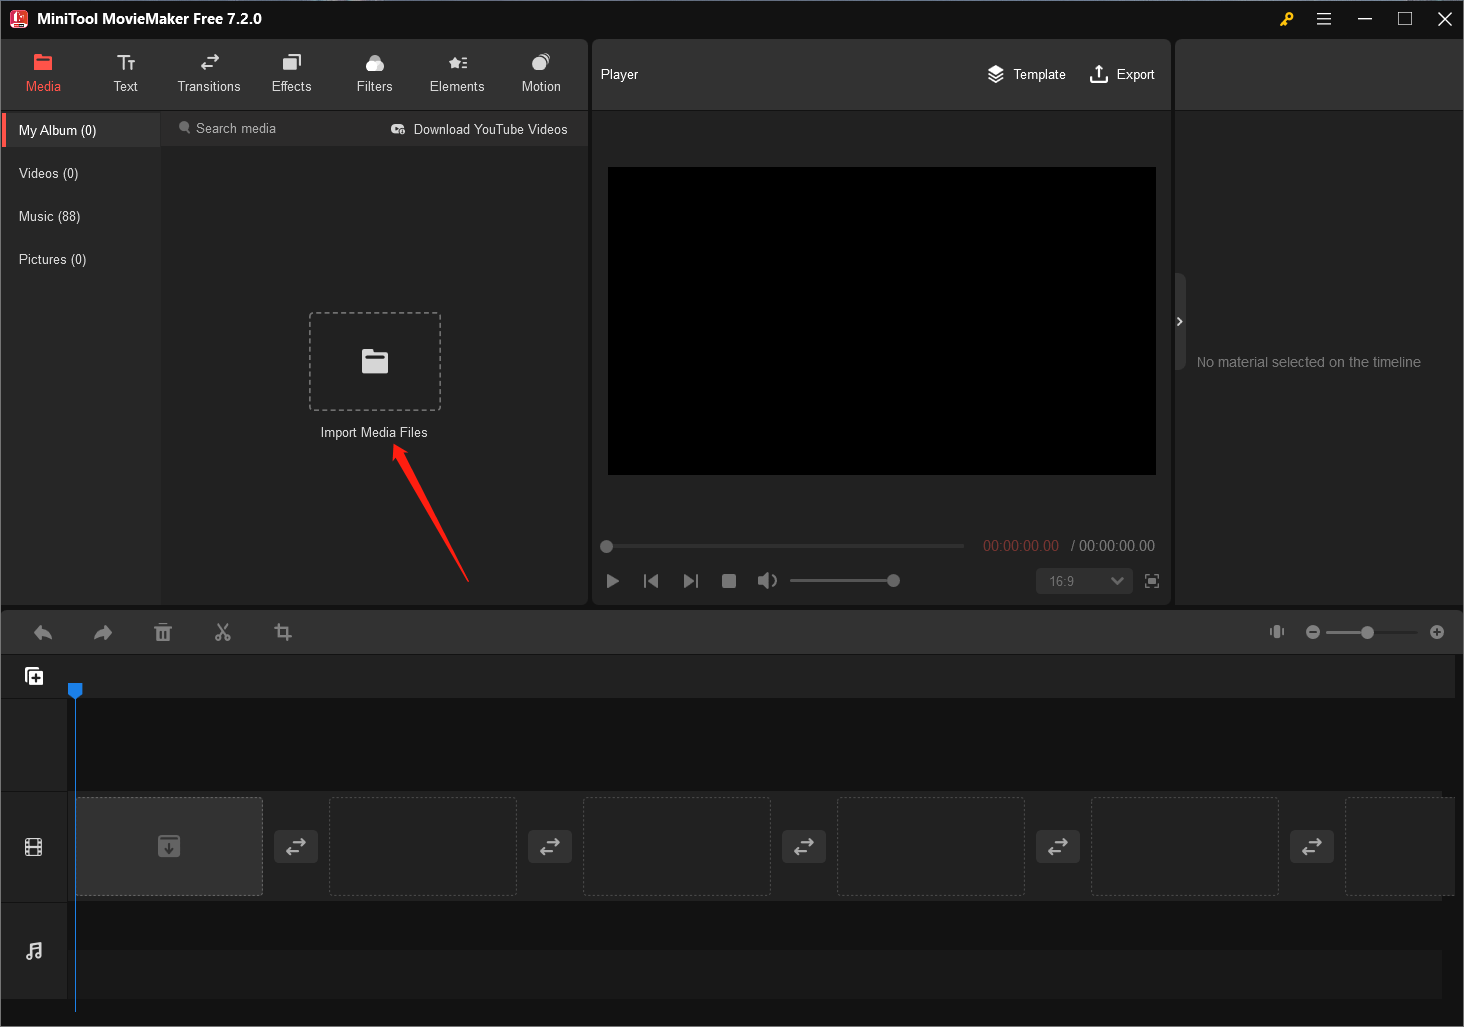
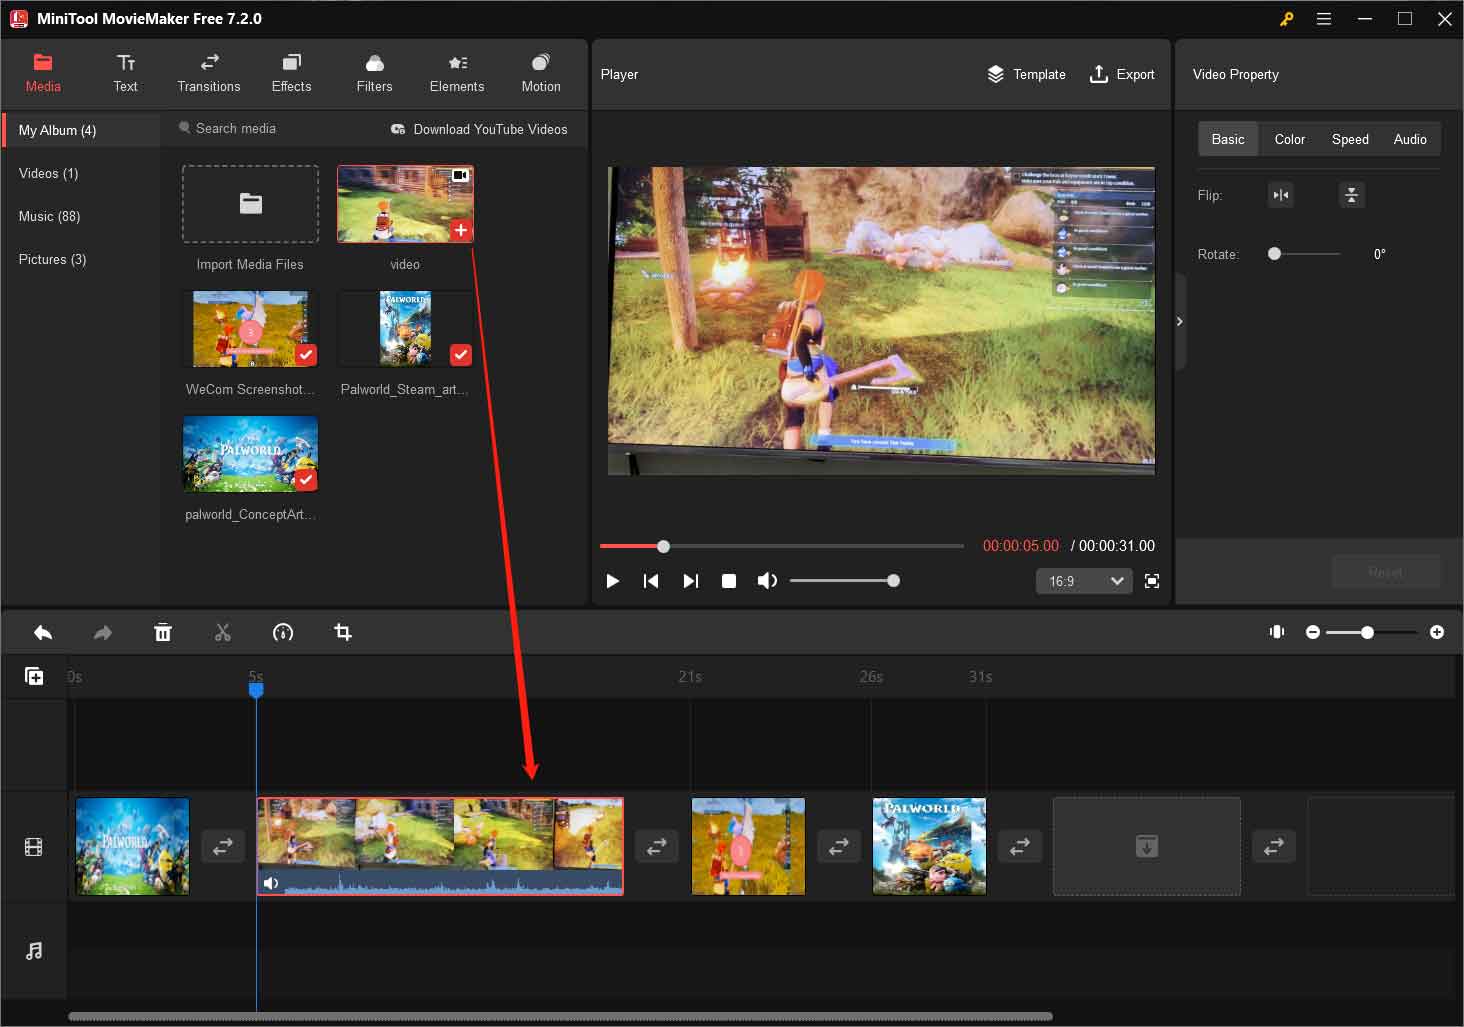
The uploaded Palworld media files will be listed in the Media Library. Just click the plus icon (+) on each media file to add them to the below timeline in your preferred order. Or directly drag and drop them onto the corresponding timeline tracks one by one.
Step 4: Trim and Arrange Clips
Carefully review your Palworld footage and trim any unnecessary sections to keep your video concise and engaging. Arrange the remaining clips in a logical order to create a coherent storyline. Pay attention to the pacing to maintain the audience’s interest.
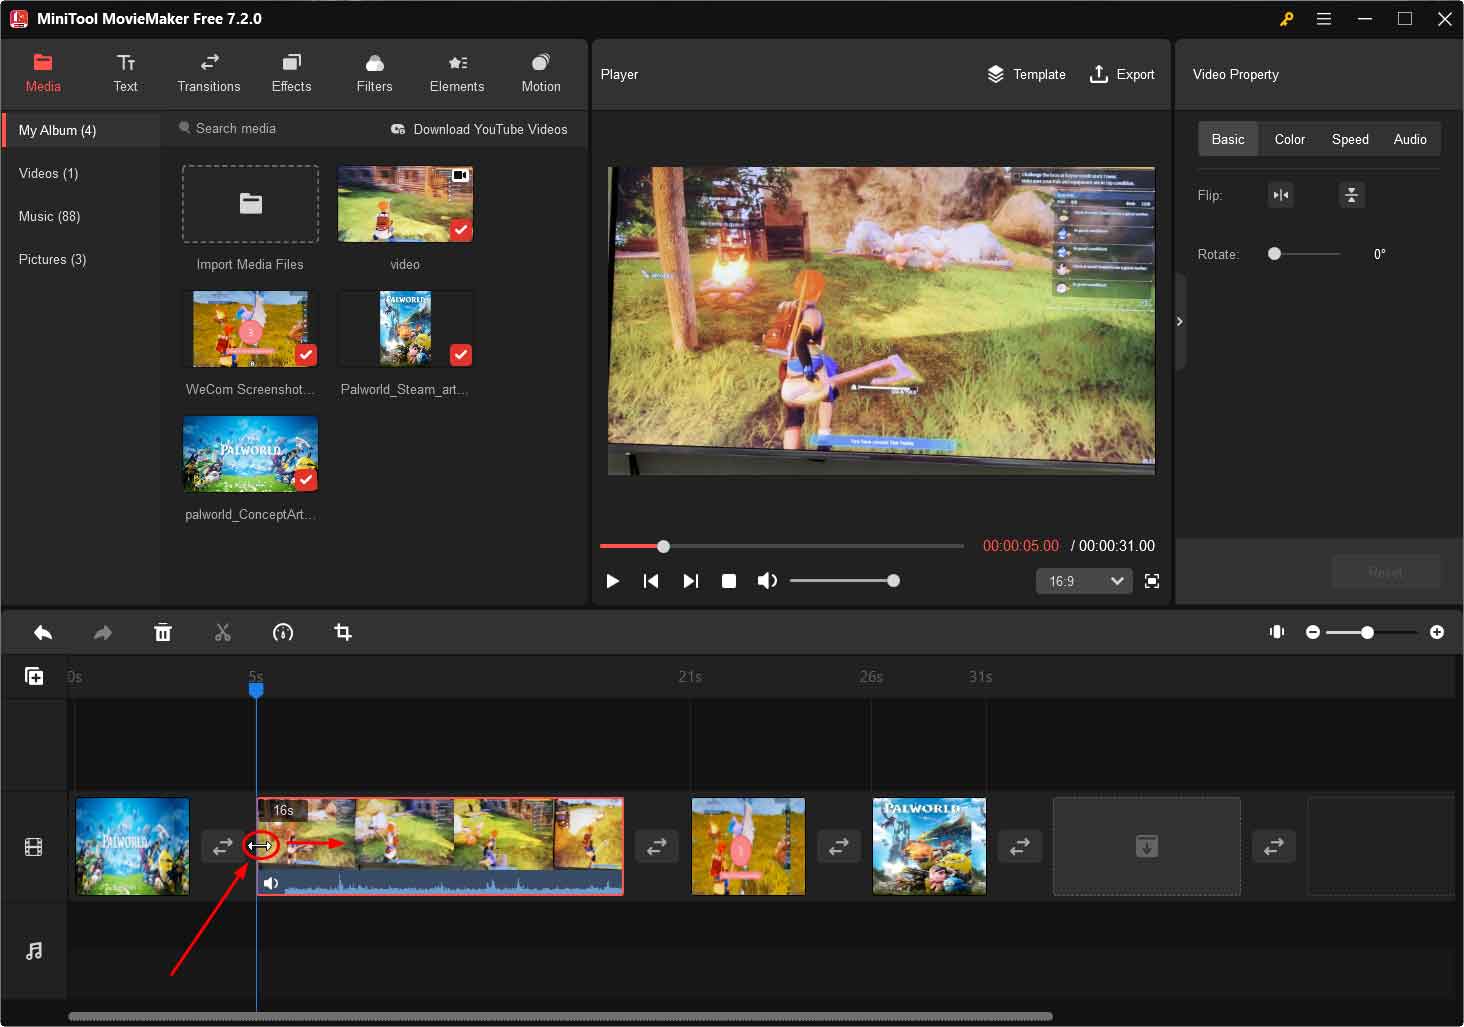
In video trimmer – MiniTool MovieMaker, click on the target Palworld video clip on the timeline to select it. Then, put your mouse cursor on either the end or the start of the video footage. When the mouse pointer turns into a double-headed arrow, drag the mouse rightwards or leftwards to cut off unwanted parts.
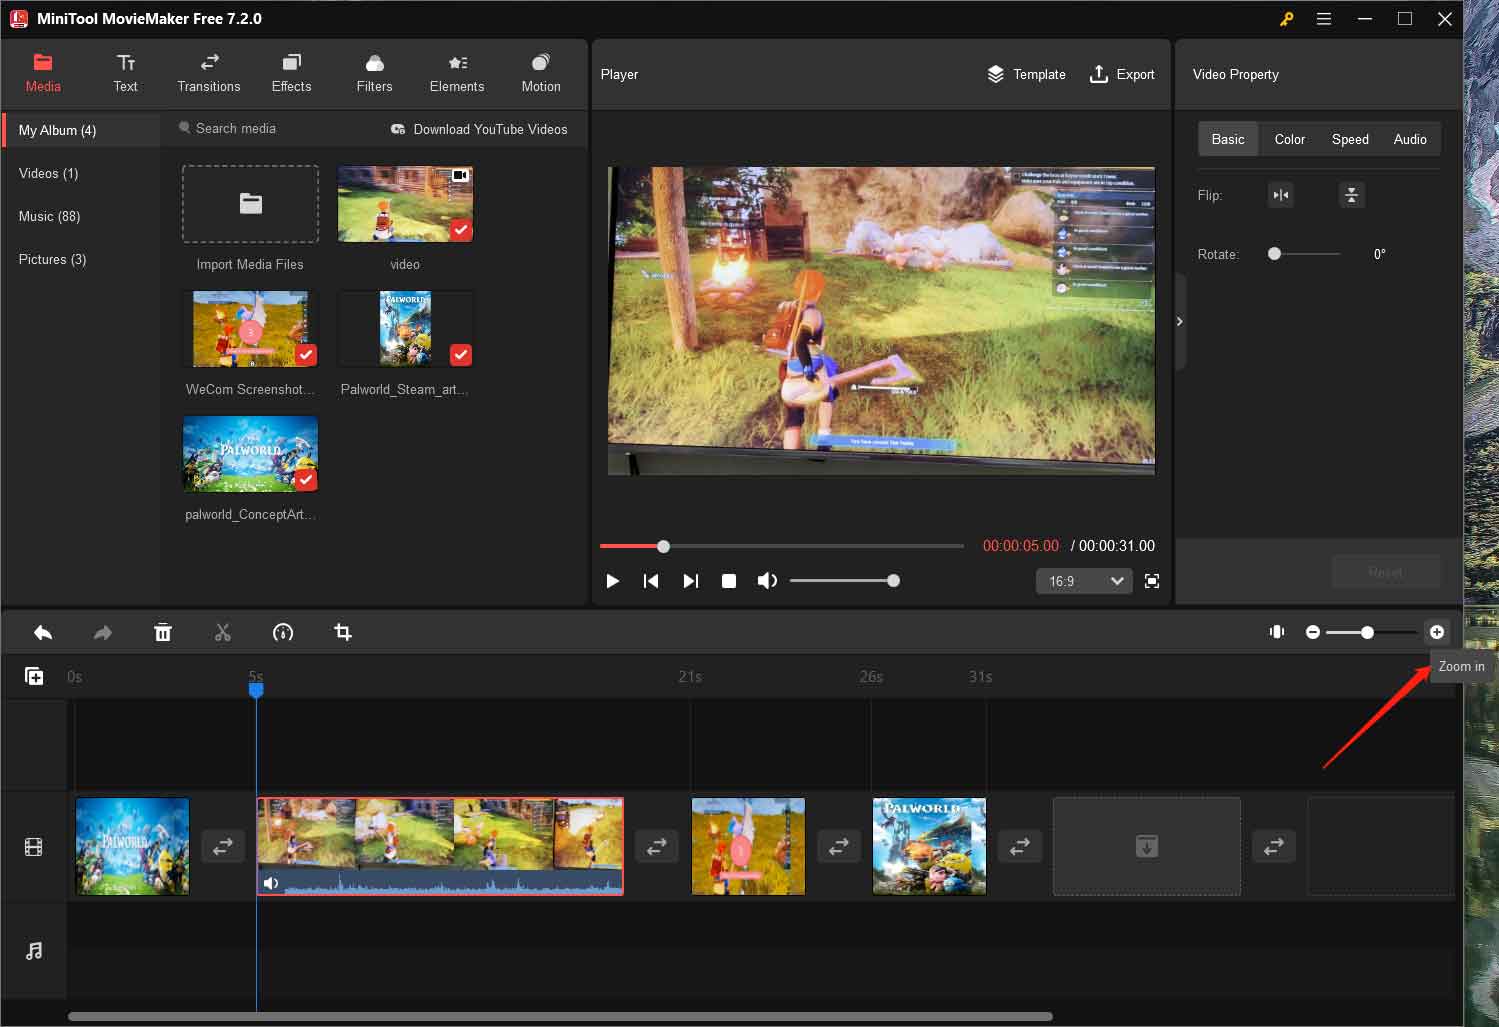
Tip: If you find it hard to locate the precise border of the wanted and unwanted video section, just zoom in timeline display in the upper right of the timeline toolbar.
Step 5: Add Transitions and Effects
Enhance the visual appeal of your Palworld video by incorporating transitions between clips. Experiment with different transition effects to find the ones that best complement the tone of your content. Additionally, consider adding subtle visual effects or filters to enhance the overall aesthetic.
In MiniTool MovieMaker, there is a transition placeholder between two graphic media files on the video track on the timeline. You can just drag and drop a proper transition there and edit the transition property in the upper right of the main window.
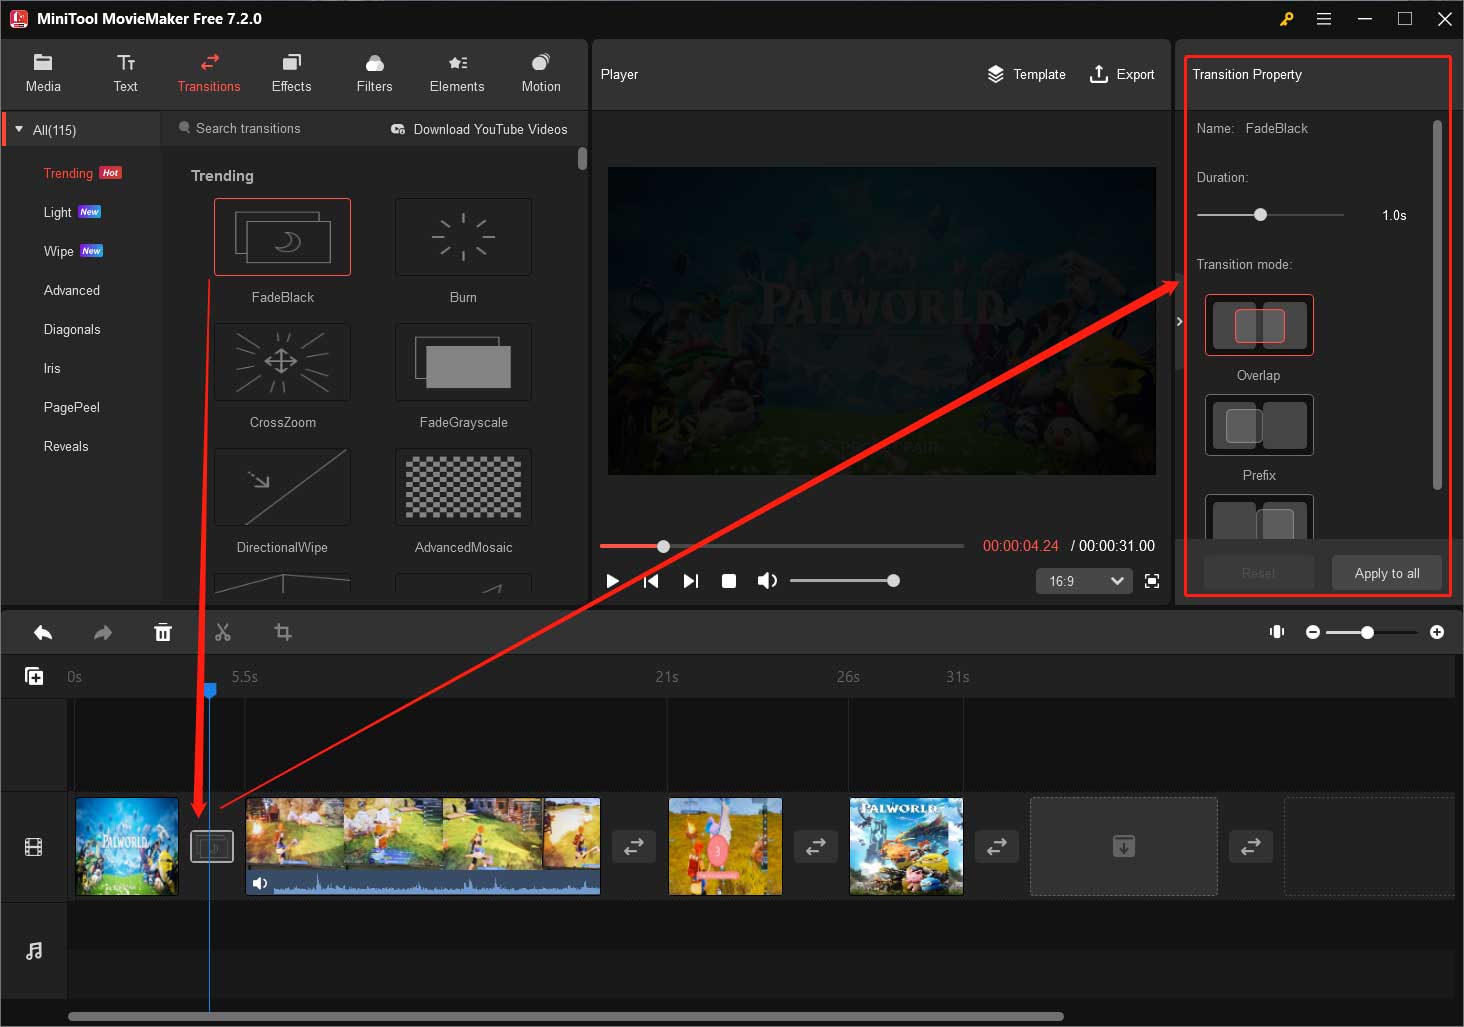
Tip: You can preview the effect of a transition by putting your mouse on it.
As for effects, filters, and motions, just put them onto the target graphic clip on the timeline.
Step 6: Implement Engaging Audio
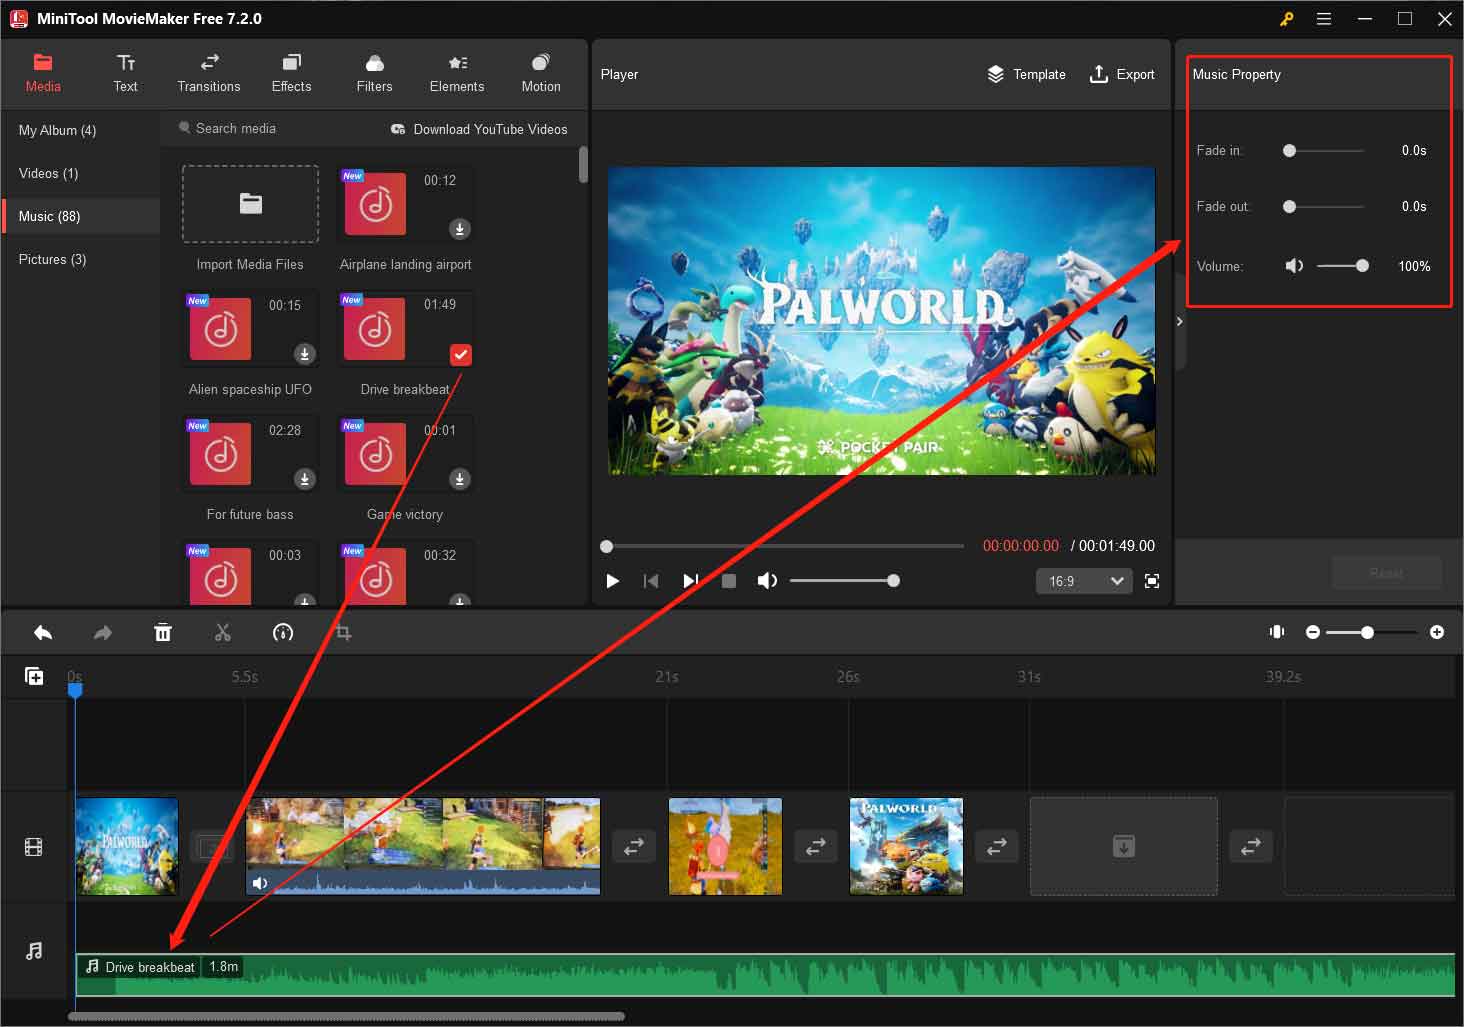
Audio plays a vital role in editing Palworld video. Choose a suitable background music track that complements the mood of your Palworld video. Adjust audio levels to ensure that the music doesn’t overpower any essential in-game sounds or commentary you wish to include.
In MiniTool MovieMaker, there are many built-in audio pieces available for users to choose from. Just switch to the Music subtab under the Media main tab, click the download icon on your desired music to get it, and add it to the audio track. You can further fade the added audio or change its volume.
Step 7: Include Commentary or Narration
If you want to add a personal touch to your Palworld video, consider including commentary or narration. Share your thoughts, strategies, or funny anecdotes related to the gameplay. This not only adds personality to your content but also helps establish a connection with your audience.
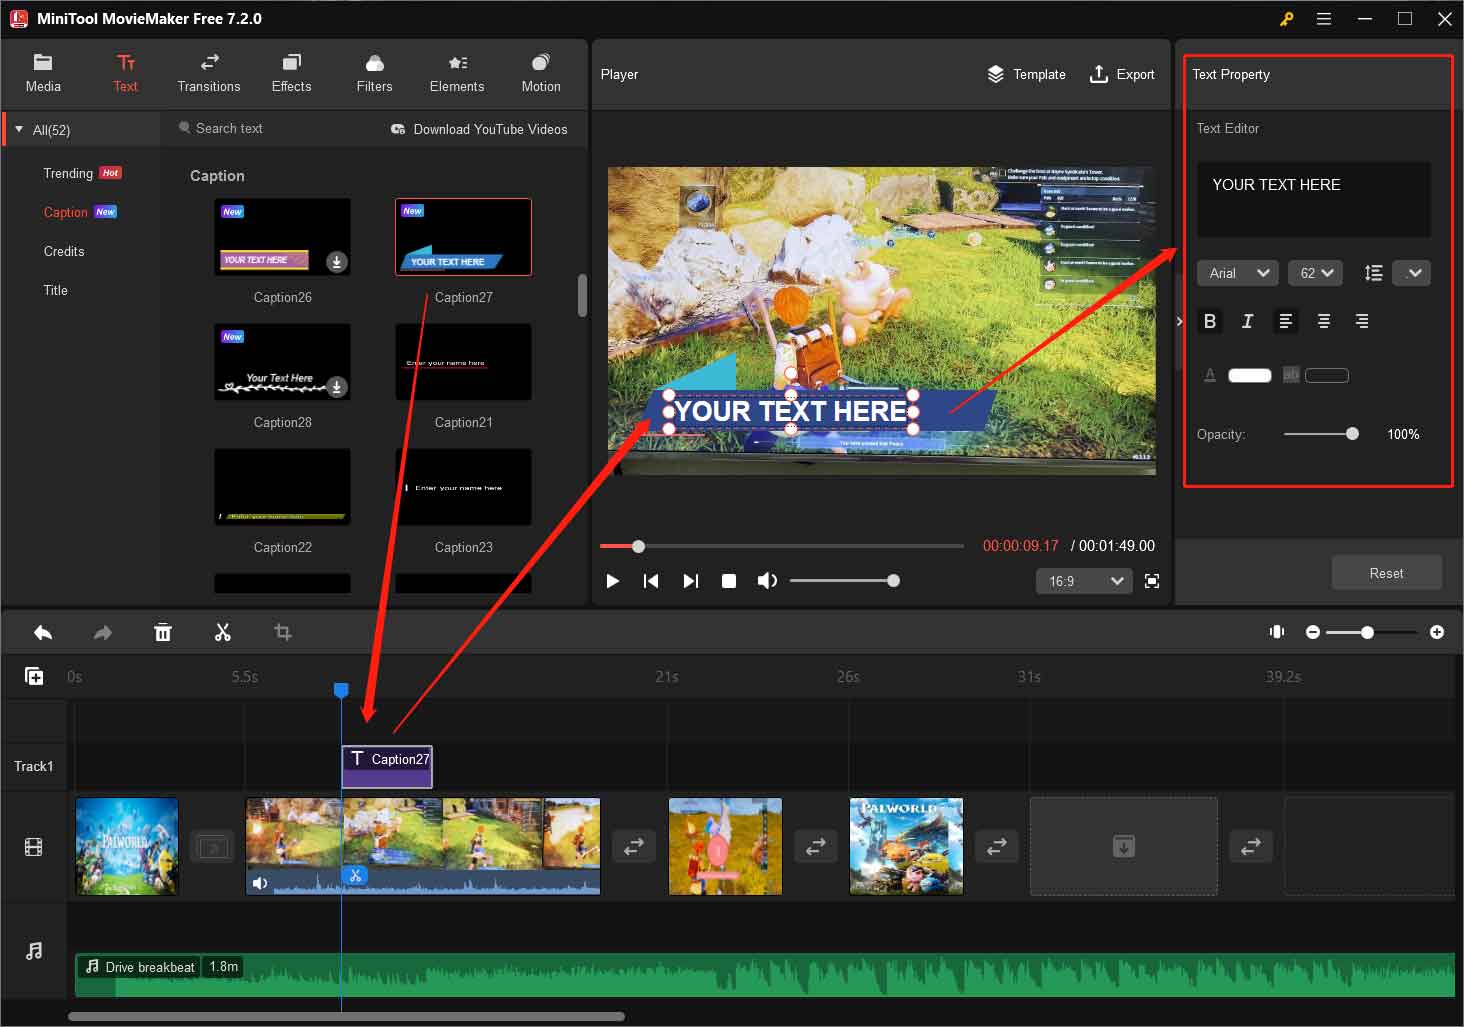
Just follow the guide in Step 6 to add your audio commentary or narration to your Palworld video. Besides, MiniTool MovieMaker enables you to add text captions. Drag the playhead on the timeline to where you’d like the text to be and go to the Captions subtab under the Text main tab to add your favorite subtitle style. Then, specify the text content, font, size, color, opacity, etc. in the Text Property just like in the Microsoft World document. You can also adjust the size and location of the text in the preview window by dragging the text border.
Step 8: Fine-tune and Polish
Review your edited Palworld video and make any necessary adjustments. Check for consistency in visual and audio elements, ensuring a polished and professional final product. Pay attention to details such as color correction, subtitles, and any additional overlays to refine your video further.
Step 9: Change the Aspect Ratio and Export the Palworld Video
On which social media platform are you going to share your Palworld video? Instagram, YouTube, TikTok, Facebook, or Twitter? The sharing platform determines the aspect ratio, format, resolution, codec, frame rate, bitrate, etc. of your target Palworld video.
In MiniTool MovieMaker, before exporting the edited video, you can change its aspect ratio based on the supported aspect ratio of your target social media. Expand the default 16:9 aspect ratio at the lower right of the Player section and choose your desired option from the drop-download list: 16:9, 9:16, 4:3, and 1:1.
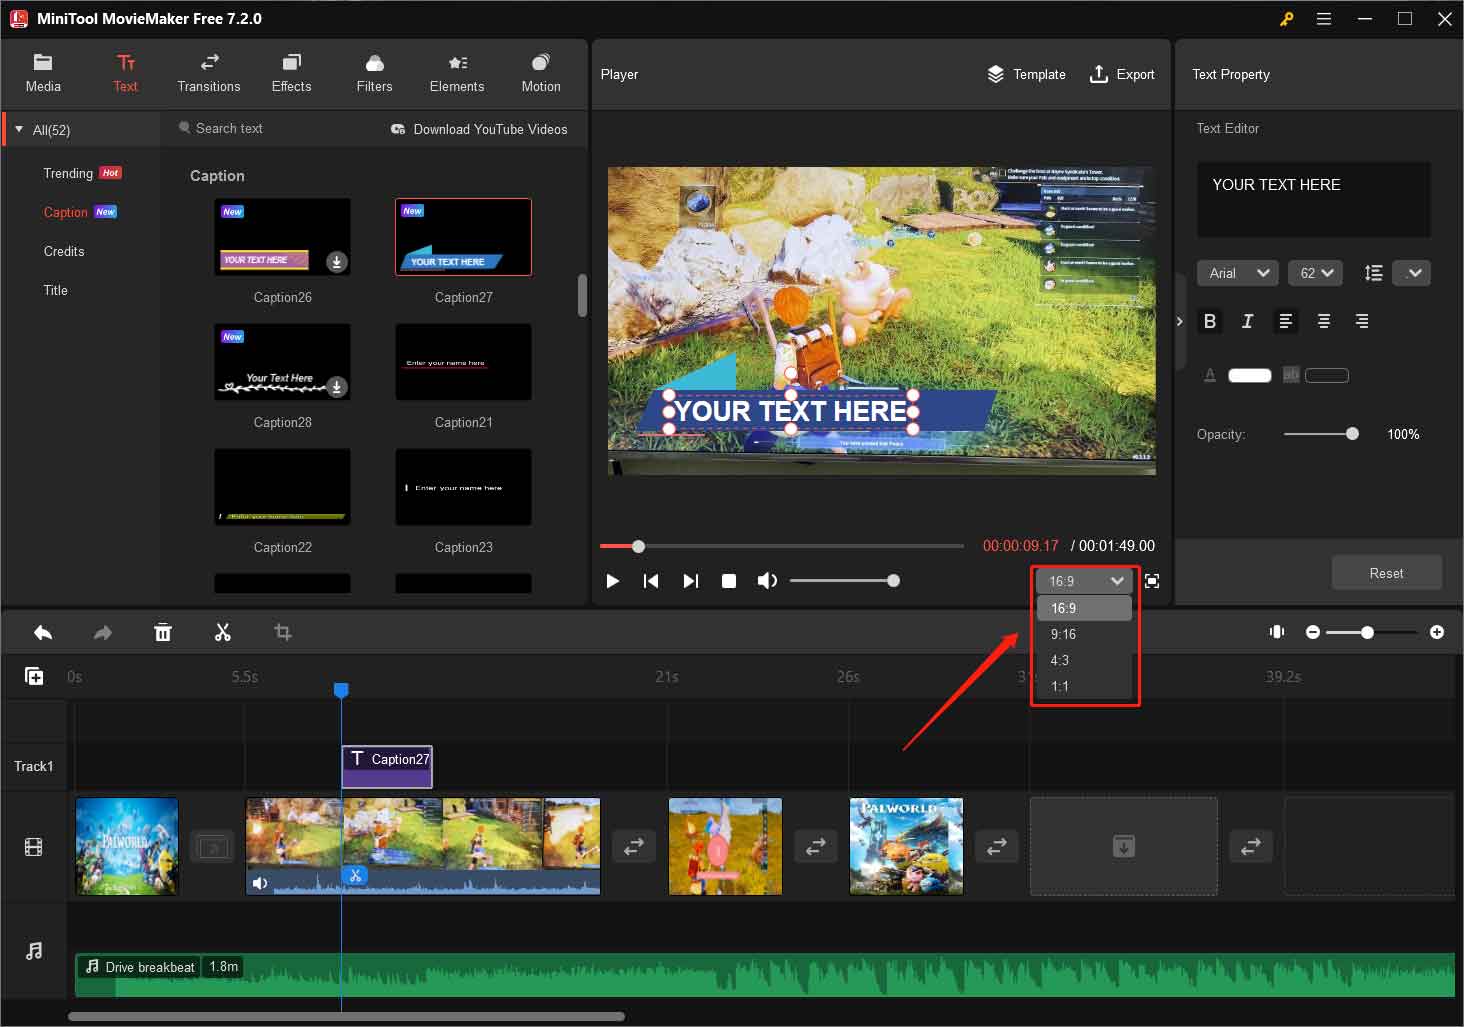
Next, click the Export option in the upper right of the Player section. In the next window, you can specify your Palworld video name, save location, format, resolution, and frame rate. You can click the Settings button to customize more parameters of the video including quality, encoder, and bit rate.
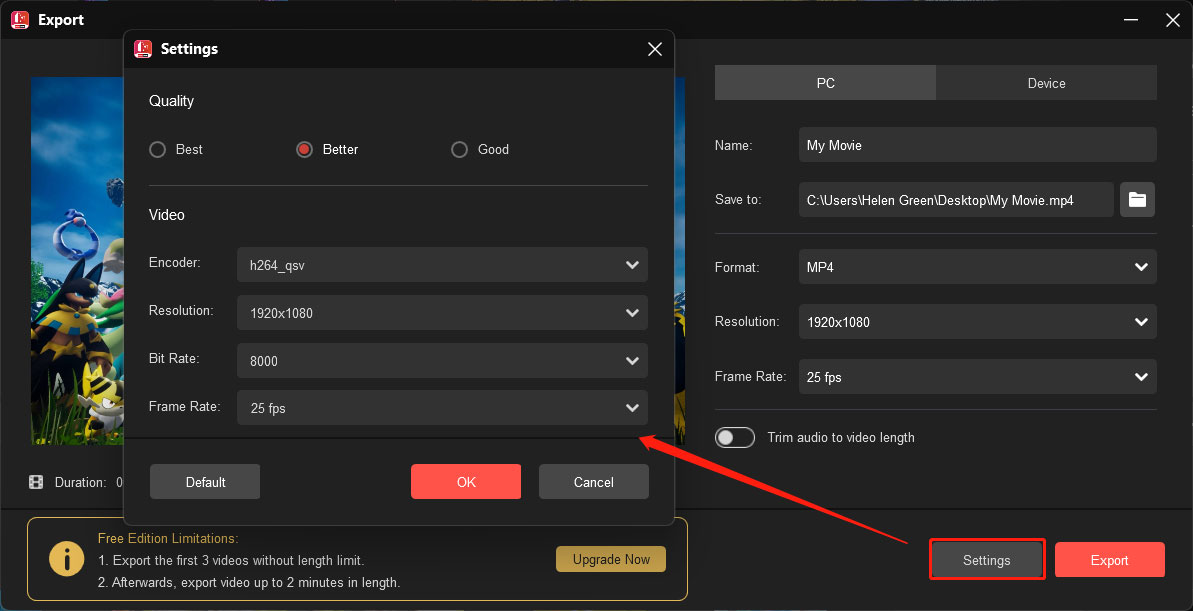
Finally, click the Export button to save your edited Palworld video.
Conclusion
Editing Palworld videos is a rewarding endeavor that allows you to share your virtual adventures with the gaming community. By following these steps and experimenting with various editing techniques, you’ll be well on your way to creating captivating and share-worthy content. So, fire up your editing software, unleash your creativity, and let the world experience the magic of your Palworld journey.


User Comments :