Nowadays, it’s common to see watermarks on documents, videos, and images shared on social media platforms. The purpose of watermark is to protect the original file and prevent others from copying or using it without permission.
Generally speaking, a watermark could be a logo, an image, or text superimposed onto an image, video, or document with great transparency. You might have already learned how to make a watermark for video, PDF, Word documents, etc. In this post, you’ll learn how to add watermark to a GIF.
Now, everyone can quickly make animated GIFs as there are many free and simple GIF makers in the market. If you’re a GIF designer and want to add a watermark to GIFs to protect your work, you’ve come to the right place. Here’re 3 methods to add watermark to GIF.
How to Add Watermark to GIF on Windows
In this part, you’ll learn to use MiniTool MovieMaker to add text watermark to your GIF.
MiniTool MovieMaker is a free GIF editor and maker without watermarks. It lets you make a GIF from various video file types like MP4, MOV, AVI, MKV, WMV, WebM, etc., and this application can also convert a GIF to video formats like MP4, MOV, and more.
Also, MiniTool MovieMaker allows you to edit a GIF as you like. You can add captions to a GIF, increase or decrease the GIF speed, trim, split, crop, rotate, and reverse GIF, and even add animated stickers to GIF.
MiniTool MovieMaker, a great GIF editor, is simple to use for everyone. Here’s a step-by-step guide on how to add watermark to GIF in MiniTool MovieMaker.
Step 1. Click the download button below to get the installer of MiniTool MovieMaker, and then install it on your PC.
MiniTool MovieMakerClick to Download100%Clean & Safe
Step 2. Launch MiniTool MovieMaker after installation and close the promotion windows to access the user interface.
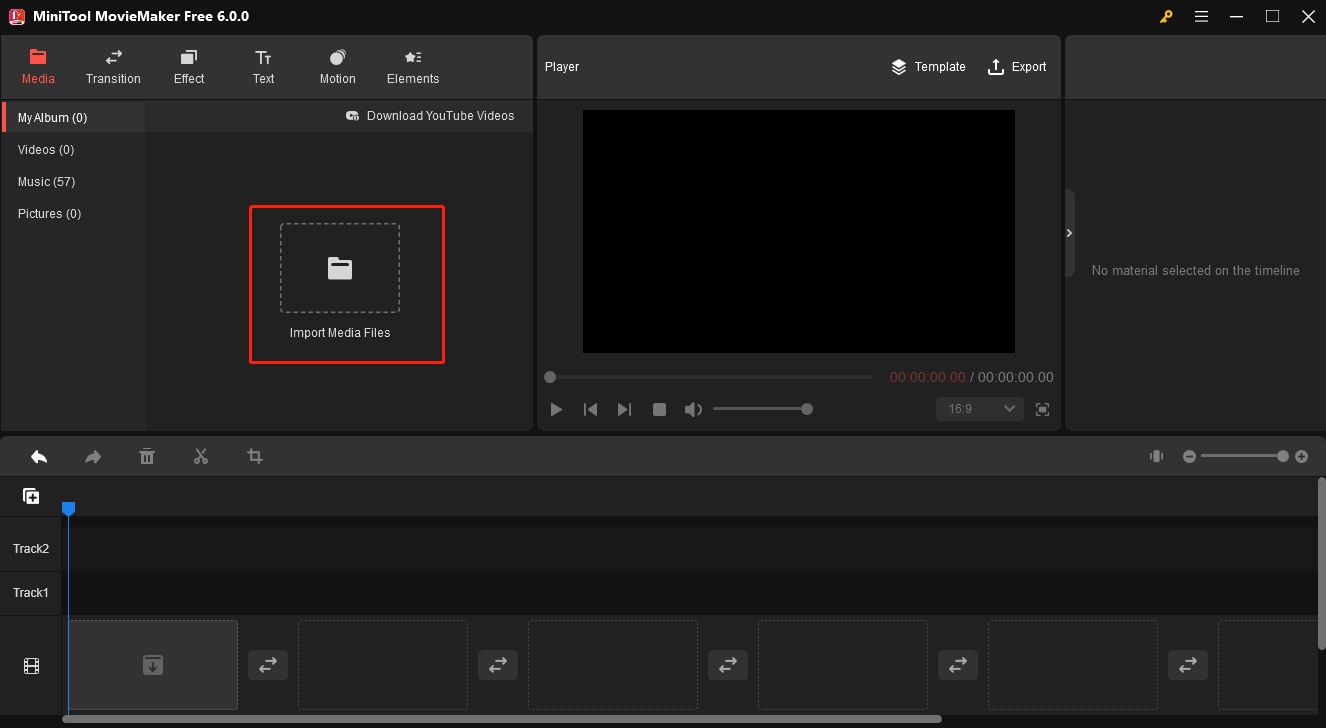
Step 3. Click on Import Media Files to browse for the folder that contains your GIF, select it and click Open to import it. Then, drag the GIF to the timeline.

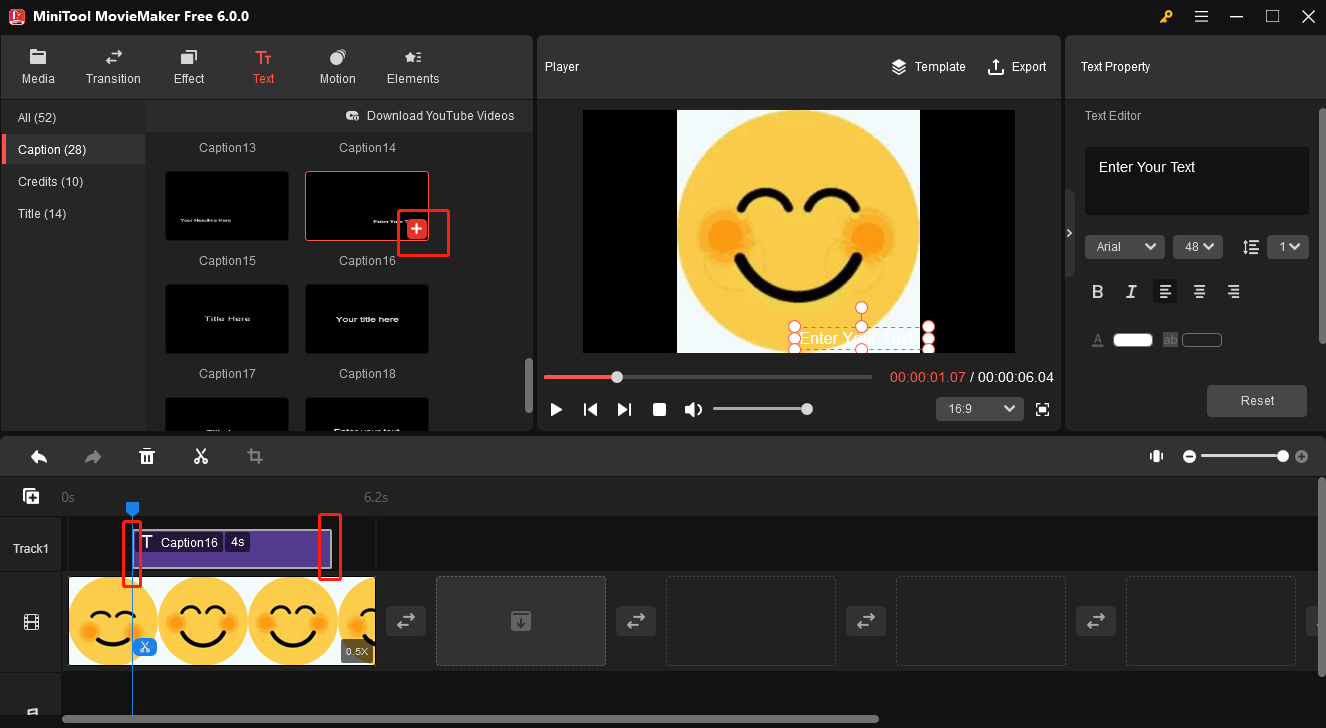
Step 4. Click the GIF in the timeline to highlight it and go to the Text tab at the top left. Choose Captions on the left. MiniTool MovieMaker provides different caption styles, and you can mouse over a downloaded text template to preview it.
Click + at the bottom right corner of the text template to add it to the timeline. You can drag the edges of the text track to change its duration.

In the Text Editor on the right, you can enter your text and change the font, size, color, alignment, background color, and more.
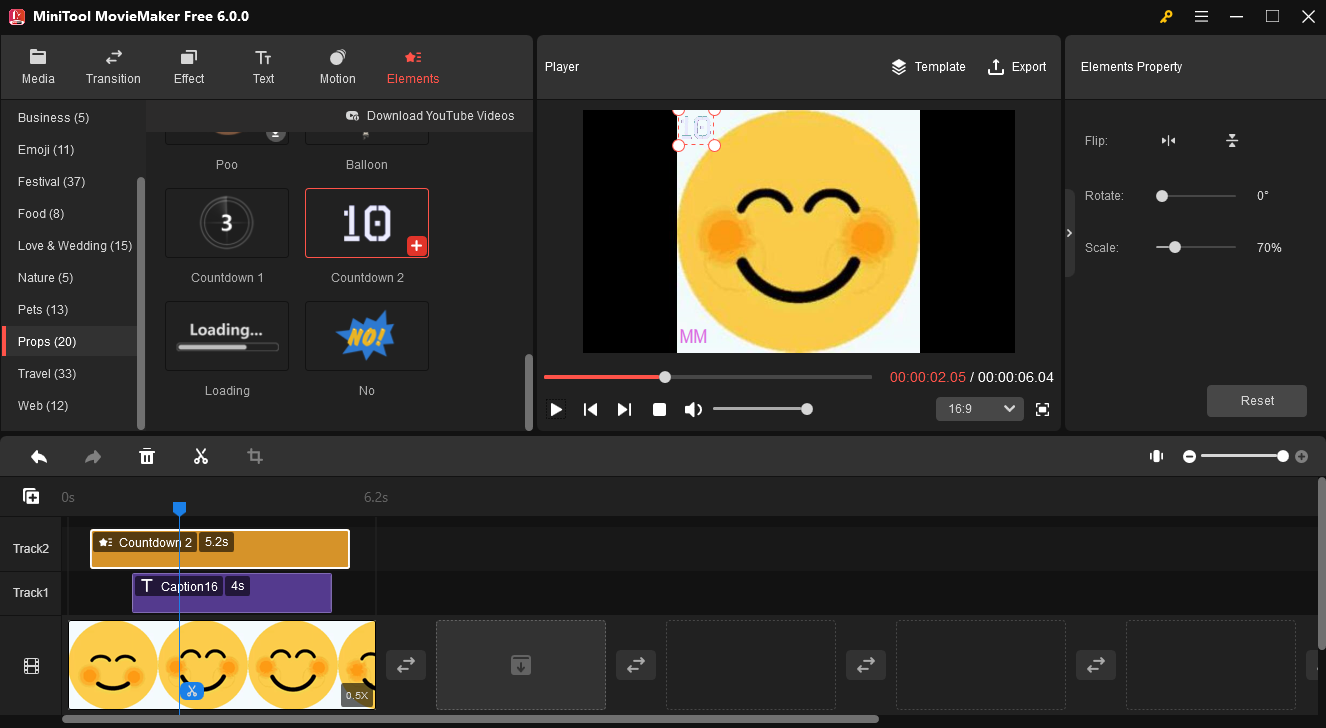
Step 5. In MiniTool MovieMaker, you can also add a sticker to GIF. This app offers various stickers like arrows, emojis, numbers, and more. To add a sticker to your GIF, first, move the playhead to the place where you want the sticker to appear, go to Elements, choose a sticker, and click + to add it.

On the timeline, you can adjust the duration of the sticker. In the Player, you can change the position of the sticker. Also, you rotate and scale the sticker.
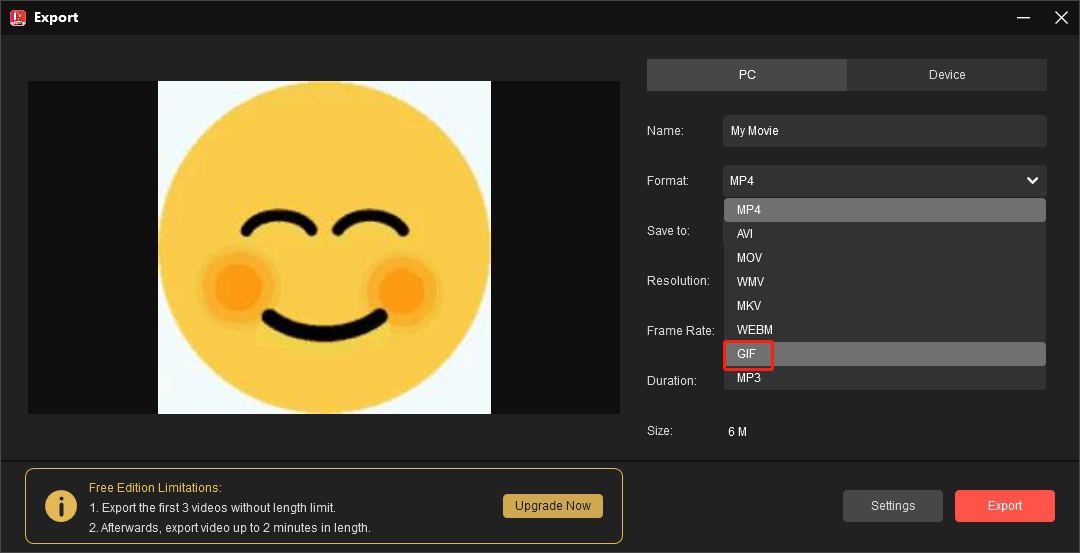
Step 6. After editing, click Export in the upper right corner to open the Export window, expand the Format drop-down menu and choose GIF from the list, choose the output folder, and click Export.

How to Add Watermark to GIF Online
This part teaches you how to add image or logo watermark to GIF using Kapwing and Flixier.
Kapwing
Kapwing is an online GIF editor that lets you add image or logo text watermark, make a border around a GIF, compress GIF, convert GIF to video, make GIF collage, rotate GIF, merge GIFs, and more.
Also, you can use Kapwing to edit your videos online, such as adding subtitles, music, filters, freeze frame effect, transitions, blur video background, compress video for email, and more.
Here’s how to use Kapwingto add image or logo watermark to your GIF.
Step 1. Visit the Kapwing website and sign in with your account.
Step 2. Create a new project and then click Add Media to upload GIF, image, and logo.
Step 3. First, add your GIF to the canvas, and then add your image or logo overlay.
Step 4. Adjust the size of your watermark and change its position on the GIF.
Step 5. If you’re happy with the result, click Export Project at the top right, set GIF as the output format, and click Export as GIF. Once done, download the GIF.
Flixier
Flixier is an online video editor for you to crop, cut, pixelate videos, apply glitch effects, and more. What’s more, it supports editing GIF. You can easily add an image or logo to a GIF on this site.
Here’s how to use Flixier to add watermark to your GIF.
Step 1. Go to the Flixier website and sign in. Click Create Project to create a new project.
Step 2. Click Import to upload your GIF and image or logo.
Step 3. Add your GIF to the timeline and then add your image or logo. You can change the duration of the watermark on the timeline. In the preview window, resize your watermark and move it to any place you want.
Step 4. Click Export, select GIF as the output format, and click Export.
How to Remove Watermark from GIF
Some GIF makers can be used for free and they export your GIF with a watermark. If you want to remove the watermark but don’t want to purchase the service, the direct way is to crop your GIF.
Generally, the watermark will be added at the bottom corner of your GIF. You can use a free and no-watermark GIF cropper like MiniTool MovieMaker to eliminate the watermark area. Alternatively, you can try some online watermark removers. If your chosen image watermark remover does not support GIF format, just convert it to PNG to JPG and try again.
Conclusion
With the 3 methods, you can easily add a watermark to your GIF. Choose one way and have a try. If you have any questions while using MiniTool MovieMaker, you can contact us via [email protected] for help.
Also read:


![Remove Watermark from Video on Windows with Ease [Ultimate Guide]](https://images.minitool.com/moviemaker.minitool.com/images/uploads/2025/11/remove-watermark-from-video-thumbnail.png)

User Comments :