Basic Understanding of Filmora
Before learning how to stabilize video with Filmora, let’s get a basic understanding of the app.
Filmora is a video editor that assists users in making and improving videos with ease. It contains a variety of tools for editing videos with functions such as pre-made social media templates, AI-powered editing, and a collection of audio resources and effects.
It supports both desktop and tablet editing. This gives you the freedom to work from anywhere. It is appropriate for creators of every skill level, from novices to experts, thanks to its intuitive interface. Filmora’s effective features help freelancers, businesses, and influencers share their stories efficiently.
Discover some of Filmora’s amazing features:
Remove the background of a video
The software makes it easier to use green screen effects in videos. Its Chroma Keying function enables you to eliminate the green background. It can be changed to any picture or video you like. The function is especially helpful for generating virtual backgrounds in videos. In addition, you can use the function to integrate a variety of elements into your background.
Utilize AI audio denoiser
Being aware of how crucial high-quality audio is to videos, it provides an audio equalizer that enables you to fine-tune audio levels. Also, you can change audio frequencies and achieve a balanced listening experience. Furthermore, the program offers noise removal abilities to get rid of undesirable background noise. This will ensure that the audio is clear, and crisp throughout the video.
Filmora offers advanced color correction and grading options, enabling you to enhance the color tone of videos. You can adjust white balance, change saturation, exposure, and so on. It provides a broad spectrum of built-in presets to use, too. Moreover, the software also has the flexibility for the creation of custom color presets.
How to Stabilize Video in Filmora Automatically
If you would like to find out how to stabilize video in Filmora app, you can accomplish this by following the detailed instructions in this section.
Step 1. Drag and drop your media files onto the timeline
Go to the official website of Filmora to download and install it on your computer. After launching, click New Project for access to the editing interface.
Then, import your shaky video to the video editing software by clicking the Import button or dragging and dropping. Now, drag and drop the imported shaky video onto the timeline.
Step 2. Select the AI Tools option
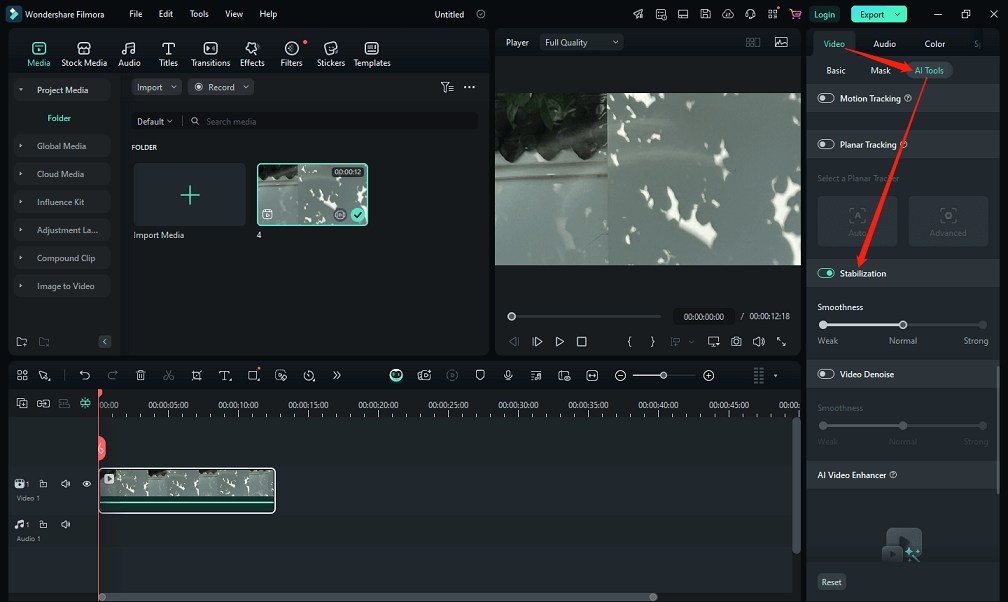
After that, click on the video on the timeline and find and select AI Tools from the right panel.
Step 3. Set the smooth level
Scroll down to locate and enable the Stabilization option. At this point, set the smooth level depending on your preference.

Step 4. Export your video
As soon as you are happy with how the video looks, click the Export button in the top right-hand corner to choose the export parameters you want and save it to your computer.
Bonus! Another Video Editor Definitely Worth Trying
MiniTool MovieMaker, a free and powerful video editing program, is highly recommended due to its user-friendly interface and extensive editing toolkit. It is aimed at newcomers and content creators who need to be able to edit and create wonderful videos.
The program allows you to do color corrections, remove audio from video, accelerate or decelerate the video, reverse video, trim video, split video, crop video, rotate or flip video, etc.
Click the download button below to discover more about the fantastic features you can use.
MiniTool MovieMakerClick to Download100%Clean & Safe
Conclusion
Now you can refer to the step-by-step guide to learn how to stabilize video in Filmora. Stabilized videos give your content a professional feel.
Related Posts


User Comments :