In this post on the MiniTool MovieMaker (a Windows movie maker) web page, we’ll offer a complete guide on stabilizing video in Final Cut Pro. Check out this post now to master Final Cut Pro stabilization and learn how to reduce shakiness in your footage.
Final Cut Pro Stabilization
Final Cut Pro is a professional non-linear video editing application compatible with macOS and iPadOS that allows users to import various video files, edit and enhance them with a rich set of tools and effects, and export them to a variety of formats.
Stabilization is just one of the great features of Final Cut Pro, providing you with the flexibility to correct shaky footage by adjusting the stabilization, rolling shutter, or both.
If the camera moves significantly or records fast motion, visual distortion may occur, causing the image to appear distorted or shaky. The rolling shutter feature in Final Cut Pro can reduce this motion distortion.
How to Stabilize Video in Final Cut Pro
Now, let’s see how to stabilize video in Final Cut Pro for Mac.
Step 1. Launch Final Cut Pro on your computer, open a project, or create a new one and import your footage. Add the shaky footage to the timeline and choose it.
Step 2. You’re better off isolating the problematic part and then applying stability correction to it only to get the best quality and results.
For this, select the clip, click the Tools pop-up menu in the upper left corner of the timeline and choose Blade, move the playhead to the frame where you want to cut, and click the scissors icon.
Step 3. Go to Window > Show in Workspace > Inspector or click the Inspector button on the right side of the toolbar, and then click the Video button at the top of the inspector.
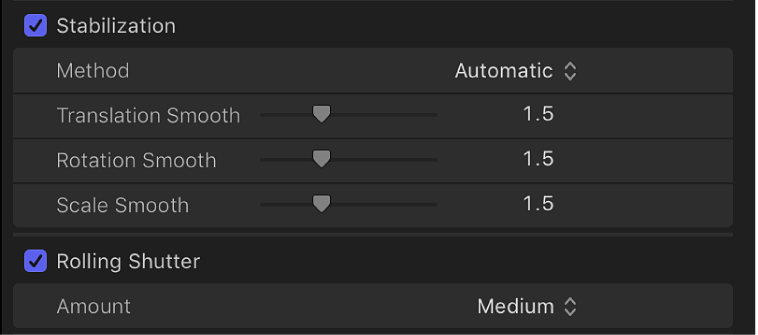
Step 4. Next, scroll down to the Stabilization and Rolling Shutter sections. Do one of the following to correct your shaky footage.

Option 1: Check the Stabilization option to reduce the shakiness. By default, Final Cut Pro will automatically analyze the clip and choose the best stabilization method (either InertiaCam or SmoothCam).
InertiaCam method is perfect for video footage with camera movements such as pans and zooms. SmoothCam uses the default stabilization technique mentioned earlier and allows you to modify the translation, rotation, and scaling parameters.
Option 2: Select the Rolling Shutter checkbox to reduce rolling shutter distortion in the video.
Step 5. Play the clip on the timeline to preview the fix. Then, export the stabilized video from Final Cut Pro.
Alternative Way to Stabilize Video on macOS
In addition to Final Cut Pro, there is a free way to stabilize videos on Mac computers – iMovie. It’s an easy-to-use and free video editor for Mac, equipped with a set of tools and effects. Now, let’s see how to stabilize video in iMovie.
Step 1. Open the iMovie app, click the Create New button to start a new project, select Movie and tap the Import Media button to import your video.
Step 2. Next, add the clip to the timeline and choose it.
Step 3. Click the Stabilization button (the fourth one) in the adjustment bar and check the Stabilize Shaky Video option. Then, drag the slider to adjust the amount of stabilization.

If you need to reduce the rolling shutter distortion, select the Fix Rolling Shutter option.
Step 4. Preview the stabilized video and export it.
MiniTool MovieMakerClick to Download100%Clean & Safe
Conclusion
It’s simple to stabilize video in Final Cut Pro, right? If you want a free tool to fix the shaky video on your Mac computer (Final Cut Pro is a paid video editor and costs a one-time fee of $299.99), iMovie is a good choice, and it should be preinstalled by default.


![How to Stabilize Video in DaVinci Resolve [Complete Guide]](https://images.minitool.com/moviemaker.minitool.com/images/uploads/2023/04/davinci-resolve-stabilize-video-thumbnail.jpg)


User Comments :