In this post on the MiniTool MovieMaker (a free Windows movie maker) webpage, we’ll explain how to stabilize video in CapCut for smooth video playback and shake-free footage.
For video creators who want polished and professional content, the issue of shaky footage can be a constant roadblock. In this post, we’ll introduce CapCut, a super-simple video stabilization tool for desktop, mobile, and online use that allows users to convert shaky videos into smooth content. Now, let’s see how to stabilize video in CapCut on PC and mobile.
How to Stabilize Video in CapCut on PC
Follow the steps below to stabilize shaky video in the CapCut desktop application.
Step 1. Download CapCut for your Windows 11/10 PC. Then, complete the installation and launch the program.
Step 2. Sign in with your TikTok, Facebook, or Google account. Click the + New project button on the top to enter the app’s main interface.
Step 3. After the interface is loaded, click the + Import button to open the File Explorer and browse for your target video clip. Select the video, click Open to import it into CapCut, and then drag it to the timeline.
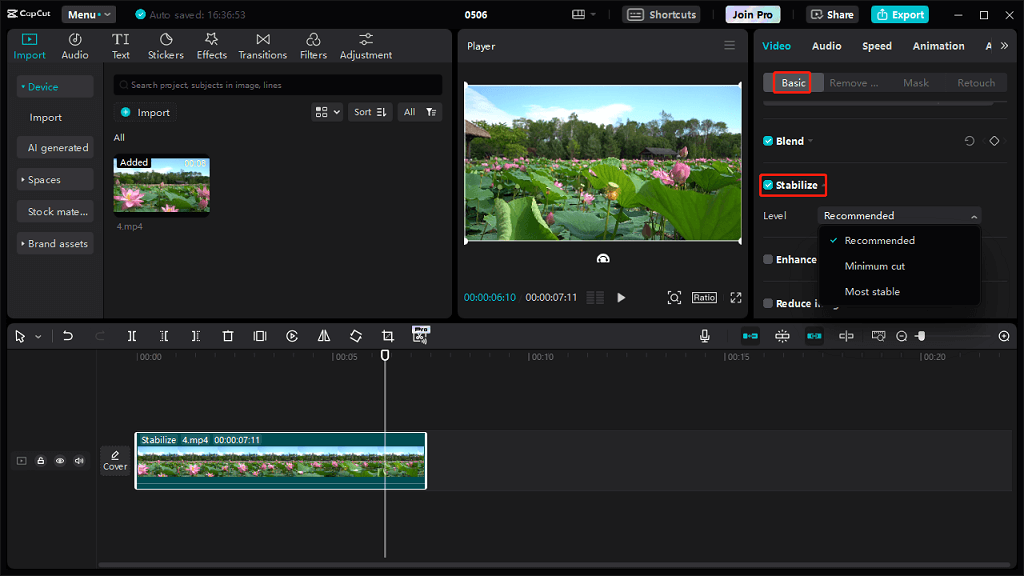
Step 4. Highlight the clip on the timeline, go to the Basic settings in the upper right corner under the Video tab, scroll down and check the Stabilize option to activate the CapCut video stabilization feature.

Step 5. Click the drop-down arrow next to Recommended to adjust the stability levels, Minimum cut, or Most stable. Select the level that best suits your preferences. For best results, especially for videos with obvious shakes, it is recommended to select Most Stable.
Step 6. Then, you can preview the video. If you’re satisfied with the result, click the Export button in the upper right corner and configure the video settings to export the video.
How to Stabilize Video in CapCut on Phone
Of course, you can stabilize a video in the CapCut app for your Android and iOS devices. Here’s how to enable CapCut’s video stabilization feature on a phone.
Step 1. Open the CapCut app. If it is not installed on your device, go to the Google Play Store or Apple App Store to get it.
Step 2. Click the + New project button to create a new project and import your shaky video from the gallery on your device.
Step 3. Select the clip, slide the bottom toolbar to the right, and choose the Stabilize option.
Step 4. Move the slider to select the stability level, Minimal cropping, Recommended, and Most stable. For the best result, use your fingers to resize the video.
Step 5. Save the changes and export the video.
How to Stabilize Video in CapCut Online Editor
If you don’t want to install CapCut on your device, use the CapCut online editor for video stabilization or other features.
Step 1. Navigate to the CapCut website in your desktop browser and sign in with your account.
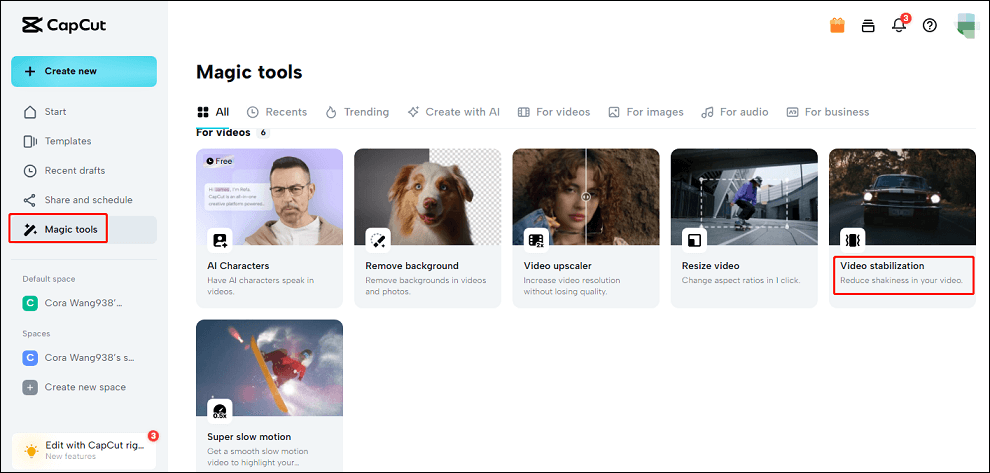
Step 2. Click the Magic tools option on the left and find the Video stabilization tool.

Step 3. Click the Video stabilization option and click Upload to open your video. Then, the video stabilization process starts automatically.
Step 4. Once done, you can click Edit more to further enhance your clip or choose Export to download or share the video.
MiniTool MovieMakerClick to Download100%Clean & Safe
Conclusion
Stabilizing shaky video in CapCut is really easy, right? Once you install the app, you can polish shaky footage in just a few clicks without complicated setups, making it easier than stabilizing video in Premiere Pro or DaVinci Resolve.
Now, it’s your turn. Follow the above steps to reduce the shakiness in your video with the CapCut app on your PC or phone.


User Comments :