When you add video effects, images, and audio to your footage, it needs to be rendered. The rendering will make it possible for PCs to play it in real-time without delay or disjointedness.
Keep reading, and we will walk you through how to render in Wondershare Filmora in this guide.
How to Render in Filmora?
When editing video, you need to render files and preview them to ensure smooth playback quality before you save or share.
With the Filmora video editing software, you can render files effortlessly. The video clip may jump and stutter (which is not a good look and unpleasant for your viewers to watch) if you do not render files.
But, let’s first take a short look at what rendering means.
What Does Rendering Mean?
According to the given context, there are different definitions of rendering. Thus, let’s explain what rendering is in the field of video editing before we start.
Real-time rendering refers to when graphics are processed on a host’s website or page in front of a user.
The footage does not exist on the viewer’s device yet appears on his or her screen in real-time directly from the host.
Advanced rendering is the rendering that takes place when you’re editing video footage.
Rendering video footage will compress and combine media files so that the PC can handle it to ensure that the video plays without a stutter.
Does Rendering Have an Effect on Video Quality?
It is always advisable to ask whether the quality or resolution will be compromised when adjustments are made to the footage.
But rendering doesn’t have an effect on the quality of the video; it just makes it easier for viewers to load and watch it.
Background Render Option – Automatically
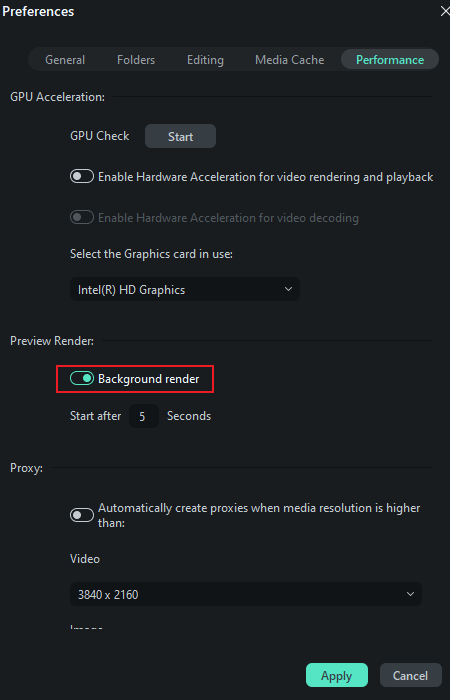
Filmora video editor offers the built-in ability to render files automatically as you go.
To select this option, go to File > Preferences > Performance and enable Background render under the Preview Render area.

Right now, Filmora will render video files as you go. The only problem with this is it can be taxing on your PC’s processing.
Render Preview Option – Manually
To apply rendering to the video before you export in Wondershare Filmora, click on the Render icon located above the video timeline and under the preview window.
The rendering icon is a play icon surrounded by a dashed circle.

When clicked on, a small new window will appear, letting you know how long it will take to render your files.
Filmora won’t render video segments on the timeline after the rendering process, thus if you render before you save your video edits, ensure to render the additional ones as well.
Another way to render added segments when video editing is to choose the video and press the Enter key on your keyboard.
Rendering videos added to the timeline while you’re in the process of video editing will essentially make the procedure faster.
These are instructions on how to render a video in Filmora automatically and manually.
MiniTool MovieMakerClick to Download100%Clean & Safe
Conclusion
This is our guide for you on how to render in Filmora. Overall, you can opt to activate Background render or click the Render icon to render your video files based on your needs.
You may also be interested in:
- After Effects Won’t Render? How to Fix the Issue
- 5 Ways to Fix Adobe Media Encoder Crashes When Rendering
- How to Solve the Sony Vegas MP4 Rendering/Converting Problems?
- Best Way to Fix DaVinci Resolve Not Rendering or Not Exporting Full Video
- 6 Solutions for DaVinci Resolve Rendering Zero-byte Files on Windows 11/10


![How to Render in Final Cut Pro? [Full Guide]](https://images.minitool.com/moviemaker.minitool.com/images/uploads/2023/06/how-to-render-in-final-cut-pro-thumbnail.png)


User Comments :