Do you know how to remove background noise in Final Cut Pro? If not, please read this post from MiniTool MovieMaker, which will show you how to remove background noise in Final Cut Pro and provides you with two Final Cut Pro alternatives for removing background noise.
In recording videos, sometimes some background noises such as wind, talking, static, crying, etc. are unavoidable. These background noises will affect the viewing experience.
To create a good video, it is necessary to remove the background noise. Final Cut Pro is a professional video editor and it can help you remove background noise. The following parts will give you guidance on how to remove background in Final Cut Pro.
How to Remove Background Noise in Final Cut Pro
Final Cut Pro is an excellent video editing software for Mac. It provides you with some useful built-in tools like Voice Isolation5 to enable you to remove background noise, edit multi-channel audio, and others.
The following are steps on how to remove background noise from audio in Final Cut Pro.
Step 1. Download and install Final Cut Pro on your Mac, and launch it.
Step 2. Click File > New > Project to create a project, and then click File> Import > Media to import a video with background noise, then put the video on the timeline.
Step 3. Go to the Installed Effects and choose Audio Enhancement, then tap the second icon from the right, and click Levies > Compressor. Next, drag the compressor to the audio clip to level out the voice frequencies.
Step 4. To control the clipping, drag the Limiter effect under the Installed Effects to the audio track.
Step 5. Click Modify > Enhance Audio, customize options, and drag the sliders to remove background noise.
Step 6. Click File > Share > Export File to save it.
Final Cut Pro Alternatives for Removing Background Noise
Are there other ways of removing background noise in addition to guidance on how to remove background talking noise in Final Cut Pro? Of course! Here are 2 wonderful tools worth trying.
How to Remove Background Noise with Kapwing
Kapwing is an online video editor with various editing tools. With Kapwing, you can edit audio easily. For example, it offers you some basic audio editing tools like cutting and trimming, and it also enables you to do some advanced audio settings like removing background noise, applying audio effects, and more.
Here are steps on how to remove background talking noise with Kapwing.
Step 1. Go to the Kapwing website.
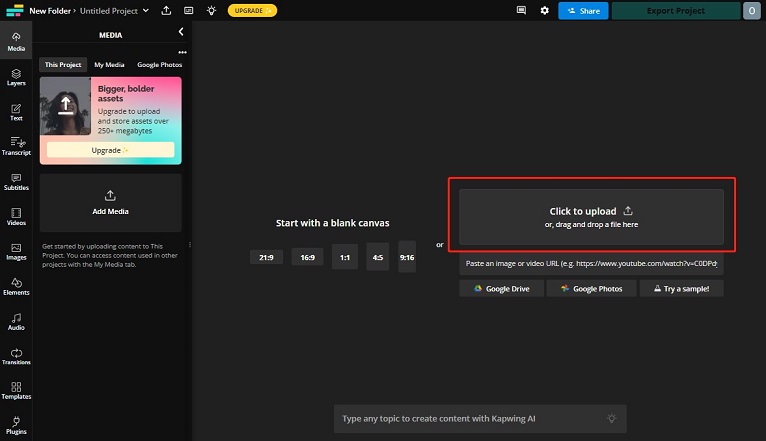
Step 2. Click the Click to upload area to choose one video with background talking noise from your device, and click the Open icon to upload it.
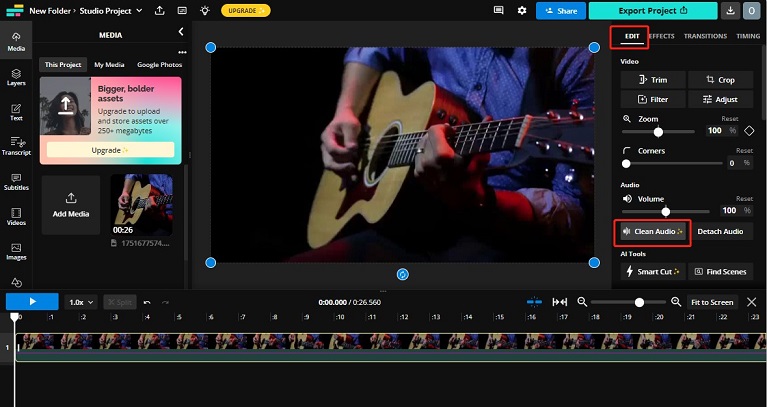
Step 3. Navigate to the EDIT window, click the Clean Audio button, and then it will remove the background noise from the audio.
Step 4. Click the Export Project button after your editing, adjust the output settings such as format, resolution, and compression level, and then click Export to save it.
How to Remove Background Noise with Media.io
Media.io is also an online editor that can edit photos, videos, and audio. As an audio editor, it enables you to remove background noise to enhance audio quality, extract or remove audio, convert audio format, reduce audio file size, and change voice into different pitches.
For removing background noise, it allows you to remove different types of noise such as wind, rain, static, and others. Generally, Media.io is a good tool to remove background noise.
How to remove background noise with Media.io? You can refer to the following guidance.
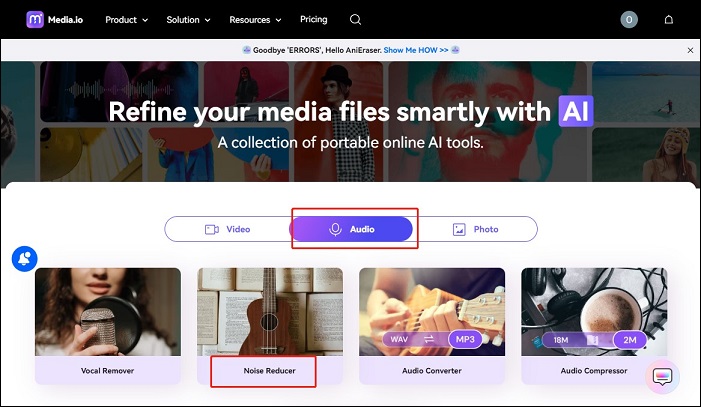
Step 1. Visit the Media.io website, navigate to the Audio page, choose Noise Reducer, and click the Get Started For Free button.
Step 2. Click the Upload icon to import the video from your computer.
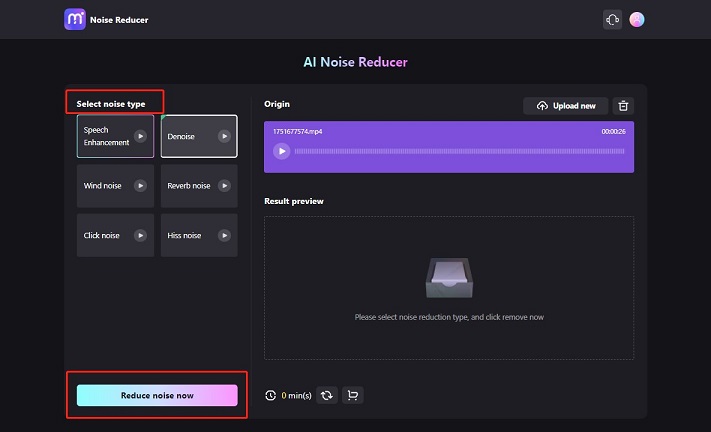
Step 3. Choose the type of noise you want to remove, and then tap the Reduce noise now button to begin the process.
Step 4. Click Download to save it.
MiniTool MovieMakerClick to Download100%Clean & Safe
Bottom Line
After reading this post, you may have mastered how to remove background noise in Final Cut Pro. Now you can choose one way from them and go to remove background noise with it.



User Comments :