Learn how to check video resolution and understand why it’s crucial to know video resolution in the comprehensive guide. It also offers the best free way to change the resolution of the video.
What Is Video Resolution
Before learning how to check video resolution, let’s first understand this term.
Video resolution indicates the number of pixels in a single video frame, expressed as width × height. Higher resolution means more pixels, which produces clearer and more detailed visuals.
For instance, a resolution of 1920 × 1080 pixels (1080p) shows that every frame contains 1920 horizontal pixels and 1080 vertical pixels, for a total of 2,073,600 pixels per frame.
Common video resolutions include:
1. SD (Standard Definition): 480p (720 × 480), often seen on older TVs and DVDs.
2. HD (High Definition)
- 720p (1280 × 720), the basic HD resolution.
- 1080p (Full HD, 1920 × 1080), the most widely used video resolution currently.
4. 2K/QHD (Quad HD): 1440p (2560 × 1440), offering better clarity and detail compared to 1080p.
5. 4K/UHD (Ultra High Definition): 2160p (3840 × 2160), mainly used on high-end TVs, movies, and premium streaming.
6. 8K/FUHD (Full Ultra HD): 4320p (7680 × 4320), a cutting-edge display resolution, but not yet widely available.

How to Check Video Resolution on Windows
Now, let’s explore how to check the resolution of a video on a Windows computer.
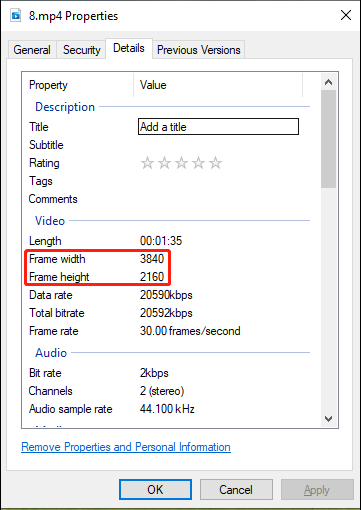
Method 1: Use File Properties
- Right-click the video file and select Properties from the dropdown list.
- Go to the Details tab. Check the Frame width and Frame height options – this is the resolution of your video.
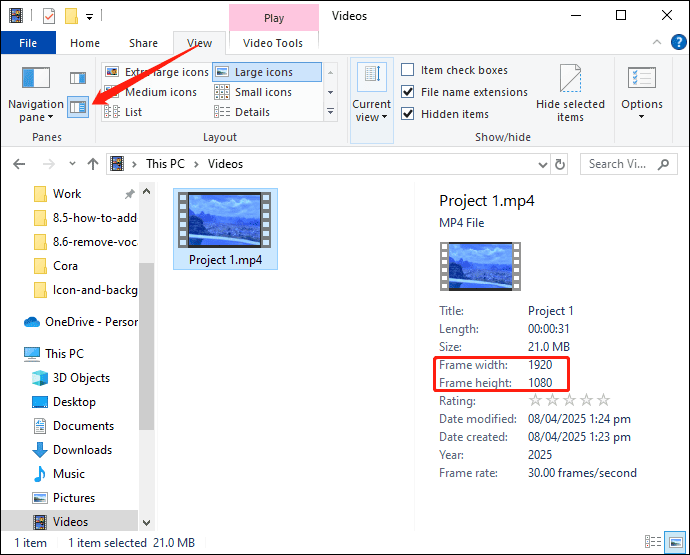
Method 2: View by Details Pane
- Open the folder that stores your target video.
- Switch to the View tab and ensure the Details pane option is selected.
- Click on any video, and its property information will be displayed on the right.
- Find the Frame width and Frame height options.
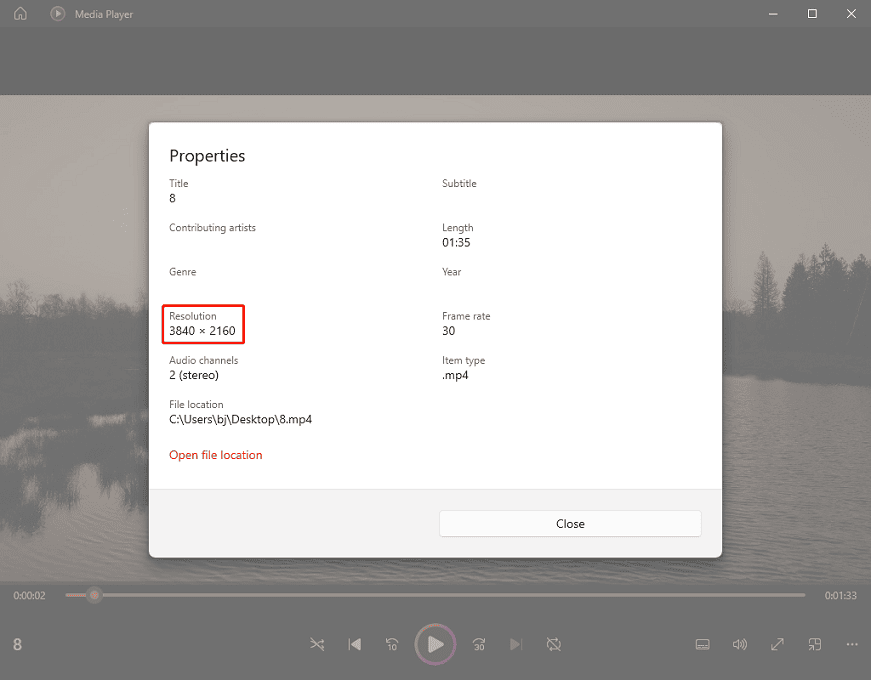
Method 3: Use Windows 11’s New Media Player
Windows includes a new Media Player app to open and manage video and music files. This app also serves as a video resolution checker.
When playing a video with Media Player, right-click on the screen and select Properties. You can then view the Resolution in the overlay.
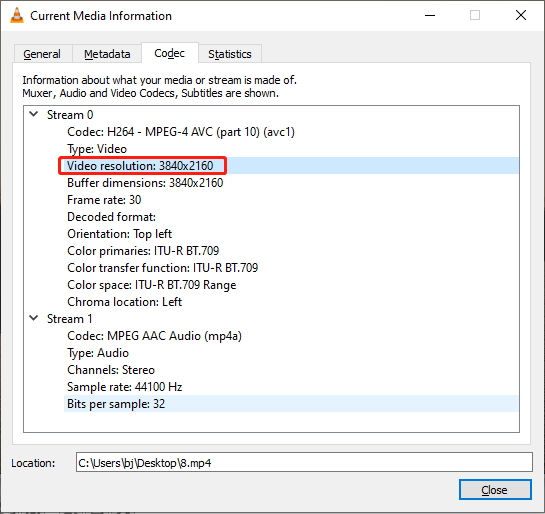
Method 4: Use VLC Media Player
In addition to the Windows built-in apps, some third-party applications also allow you to verify the resolution of a video. VLC Media Player is a free video player that supports almost all video formats. It also lets you inspect the video resolution.
Open your video with VLC Media Player, click Tools on the top menu bar, and select the Codec Information option. Next, you can find out the video resolution, check the video codec, view the frame rate, etc.
The Importance of Checking Video Resolution
As a content creator, I always confirm the resolution of my videos before editing, ensuring a smooth workflow in post-production. Personally, knowing the video resolution has many benefits, and here are some examples.
Set up the Project or Timeline Resolution Correctly
The resolution of your video should match your project settings. Otherwise, the video may have black bars or the image may be stretched.
Boost Performance
Processing high-resolution footage can consume a lot of system resources, and your video editing software may lag. If you know the resolution in advance, you can use proxy media or reduce the playback quality to improve the performance.
Meet Platform Requirements
Generally speaking, social media platforms such as YouTube and Instagram have different resolution preferences for specific content formats. Therefore, it’s necessary to learn the video resolution before uploading. If the resolution isn’t suitable, make some adjustments to achieve optimal quality.
![[10 Ways] How to Fix Adobe Premiere Pro Playback Lagging Issue](https://images.minitool.com/moviemaker.minitool.com/images/uploads/2023/03/premiere-pro-playback-lag-thumbnail.jpg)
How to Lower the Resolution of Video
If you need to lower the video resolution, such as from 4K to 1080p or 720p, to reduce its file size, you can try MiniTool MovieMaker. It’s an easy-to-use and feature-rich video editor without a watermark.
Step 1. Get the Video Editor
Click the button below to download and install MiniTool MovieMaker on your PC.
MiniTool MovieMakerClick to Download100%Clean & Safe
Step 2. Import Your Video
When you launch the application, close the pop-up window to access the main interface. Then, click the Import Media Files button to upload your video. Next, add it to the timeline.
Step 3. Edit Your Video (Optional)
Edit your video by trimming, cropping, speed changing, applying filters, adding text, and more.
Step 4. Lower the Video Resolution
Click the Export button in the upper right corner to open the Export window. Expand the Resolution menu and choose one that meets your needs.
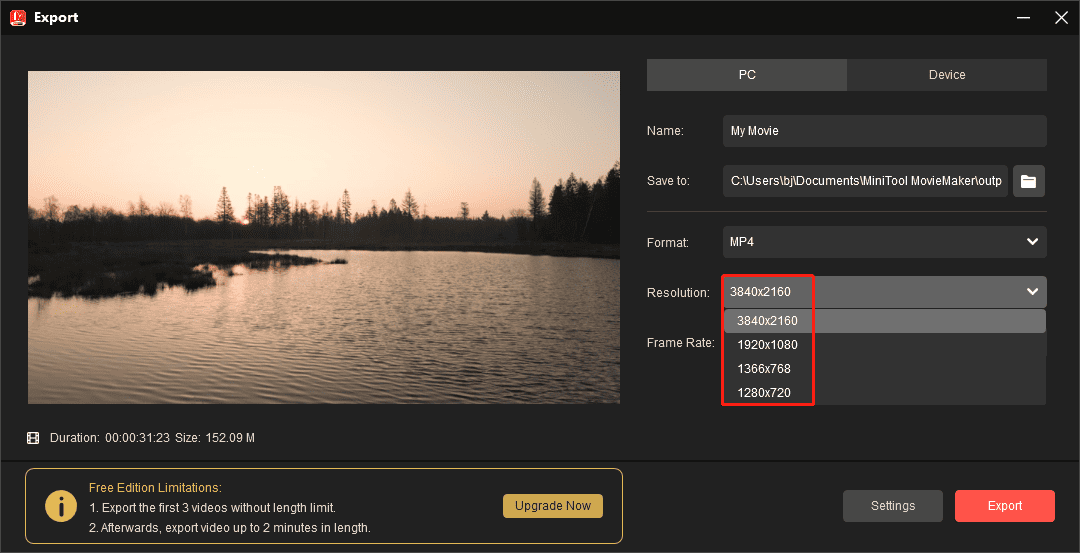
Finally, click Export again to start rendering your video.

Conclusion
Video resolution is important because it directly determines the clarity and details of your content, as well as how it fits on your screen. Therefore, it is crucial to know how to check video resolution.
Now, it’s your turn. Try the above instructions to get the resolution information of your footage.
About The Author

Position: Columnist
Cora is a tech writer specializing in digital media workflows, with over six years of hands-on experience in video post-production, media transcoding, and screen capture. Her writing is always clear and practical. Cora also produces in-depth software reviews for users across skill levels to help them find the right tool and enjoy video editing.
User Comments :