YouTube Shorts, the short-form section of YouTube, are vertical videos no longer than 60 seconds. Want to add captions to YouTube Shorts? This article from the free video editor - MiniTool MovieMaker will introduce to you how to add captions to YouTube Shorts.
In the following content, you will learn the requirements of YouTube Shorts captions, how to add captions to YouTube Shorts manually using YouTube Studio, and how to add a subtitles file to YouTube Shorts. In addition to those, we will also recommend an excellent video editor that can help you create wonderful videos for YouTube Shorts and enable you to add captions. Now, let’s explore this article.
What Are YouTube Shorts
In 2019, YouTube intends to create YouTube Shorts to compete with TikTok, an online video platform for short videos. After TikTok was banned in several Asian countries in September 2020, YouTube Shorts beta was launched in several Asian countries. In March 2021, the beta was released in the United States, followed by a global release on July 13, 2021.
YouTube Shorts are vertical videos no longer than 60 seconds. Users can scroll through an endless feed of videos on their phones and other devices. YouTube Shorts includes features similar to TikTok, such as live video, simple editing tools, and playlists. It allows users to add subtitles or captions and licensed music. And it also includes tools to edit long-form YouTube videos into YouTube shorts. But few people use YouTube’s editing tools for Shorts.
Why Add Captions to YouTube Shorts
Why do you want to add captions to YouTube Shorts? There must be some benefits that entice you to add captions to your videos. The following content has compiled 3 main benefits for your reference.
#1. Enhance Content Accessibility
Sometimes, when a user watches a video in a public place or a place that requires silence, a video with captions can enable the viewer to fully receive the information that the video is intended to express and convey. Also, captions can help viewers better understand the content of the video. What’s more, adding captions to your YouTube Shorts videos allows those who are deaf or hard of hearing to enjoy your videos.
If your target audience is a global audience, adding captions in corresponding foreign languages can make your video content better understood by more viewers and attract them to follow more content.
#2. Increase Visibility
YouTube’s algorithms rely on a variety of metadata, including captions, to classify and display videos. Captions provide additional keywords and SEO data. Adding captions to your YouTube Shorts videos can increase their visibility on search engines and improve your content rankings, which can make more people see your videos. Furthermore, you will get the opportunity to improve your search engine optimization and achieve when you use captions to work with YouTube’s algorithms.
#3. Improve Content Quality
In addition to improving content accessibility and increasing visibility, adding proper captions to your video can improve the quality of your video. Well-crafted captions not only make the dialogue clear but also convey the tone of the speaker and add context to the visual elements. Those will show that your video is professional and of high quality. Over time, high-quality video content can help you improve your reputation and attract more fans.
Requirements of YouTube Shorts Videos and Captions
No matter whether you want to create a video or add captions to YouTube Shorts, you’d better learn its relevant requirements. This part will give you a detailed introduction. Now, let’s get started!
From the above, we know that the maximum length of YouTube Shorts videos is 60 seconds. Your video can be several 15-second videos combined or one continuous video. More importantly, the video for YouTube Shorts must be in 9:16 aspect ratio and 1920 pixels by 1080 pixels resolution.
YouTube Studio allows you to add captions or subtitles by uploading a subtitle or closed caption file. The thing you need to clarify is what subtitle and closed caption file formats are supported by YouTube Studio. Here are file formats supported by YouTube Studio: SubRip (.srt), SubViewer (.sbv or .suv), MPsub (.mpsub), LRC (.lrc), Videotron Lambda (.cap), WebVTT (.vtt), SAMI (.smi or .sami), RealText (.rt), TTML (.ttml), and DFXP (.ttml or .dfxp)
After learning the YouTube Shorts requirements, we can go to learn how to put captions on YouTube Shorts.
How to Add Captions Using YouTube Studio
YouTube Studio (formerly known as YouTube Creator Studio) is a platform that enables content creators to manage their online presence, analyze audience engagement, manage comments, promote their channels, etc. What’s more, it allows you to edit, schedule, and upload videos. Hence you can use YouTube Studio to add captions to YouTube Shorts videos. Here are 4 options for adding captions including uploading a pre-written file, using auto-sync, typing in captions manually as well as using auto-translate.
To help you learn how to add captions to YouTube Shorts using YouTube Studio, the below content provides you with the detailed steps. Here’s how:
Step 1. Go to the website of YouTube Studio and sign into your account. If you have not uploaded a video, you can click the Create icon at the higher-right corner, choose the Upload video option, and click the SELECT FILES button to upload your video.
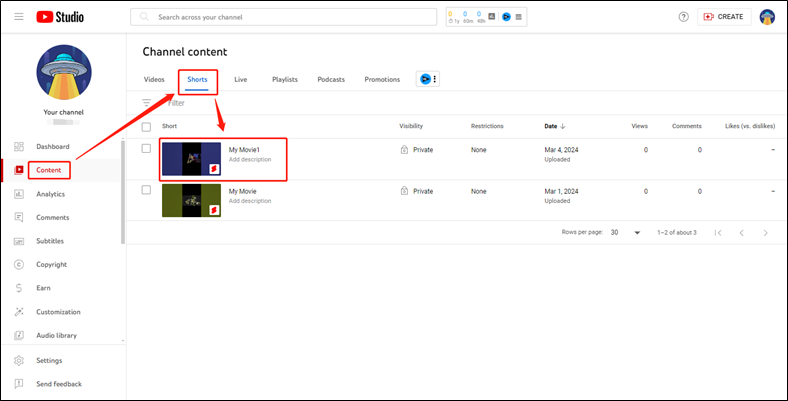
Step 2. You can click the Content option, switch to the Shorts tab to open the video that you intend to add captions, and click Subtitles. Or you can click the Subtitles option from the left menu bar and select the target video.
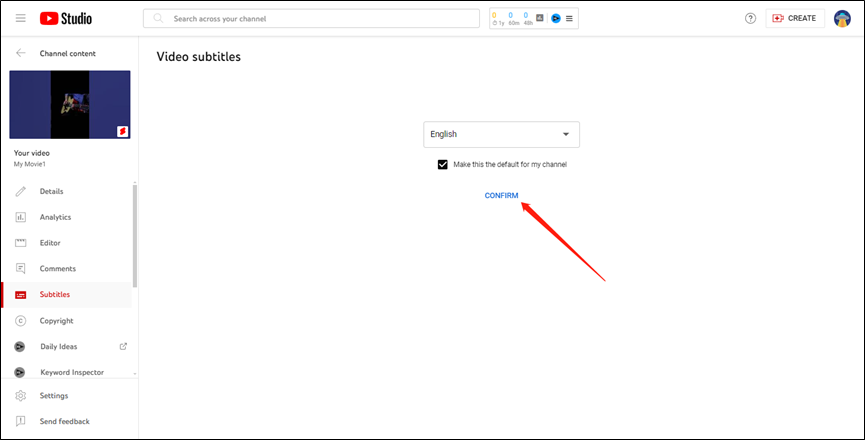
Step 3. Select the language for your captions and click CONFIRM.
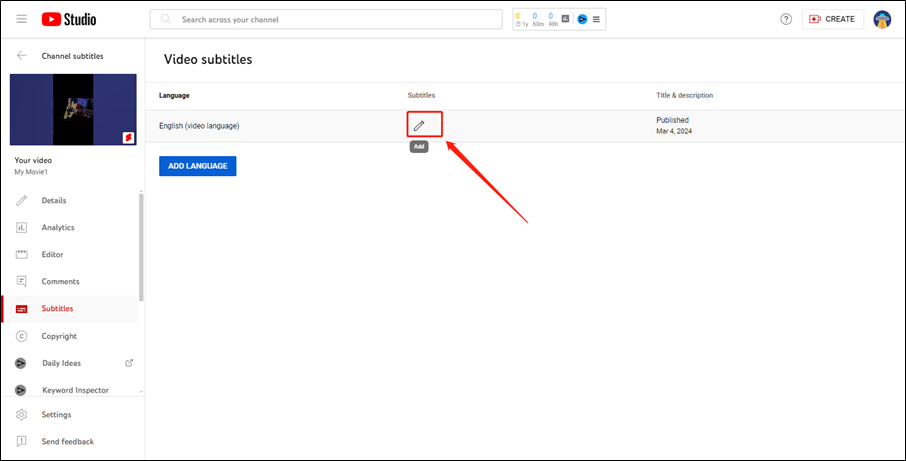
Step 4. Click the Add icon.
Step 5. Then there will appear a popup that displays 4 options for adding captions.
#Option 1: Upload file. It enables you to add captions by uploading a subtitle file that includes what is said in the video, the timestamps for when each line of text should be displayed, and even position and style info.
1. Choose Upload file.
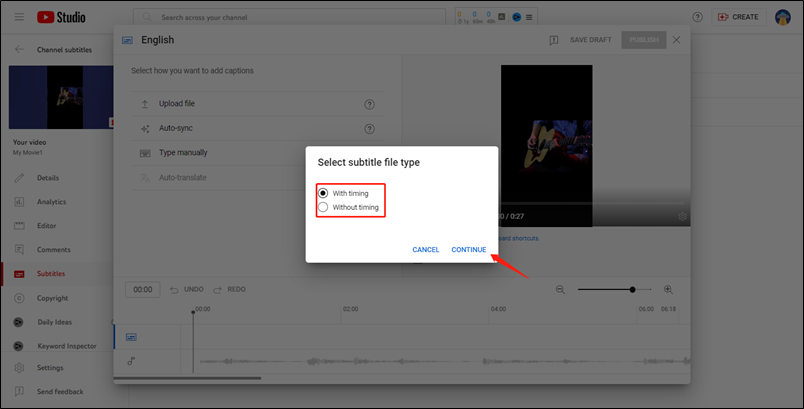
2. select between With timing or Without timing and click CONTINUE.
3. choose a subtitle file and upload it. Then you can check the text and timing of the subtitles.
4. click the PUBLISH button.
#Option 2: Auto-sync. This option enables you to add captions or subtitles when watching a video. You should know that the transcript must be consistent with the language in the video and this option is not recommended for videos longer than an hour or with poor sound quality.
1. Click on the Auto-sync option.
2. Enter the words that are spoken in the video. Or click the three dots next to EDIT TIMINGS and choose the Upload file option to upload your transcript file.
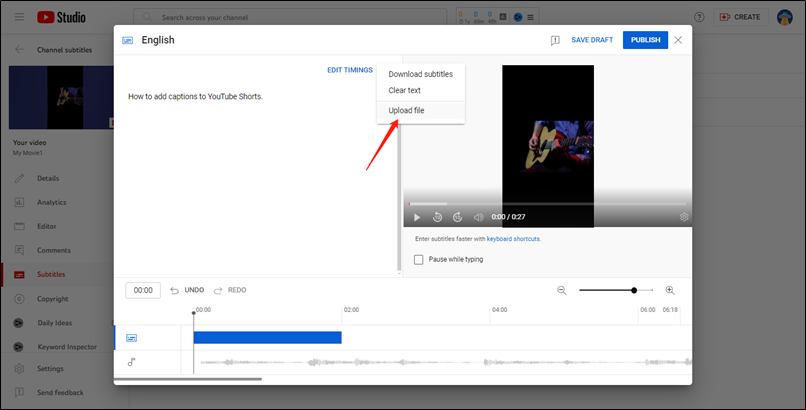
3. Next, click EDIT TIMINGS to set the start and end of a line of subtitles.
4. Click PUBLISH.
#Option 3: Type manually. This one requires you to type or paste transcripts of subtitles and captions and you need to set the start and end times of the subtitles.
1. Select Type manually.
2. Play the video, listen to the audio, and then enter in what you hear. You can press Enter to add a new subtitle.
3. Once you finish adding captions, just click the PUBLISH button.
#Option 4: Auto-translate. It will automatically translate the subtitles in the video. However, this requires you to publish subtitles in the original language of the video first. This way is not suitable for adding captions to YouTube shorts.
How to Add Text to YouTube Shorts
This part recommends a great video editor for you and tells you how to caption YouTube Shorts with it.
An Excellent Video Editor for YouTube Shorts
MiniTool MovieMaker is an excellent video editor without watermark that can help you edit and create videos for YouTube Shorts. Also, it is a good video maker for different social media, such as Facebook, Instagram, LinkedIn, and others. It provides you with various useful editing features like trimming, merging, rotating, or reversing videos, adding transition effects, making color corrections, changing video speed, adding music to a video, fading music, changing aspect ratio, and making other editions.
What’s more, it offers various text templates that enable you to add captions, titles, and ending credits. Besides, MiniTool MovieMaker provides several Hollywood-style video templates that help you create wonderful videos easily and quickly.
Main Features of MiniTool MovieMaker:
- It enables you to edit and create videos easily with its intuitive interface.
- It provides you with a full set of basic editing tools.
- It helps you create video from images.
- It supports most common formats for importing and exporting.
- It offers several aspect ratios for different platforms.
- It offers professional video templates to make videos easily.
- It has many royalty-free resources like music, transitions, text, animated stickers, etc.
- It allows you to apply 3D LUT effects and make color corrections.
- It can convert video formats like converting MOV to MP4, WMV to MP3, 3GP to AVI, etc.
- …
Add Text to YouTube Shorts with MiniTool MovieMaker
Below is a guide on how to add text to YouTube Shorts using MiniTool MovieMaker.
Step 1. Get the installer of MiniTool MovieMaker by clicking the below download button and install it on your desktop.
MiniTool MovieMakerClick to Download100%Clean & Safe
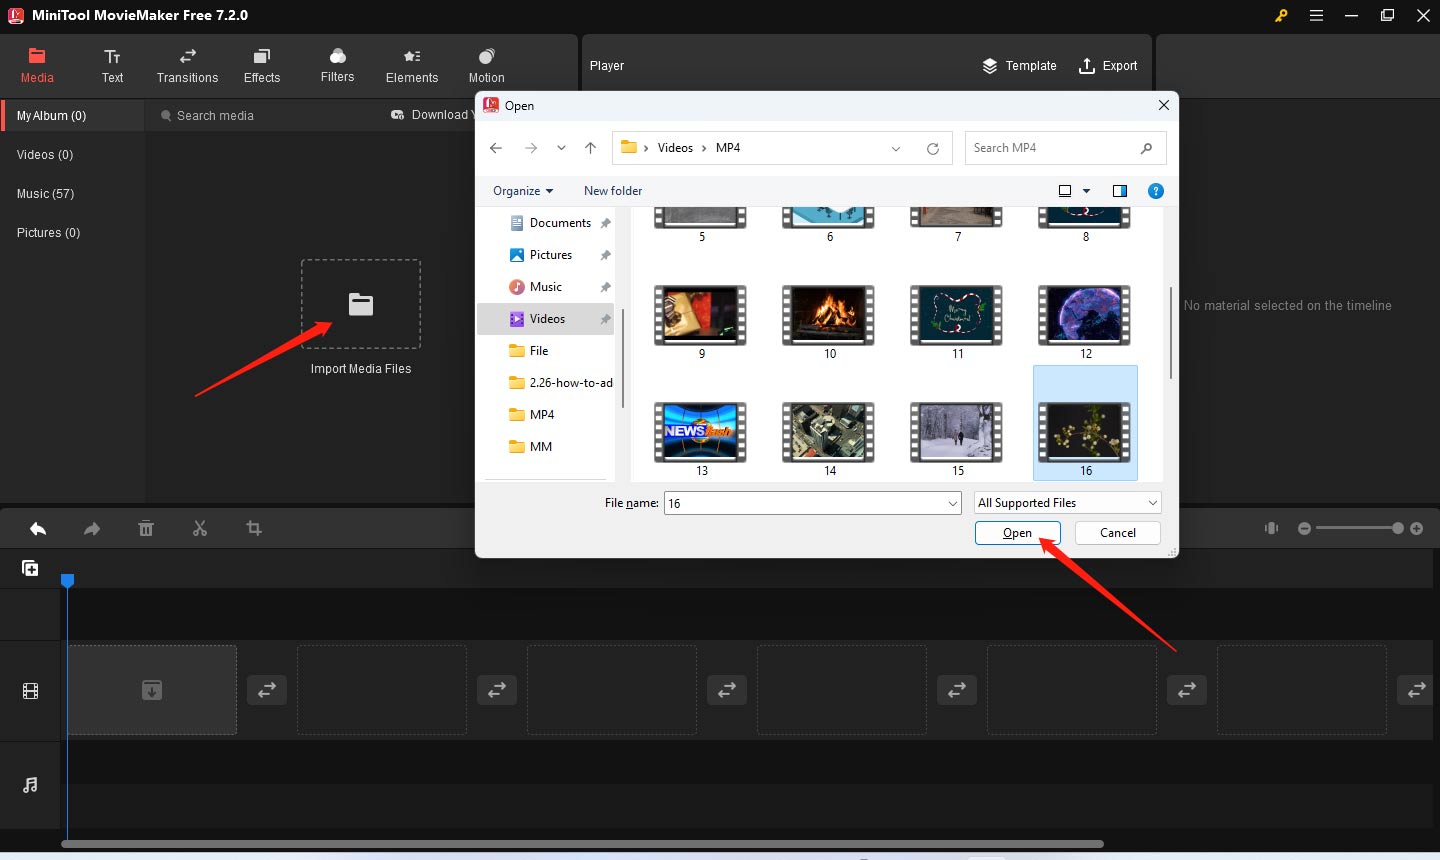
Step 2. Launch this video editing software and click the New Project button to enter the main editing interface. Click the Import Media Files area to choose the video for YouTube Shorts and click Open to upload it to the Media library.
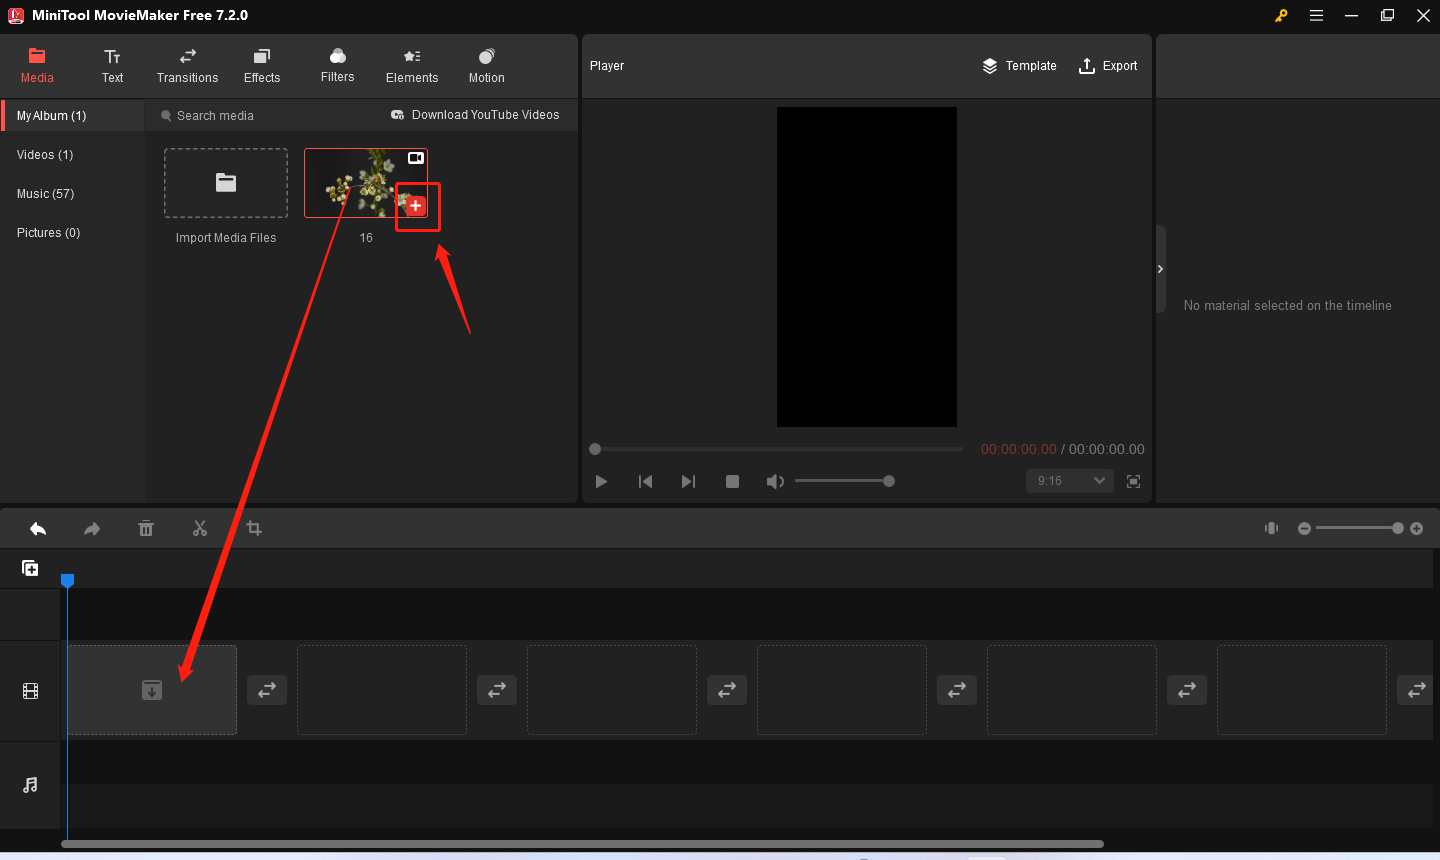
Step 3. You can click the plus icon at the lower-right corner of the video clip to add it to the timeline. Alternatively, you can directly drag and drop it onto the timeline.
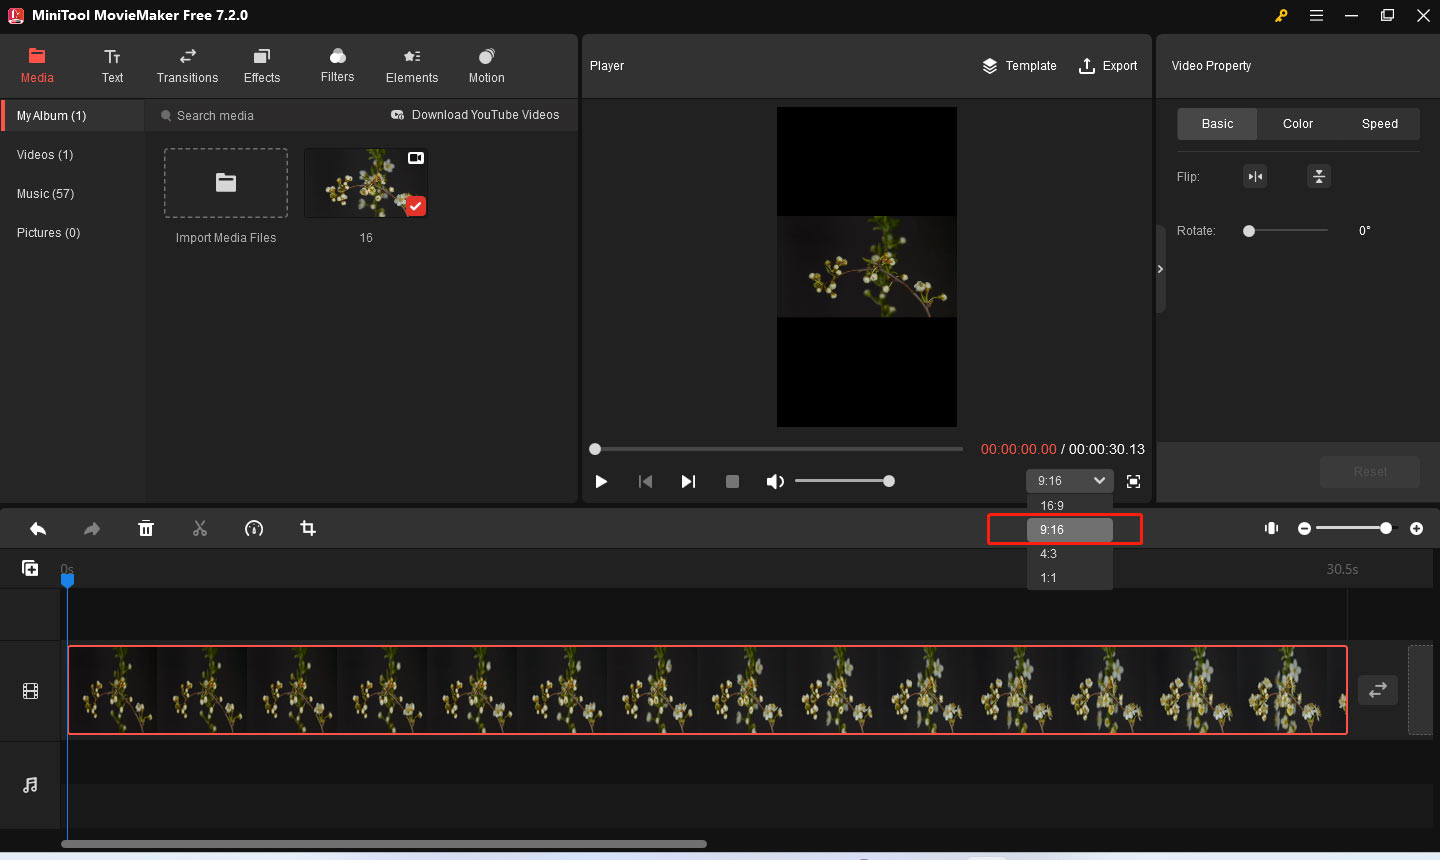
Step 4. If your video is not in the 9:16 aspect ratio, you can go to the Player window, open the aspect ratio list, and click the 9:16 option.
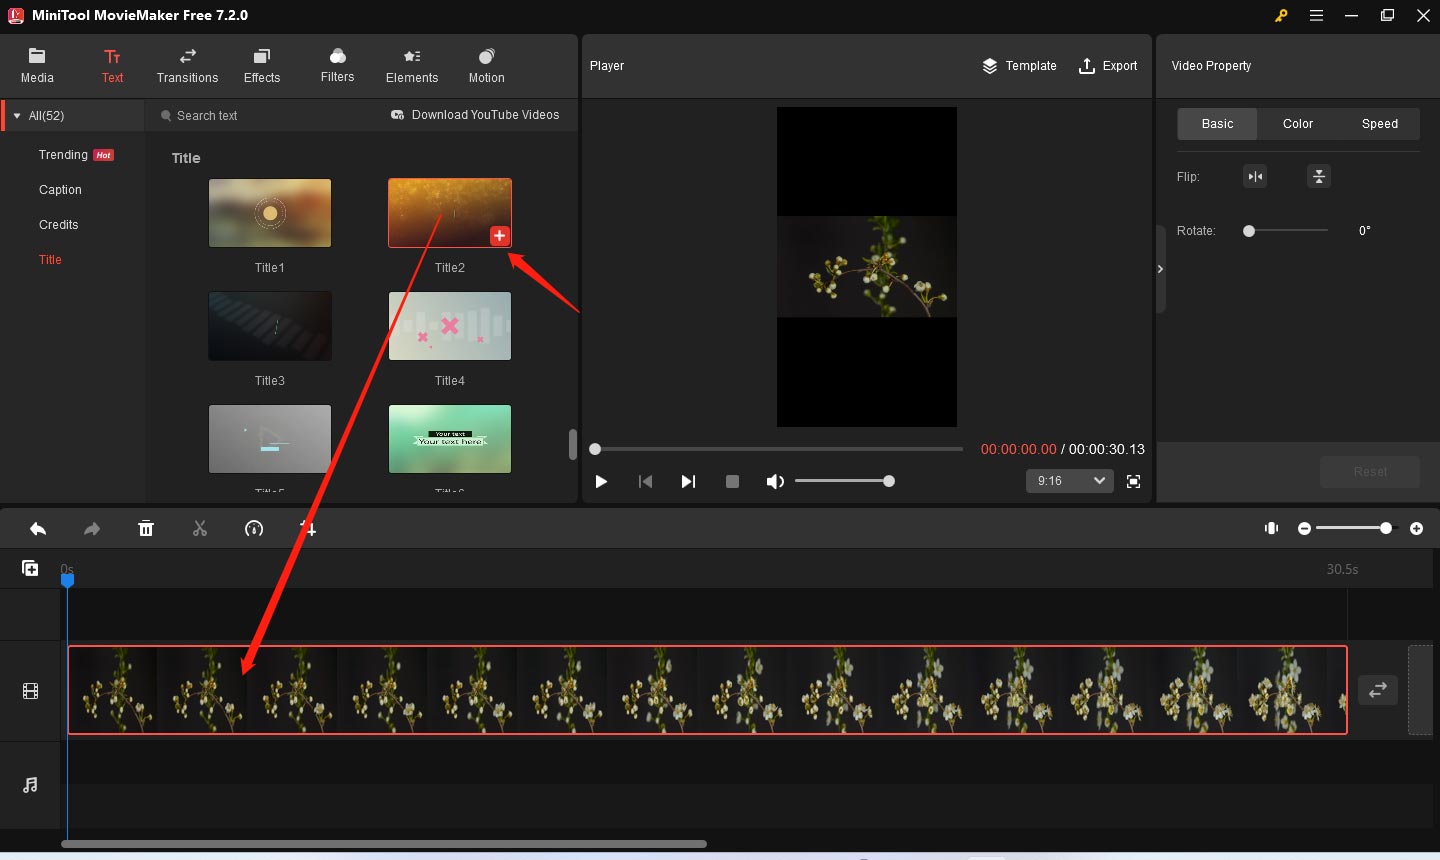
Step 5. Add a Title: Click the Text tab, choose the Title option from the left, and you can see various title templates here. You can move your mouse cursor over the title to preview it. Find the title you prefer and directly drag and drop it at the beginning of the timeline. Or you can click the first video clip on the timeline and click the plus icon on the desired title to add it to the front of the first video clip. Then you can type in the title content you want to convey in the Text Property section.
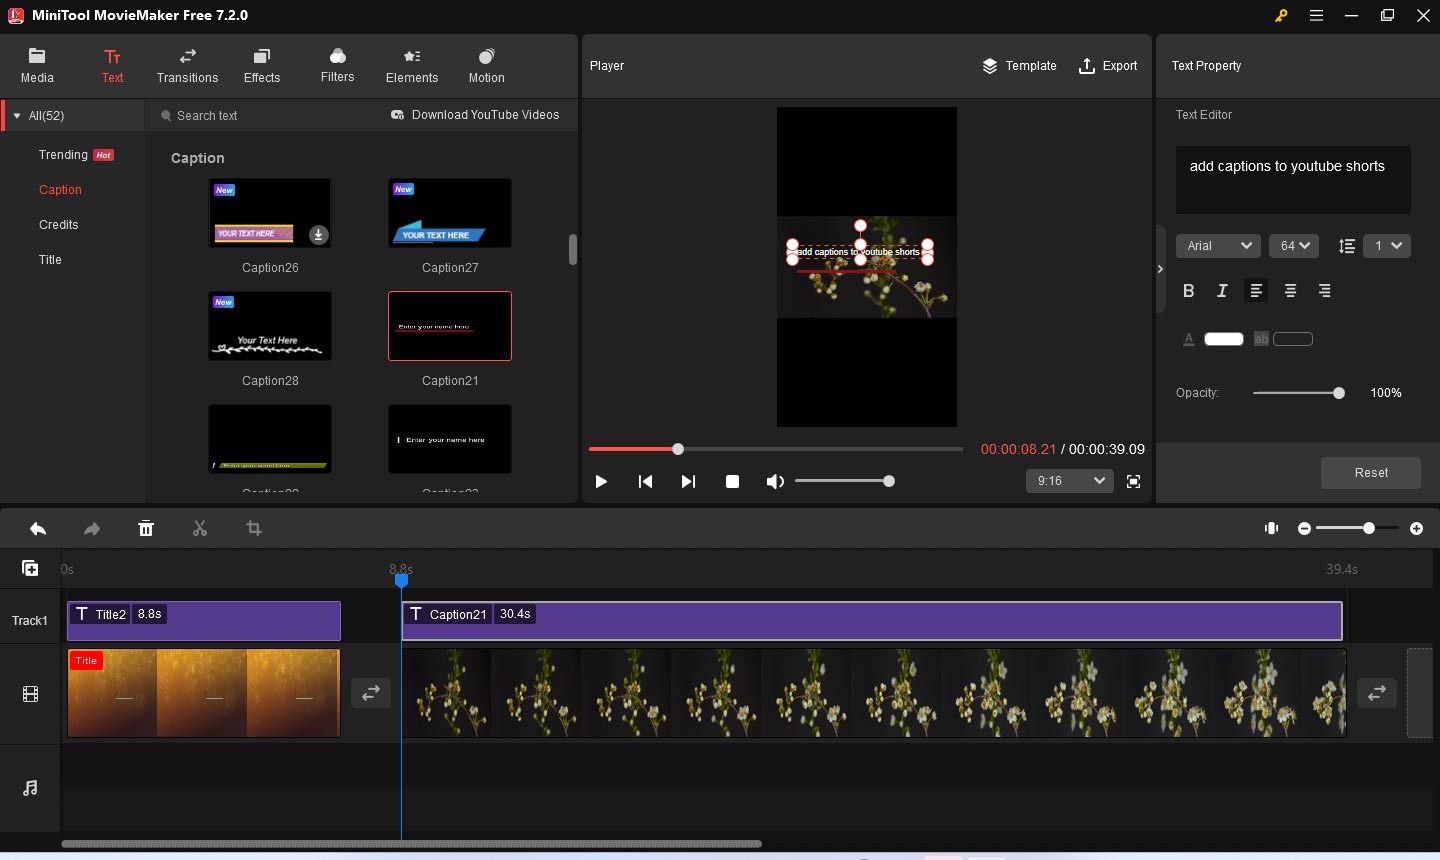
Step 6. Add Captions: click the Caption option and choose the caption you like. Then you can add it to the timeline by directly dragging and dropping. Next, enter captions in the Text Property section. To adjust the duration of the caption, you can move your cursor over the end of the caption track. Until the cursor becomes a double-headed arrow, you can drag it leftwards or rightwards to shorten or lengthen its duration. You just need to repeat the above operations to add more captions.
Step 7. Add Ending Credits: Adding credits to a video is the same as adding a title. But the credits should be at the end of the video.
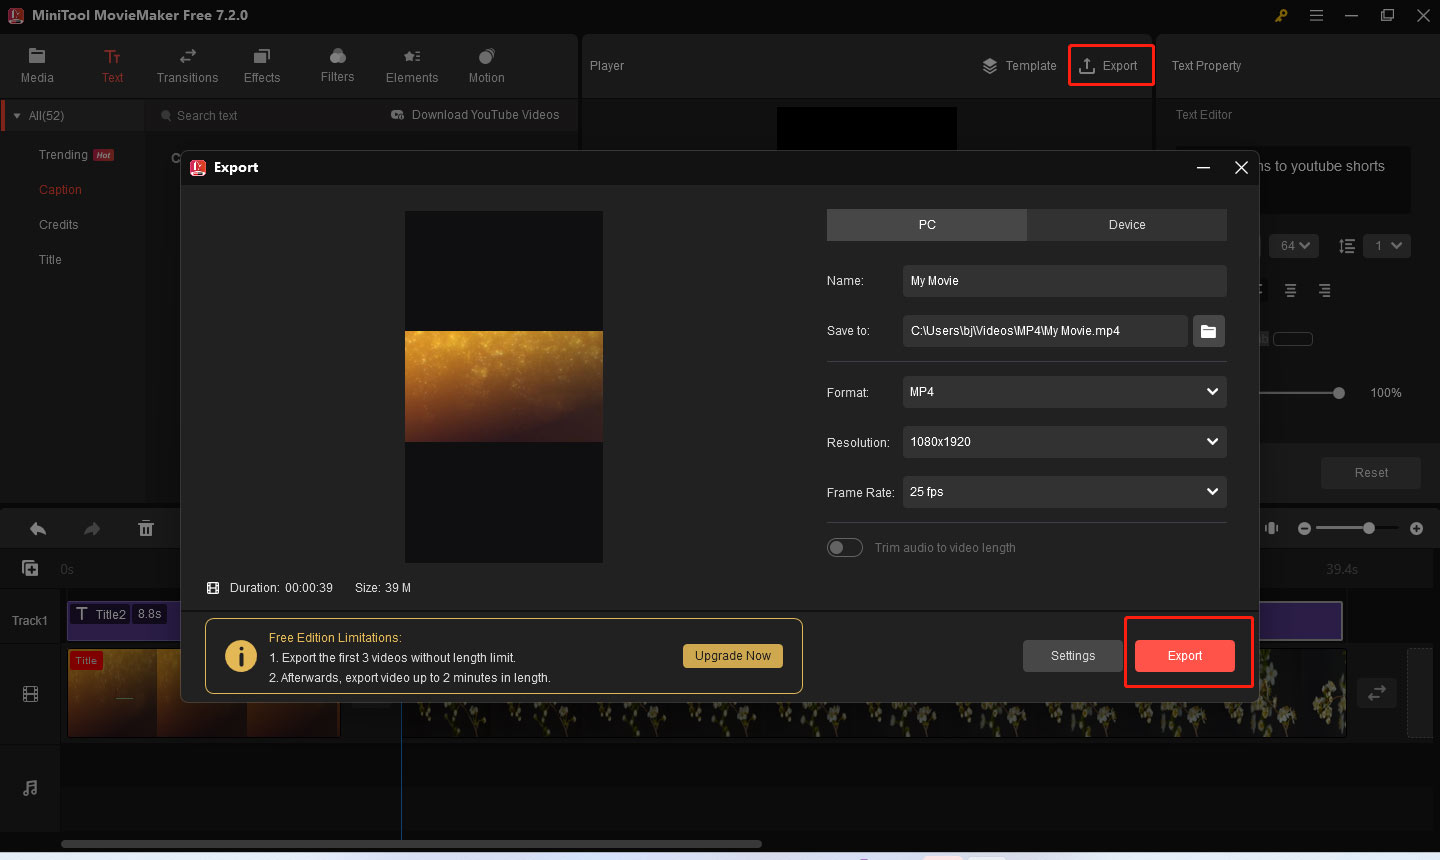
Step 8. You can also use its various tools to fine-tune the video. After you finish making editions, you can click the Export option in the Player section to open the Export window. In this window, you can rename the video, change its video format, adjust its resolution, change its frame rate, and others. Finally, click the Export button.
Final Thoughts
How to add captions to YouTube Shorts? You can use YouTube Studio or other third-party video editors like MiniTool MovieMaker. With MiniTool MovieMaker, you can not only add captions but also add a video title and credits. You can refer to the above guidance for reference. Hopefully, this article is helpful to you!
Finally, if you have any questions or comments while using MiniTool MovieMaker, please don’t hesitate to contact us via [email protected].


User Comments :