In this post, we will not only show you how to speed up video in Avidemux but also recommend another video editor - MiniTool MovieMaker for the task. Scroll down the page for details.
It is possible to make timelapse or speed up video with the help of a variety of advanced software programs. Such effects bring fun and adventure to your edited video, and you may be keen to learn about tricks to do such editing. But before you perform, it is vital to understand the basic difference between video acceleration and time lapse.
Speed up video. This is the process of recording video at a standard frame rate and then playing the recorded one at a faster frame rate. It increases the pitch but tries to decrease the video duration.
Time lapse video. The time lapse video is created by capturing video frames at a very slow speed as compared to the standard rule of 16 frames per second. After shooting, this type of video is played on the normal frame rate or at slightly slower, and the long events can easily be reduced into short clips.
How does Avidemux speed up video? Refer to the step-by-step instructions below.
How to Speed Up Video in Avidemux
It is a lot easier to speed up video in Avidemux; all you have to do is:
Step 1: After downloading and installing the Avidemux software tool, double-click it to open. Go to File > Open… to import the video that you want to speed up from your local folder. Or, you can drag and drop the video directly into Avidemux.
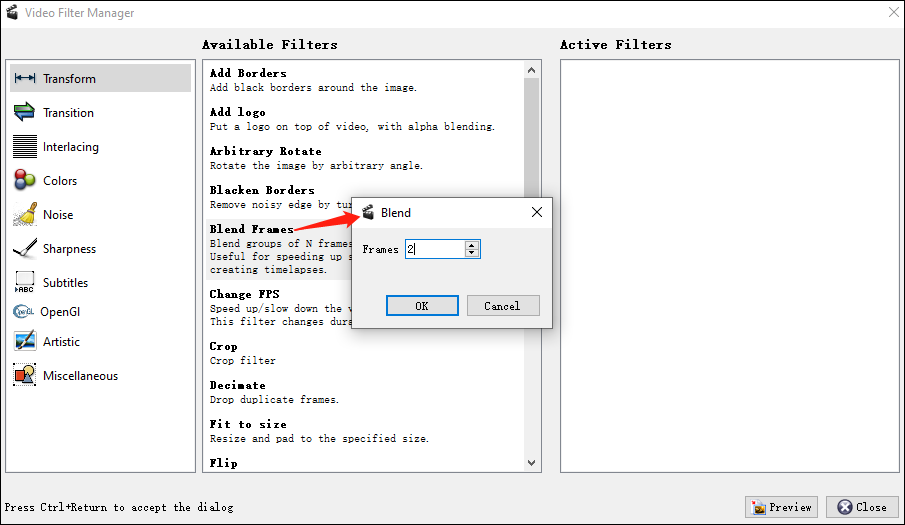
Step 2: Next, select a video output format by clicking the Copy drop-down button under Video Output. At this point, click the Filters button or go to the top menu Video and select the Filters option. When you are in the Video Filter Manager window, head to Transform > Blend Frames to increase Frames to the desired value, and then click the OK button.

Step 3: After that, you can click on the Preview button to preview the accelerated video. If you are not satisfied with that, you can click on Blend Frames from Active Filters and select the Configure option to readjust the value.
Step 4: Once done, close the preview window and go back to the main interface. Go to File again. From the drop-down list, click on Save to specify the output destination and customize the file name. Finally, click the Save button to start exporting your accelerated video.
Bonus Tip: How to Speed Up Video with an Alternative to Avidemux
MiniTool MovieMaker is one of the best alternatives to Avidemux for speeding up or slowing down videos in just a few simple steps. Also, it is loaded with other nice video editing features, such as adding text, splitting or trimming, inserting music or sound effects, applying transitions, filters, motions, stickers, flipping or rotating, and more.
Here’s how to speed up video using MiniTool MovieMaker.
Step 1: Click on the following button to download and install MiniTool MovieMaker on your computer. Launch this video editor app and close the promotion window to enter the main interface.
MiniTool MovieMakerClick to Download100%Clean & Safe
Step 2: Click the Import Media Files option to import the video that you want to accelerate. Drag and drop the imported video to the timeline.
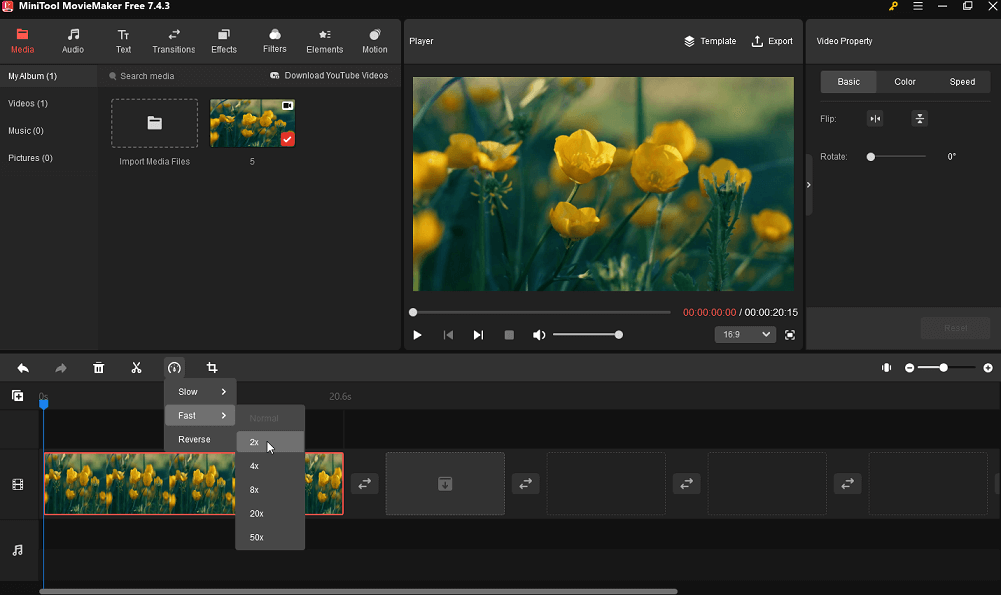
Step 3: Leave the video on the timeline highlighted and click the Speed icon on the toolbar, then place the mouse cursor over the Fast option to select the value you want to use.

Step 4: If you are satisfied with the preview, you can click on Export at the top right to make some output settings, for example, give your accelerated video a name, specify the destination folder, and change the video format, resolution, frame rate, etc. Finally, click the Export button to save the accelerated video to your computer.
Conclusion
This post shows you step-by-step how to speed up video in Avidemux. You can also try to use an alternative to the video editor, such as MiniTool MovieMaker, to adjust the speed of the video. Hopefully, these methods are helpful to you.


User Comments :