What Is Light Flicker in Video
Before finding out how to flicker from video, let’s first understand this effect.
Light flicker refers to irregular brightness changes in videos, occurring when the brightness and intensity of light in a video constantly change. Many factors can cause this effect, including mismatched video frame rate, light source problems, equipment failures, etc.
Light flicker can be distracting, affecting the visual experience and downgrading the video quality and professionalism. You can eliminate this effect from your videos to elevate the overall quality and achieve seamless video playback. However, appropriate use of the flicker effect when paired with music can help capture your audience’s attention.
How to Remove Flicker in Premiere Pro
Premiere Pro is a professional video editing program that provides almost all the tools and effects to turn your imagination into reality. This app might come to your mind when you are worried about how to remove flicker from video.
Premiere Pro has an Anti-flicker Filter effect in the Effects Controls tab > Motion effect for fixing flickering lines and details on the interface screen by slightly blurring the image. However, light flicker is a different kind of flicker and cannot be eliminated by this filter.
If you’re wondering how to remove light flicker in Premiere Pro, follow the steps below.
Step 1. Launch Adobe Premiere Pro and import your video into the timeline.
Step 2. Duplicate the clip by holding down the Alt key, clicking and dragging the clip over the video layer.
Step 3. Highlight the clip on video layer 2, go to Opacity under Effect Controls, and set the Opacity to a lower number like 50. Then, the flicker in the video will be removed. The only side effect, however, is a slight increase in blur in your footage.
Step 4. Export the video from Premiere Pro.
This is the easiest way to remove flicker from video in Premiere Pro, but it may not work well for stubborn flickering in your videos. In addition to the built-in tools, you can add plug-ins to get the most out of Premiere Pro. To eliminate flickers from videos effectively, you can resort to the Flicker Free plug-in by Digital Anarchy, which is also compatible with After Effects, DaVinci Resolve, Vegas, Avid, etc.
How to Remove Flicker from Video in CapCut
CapCut is also a popular video editor because of its ease of use and wide range of features, making it easy to create high-quality videos on phones and computers. If you’re looking for a tool to eliminate light flicker, the CapCut desktop app won’t let you down.
With the power of intelligent algorithms, CapCut can automatically detect and process flickering frames with just one click. This advanced flicker removal feature can fix distracting flickers caused by various factors.
Here’s how to remove flicker from video in CapCut.
Step 1. Open the CapCut desktop app on your computer and click the + Create project button on the top to enter the app’s main interface.
Step 2. Click the + Import button to open your video and add it to the timeline.
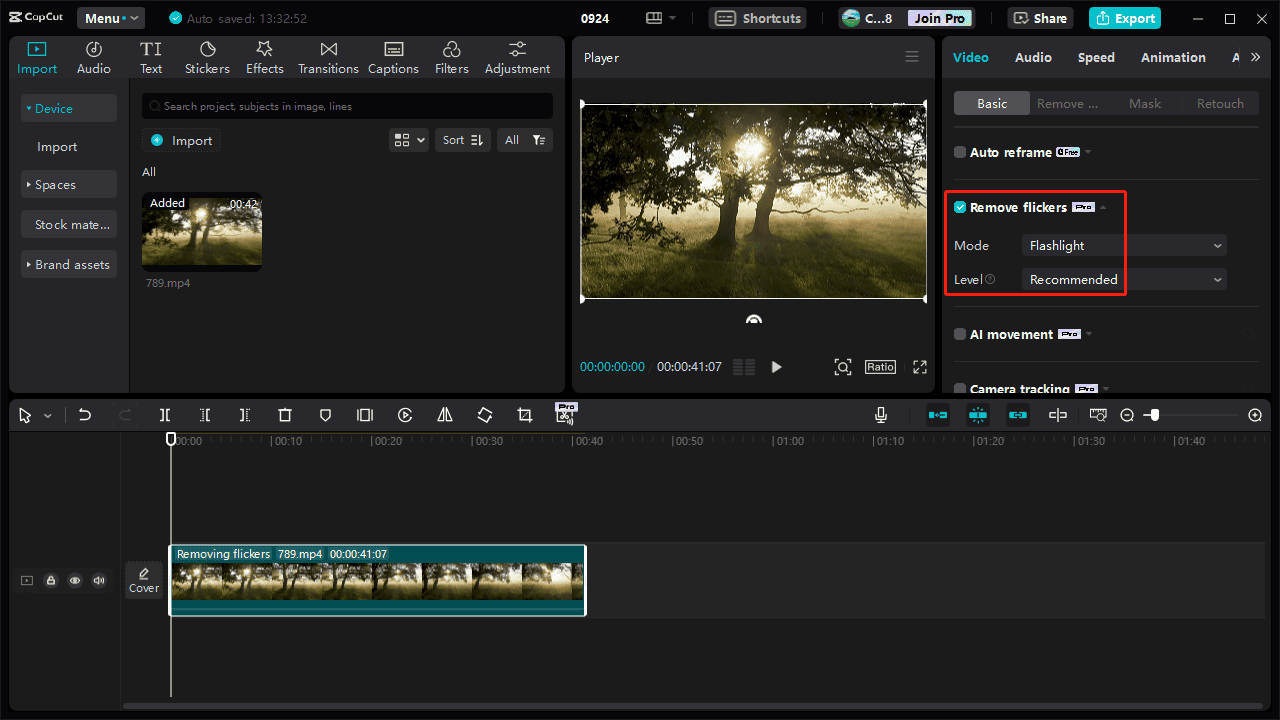
Step 3. Select the video on the timeline and go to Basic under the Video tab. Scroll down and check the box next to Remove flickers. Then, choose your preferred method and level to eliminate the flicker in the video.

Step 4. Once done, click the Export button to start rendering the video from CapCut.
MiniTool MovieMakerClick to Download100%Clean & Safe
Conclusion
This post covers two techniques for removing flicker from videos to help you enhance the video quality and viewing experience. Now, it’s your turn. Follow these steps to make your video more professional and deliver high-quality content.


![How to Fix Premiere Pro Audio Not Playing [Solved]](https://images.minitool.com/moviemaker.minitool.com/images/uploads/2024/10/premiere-pro-audio-not-playing-thumbnail.jpg)

User Comments :