This post from MiniTool video editing software will explain how to add flicker effect to video to make it dramatic and visually appealing.
What Is the Flicker Effect
Before we explore how to add flicker effect to your videos, let’s first know a little bit about this effect.
The flicker effect refers to the rapid, violent fluctuations in brightness that occur between scenes in video. When the signal is unstable or the screen malfunctions, the TV is the first device to experience this situation. Black and white are often used as contrasting colors for a shimmering effect. Other shades are also an option.
Flicker effects are often used in Instagram and TikTok videos. When paired with music, flashing videos can always be used to highlight key points or grab your audience’s attention.
How to Add Flicker Effect to Video on CapCut
CapCut has become a very popular video editing application in recent years due to its ease of use and comprehensive editing features. It’s also a favorite video editor for many content creators.
CapCut offers a variety of tools and visual effects. You can resize, trim, mirror, and reverse videos, add text, filters, transitions, stickers, and more to take your footage to the next level. Additionally, this app has a huge library of effects where you can find various video effects and body effects.
Here’s how to add flicker effect to videos on CapCut.
Step 1. Open the CapCut app on your PC. If you haven’t installed it on your PC, go to the app store on your device to get it.
Step 2. Log in to CapCut using your account. Click the + Create project button on the top to access the app’s main interface.
Step 3. Click the + Import button to upload your video into this app and drag it to the timeline.
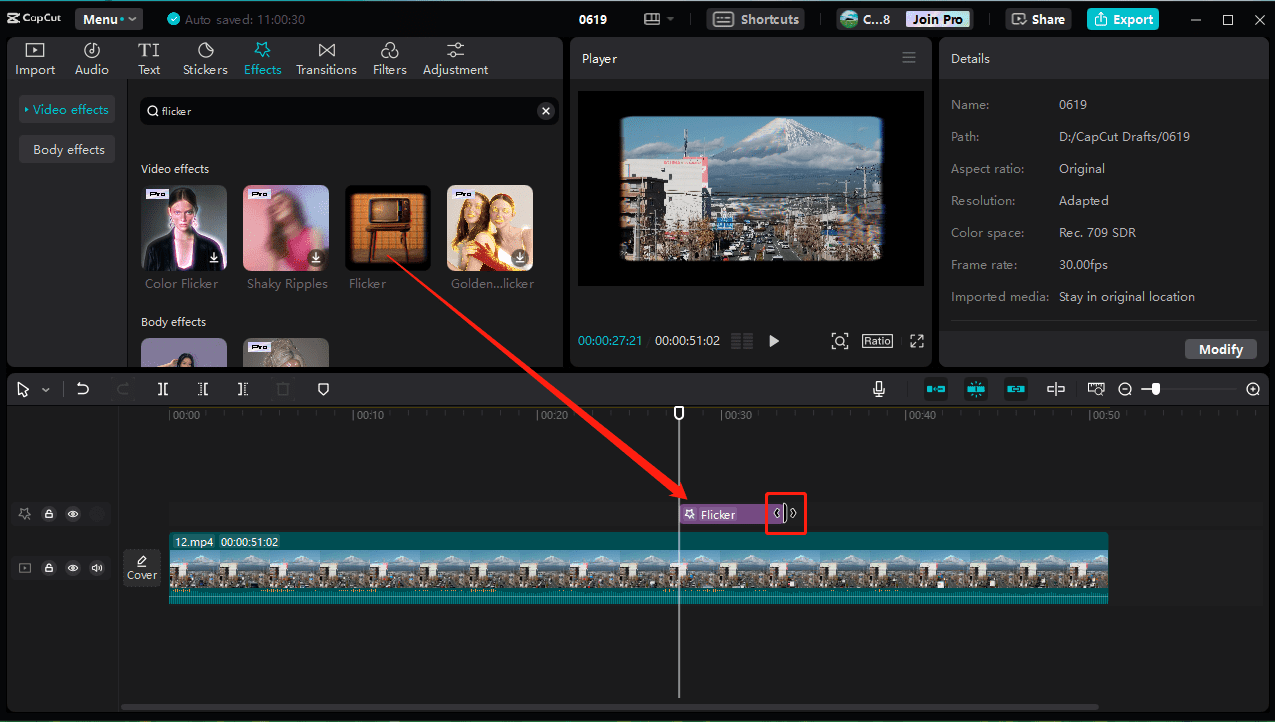
Step 4. Go to Effects on the top menu bar, enter “flicker” in the search box, and press Enter to load all flicker effects in CapCut. Find the Flicker effect and download it, then click the + icon to apply it to your video.

You can drag the effect track directly to change where it appears in the video, or hover the mouse over the track’s start or end point and drag the arrows to change its duration.
Step 5. If you’re satisfied with the result, click the Export button, complete the output settings, and export the video.
How to Add Flicker Effect in Premiere Pro
Adobe Premiere Pro is a professional video editing application, but how to create a flicker on this software? Follow the steps below.
Step 1. Launch Premiere Pro and click File > Open Project to open your project. Or, create a new project, import your video clip, and add it to the timeline.
Step 3. First, you should create a new adjustment layer. To do this, click the New Item button (a small folder-like button) in the bottom left of the project panel, select Adjustment Layer, and click OK.
Then, drag the adjustment layer above the video clip on the timeline and adjust the length and position of the adjustment layer to determine where the flicker effect begins and ends.
Step 4. Go to the Effects panel, search for “strobe”, and then drag the Strobe Light effect on top of the adjustment layer.
Step 5. Go to the Strobe Light settings under the Effects Control on the left, set the Strobe Duration to 0.01, the Strobe Period to 0.02, and set the Blend with Original to 85%. Then, preview your video.
Step 6. To export the video, go to File > Export > Media to open Export Settings, choose the video format and output folder, and click Export.
MiniTool MovieMakerClick to Download100%Clean & Safe
Conclusion
Now it is your turn. Choose a way and add a flicker effect to your video.


![How to Create a Bokeh Effect to Your Video [Solved]](https://images.minitool.com/moviemaker.minitool.com/images/uploads/2023/12/video-bokeh-effect-thumbnail.jpg)

![[10 Ways] How to Fix Adobe Premiere Pro Playback Lagging Issue](https://images.minitool.com/moviemaker.minitool.com/images/uploads/2023/03/premiere-pro-playback-lag-thumbnail.jpg)
User Comments :