Have you ever encountered no sound during playback in Premiere Pro? How to fix the Premiere Pro audio not playing issue? This post explains 6 methods to help solve the annoying problem and get your audio work in this professional video editing software.
When editing in Premiere Pro, you may sometimes find that a clip plays without sound. It’s easy to panic when you open a project in Premiere Pro and notice there’s no sound, but there are several methods you can try to resolve the issue. So, don’t worry. Try the solutions to Premiere Pro audio not playing now.
MiniTool MovieMakerClick to Download100%Clean & Safe

#1. Check the Volume
If you can’t hear audio when you play a project in Premiere Pro, first, check the volume on your computer. Click the Speaker icon on the taskbar and select the Open Volume mixer option. Make sure the volume in Premiere Pro is not muted, then turn the volume up slightly to see if there is sound in the project.
#2. Check the Audio Hardware in Premiere Pro
If your video does have sound and the volume is not muted on your computer, check the audio hardware in Premiere Pro. Click Edit in the top left, hover your mouse over Preferences, and click on Audio Hardware.
In the Preferences window, expand the Device Class pop-up menu, choose an ASIO driver when available or select MME to adjust the audio hardware driver settings. Then, open the Default Input drop-down list and select the microphone you’re using, next open the Default Output drop-down list, select the correct audio device you want to use, and click OK.
After that, play your video again. If you still can’t hear sounds, repeat the above step and try a different audio device.
#3. Enable the Audio Track
If audio is missing from some clips, check if you have disabled the audio track. In the timeline panel, look for a speaker icon in the title box of the audio track. If no speaker icon appears, the audio track is disabled. Click in the box to enable the audio track to fix Premiere Pro audio not playing issues.
In addition, make sure there is no muted track in your project and increase the volume if necessary. Moreover, make sure that all the individual clips are not disabled.
#4. Update the Audio Driver
After following the steps above if you are still experiencing issues with Premiere Pro audio not playing, try updating the audio driver. This should resolve your problem if it were caused by an outdated driver for your computer’s sound card.
#5. Clear Media Cache
Alternatively, you can delete the media cache to fix the audio not playing in Premiere Pro. Click Edit in the upper left corner, select Preference, and click Media Cache. Then, click the Delete button next to Remove Media Cache Files to remove media cache files in Premiere Pro.

#6. Convert Codec Incompatible Clips
If the audio is still not playing after you complete the above steps, consider the codec incompatibility issues. If your video’s audio has been encoded with an incompatible codec, Premiere Pro can’t decode files and play the audio properly. So, you should transcode the video in a different audio encoding format.
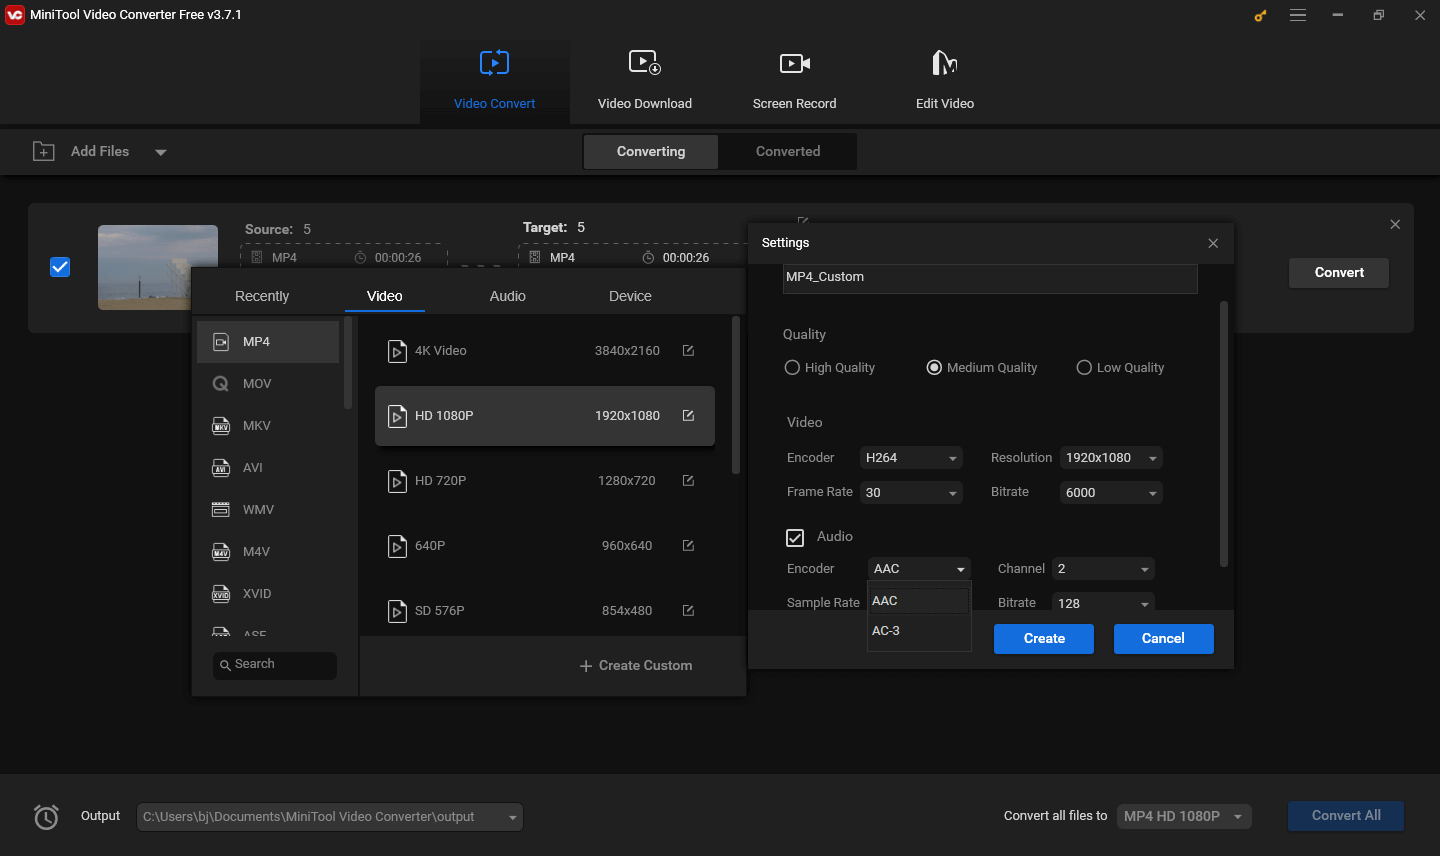
To complete this task, a video file converter is necessary. Here we recommend a free video converter without watermarks, MiniTool Video Converter. It allows you to change the video/audio container formats, codecs, bitrate, video resolution, frame rate, etc.
MiniTool Video ConverterClick to Download100%Clean & Safe
Step 1. Launch MiniTool Video Converter after installation. Click on the Add or Drag files here to start conversion area under the Video Convert tab to import your video file.
Step 2. Click the Edit icon in the Target box to open export settings. Switch to the Video tab, select MP4, and click on the desired profile. Or you can click the + Create Custom to create a custom MP4 format by configuring the audio and video parameters. Make sure Premiere Pro supports the selected video and audio encoders.
Step 3. You’ll return to the main interface of MiniTool Video Converter after selecting the output format, click the Convert button to start the task. Once done, import the converted video into Premiere Pro and see if the no-audio issue is fixed.
Conclusion
That’s all about the troubleshooting tips for Premiere Pro audio not playing issues. We hope these steps resolve the audio problems and you can enjoy a smooth editing experience in Premiere Pro.
About The Author

Position: Columnist
Cora is a tech writer specializing in digital media workflows, with over six years of hands-on experience in video post-production, media transcoding, and screen capture. Her writing is always clear and practical. Cora also produces in-depth software reviews for users across skill levels to help them find the right tool and enjoy video editing.
User Comments :