How to Change the Shape of an Uploaded Image in Canva?
Here are ways to help you change the shape of an image in Canva easily and for free.
How to Change the Shape of an Image in Canva (Using Frames)?
Step 1: First things first, visit the Canva homepage, click the + Create a design button located in the upper left corner, and select a design. Or, open a project you are working on in the Recent designs area.
Step 2: When you are in the editing interface, browse through the options on the left-hand side and select the Uploads tab. If empty, click the Upload files button to upload a photo. But if you’ve already uploaded one, place it on the design by clicking on it.
Step 3: After adding the picture to the design, select the Elements tab from the menu on the left. Then, input “frames” in the search bar and press the Enter key.
Step 4: When you do so, the findings are shown to you. At this point, click See all from the Frames section to have access to all the available frames in Canva.
Step 5: With all the frames presented, click on the one you desire to put on the design. After that, drag and drop the photo onto the frame you add to alter its shape.

Step 6: Once you are satisfied with the changed image shape, click the Share button at the top right and hit the Download icon to choose a file type (PNG is recommended). Finally, click the Download button at the bottom to save the design to your computer.
How to Change the Shape of a Picture in Canva (Using the Crop Tool)?
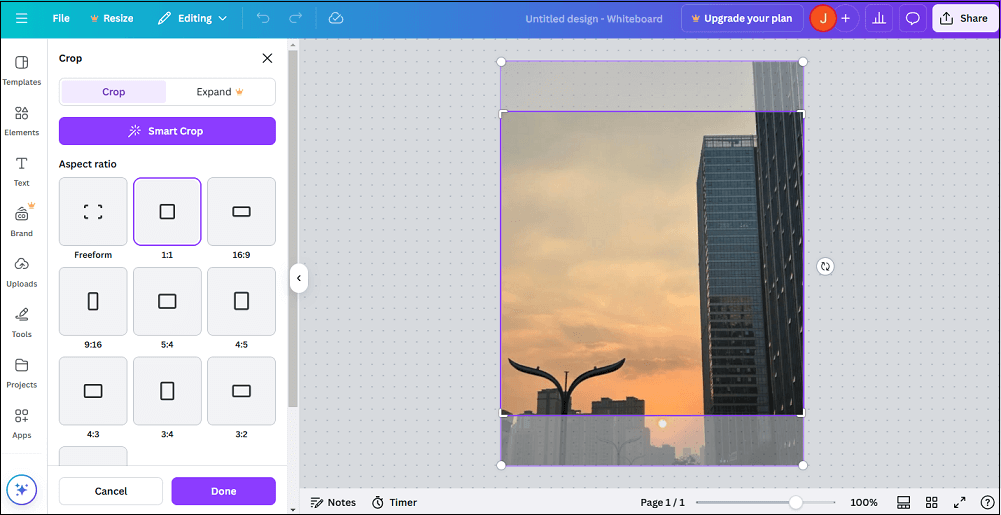
1. Repeat Steps 1 and 2 of the method above to open the editing interface and add the picture. Keep the image selected and hit the Crop icon on the top. The crop function will be displayed.
2. Next, freeform crop or adjust the aspect ratio by clicking on a preset you want. As soon as you are satisfied with the outcome, click the Done button to modify the photo’s shape. If you are unsure which option to select, click the Smart Crop button in order to automate the cropping procedure.
Bonus Tip: Turn a Rectangular Image into a Square with MiniTool MovieMaker
MiniTool MovieMaker is one of the best free apps for editing photos, videos, and audio files. You can use its Crop tool to transform a picture that is rectangular to a square. Here are the steps to take:
Step 1: Download, install, and run MiniTool MovieMaker on your Windows PC.
Step 2: Click the New Project button from the project library window to enter its editing interface.
Step 3: Click the Import Media Files button to select and open the image from your computer’s local folder.
Step 4: Drag and drop or click the + icon to add the imported image to the timeline below.
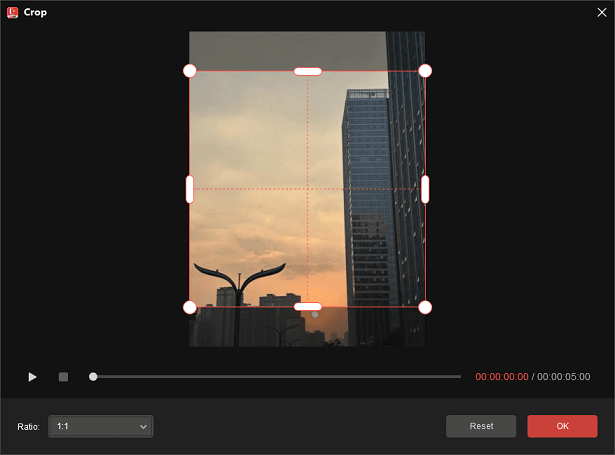
Step 5: Keep the image on the timeline highlighted and hit the Crop icon on the toolbar. In the Crop window, you will see the Ratio option. Expand the drop-down list and select the 1:1 option. Now, click the OK button to turn this rectangular photo into a square.
From the Image Property panel, you can opt to scale, rotate, or flip the image and adjust its duration and color.
Step 6: When you are happy with the result, click the Export button at the top right to name the project and choose where to save it. Additionally, configure the file format (GIF is recommended), resolution, frame rate, etc. Lastly, click the Export button to save the created project to your computer.
![[2 Ways] How to Circle Crop Photo by Office Apps (Word)?](https://images.minitool.com/moviemaker.minitool.com/images/uploads/2022/11/circle-crop-photo-thumbnail.png)
Conclusion
How to change the shape of an image in Canva easily and for free? Use the frame options or Crop tool to complete this task instantly.
User Comments :