This post from the Windows video editing software - MiniTool MovieMaker explains how to add captions on CapCut and several ways to fix CapCut auto captions not working.
CapCut is a popular video editor app that works on both your PC and phone, providing a variety of tools and effects to edit and enhance your clip, such as text, filters, special effects, transitions, stickers, and more. In this post, we’ll focus on the Text feature, tell you how to add captions on CapCut and fix CapCut auto caption not working issue.
How to Add Captions on CapCut
Now, let’s see how to add subtitles on CapCut on your PC.
Step 1. Download CapCut for your PC and then install it.
Step 2. After installation is done, launch this app and sign in with your account.
Step 3. Click the + Create project button at the top to create a new project and access the edit page.
Step 4. Click Import to open your video and drag it to the timeline.
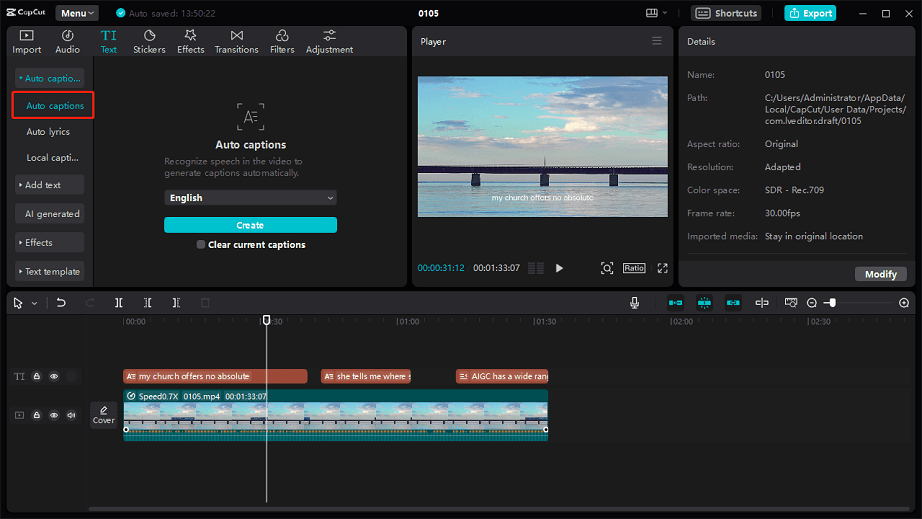
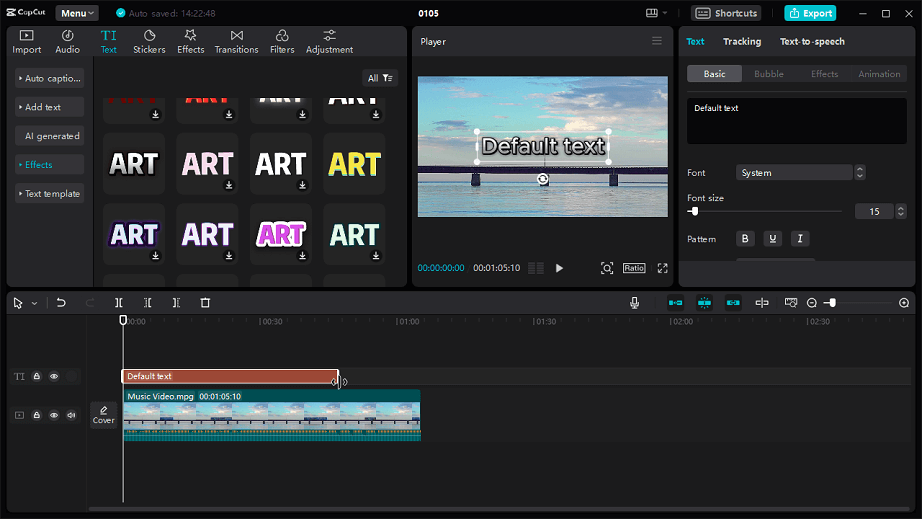
Step 5. Go to Text and you’ll see several options to add captions to your video.
- Auto captions: Recognize the speech in the video and generate captions automatically.
- Add text: Add a default text track and then enter your text.
- Effects: Select a text style with certain effects and then type your text.
- Text template: Choose from rich text templates and replace them with your text.
Auto captions
If you want the app to convert speech in the video to text, expand the Auto captions menu, choose a language, and click Create to start.

Similarly, if you want to add lyrics to your music video, go to Auto lyrics.
CapCut will add these captions to your video and automatically adjust the duration of each sentence. Then, you can correct these words, change the font, text size, and more on the right Text section.
If want to embed some SRT, ASS, and LRC subtitles, go to Local captions and click Import to open your file.
Manually add subtitles
To manually add your subtitles, you can go to Add text to add a default text track, then enter and edit your text. Or, go to Effects or Text template, choose a text style, and enter your text.

Step 6. If you’re happy with the result, click Export to export video from CapCut.
How to Fix CapCut Auto Captions Not Working
CapCut’s auto caption is an easy feature that can easily and quickly turn speech in a video into subtitles, helping viewers better understand your video.
However, sometimes Capcut auto caption may not work. If you suddenly encounter this situation, hope the following tips can solve the problem. Don’t forget to save your project before trying these tips.
#Check for updates
On PC: Go back to the home page of the CapCut app and click the Settings button in the upper right corner. If a new version is available, you’ll see an Update option next to Version. Click it to update CapCut to the latest version.
On phone: Open the Play Store or App Store, search for CapCut, and check for a new version.
#Restart your PC or phone
If a simple app update doesn’t resolve the issue, try restarting your computer or smartphone. After that, open the CapCut app and see if it can automatically generate subtitles.
#Reinstall CapCut
Also, you can attempt to reinstall the app to fix the CapCut auto captions not working issue. Firstly, uninstall the CapCut app from your device and then install it again from the app store.
#Resort to CapCut online version
If you still cannot add auto captions in the CapCut app, access the online app in your browser, then import your video, and try auto captions.
MiniTool MovieMakerClick to Download100%Clean & Safe
Conclusion
CapCut provides you with different options to add subtitles. This post details how to add captions on the CapCut desktop app., and the steps are almost the same as adding subtitles on the CapCut app on your phone. Also, when CapCut fails to create auto captions, try the above tips to fix it.
You may also like:


User Comments :