In this guide, you will learn how to fix Avidemux no audio. To avoid this kind of issue, you can also try another useful video editor - MiniTool MovieMaker to edit audio.
Fix: Avidemux No Sound
Avidemux is an open-source and cross-platform video editor that allows you to edit and linearly organize video files. Also, you can apply audio or video effects to media files. However, after exporting the video project, you may have an Avidemux no audio issue, which is really frustrating. Need a solution? Refer to the following.
If you are facing Avidemux without sound, most of the time this is just because you have not enabled it, as the audio output of Avidemux is set to DUMMY by default. To resolve it, click the Tools heading, pick its Preferences, and switch to the Audio tab. After that, adjust the Audio output to WIN32 or whatever is appropriate for your operating system in the Audio Device menu box. Finally, hit the OK button. You should now be able to hear the audio.
In addition, there are many amazing video editing software than Avidemux that give you more editing capabilities without this type of problem. In this guide, we recommend MiniTool MovieMaker – a simple-to-use and powerful video editing application that is fully compatible with MP4, AVI, MOV, MPG, VOB, MP3, WAV, etc., video and audio formats. Move to the next section to learn how it can edit audio in your video project.
Extra Tip: Edit Audio in Video with MiniTool MovieMaker
MiniTool MovieMaker is an intuitively designed and full-featured video editing software for creating stunning videos in minutes. Regardless of your level of expertise, it can help you edit the audio in your video quickly and easily.
Besides, you can use it to split, trim, crop videos, change video playback speed, color correct videos, and more as needed. Furthermore, it provides various transitions, effects, filters, and captions to enhance the professional and artistic look of your videos.
MiniTool MovieMakerClick to Download100%Clean & Safe
Here’s how to edit audio in video using MiniTool MovieMaker.
Step 1: Download, install, and open MiniTool MovieMaker on your computer. Create a new project in the promotion window.
Step 2: Click Import Media Files under Media to import the video whose audio you would like to edit. Add the imported video to the timeline by clicking the + icon or dragging and dropping.
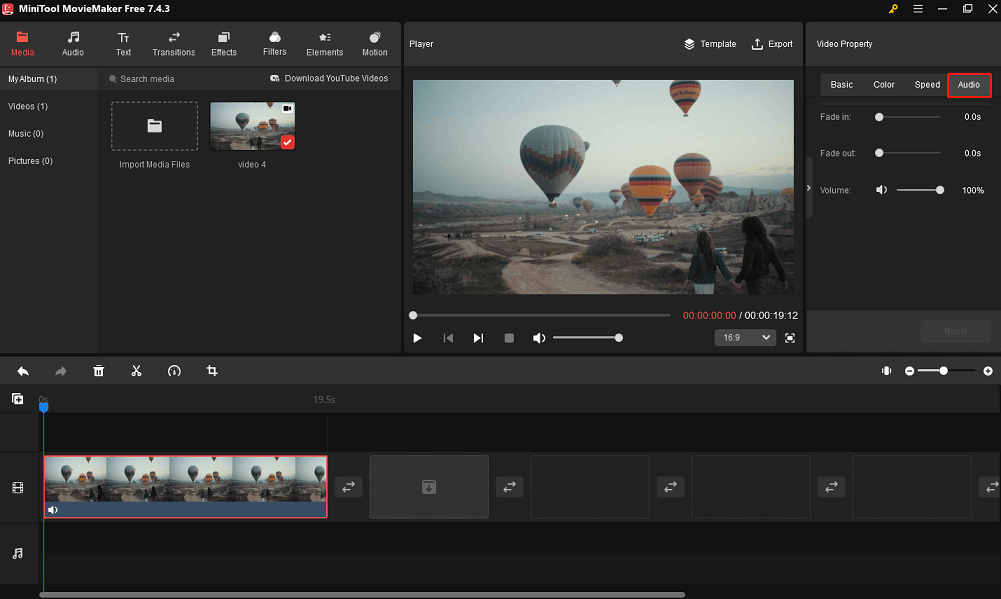
Step 3: Keep the video on the timeline highlighted and select Audio under Video Property. From there, you can apply fade-in and fade-out effects to the video’s built-in audio and alter the volume.

Step 4: You can even switch to the Basic, Color, and Speed tabs to perform other edits on your video project, like flipping, rotating, adjusting contrast, saturation, or brightness, applying 3D LUT, speeding up, slowing down, and reversing.
Step 5: Now, click the Play icon to preview the edits you make. When you are satisfied, click Export in the upper right corner to access the output settings window. In the PC tab, name the edited video project, choose where to save it, and configure the appropriate format, resolution, and frame rate. Finally, click the Export button at the bottom to save the edited video project to your computer.
Conclusion
You can refer to the guide described above if you are experiencing Avidemux no audio. To prevent this type of problem from occurring, you can also try out other video editing software, like MiniTool MovieMaker, to edit the audio in your video project.
You May Also Like


User Comments :