Before adding, changing, or setting the album artwork/cover in Windows Media Player, you need to be aware in mind that Windows Media Player only supports images of PNG, TIFF, GIF, JPEG, and BMP formats.
Also, if the target music hasn’t been added to Windows Media Player, you need to add it to WMP in advance. You can either right-click on the song and open it with Windows Media Player or just put it in the Music folder in Windows Explorer’s library. Windows Media Player will automatically add the media files in the library to its platform.
How to Change Album Artwork On Windows Media Player?
Usually, Windows Media Player will automatically find the corresponding artwork for its albums. It achieves this via the Internet. That is the best way to tag your music. Yet, sometimes, Windows Media Player will fail to locate and upload/import the right cover if it is not available in the online resources.
On the other hand, Windows Media Player may load an incorrect or wrong cover for your albums. Then, you have to manually add or change the cover art for those albums.
Next, let’s see how to add an album to Windows Media Player?
- Open Windows Media Player.
- Choose Library on the top bar.
- Expand the Library menu to view its content in the left panel.
- Further, unfold the Music section.
- Click on the Album option under the Music section and view its contents in the right area.
- Find the target album, either the one without a cover or the one you want to change its cover.
- If you want to match the album cover with its original cover, you may need to search online, find and download the original cover. If you want to add a cover you like despite match and you already have the cover image stored on your computer, you can use it directly.
- Anyhow, right-click on the target album cover photo and select Copy. Or, click on the image and press the Ctrl + C keys.
- Then, go back to the Album screen in Windows Media Player. Right-click on the target album and select Paste album art.
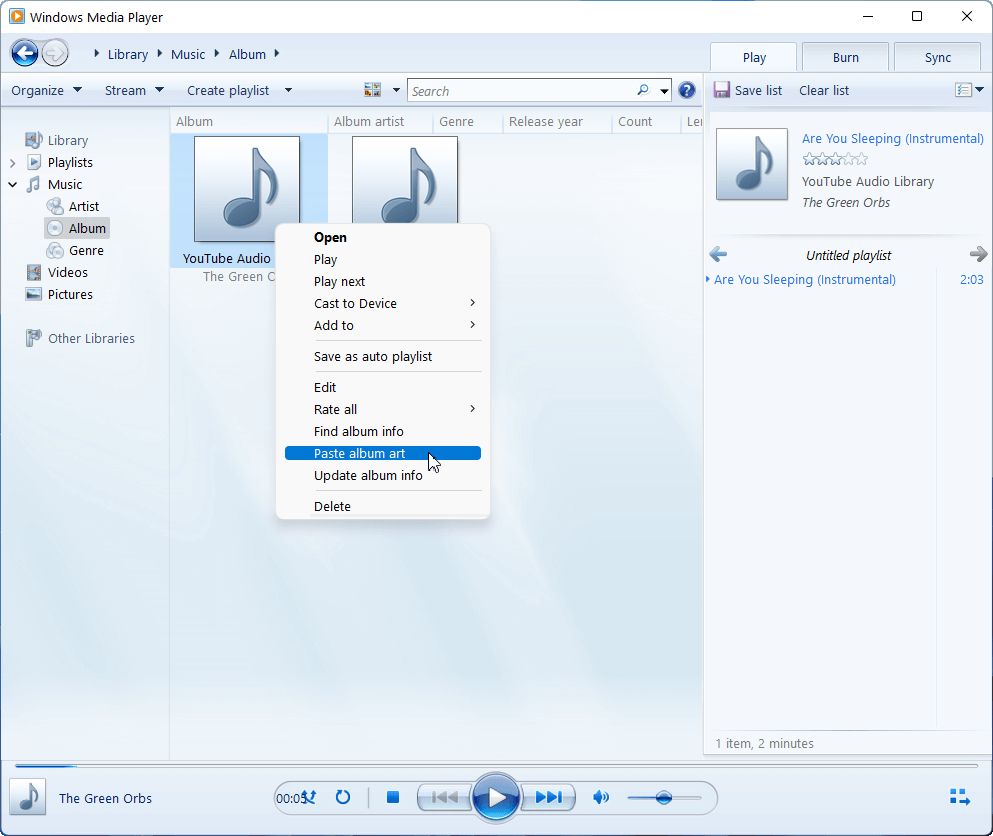
If you do not see the change in the cover straight away, just refresh the Album screen. Simply, you can switch to other sections like Artist or Videos. Then, switch back to Album and you will see the album cover turns to your designed picture.
Besides altering album art, you can also find album information, update album information, etc. through the right-click menu in Windows Media Player. If Windows Media Player can’t find album info, Windows Media Player not retrieving album info, Windows Media Player not getting album info, or Windows Media Player won’t update album info, it may be due to your album being very old or rare. Or, it may be a local band that hasn’t released their album through a professional record label.
Album Art Can’t Be Changed
You may be prompted with the following warning message after clicking the Paste album art option.
Album art can’t be changed when a song from the album is in use. Please try again later.
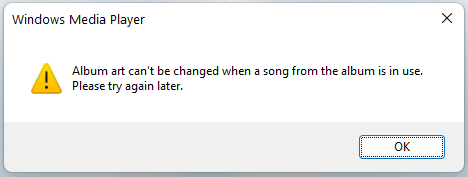
If so, you can choose one of the following reactions to deal with the situation.
#1 Just Wait
First of all, you can wait without doing anything including closing the warning message. After a few seconds, you will see that the album cover turns to the photo you select. Then, you can close the warning. Or, you can close the warning first and then wait.
#2 Refresh the Album
Secondly, you can close the warning window and try to update the Album view just as described above. After switching back to the Album section, you can view the cover change.
#3 Restart Windows Media Player
If both above methods don’t work. You can close the Windows Media Player app and relaunch it. After reopening, go to the Album tab and you can see the art of the target album has changed.
#4 Try Again
If you still can’t see the change after restarting Windows Media Player, then, you have to repeat the process above to add your preferred artwork to the target album.
How to Add Album Art to Mp3 Without Windows Media Player?
Without Windows Media Player, can you still add an album art cover? Of course! You can add art to your albums with other media player programs like Groove Music, VLC Media Player, iTunes, etc. Let’s take VLC Media Player for example to show you how to change album art without the help of Windows Media Player or the default media player on your device, no matter it is a Windows PC, Mac computer, iPhone, or Android phone.
Tip: If currently, you have no VLC Media Player on your device, you need to download and install it now.
- Open the target MP3 file with VLC Media Player.
- Click on the Tools tab on the top menu and select Media Information.
- In the lower right of the new pop-up window, you can see the current album art. If it currently has no album cover, it will show the logo of VLC Media Player.
- Right-click on the cover area and select Add Cover Art from file.
- Choose your designed cover image and click Open.
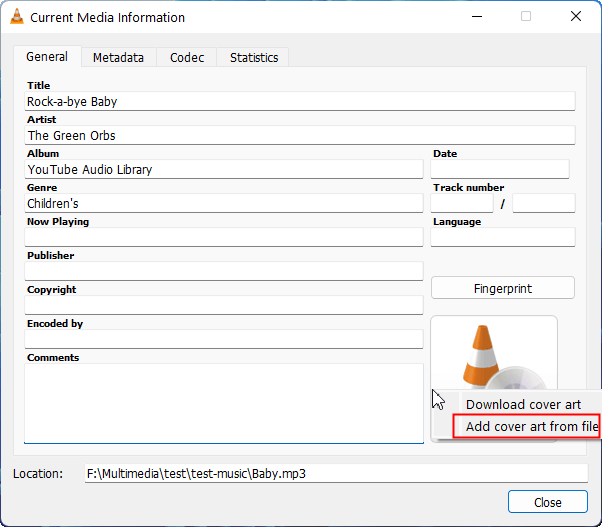
Or, you can take advantage of the Download cover art option to get its official cover from an online source.
How to Remove Album Art from Windows Media Player 12?
Now, let’s have a look at how Windows Media Player deletes album art.
- Launch Windows Media Player.
- Click on the Library tab.
- Right-click on any of the column headers and select Choose Columns.
- In the popup, uncheck the Album art.
- Click OK.
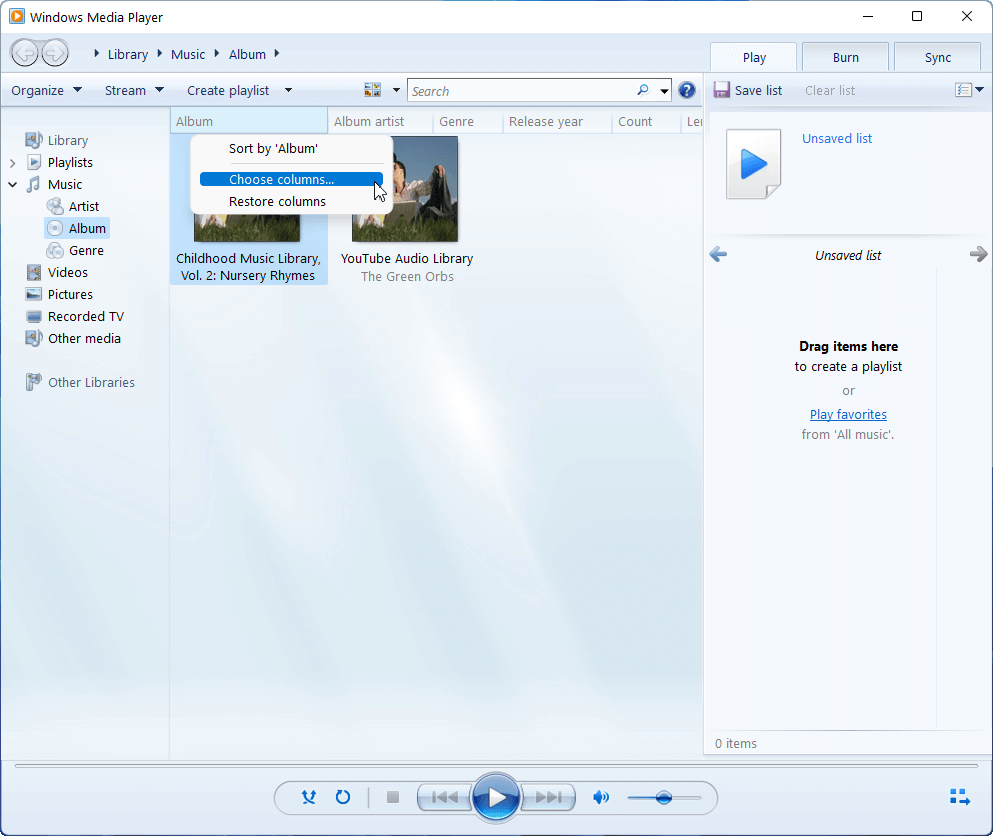
OR
- Click Library in Windows Media Player.
- Right-click on the target album or track and choose Advanced Tag Editor.
- Select the Pictures tab.
- Click Delete.
- Click Apply.
If you can’t access the Advanced Tag Editor, it is probably because the file you want to edit is “read-only”. Find the file on your device, right-click on it and select Properties. Then, uncheck Read-only and click OK. Then, you can continue the above process.
Also read:


User Comments :