In this post from MiniTool MovieMaker - a Windows video editing software, we will mainly show you how to make sparkle effect in Premiere Pro using two different techniques.
Adding a sparkle effect to videos is an excellent way of making a distinctive look for your compositions. Sparkles can be used to enhance the tone and context of your shots, creating an impression of quality, wealth, and rarity. Also, sparkle effects are magical and can help transport the audience to a different time or world.
Here, you will learn how to make easy 90s sparkle effects in Premiere Pro. Browse to find out more.
How to Make Sparkle Effect in Premiere Pro?
The 90s was a great time for sparkles, and the trend has recently picked up again thanks to TikTok and Instagram sparkle filters. The following are 2 techniques to add sparkles to videos, and which you select will rely on the footage you have. You need the footage to have a lot of light sources to get the best possible result.
1. Use Overlays
An overlay will work on any footage. However, unlike the other options, it does not react to the footage. Although you can make modifications to the tone, opacity, and blend mode of overlays, they can be quite limited.
Step 1: Select an overlay layer that fits the footage.
Step 2: Put the overlay on the track above the footage.
Step 3: Trim the ends to match the sequence.
Step 4: Choose the overlay, go to the Control panel, and try out a couple of different blend modes to see which works best; Screen is typically a safe bet.
Step 5: Modify the strength of the overlay by modifying the Opacity.
2. Use Your Footage
Using your footage is the most customizable way of creating sparkle effects since you’re basing them on the footage you have. This technique depends on there being plenty of light sources in the frame. It works extraordinarily well on high-contrast shots like city skylines at night.
Step 1: Hold down Alt and drag the clip up to create a duplicate in the track above.
Step 2: In the Effects Control panel, look for Directional Blur and put it on the top layer.
Step 3: From the Effects Control panel, adjust the Direction to 45º and the Blur Length to 15.
Step 4: In the Blend Mode drop-down menu, select Lighten or Screen (whichever fits your footage best).
Step 5: Hold down Alt and drag the top layer upwards a track to create another duplicate.
Step 6: In the Effects Control panel, adjust the Direction to -45ª.
Bonus Tip: How to Add Sparkle Effect to Video in MiniTool MovieMaker?
Like Premiere Pro, MiniTool MovieMaker is a fantastic video editing software for Windows that allows you to add sparkle effects to your videos. In addition to the sparkle overlays, it also has other types of eye-catching overlays, such as film frames, retro cameras, and comic speedlines.
Furthermore, it enables you to add music or sound effects, text styles, transitions, filters, stickers, and motions to spice up your video projects.
Here’s how to add a sparkle effect to a video using MiniTool MovieMaker.
MiniTool MovieMakerClick to Download100%Clean & Safe
Step 1: Download and install MiniTool MovieMaker on your Windows PC.
Step 2: Open it and close the promotion window to enter its editing interface.
Step 3: Click Import Media Files to import the video you want to add the sparkle effect.
Step 4: Click the + icon on the imported video to add it to the video track in the timeline below.
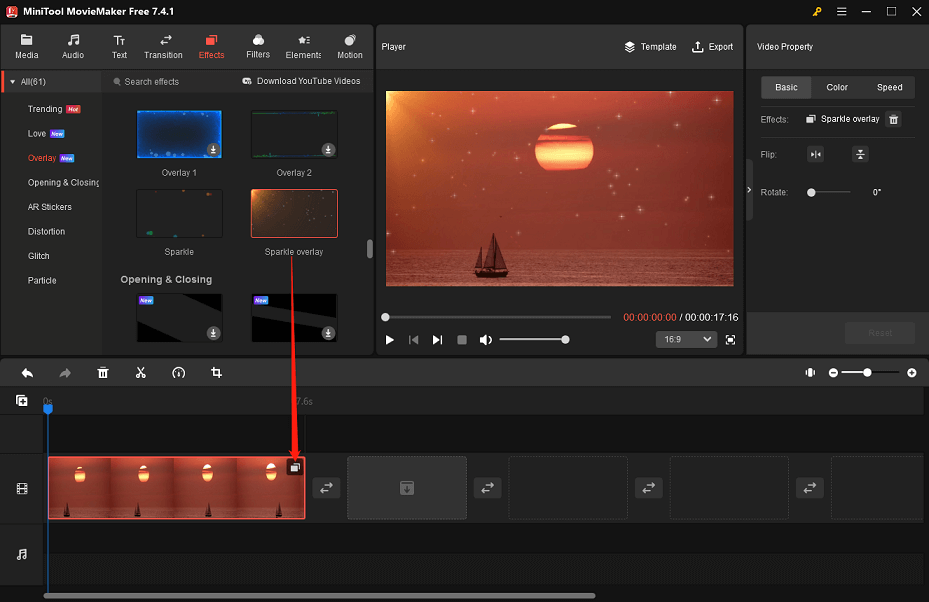
Step 5: Go to the Effects tab on the top and select the Overlay sub-tab on the left. Scroll down to locate the sparkle effect you like and download it by clicking the Download icon.
Step 6: Drag and drop the downloaded sparkle effect onto the video on the video track.

Step 7: If you leave the video highlighted on the video track, you can make additional edits to it from the Video Property area, like flip, rotate, color correct, speed up, slow down, reverse, etc.
Step 8: Once done, click Export to configure some suitable output options for your video and then save it to your Windows PC.
Final Thoughts
Making a sparkle effect in Premiere Pro is really easy, no matter which of the two techniques you select. You don’t have to spend a lot of time adding these flourishes, but the results speak for themselves.


User Comments :