Morph Cut transition in Premiere Pro is a popular feature enjoyed by those who shoot dialogues and interviews frequently. In this kind of raw video, there are a ton of filler words such as um, ah, and long pauses that need to be edited. Often, removing these elements creates a jump-cut effect between clips, yet Morph Cut can help. The feature seamlessly blends frames using interpolation and face-tracking technology.
In addition to the standard use, lots of enthusiasts have found a hidden trick: create a morph glitch transition using Morph Cut. This gives your videos a dynamic, edgy look, particularly for fast-paced scenes. In this post, we will take you through the process of creating a morph transition in Premiere Pro and give an alternative way to easily achieve a similar effect.
Also learn: 5 Most Common Video Transitions in Film | Free Use Now
How to Add Morph Cut in Premiere Pro?
Adding a morph transition in Premiere Pro is a simple process. Here’s how it can be done:
Step 1: Make sure Premiere Pro is installed on your PC. If not, then download and install it.
Step 2: Import the two video clips you would like to edit and put them on the timeline.
Step 3: Go to Effects > Dissolve and find the Morph Cut option. Drag and drop the transition effect between the two clips. It will start analyzing in the background. When it processes, you can alter the alignment of the Morph Cut transition as desired.
Step 4: Once the process is finished, you will notice that the two clips are seamlessly stitched with an amazing morphing effect. When you’re happy with the result, export the video to your PC.
While the technique can create a morph transition in Premiere Pro, a large number of users have reported difficulties in getting the desired outcome. Common problems include the inability of Premiere Pro to detect a face in the video, which is critical for the effect, or the effect failing to render correctly. These challenges can get frustrating, especially if they prevent you from enjoying the effect you had in mind.
Don’t worry! Next, we recommend a Premiere Pro alternative method that enables you to effortlessly create morph transitions with a few clicks using another video editor.
Best Alternative Video Editor for Adding Morph Transition
MiniTool MovieMaker supports hundreds of transition effects, including morph, burn, dissolve, flash, ripple, wind, cross, etc., allowing you to seamlessly stitch clips in just a few clicks. After adding a morph transition, you can customize it by changing the duration and mode with ease.
MiniTool MovieMakerClick to Download100%Clean & Safe
Here’s how to add a morph transition between two clips with MiniTool MovieMaker.
Step 1: Download, install, and launch MiniTool MovieMaker on your PC.
Step 2: Close the promotion window to gain access to its editing interface.
Step 3: Click Import Media Files to import your video or image files and drag them onto the timeline.
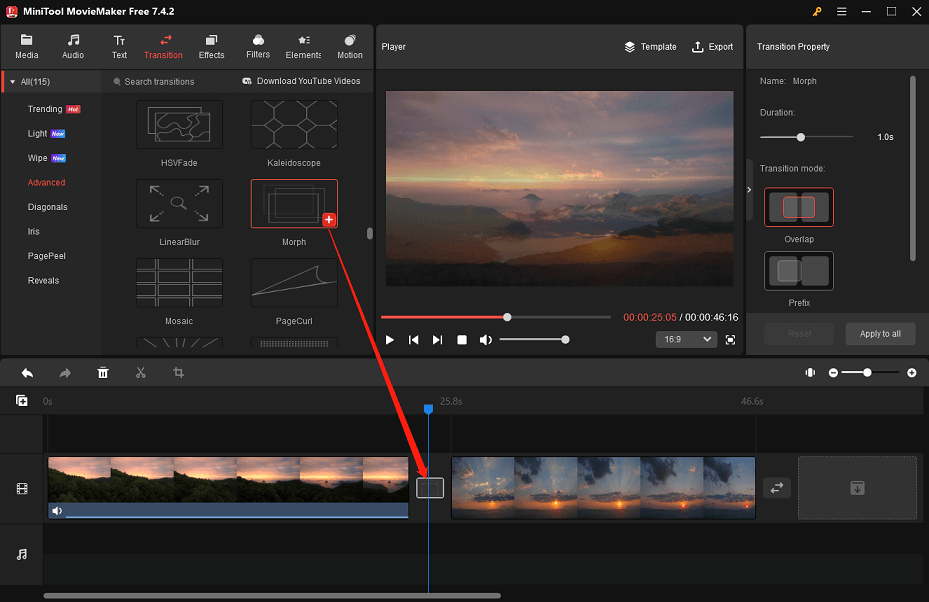
Step 4: Select the previous clip on the timeline, go to Transition > Advanced, then locate and download the Morph transition in that category. Click on the + icon to add it between the two clips.
Step 5: In the Transition Property area, change the added morph transition’s duration and mode.
Step 6: Click Export at the top right to make some output settings and save the edited video to your PC.

Conclusion
That’s how to add a morph transition in Premiere Pro. While the Morph Cut feature in Premiere Pro allows you to create a morph transition between two clips, it does not always operate correctly. For a smoother experience, consider using MiniTool MovieMaker as an alternative to easily create eye-catching morph transitions with only a few clicks.
You May Also Like


User Comments :