Cross dissolves are one of the most common editing techniques in the history of cinema. Apply one to fade in and fade out of scenarios slowly. In this guide, we will mainly show you how to add cross dissolve transitions in Premiere Pro.
About the Cross Dissolve
A cross dissolve is a technique used in post-production video editing. It involves gently increasing the opacity of one scene over the previous scene. Unlike the jarring transition of a straight jump cut, one scene dissolves into the next, and the two pictures overlap briefly.
Cross dissolves, sometimes referred to as cross-fades, were at their most common in the early days of cinematography and can be regarded as one of film’s earliest special effects. In older movies, they were usually applied to show the passage of time, make a montage-like effect, or give a gentle transition from one scene to another.
Understand the Considerations for Cross Dissolves
Any shot can dissolve or fade into any other shot, but to make a nonintrusive dissolve cut, a video editing app has to take the following into account:
- Film grain. Ensure that each footage has a similar film grain. If you do not, cross-fades will lose the soft, dreamlike quality, which makes them so effective.
- Lighting. Overall, scenes that dissolve into one another should have similar lighting levels or be lit in diverse ways that look good together.
- Composition. When one footage dissolves into the next, the two footage will both be visible for a couple of frames. Each footage’s composition should complement one another.
Cross dissolves on effects or title screens. Cross dissolves do not have to be reserved only for traditional movie scenes. The shot can dissolve into white or black for dramatic effect. Or title cards can dissolve into action, for example, a company logo that fades into a shot on a sizzle reel.
More advanced cross dissolve techniques. Cross dissolves can be invisible as well. A common editing technique is to show an outdoor scene, pan up to a clear sky, fade into another one, and then pan down to a completely different outdoor.
How to Add Cross Dissolve in Premiere Pro?
The cross dissolve effect is a well-established one, and it is built into Adobe Premiere Pro as the default transition. The following is a step-by-step guide on how to add a cross dissolve in Premiere Pro:
Step 1: Choose the frames you would like to dissolve between.
Step 2: From the Effects panel, click Dissolve, and then select Cross Dissolve.
Step 3: Click on and move the edges of the dissolve to adjust its duration. A traditional cross dissolve takes 24-48 frames. A shorter dissolve is more like a hard cut, and a longer dissolve has a dreamlike quality.
Extra Tip: How to Add a Dissolve in MiniTool MovieMaker?
MiniTool MovieMaker is one of the top video editors for Windows 11 and is ideal for anyone who wishes to add a dissolve transition to their own projects. There are currently 115 transitions, divided into Light, Wipe, Advanced, Diagonals, Iris, PagePeel, and Reveals categories.
MiniTool MovieMakerClick to Download100%Clean & Safe
Here’s how to add a dissolve between two video or image clips using MiniTool MovieMaker.
- Download, install, and run MiniTool MovieMaker on your Windows PC.
- Close the pop-up window to access the main interface.
- Click Import Media Files to upload your video or image files.
- Drag and drop the uploaded media files onto the timeline.
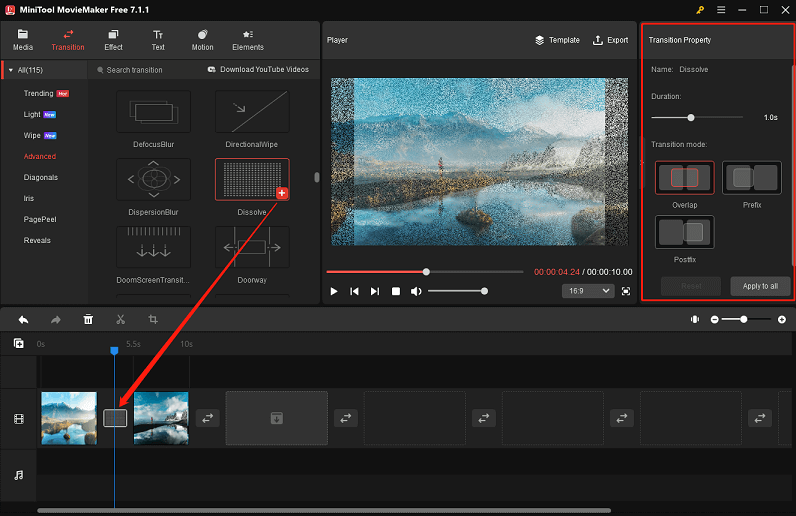
- Select the previous video or image clip on the timeline, go to Transition > Advanced, then locate and obtain the Dissolve transition in that category.
- Click the + icon to add the obtained dissolve transition between the previous clip and the next one.
- In the Transition Property area, change the added dissolve transition’s duration and mode.
- Click Export in the upper right corner to save the final video to your Windows PC.
Conclusion
Cross dissolves are just among plenty of classic video transitions. In addition to the guide offered in this post on how to add cross dissolve in Premiere Pro, you can also use this video editor to add other transitions, like ripple dissolves, cutaways, and fades to polish your video content.
User Comments :