How to Make a Dissolve Transition in After Effects?
Using After Effects, making dissolve transitions may not be as intuitive as using other NLE programs like Premiere Pro, DaVinci Resolve, or Vegas Pro. But Adobe After Effects contains a range of transition presets pre-installed to add to your layers instantly.
Now, let’s follow the After Effects dissolve transition guide to make your video clips unique.
1. Use AE Transitions to Add the Dissolve Transition
We will start with the easiest part of the guide, which is adding dissolve transition effects that are already installed with After Effects. This method does not require much time to adjust the settings. Do the following:
Step 1. Import Video Files
Import the clips you would like to transition to and from. Create a new composition and put each clip one on top of the other, overlapping where you want the dissolve transition to happen.
Step 2. Add the Dissolve Transition
Choose the layer to apply the transition effect. Find After Effects transitions from the Effects and Presets panel > Transitions or in the Effects menu > Transitions. AE currently has 17 transitions, including wipes, block dissolve, Venetian blinds effects, and jaws effects. Just add the block dissolve transition.
Step 3. Adjust Transitions Settings
Once applied, you need to access the Effects controls, set the Transition Completion, and then animate it so that the layer smoothly dissolves into the layer below. 0% Transition Completion means that the top layer will be completely visible; 100% will make the layer invisible and the one below will appear.
Click on the stopwatch next to Transition Completion to set the playhead where you wish the layers to dissolve as well as enable keyframing. Drag the slider to 100% to dissolve the effect gradually into the layer. If you want the effect to transition longer, add keyframes in between.
There are other settings you can modify in the Effect Controls. For the Block Dissolve, in particular, you can adjust the height and width of the blocks, along with adding some feathering to the edges. The Soft Edged option gives the best results by default. However, if you are searching for a blocky glitch effect, deactivating it will make it more sudden.
Experiment with the settings and other transitions, like card wipe, where you can adjust wipe angle, timing randomness, random seed, and so on. Each effect will have parameters that you can change to create extraordinary dissolves.

2. Create the Basic Dissolve Transition
This is another way of showing you how to make a dissolve effect in After Effects. The downside is that you don’t have tons of customization options. It can be used for an easy transition between two scenes.
Still, if you would like to apply multiple dissolves in your project, seeing the same dissolve transition throughout the footage might become boring and predictable, unless you are going for a more consistent look. Proceed as follows:
Step 1. Create A New Composition
Import your files and then drag and drop your clips onto the timeline. Do not forget to overlap the two layers where you wish to make the dissolve.
Step 2. Adjust the Opacity Settings
Press T to bring the opacity settings. Animate the opacity of the top layer from 100% to 0%. It will make a dissolve that transitions gradually into the layer below. Put the playhead where you desire the transition to begin and click on the stopwatch to enable keyframing. This will add a keyframe to that place. Drag the playhead where you wish the transition to end and modify the opacity value to 0%.
For a smoother cross-dissolve, change the opacity from the bottom layer, not from 100% to 0%, but from 0% to 100%. It will make a dissolve transition where the top layer is invisible as the bottom layer appears.
You can experiment with the settings and apply more keyframes to get a different transition behavior.

Bonus Tip: How to Add a Dissolve Transition in MiniTool MovieMaker?
MiniTool MovieMaker is one of the best lightweight video editors on the market and is perfect for anyone who wants to add dissolve transitions to their personal projects. There are now 115 transitions, including Light, Wipe, Advanced, Diagonals, Iris, PagePeel, and Reveals categories.
MiniTool MovieMakerClick to Download100%Clean & Safe
Here’s how to add a dissolve transition between two video clips with MiniTool MovieMaker.
- Download, install, and open MiniTool MovieMaker on your PC.
- Close the pop-up window to go to the main screen.
- Click Import Media Files to import your video files and drag them onto the timeline.
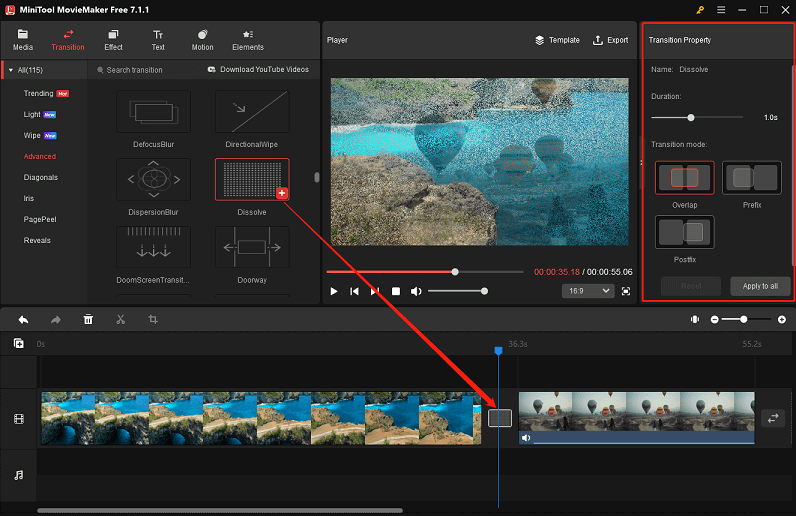
- Select the previous clip on the timeline, navigate to Transition > Advanced, then find and get the Dissolve transition in that category. Click + to add it between the two video clips.
- In the Transition Property section, adjust the added dissolve transition’s duration and mode.
- Click Export to save the final video to your PC.
Conclusion
These are the two different ways we show how to make After Effects dissolve transitions. Plus, you can play with the dissolve transition in MiniTool MovieMaker to bring your project to life!
User Comments :