What Are LUTs in Premiere Pro
LUTs (Look-Up Tables) in Premiere Pro are a tool used for color correction and grading. You can use LUTs like filters, applying preset color adjustments to give your video a specific look or mood. In Premiere Pro, you can use built-in LUTs or import your own custom LUTs. Learning how to use LUTs in Premiere Pro can save time and give your videos a professional appearance with just a few clicks.
How to Use LUTs in Premiere Pro
Using LUTs in Premiere Pro is a quick way to enhance the color grading of your video. Here’s how to do it:
Step 1: Launch Premiere Pro and open your project or create a new file.
Step 2: Select the video clip you want to apply the LUT to.
Step 3: Click the Window button in the top menu and select Color to open the Color workspace.
Step 4: The Lumetri Color window will pop up. Scroll down to the Creative section. Find the Look dropdown menu, and click it to choose from a list of built-in LUTs.
Step 5: Once the LUT is applied, you can adjust the strength of the effect using the Intensity slider in the Creative section.
Step 6: If needed, you can adjust other settings like Exposure, Contrast, and Saturation in the Basic Correction section to further refine the look.
How to Install Custom LUTs in Premiere Pro
If you want to use custom LUTs in Premiere Pro, you can follow the steps below.
Here’s how to install LUTs in Premiere Pro:
Step 1: First, ensure you have the custom LUT files saved on your computer. These files usually come in formats like .cube or .3dl.
Step 2: You need to place the LUTs into the Premiere Pro folder. By default, this folder is located at:
C:\Program Files\Adobe\Adobe Premiere Pro CC [Version]\Lumetri\LUTs\Creative.
Copy the custom LUT files and paste them into the Creative folder.
Step 3: You need to restart it so that the software can recognize the new LUTs.
Step 4: Once Premiere Pro is restarted, open your project and go to the Color workspace. In the Lumetri Color panel, go to the Creative tab. Under the Look dropdown menu, you will now see your custom LUTs listed. Select the LUT you want to apply to your video clip.
An Easy Alternative to Premiere Pro
If you’re looking for a simple and easy way to add LUTs to your videos without the complexity of Premiere Pro, MiniTool MovieMaker is a great alternative.
MiniTool MovieMaker is a user-friendly video editing application that lets you quickly apply LUTs and enhance your footage. With MiniTool MovieMaker, you can easily import and edit video clips, and add transitions, text, music, effects, etc. to videos. Additionally, it has 9 video tracks and 2 audio tracks, so you can create rich effects for your videos.
Next, let’s see how to add LUTs using MiniTool MovieMaker:
Step 1: Click the button below to download, and install MiniTool MovieMaker on your computer.
MiniTool MovieMakerClick to Download100%Clean & Safe
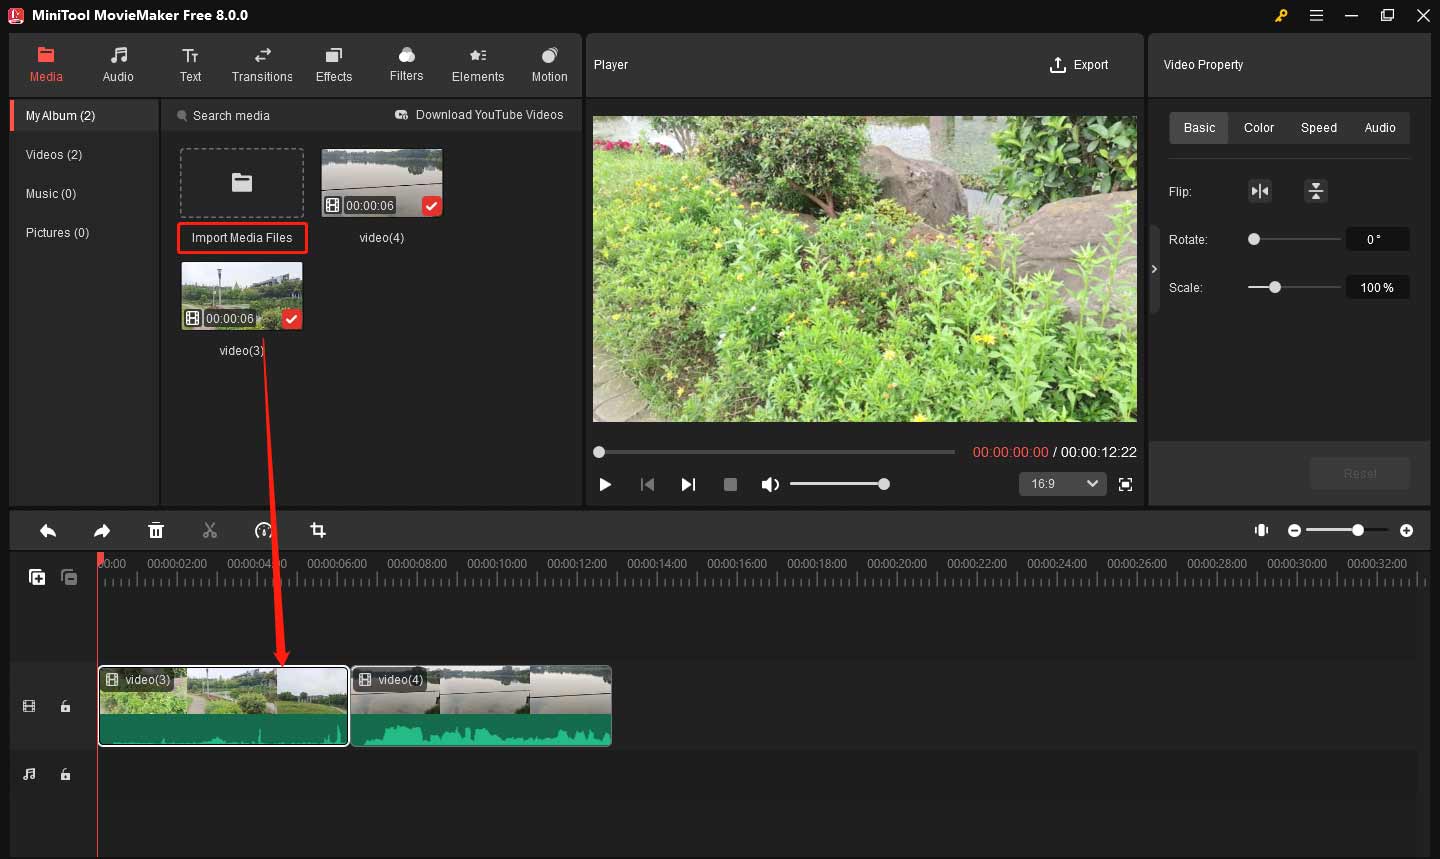
Step 2: Launch this software and close the promotion window. Click Import Media Files to import your video files. Then drag the imported files to the timeline.

Step 3: Click the video you want to edit in the timeline.
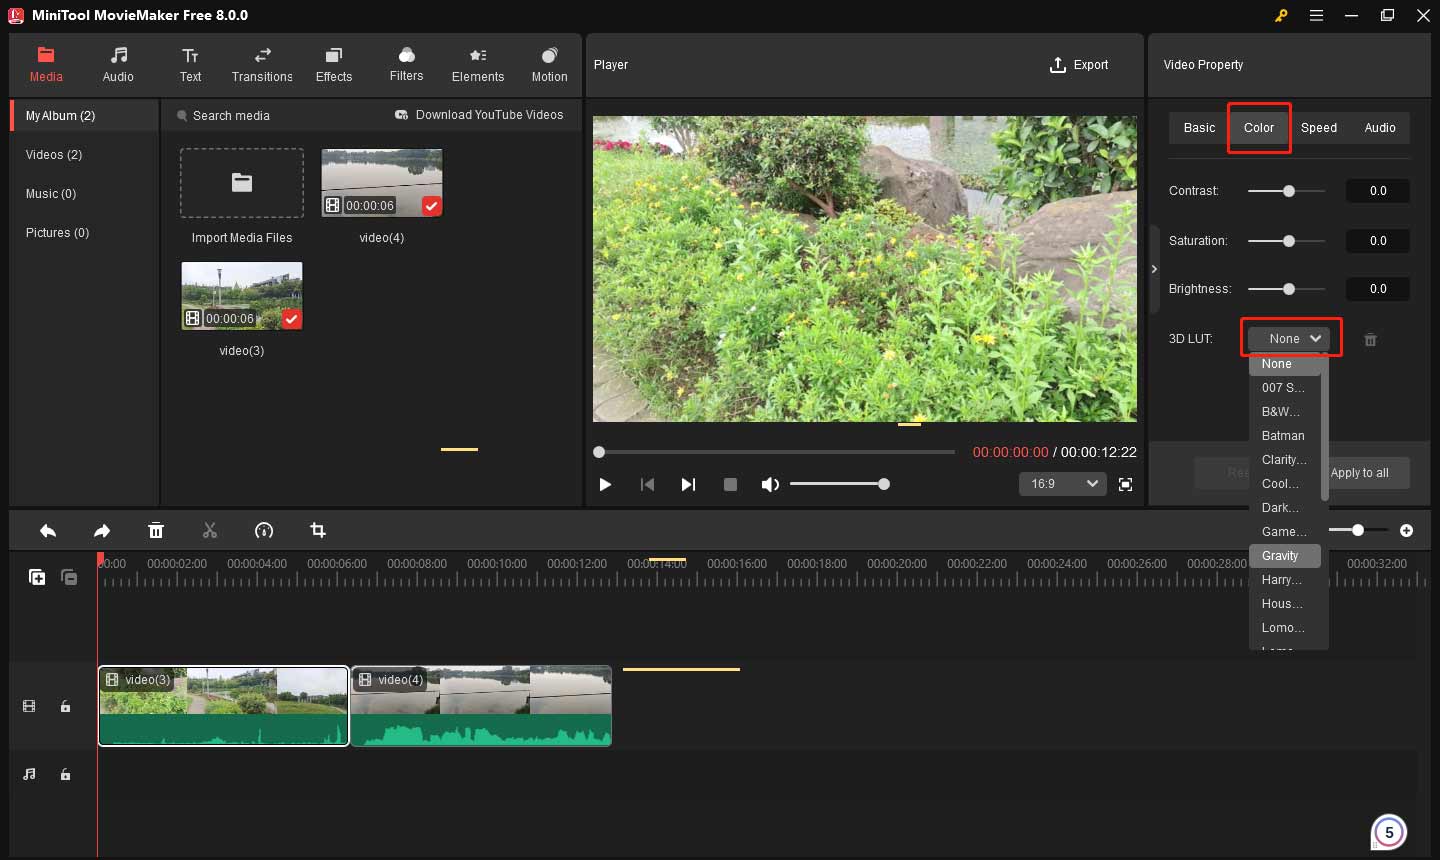
Step 4: Go to the Video Property window and click the Color button. You can see the 3D LUT section, click the box next to it to expose all the LUT options. Find your favorite effect and click it in the dropdown menu.

Step 5: After getting the desired effect, click Export in the top right corner.
Bottom Line
In conclusion, learning how to use LUTs in Premiere Pro is a powerful way to enhance your video’s color grading. By simply applying a LUT, you can instantly transform the look and feel of your footage. You can experiment with different options to find what works best for your project. With these steps, you can easily integrate LUTs into your workflow and take your video editing to the next level.


User Comments :