Premiere Pro is a professional video editor that enables you to fade in and fade out audio. It enables you to fade audio using keyframes and crossfade transition presets. The following content mainly focuses on how to fade out audio in Premiere. If you are a beginner and want to try an easy way to fade out audio, this post recommends MiniTool MovieMaker and tells you how to fade audio with it. Now, let’s get started!
How to Fade Out Audio in Premiere Using Keyframes
The keyframe is the point at which the clip volume changes. In this section, we will introduce to you how to use two keyframes to create a fade-out effect.
Step 1. Launch Premiere Pro, click the File tab at the top menu bar, move to New, and choose the Project option to create a new project.
Step 2. Click the File tab again and click the Import option to upload the video file. After the video file appears in the Project panel, you can directly drag and drop it to the Timeline panel.
Step 3. Go to the Effect Controls panel and expand the Volume dropdown. Then click the clip you want to add a fade-out effect to select it on the Timeline panel and drag the playhead to the place where you want the effect to start. Then go to the Volume section and click the stopwatch icon next to Level to create the first keyframe. This keyframe is the beginning of the volume reduction.
Step 4. Drag the playhead to the place where you want the effect to end and reduce the Level (dB) to a lower volume. After you do that, the second keyframe will be created automatically.
You can zoom in on the timeline to observe the two keyframes as well as a curve depicting the volume change. Also, you can adjust the length of the fade-out effect by changing the place of those two keyframes. If you want to shorten its length, you can drag the second keyframe towards the first one.
![How to Merge Clips in Premiere [Step-by-Step Guidance]](https://images.minitool.com/moviemaker.minitool.com/images/uploads/2023/11/how-to-merge-clips-in-premiere-thumbnail.jpg)
How to Fade Out Audio in Premiere Using Crossfade Transition Presets
Alternatively, you can use the crossfade transition presets. Premiere Pro offers 3 types of audio transition including Constant Grain, Constant Power, and Exponential Fade. Among them, Exponential is the most used fade-out effect in Premiere Pro. Below is guide on how to fade out audio in Premiere Pro
After adding the video clip to the Timeline panel, you can follow the below steps:
Step 1. Go to the Effects panel, expand the Audio Transitions dropdown, open the Crossfade list, and you can see the Exponential Fade. Or you can enter Exponential Fade in the search bar.
Step 2. You can only apply the Exponential Fade effect at the beginning or end of the audio. Then directly drag and drop it onto the end of the audio track on the Timeline panel to create a fade-out effect. If you place it onto the beginning of the audio, you will get a fade-in effect.
Step 3. To change the duration of the effect, you can move your cursor to the beginning of the effect and drag it to change. Or you can double-click on the effect. A popup will appear and you can set the transition duration here.
Step 4. Finally, you can click the File tab again and move to the Export option to export your edited work.
Also read: What Is Crossfade in Music? MORE INFORMATION

An Easy Way to Fade Audio with MiniTool MovieMaker
Premiere Pro is a professional video editor that has a long learning curve. If you are a beginner, MiniTool MovieMaker is a better choice since it is a video editor that is suitable for beginners. You can refer to the below simple guide to fade audio in MiniTool MovieMaker.
Step 1. Download and install MiniTool MovieMaker on your desktop and open it.
MiniTool MovieMakerClick to Download100%Clean & Safe
Step 2. Click the Import Media Files area to upload your video and directly drag and drop it onto the timeline.
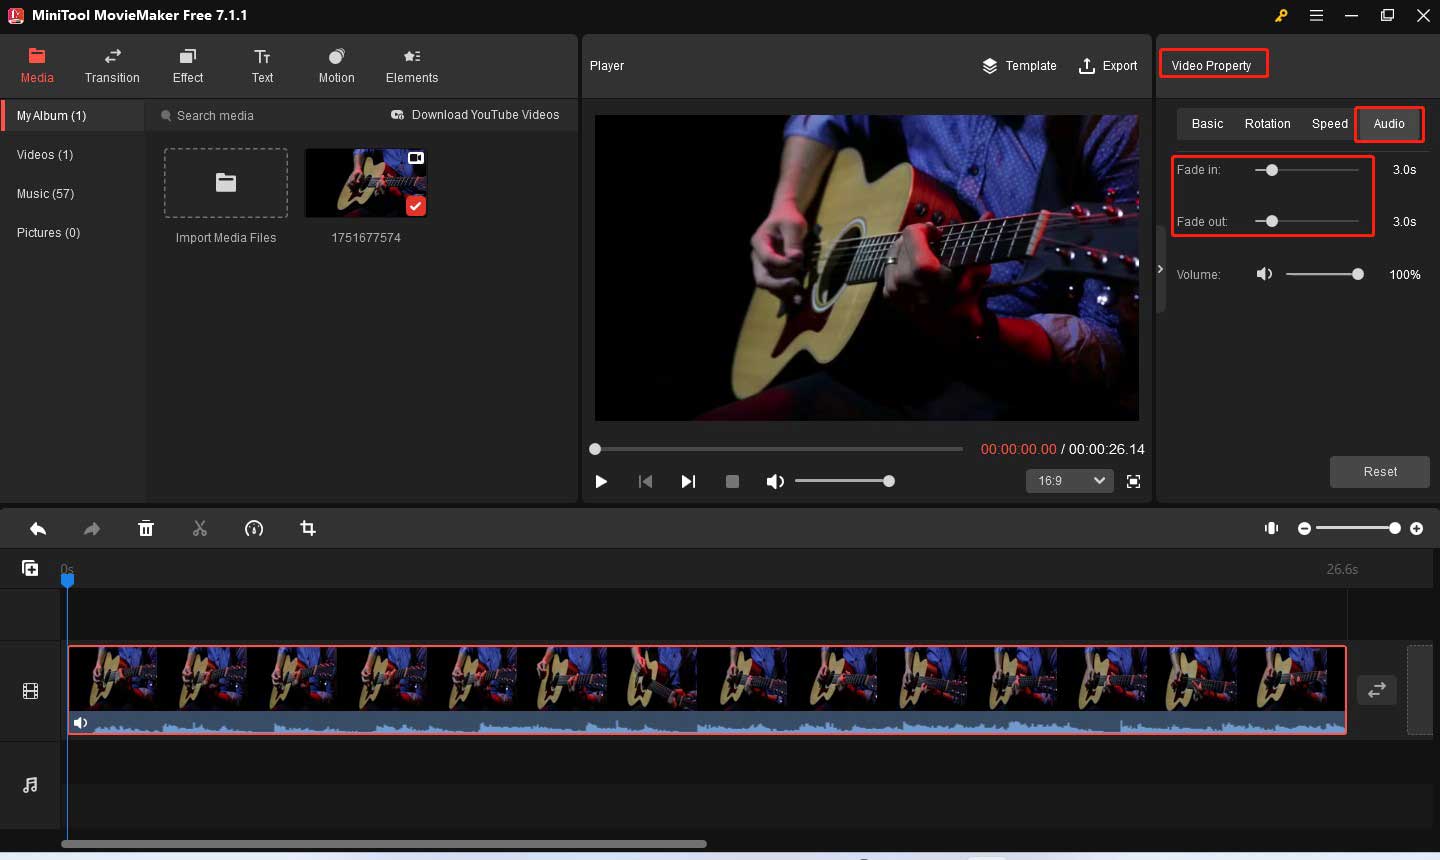
Step 3. Go to the Video Property section, click the Audio tab, and drag the Fade-in and Fade-out slider to adjust its duration.
Step 4. You can also make other editions to make your video better. Then you can click the Export option in the Player section, adjust the output parameters, and click the Export button to save it.
Conclusion
How to fade out audio in Premiere? You can use keyframes or crossfade transition presets according to your preference. Alternatively, you can try MiniTool MovieMaker to fade audio.
About The Author

Position: Columnist
Olivia is always full of enthusiasm for life and loves to record. She often records beautiful and memorable moments of life with her camera and then uses some editing tools to put the photos, videos and audio together. She also has a passion for writing and offers suggestions to readers on images, audio, videos and news. To provide more professional articles and solve problems for readers, she is continuing to learn multimedia as well.
User Comments :