Smooth audio transition is essential in video editing. How to create smooth audio transitions in DaVinci Resolve? This tutorial on MiniTool MovieMaker will guide you through how to fade out audio in DaVinci Resolve using 3 different methods.
How to Fade Out Audio in DaVinci Resolve
Davinci Resolve is a powerful video editing program that allows you to create professional-looking videos with various effects and transitions. One of the essential skills in video editing is fading audio in and out. However, how to fade audio in DaVinci Resolve? Luckily, we will show you three methods to fade out audio in Davinci Resolve. Let’s get started!
Method 1: Using Fade Markers
Fade markers are the easiest and fastest way to fade out audio in Davinci Resolve. They are small handles that appear on the corners of the audio clip in the timeline. here’s how to fade out audio in DaVinci Resolve with fade markers:
- Select the audio clip on the timeline.
- Move your mouse over the upper right corner of the clip to reveal the white handle (called the fade-out handle).
- Click and drag the handle to the left until it reaches the point where you want to fade out. You will see a timer showing the length of the transition.
- Adjust the fade curve by dragging the small circle in the middle of the fade up or down. You can make the fade start quickly and end slowly, or vice versa.
To fade in audio, use the same steps on the left side of the clip. You can also use fade markers on video clips to create smooth visual transitions.
Method 2: Using Keyframes
Keyframes are another way to fade out audio in Davinci Resolve. They allow you to have more control and precision over the fade transition. This is how to make audio fade out in DaVinci Resolve with keyframes:
- Choose the audio clip on the timeline.
- Open the Inspector by clicking the Inspector button in the upper right corner of the screen.
- Move the playhead to the point in the audio clip where you want the fade to start.
- Then, click on the diamond-shaped button next to the Volume slider in the Inspector to add a keyframe. This keyframe will mark the start of the fade out.
- Move the playhead to where you want the audio to be completely silent. Add another keyframe here.
- Now, go back to the second keyframe you added. Click it to select it, then drag the volume slider all the way down. This will lower the audio clip’s volume to zero at this keyframe, creating a fade-out effect.
Method 3: Using Crossfade
Crossfade is a special audio transition that blends the end of one audio clip with the beginning of another. It can create a smooth and seamless sound between two clips. To use crossfade, follow these steps:
- Select the audio clips that you want to crossfade on the timeline. Make sure they are on the same track and slightly overlap each other.
- Go to the Effects Library on the left side of the screen.
- Go to Toolbox > Audio Transitions.
- Choose the Cross Fade effect and drag it onto the overlapping area of the audio clips. You will see a box showing the fade angle.
- Adjust the length and position of the crossfade by dragging the edges of the box. You can also change the fade curve by dragging the middle circle up or down.
You can use crossfade on video clips as well, but it will only affect the audio, not the video.
An Easier Way to Fade Out Audio – MiniTool MovieMaker
In addition to DaVinci Resolve, there are many other video editors with audio fade features. MiniTool MovieMaker is one of them. However, compared to DaVinci Resolve, it might be easier to use. To fade out audio with MiniTool MovieMaker, follow these steps:
1. Download and install MiniTool MovieMaker on your computer.
MiniTool MovieMakerClick to Download100%Clean & Safe
2. Launch this software, click the Import Media Files dotted area to import your video and audio clips, and drag and drop them onto the timeline.
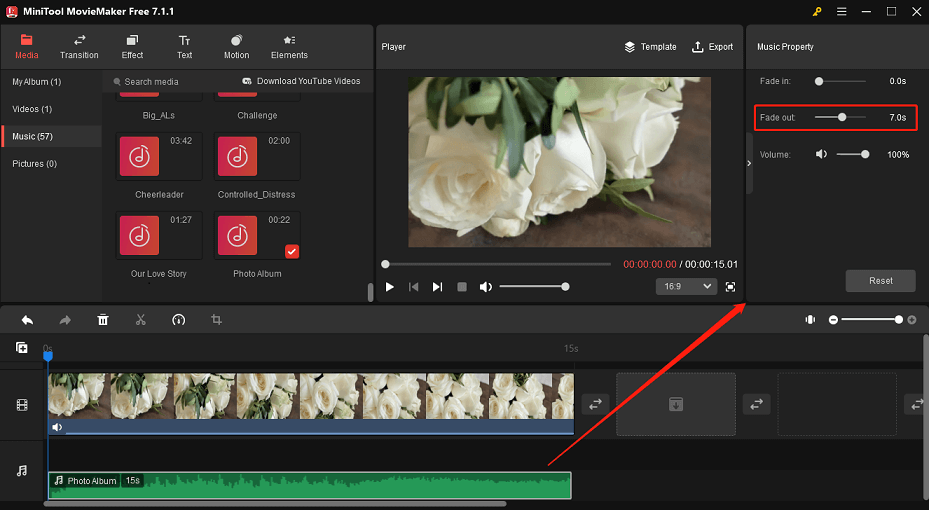
3. Select the audio clip on the timeline, and the Music Property window will appear on the right.
4. Drag the Fade out slider to change the duration of the effect.

5. Drag the Volume slider left or right to make the audio quieter/louder.
6. Click on Export to save the video to your device.
Final Thoughts
Fading audio in and out is a simple but effective technique to improve your video editing skills. In this post, we showed you three methods to fade out audio in Davinci Resolve. You can use these methods to create different types of audio transitions, such as fade in, fade out, or crossfade.


User Comments :